![]()
Installation Steps: BioTuring BioStudio
¶Introduction 
Software to tackle biomedical challenges:
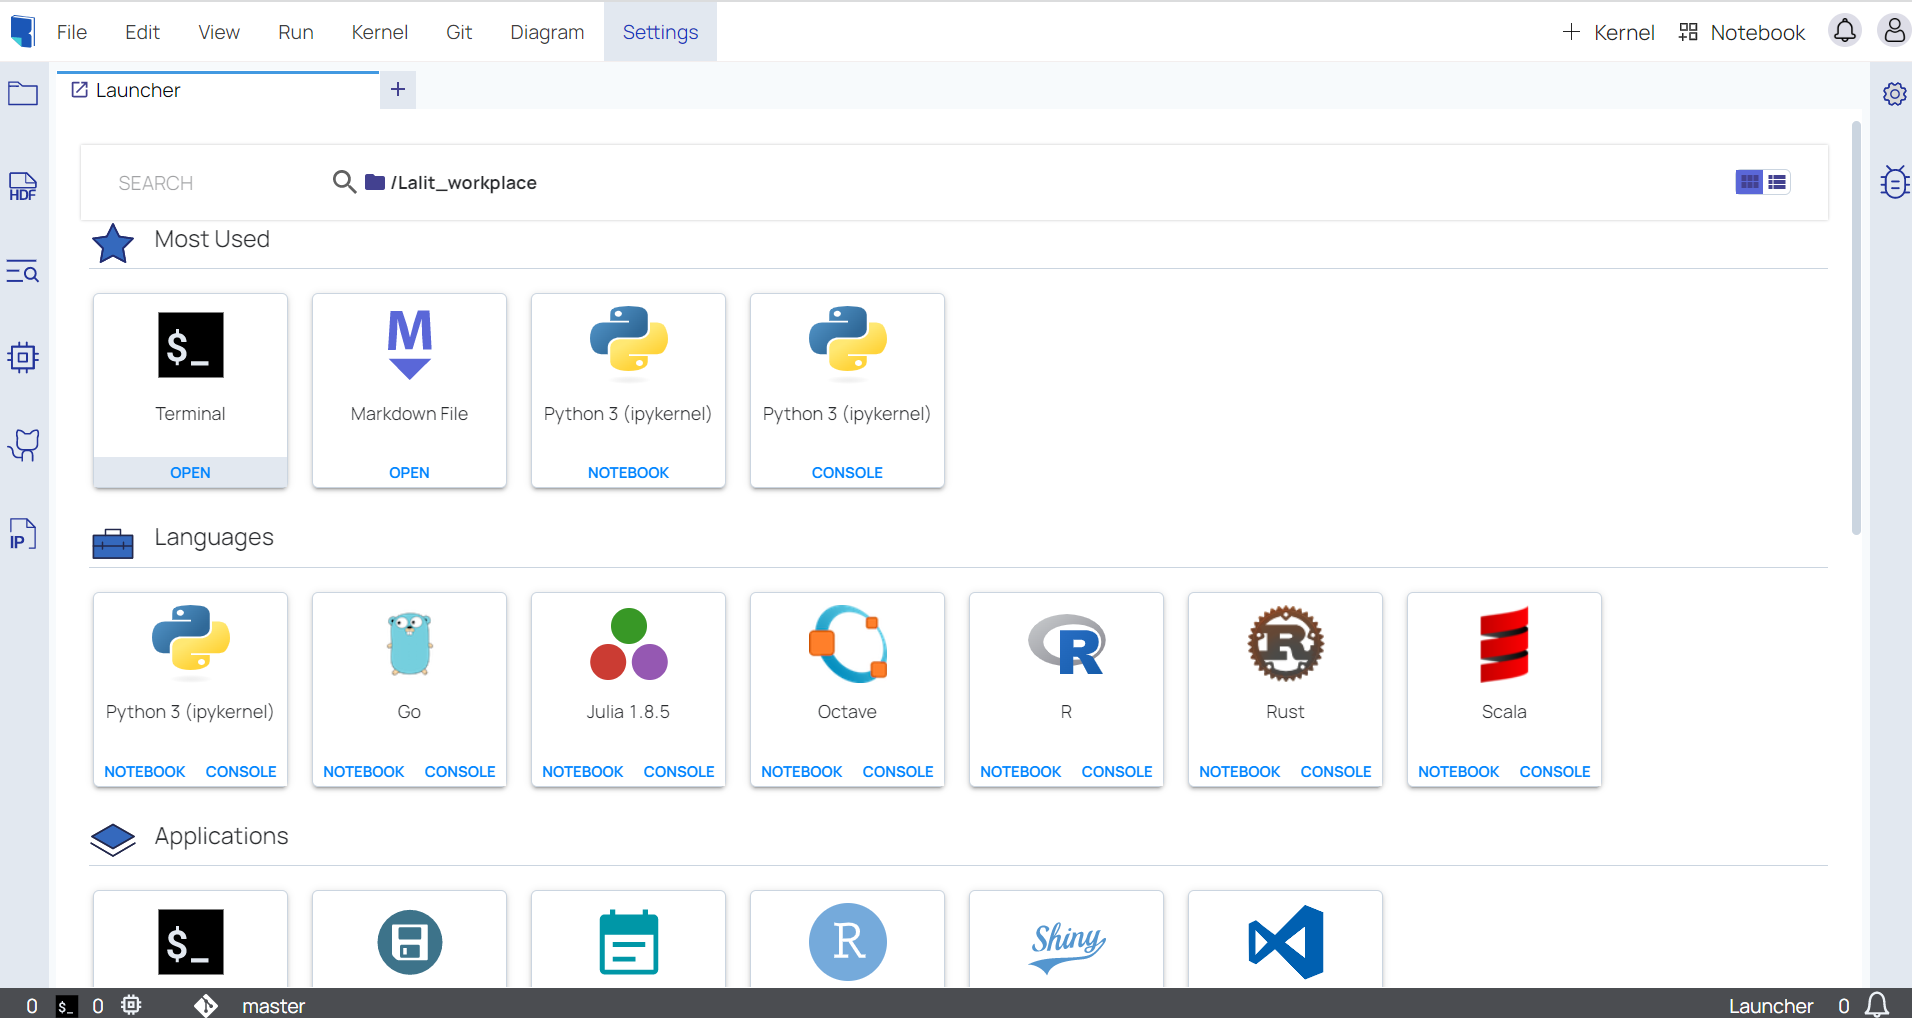
Colaboratory , or BioStudio for short, is a product from Bioturing.BioStudio has a variety of features and pre-built notebooks , for user to download and use. We are providing all types of user friendly tools that helps, users to post their data and analyze the reports. Our product can be used to write and execute arbitrary python, R code, Golang, Julia, RStudio, VS Code and many more through the browser, and is especially well suited to data analysis and education. More technically, BioStudio is a hosted Jupyter notebook service that requires no setup to use. Users can build their own notebook based on their requirements.
We are keep adding new features and functionalities to BioStudio.
System Requirements 
Before installing the BioStudio, some pre-installation steps are required:
| Basic recommendation | Optional | |
|---|---|---|
| CPU | 16 core | This is basic requirement to start BioStudio and based on requirement, Resources as well as machine can be added. |
| RAM | 64 GB Minimum | As above |
| HDD | / partition can be 100 GB | As above. |
| Data Volume : 1TB | As above. | |
| OS | Any OS. Ubuntu 20.04 and above. | BioStudio is more supportive with Linux OS. For better performance linux OS is recommended. |
| AWS Instance | Support any type of instance type. Depend on needs | AWS g5.4xlarge in case using GPU. |
| Platform | Docker / Kubernetes |
| Note | |
|---|---|
| In case we want to use GPU based Notebooks with BioStudio. We need to install NVIDIA and below would be a requirement. | |
| The system has one or multiple NVIDIA GPU(s) (at least 16 GB memory per GPU) - with Turing architecture or above. | |
| BioStudio supports any Linux OS. We are recommending Ubuntu 20.04 or above. | |
| SSL can be configured later also. | |
| Please contact support@bioturing.com to get the token for your company. | |
| Security | |
| The BioStudio platform uses HTTPS protocol to securely communicate over the network. | |
| All of the users need to be authenticated using a BioTuring account or the company’s SSO to access the platform. | |
| We highly recommend setting up a private VPC network for IP restriction. | |
| The data stays behind the company firewall. | |
| The BioStudio platform does not track any usage logs. | |
| Data visibility | |
| Data can be uploaded to Personal Workspace or Data Sharing group. | |
| In the Personal Workspace, only the owner can able to see and manipulate the data she/he uploaded. | |
| In the Data Sharing group, only people in the group can able to see the data. | |
| In the Data Sharing group, only people with sufficient permissions can able to manipulate the data. |
Network requirements 
| Domain | Explain |
|---|---|
| *.bioturing.com | We need to retrieve data from the BioTuring ecosystem server. |
| *.anaconda.org | We need to retrieve packages from the Anaconda server. |
| *repo.anaconda.com | We need to retrieve packages from the Anaconda repo server. |
| Amazon S3 | We need to retrieve resources from the BioTuring ecosystem server. |
| github.com | We need to retrieve packages from the Github. |
| cdn-eu-west-1.s3.eu-west-1.amazonaws.com (euro -west1) | We need to retrieve packages from the CDN. |
| s3.us-west-2.amazonaws.com/cdn.bioturing.com (us -west2) | We need to retrieve packages from the CDN. |
| cdn.bioturing.com (us -west2) | We need to retrieve packages from the CDN. |
| talk2dataupdate.s3.us-west-2.amazonaws.com | We need to retrieve packages from here. |
| openapi.bioturing.com | We need to retrieve packages from here. |
| portal.bioturing.com | We need to retrieve packages from here. |
| update.bioturing.com | We need to retrieve packages from here. |
| talk2data.bioturing.com | We need to retrieve packages from here. |
| ml.bioturing.com | We need to retrieve packages from here. |
| authenticate.bioturing.com | We need to retrieve packages from here. |
| colab.bioturing.com | We need to retrieve packages from here. |
| cdn.bioturing.com | We need to retrieve packages from here. |
| studio.bioturing.com | We need to retrieve packages from here. |
👉 Please contact 📧 support@bioturing.com to get the token for your company.
🔔 Note: Our software can be installed with minimum capacity of instance / server. The ideal system that we recommend for most companies is AWS c5a.8xlarge for CPU based. Instance can be chosen based on requirement. If the notebook is based on GPU, we can select GPU based instance. Our Product is containerized based applications. Kindly select the machine based on your requirements. BioStudio can be run on Docker using Docker engine and Kubernetes.
✨ Important note ✨: We can install BBrowserX talk2data (Bioturing ecosystem) 🔗 BBrowserX and BioStudio on the same server. Installation process is the same to run our installation script for BioStudio. Step by step Instructions to install BioStudio are given below. Only changes on domain name for BioStudio. Kindly do not use BBrowserX talk2data domain name during this installation, In case you are planing to install BBrowserX and BioStudio on same machine.
💫 BioStudio token can be updated later, after installation.
💫 Contact point to get BioStudio token is 📧 support@bioturing.com
💫 SSL certificate can be installed later, If BioStudio planned to install on separate instance.
User can access BioStudio application using two ways, In case installed BBrowserx and BioStudio on the same machine.
1️⃣ Browse the BioStudio application https://<BioStudio Domain name> , If you have SSL certificate for BioStudio domain and configured with Nginx else use http protocol.
2️⃣ Use BioStudio Desktop application - using IP address.
Bioturing Launcher 🔗 Desktop Application
🔔If BioStudio will install on separate server. BioStudio can be accessed using any browser by IP address or Domain name.
Download and Install 
Note: We suggest starting from scratch to avoid package/driver conflicts. For Tag naming conversion, kindly select based on your architecture.
New Server Set up on AWS. 
🔶 Login to AWS console with admin user account to launch an EC2 instance.
Note: It’s up to the client. How they are going to manage infrastructure, Load, Network, Access and traffic …etc.
Create a VPC 
🔶 Search VPC on the search box.
🔶 Select the appropriate region for VPC.
🔶 Click on *Create VPC.
🔶 Fill-out Name tag , IPv4 CIDR block details.
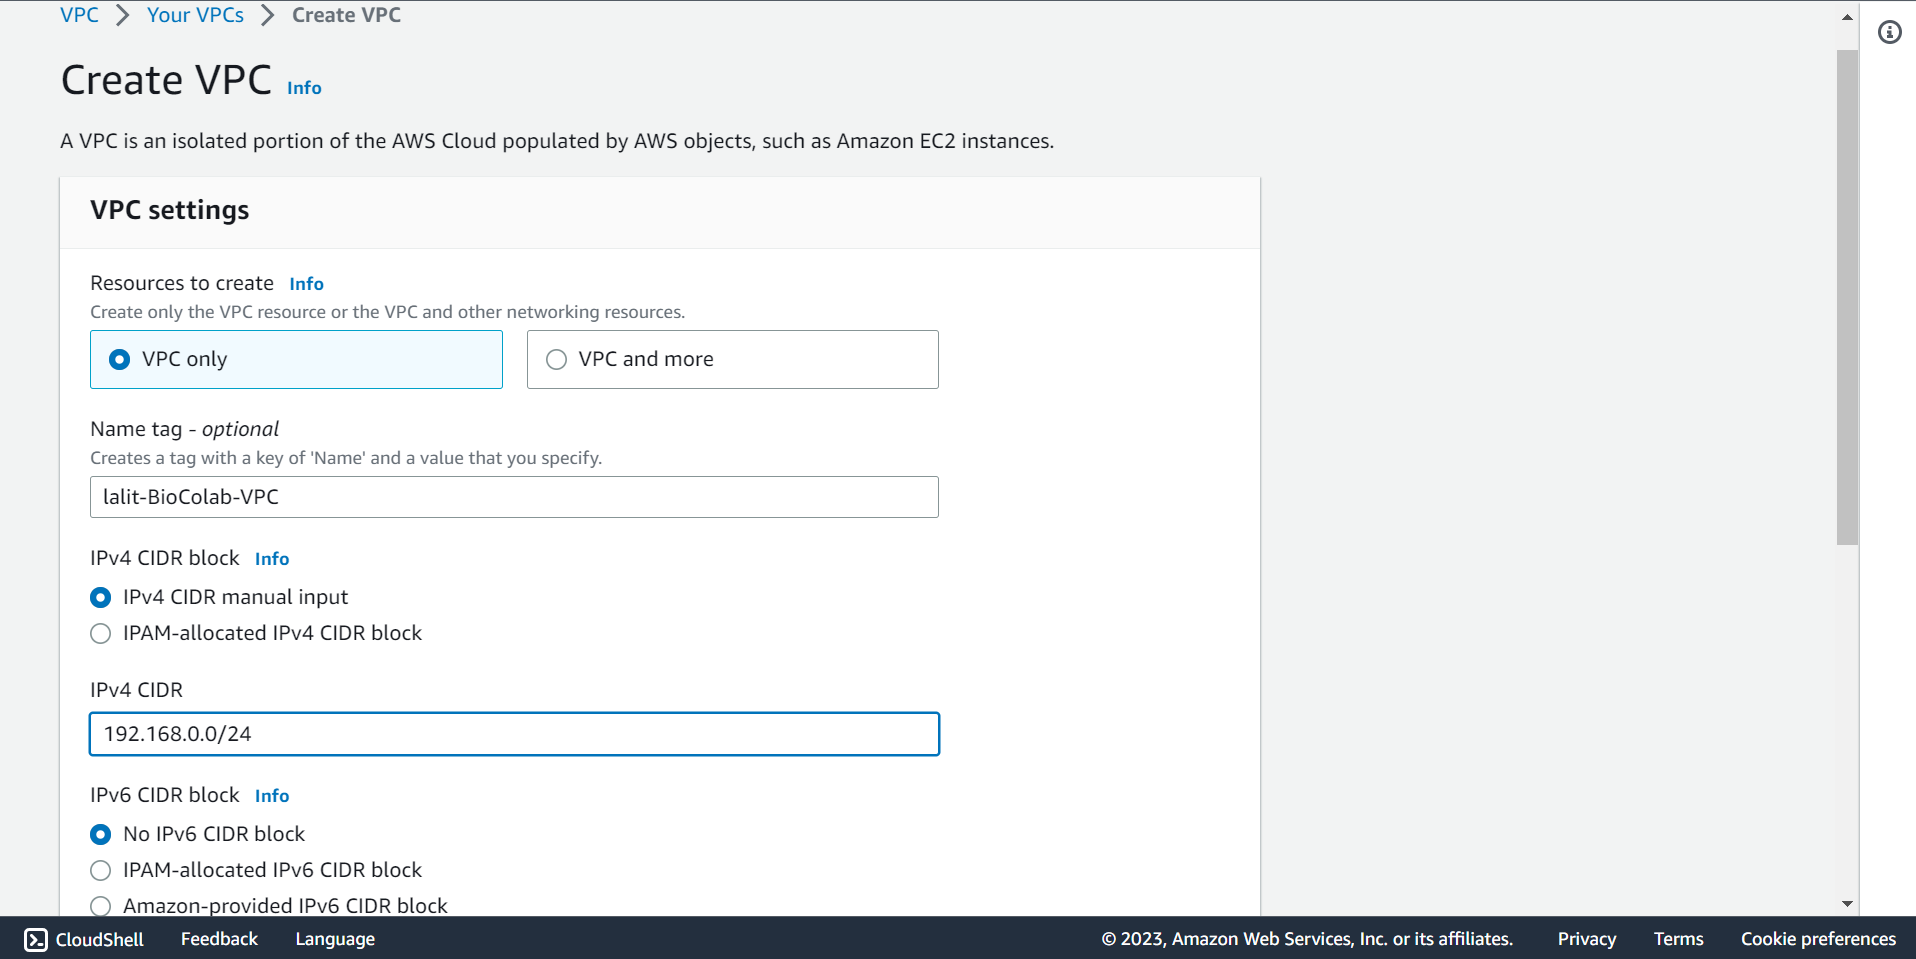
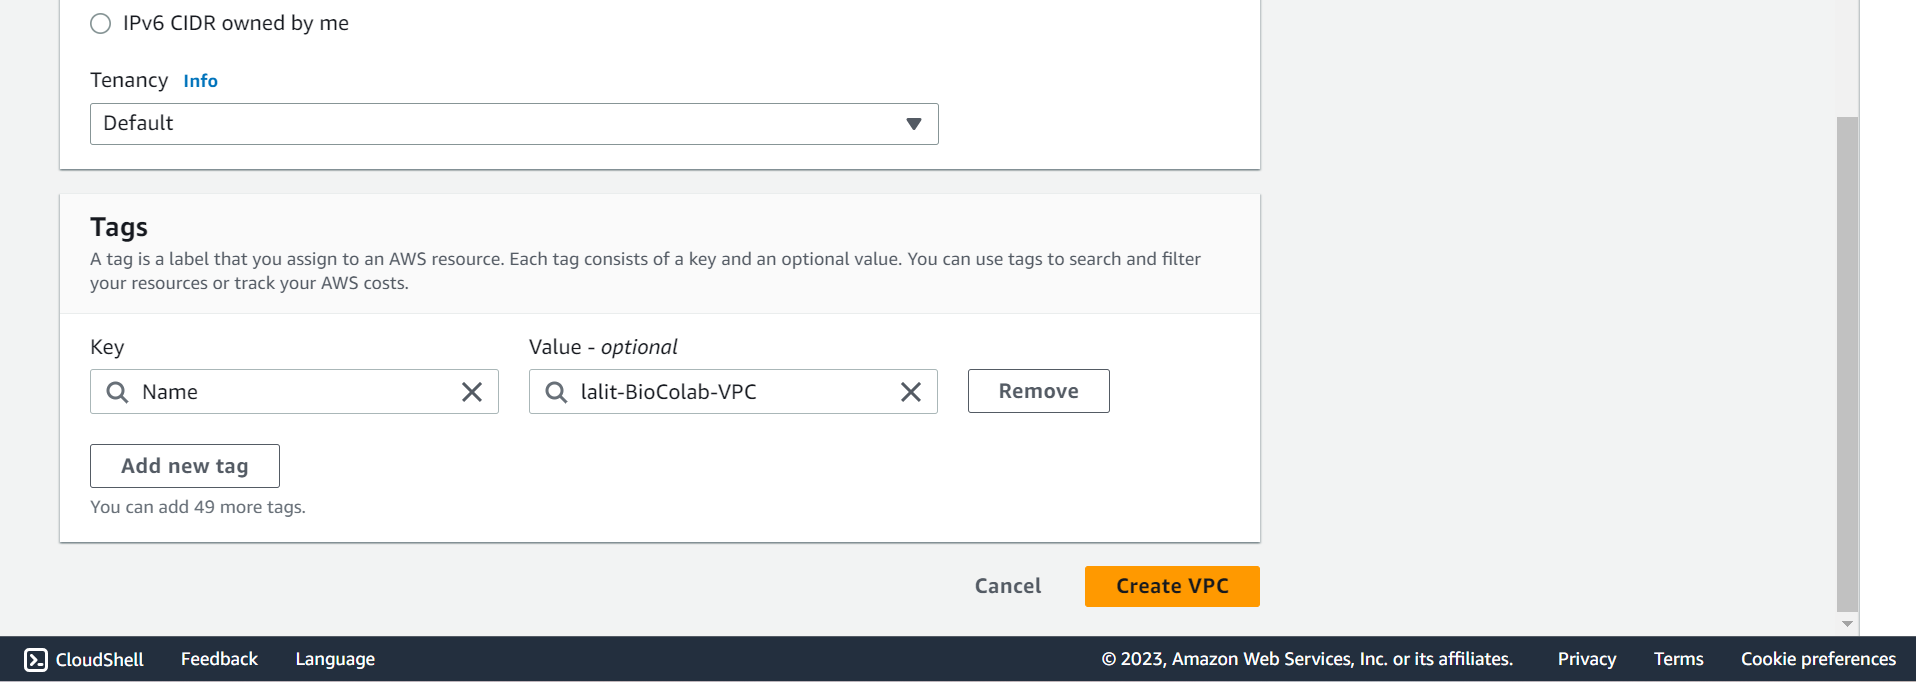
🔶 Mentioned Tags and select Create VPC push button.
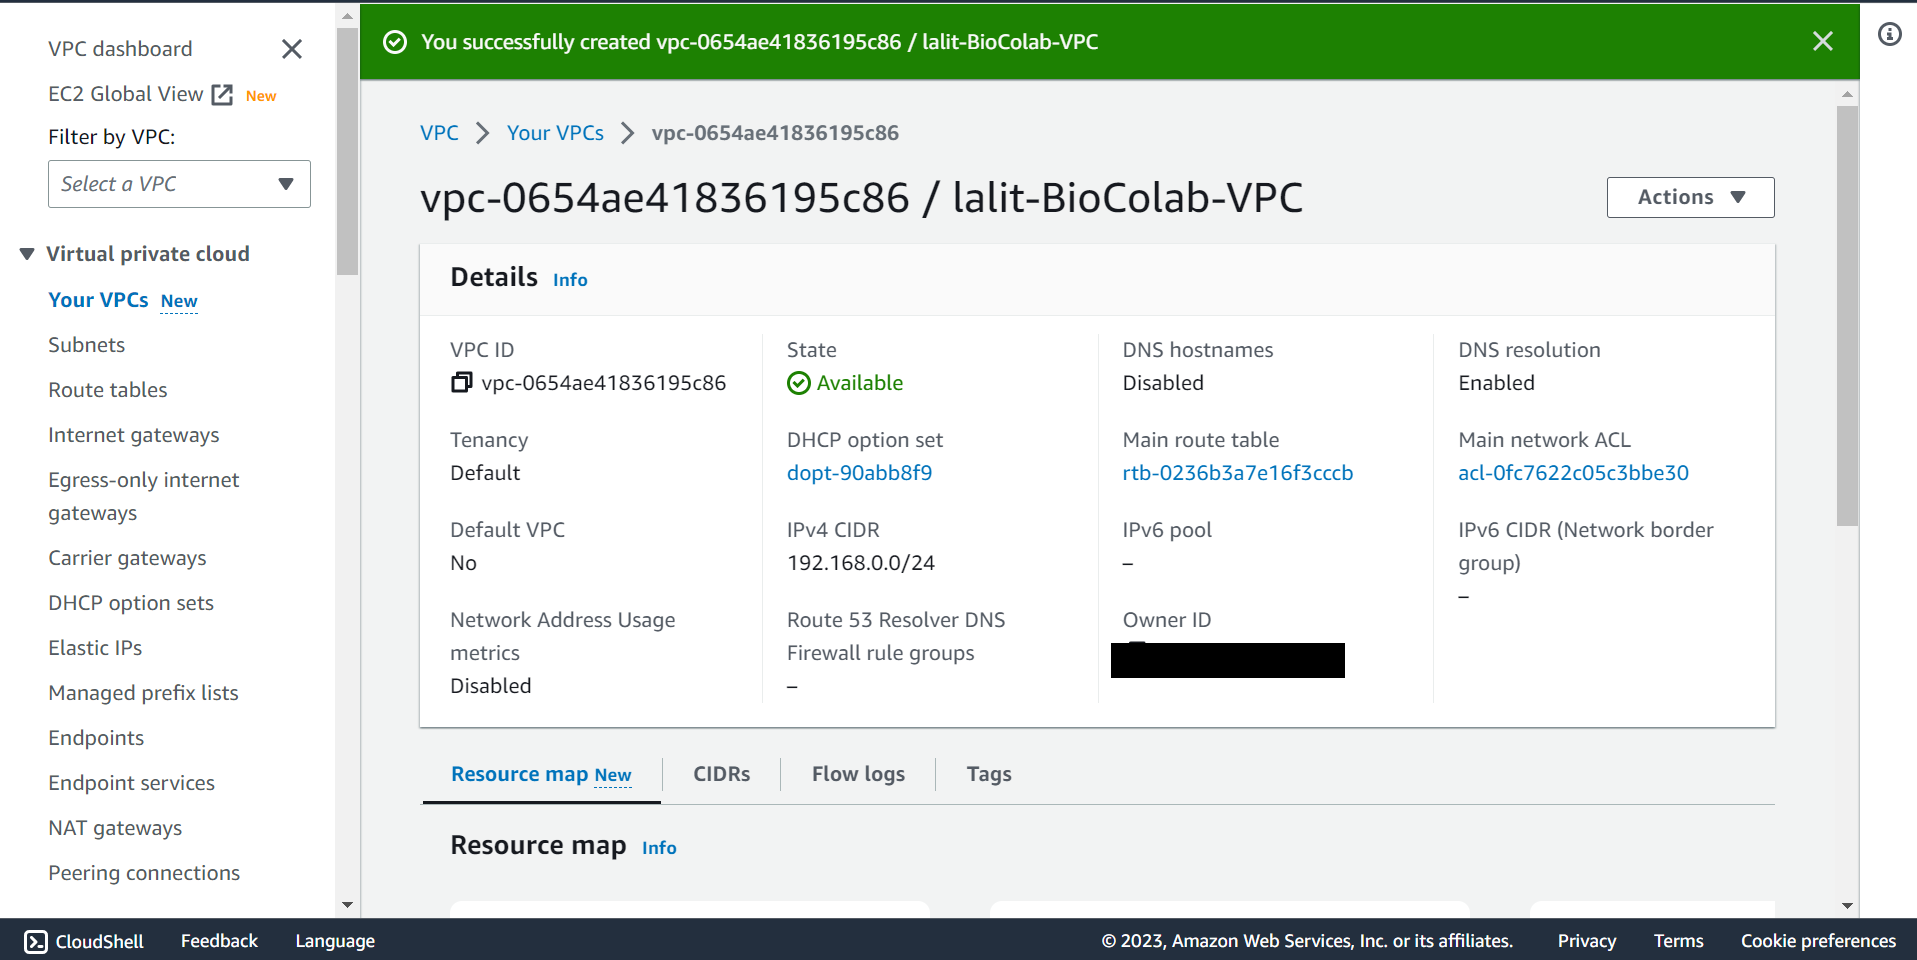
🔶 Verify VPC creation successfully completed.
Create a Subnet 
🔶 Time to create Subnet. Click on Create subnet.
🔶 Select VPC ID and type Subnet name.
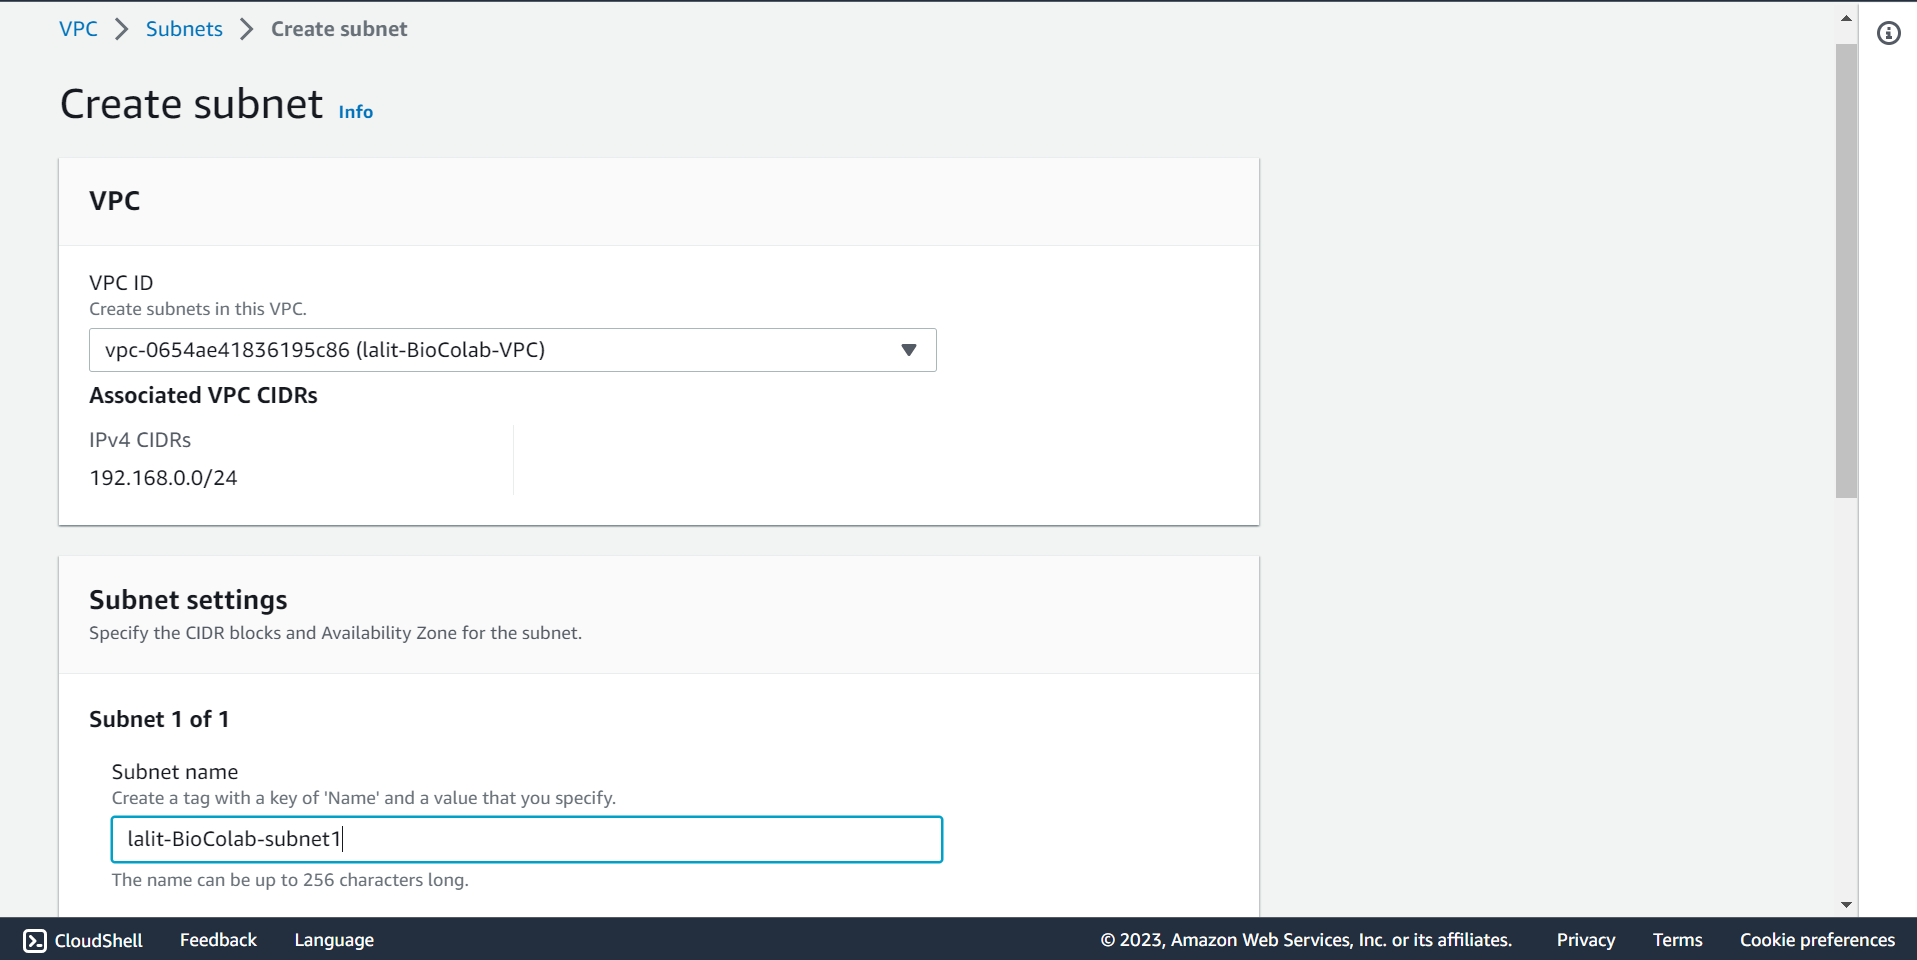
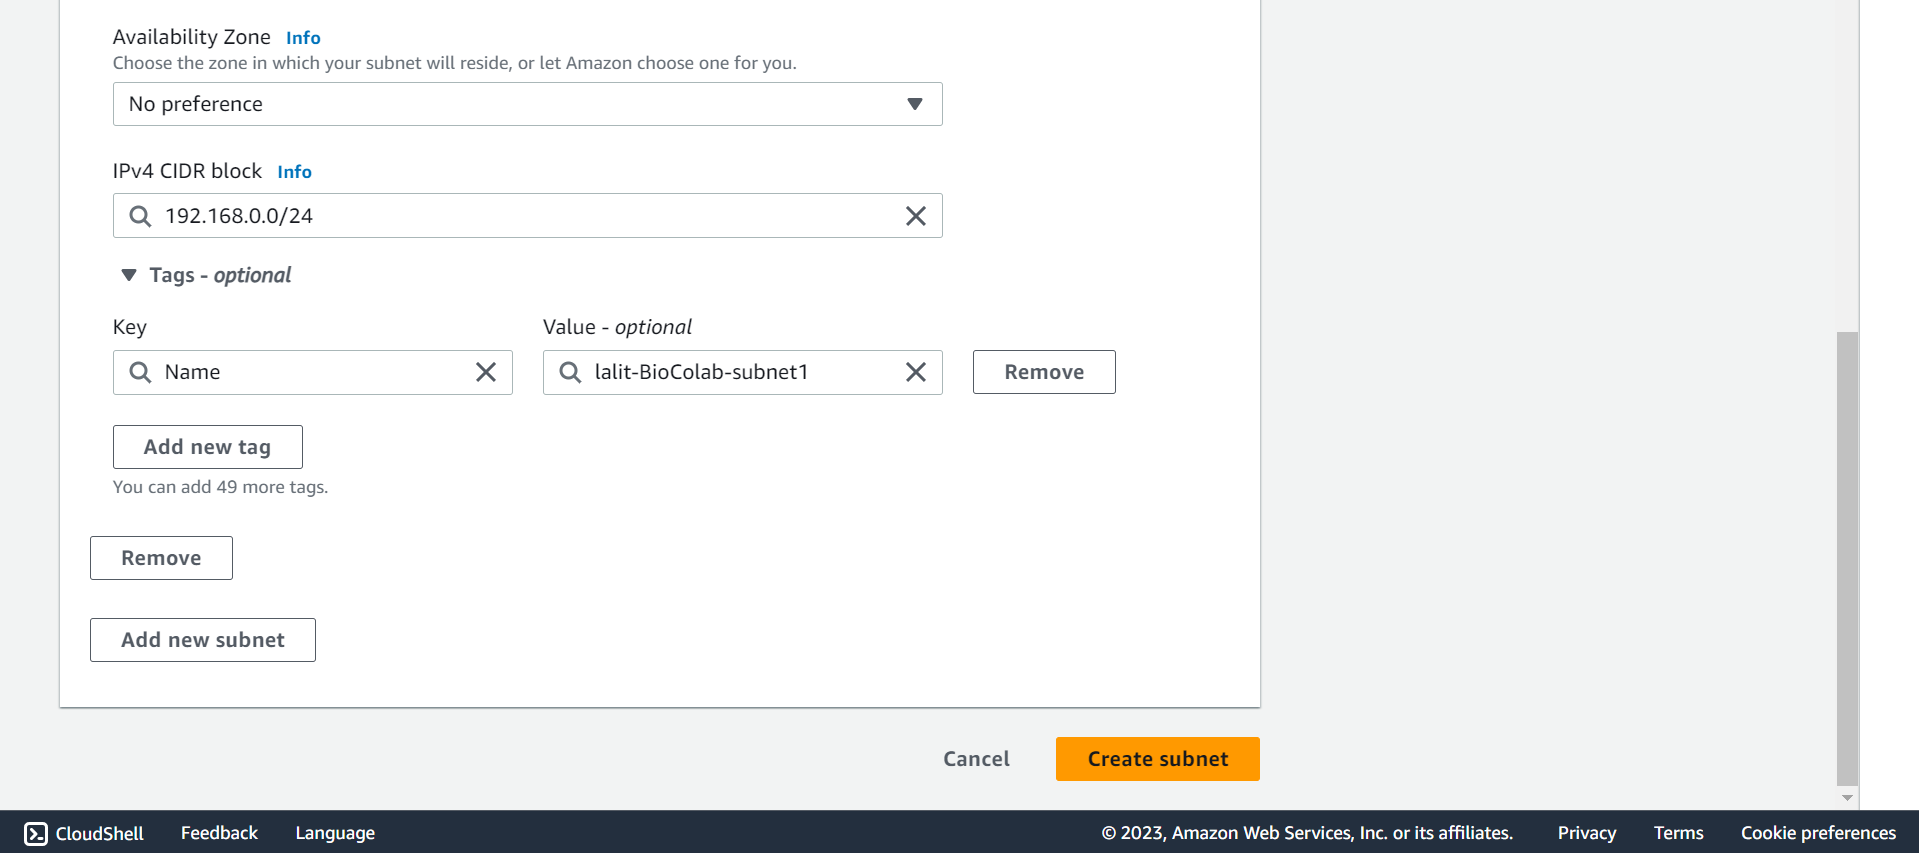
🔶 Fill CIDR block, type Tag Key and Value then Click on Create subnet.
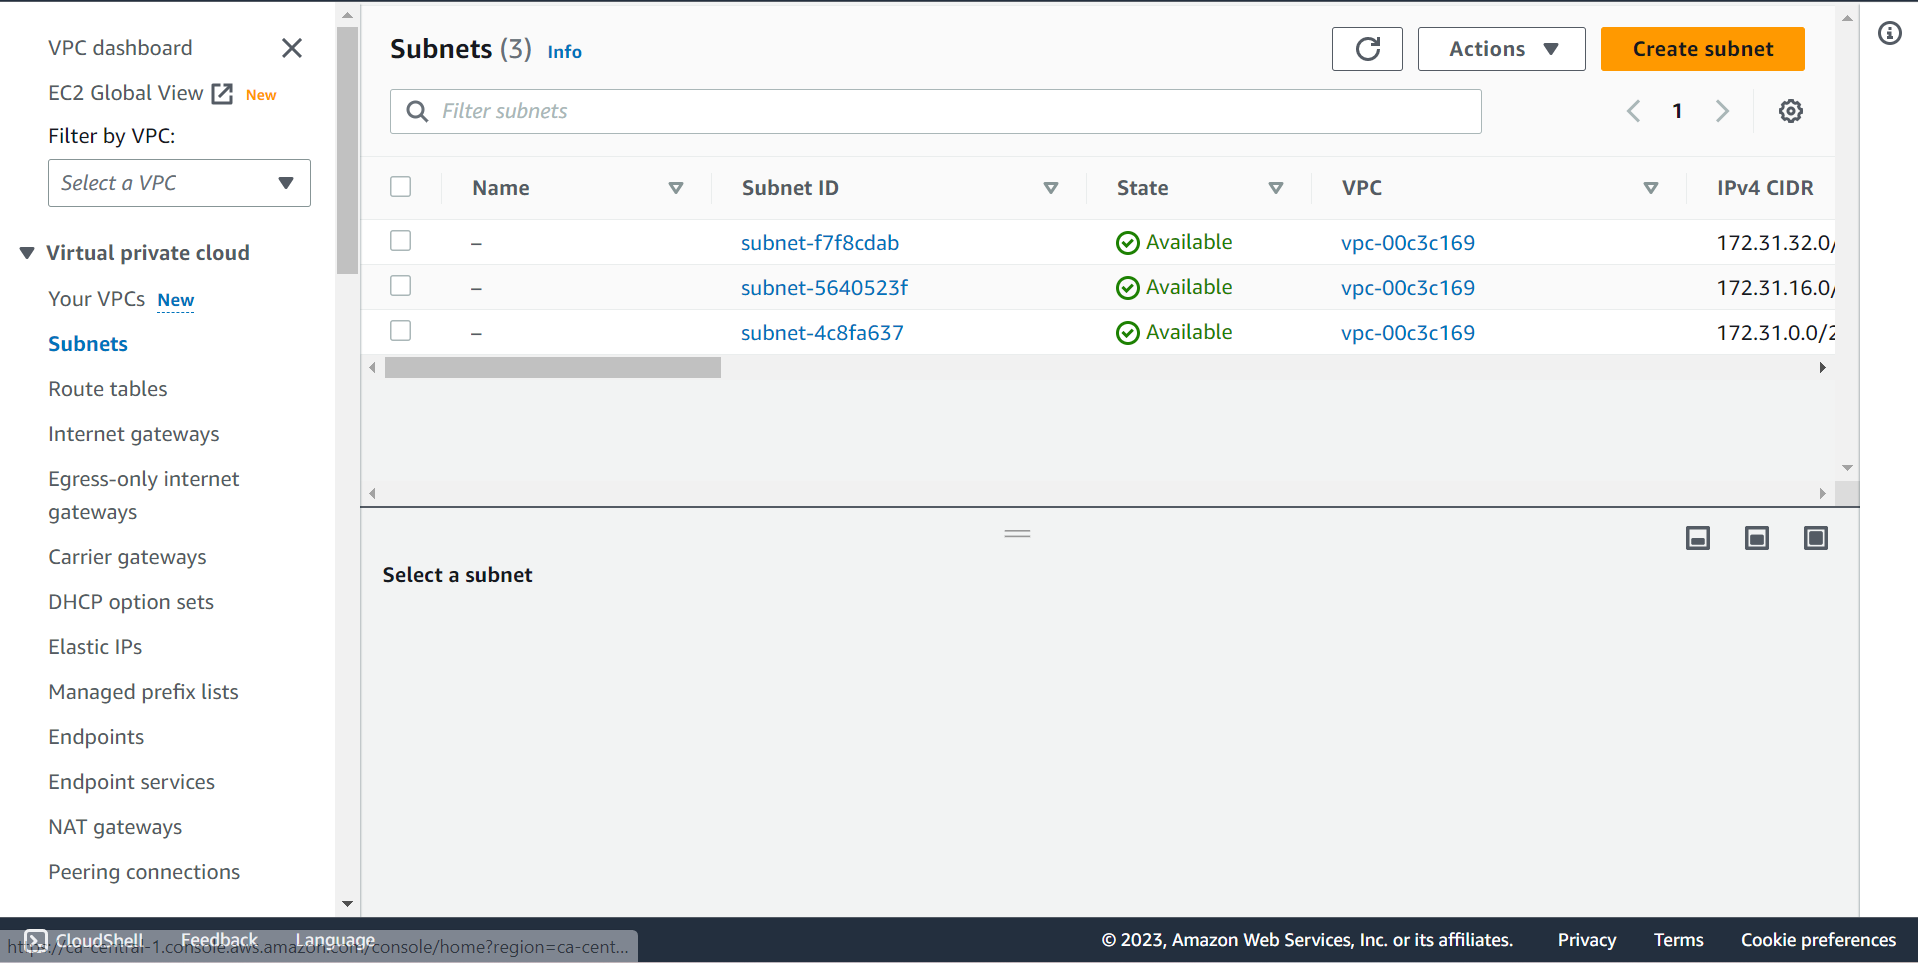
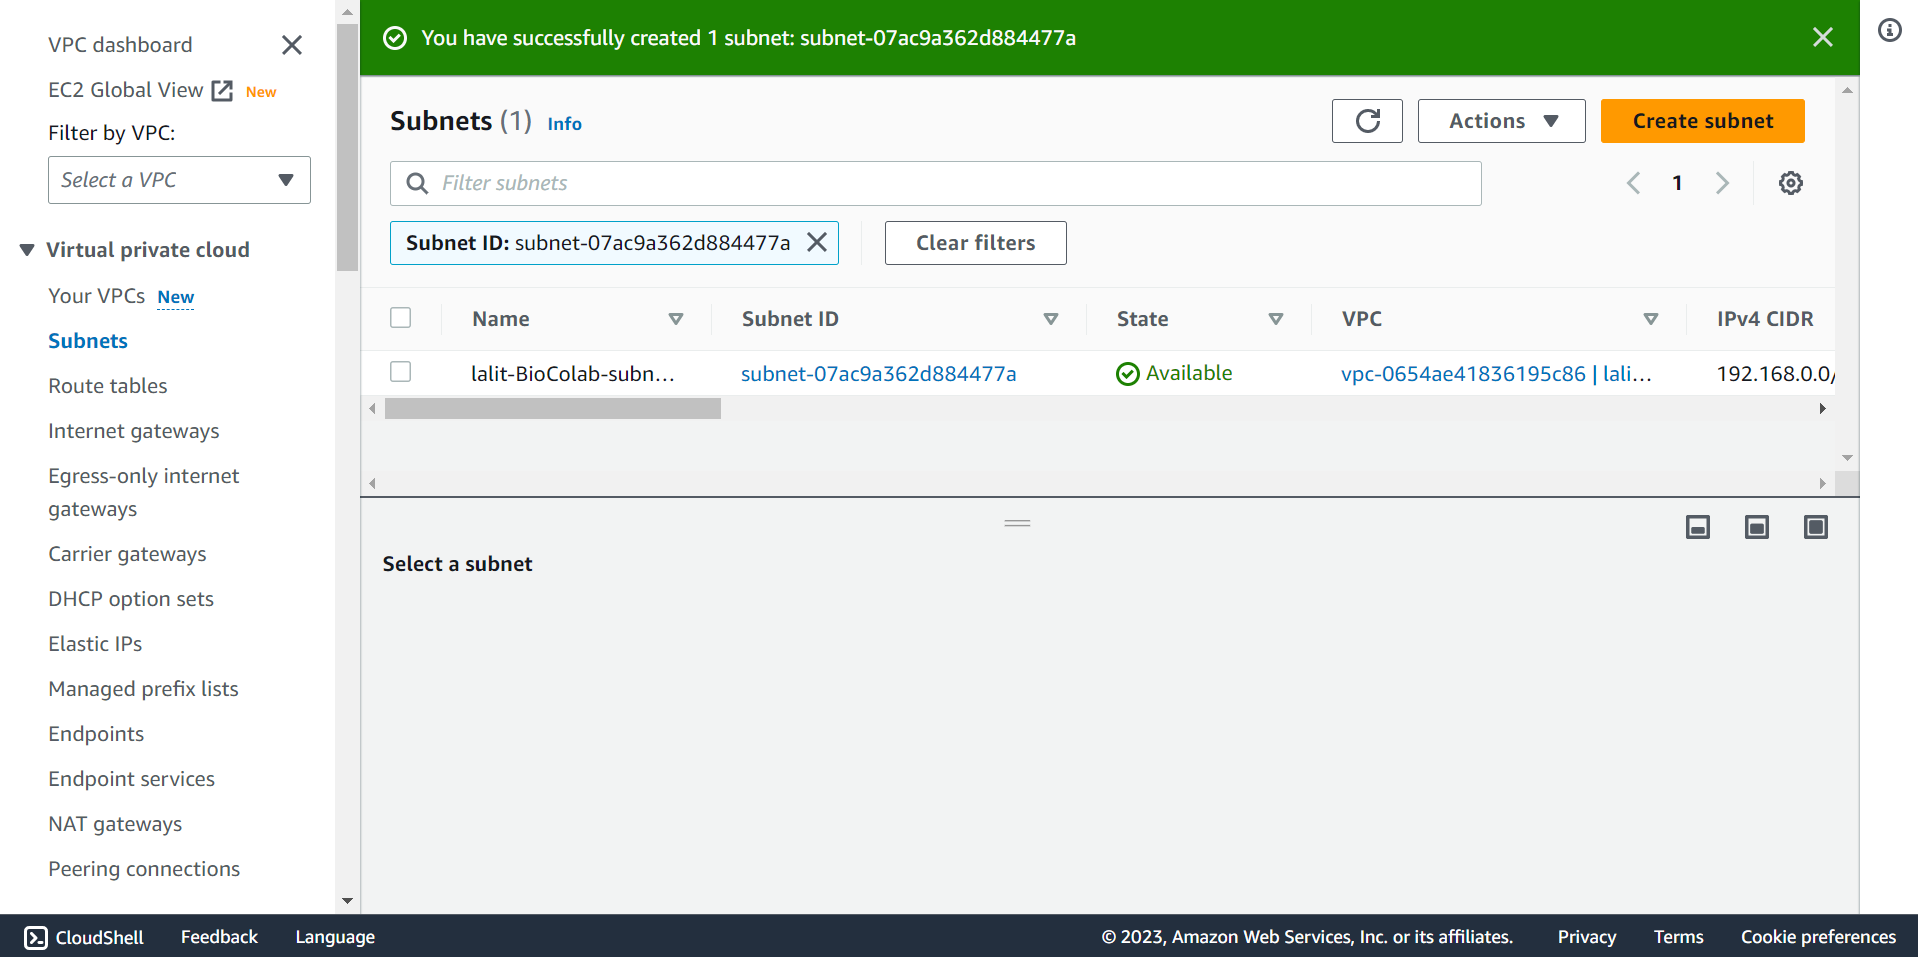
🔶 Subnet created successfully.
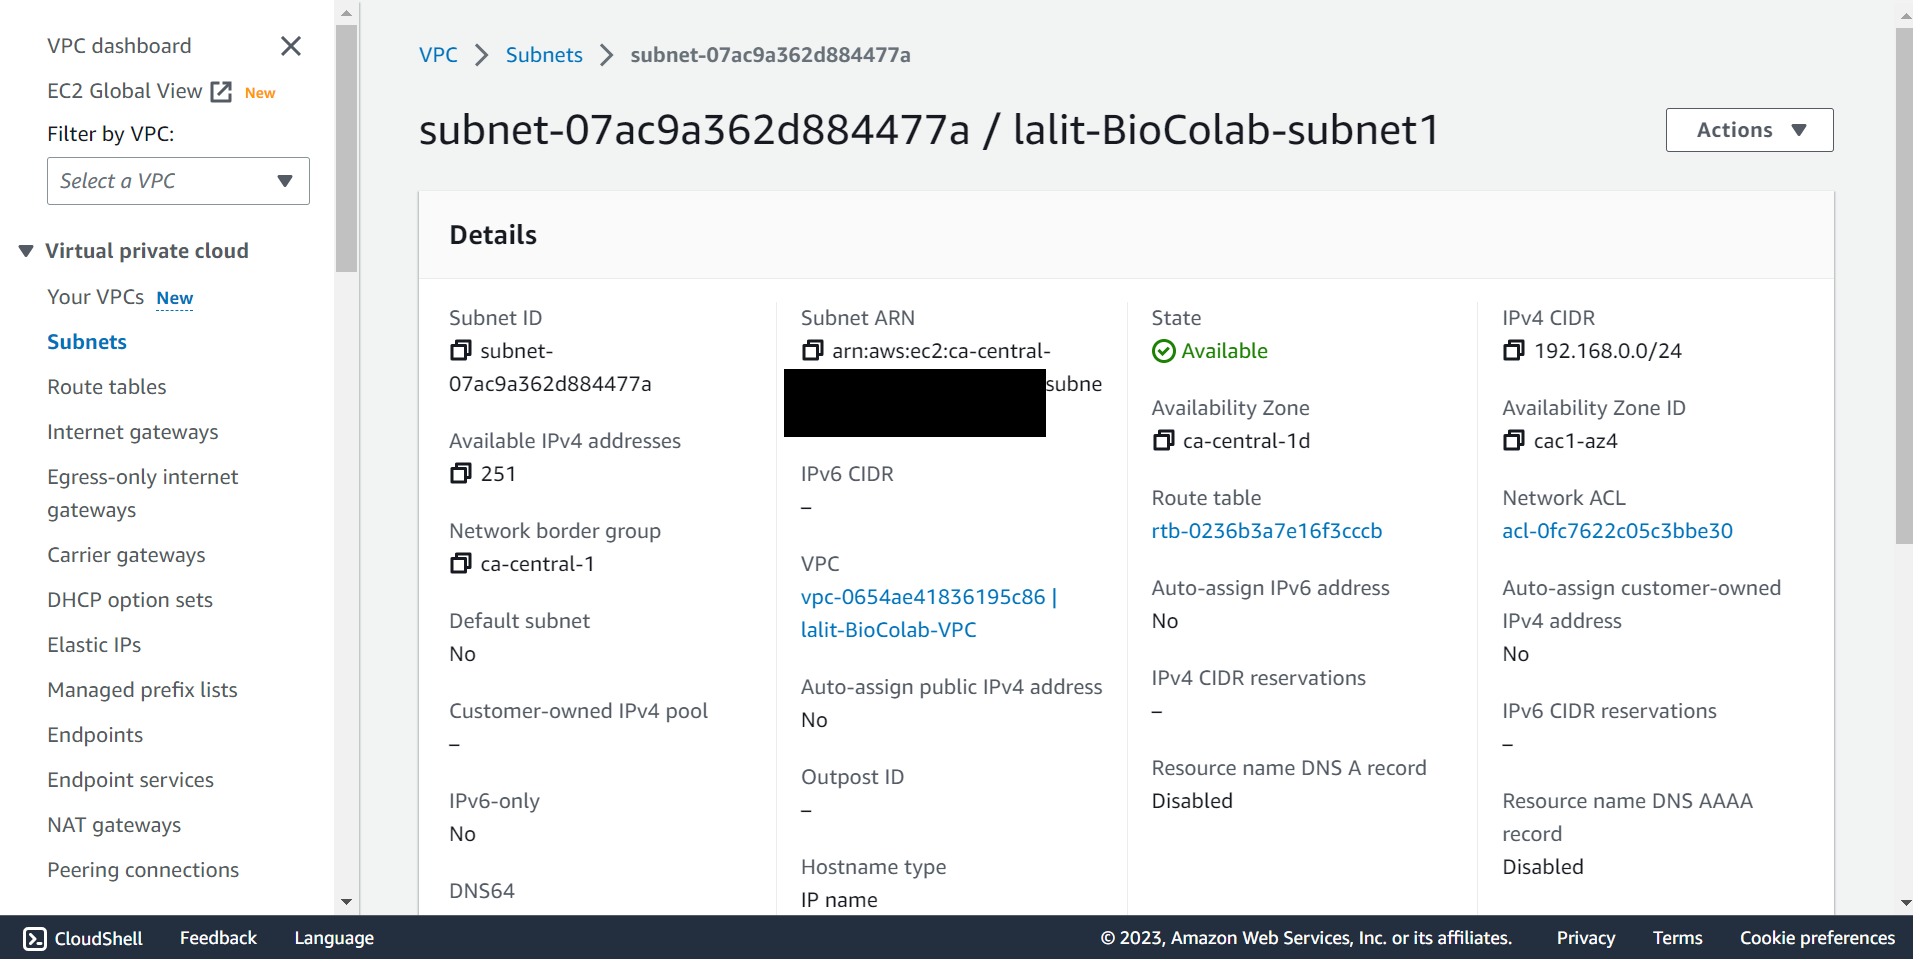
🔶 Check Subnet detail.
Create Internet Gateway 
Note: As noticed. During Subnet creation 🔃 Router table was automatically created.
⭕ Time to create Internet Gateway.
🔶 Router Table.
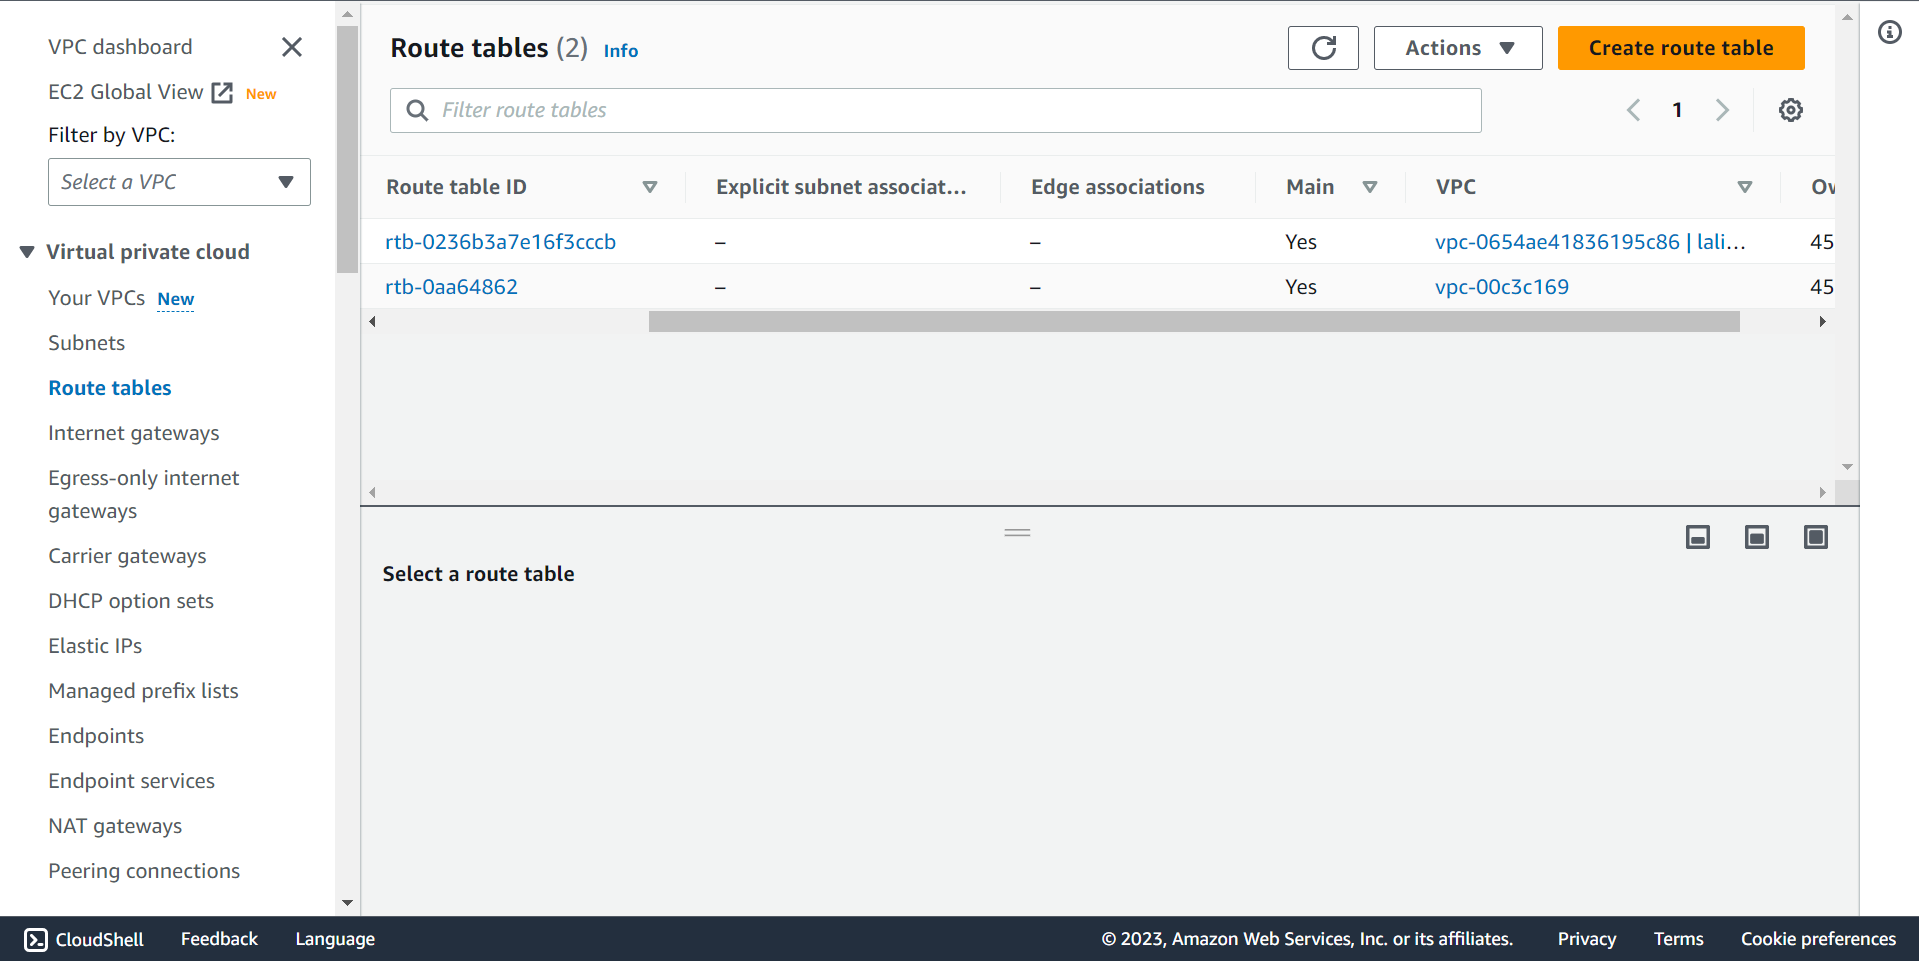
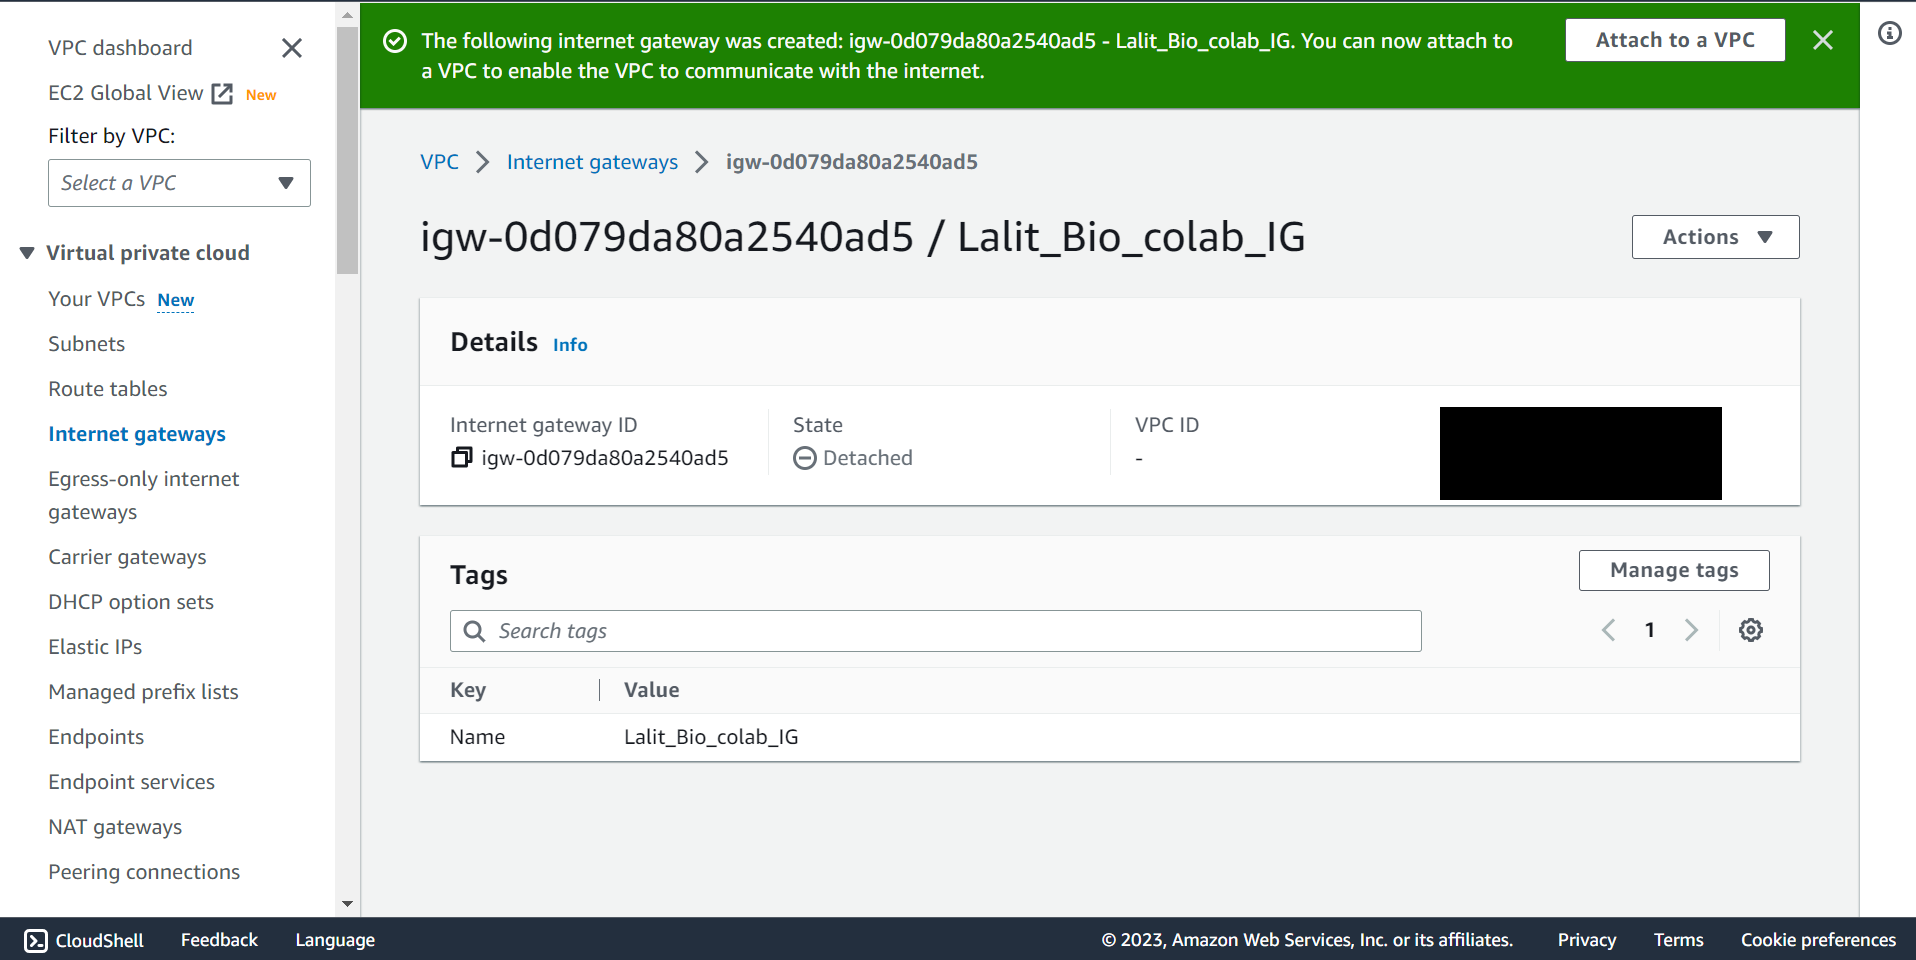
🔶 Select Internet gateway and Click on Create internet gateway.
🔶 Fill Name Tag, Key and Value then Click Create internet gateway.

🔶 Internet gateway created successfully.
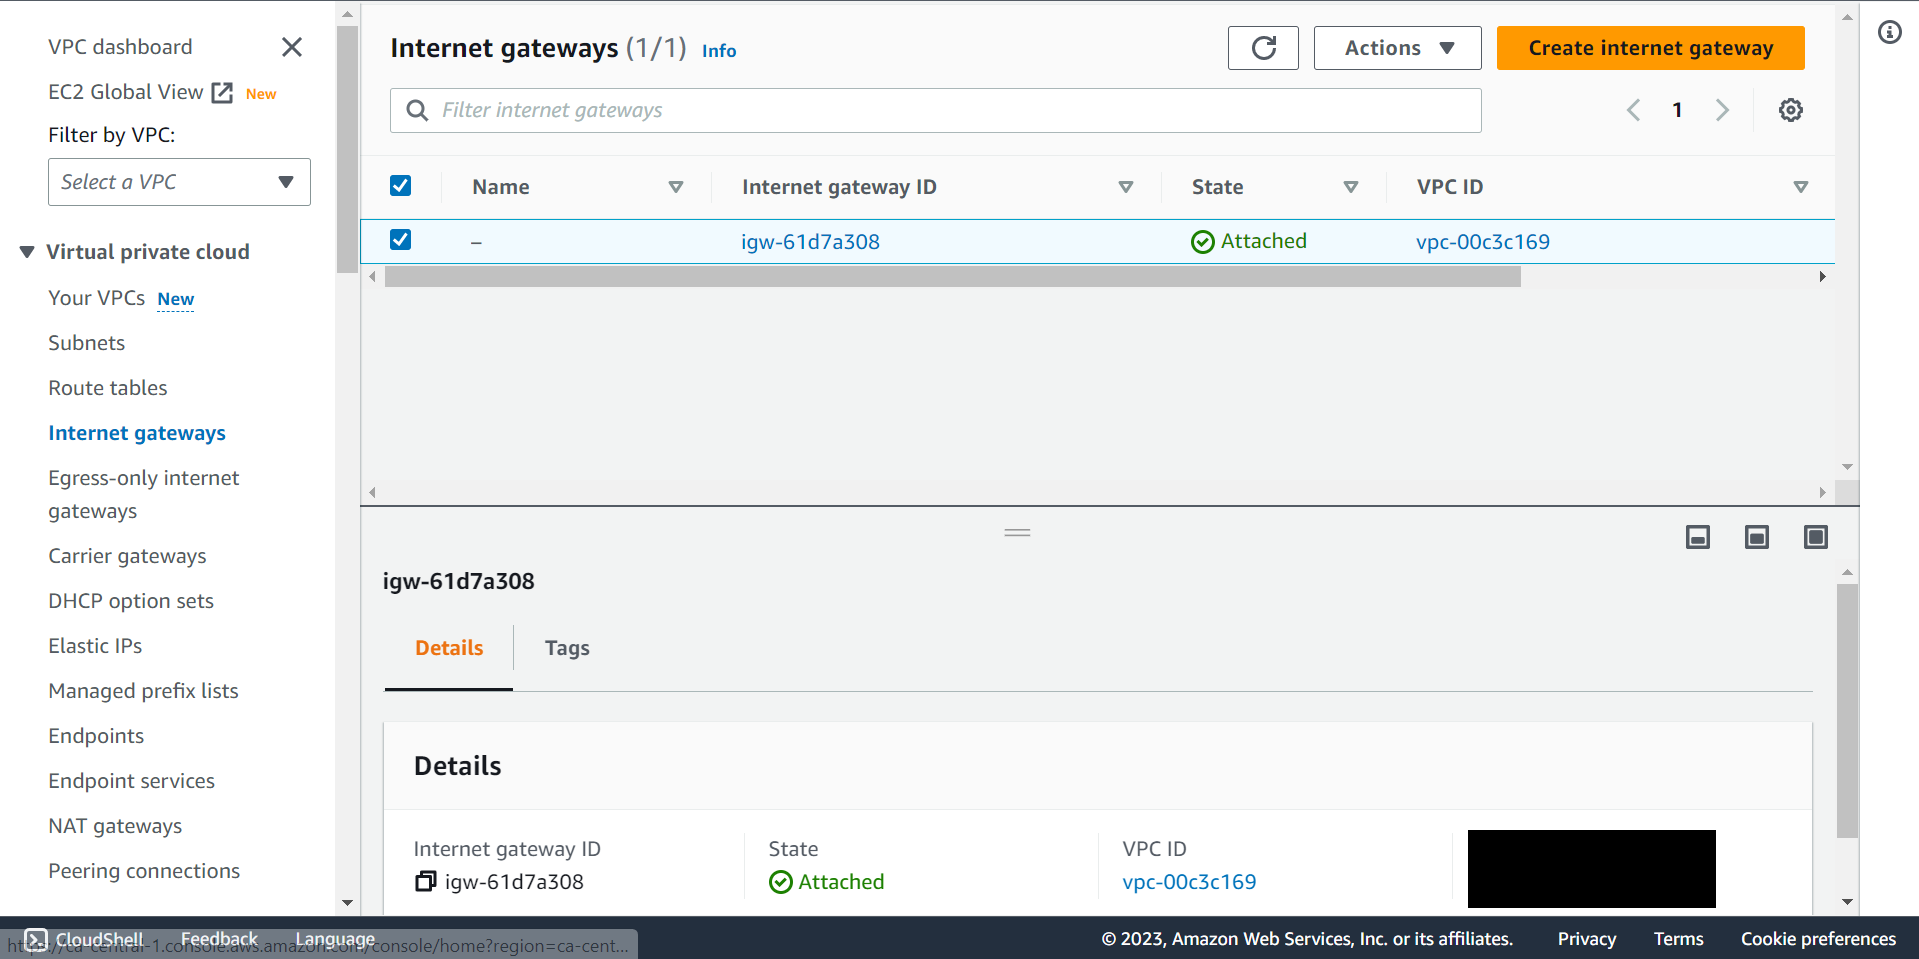
Internet Gateway attached to VPC. 
🔶 In Internet gateway Click on Action and select Attached to VPC.

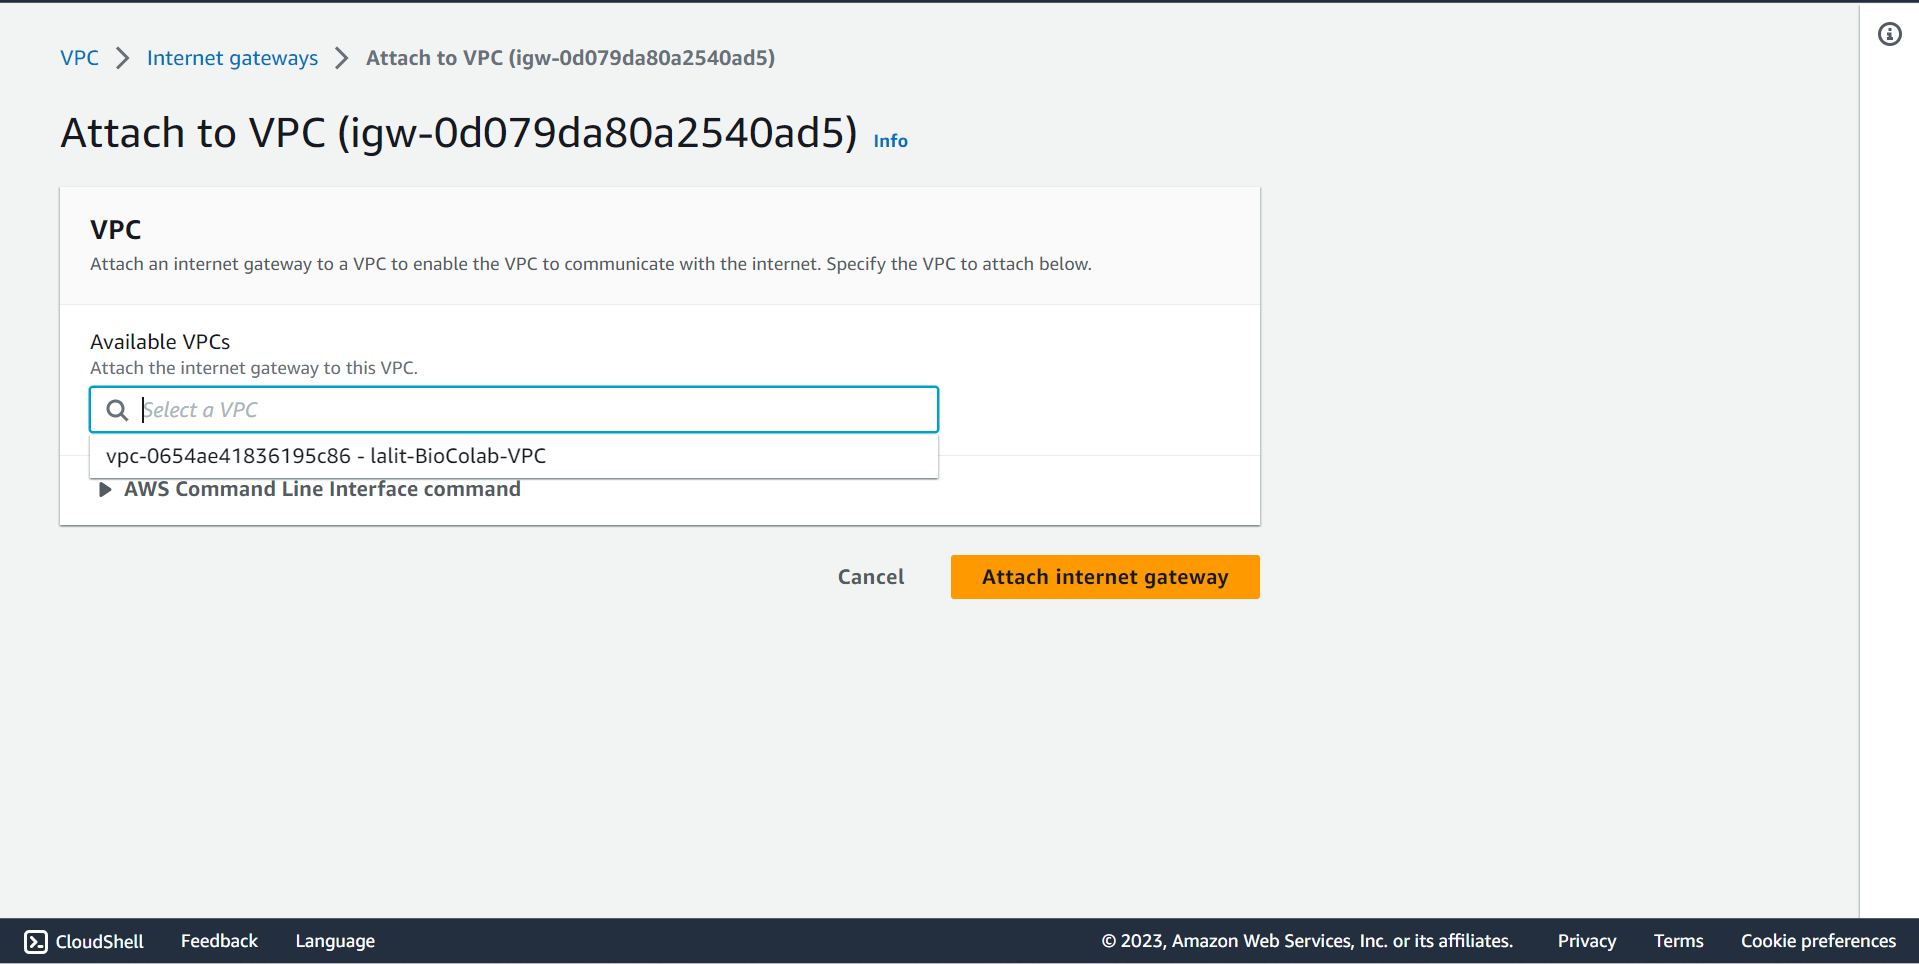
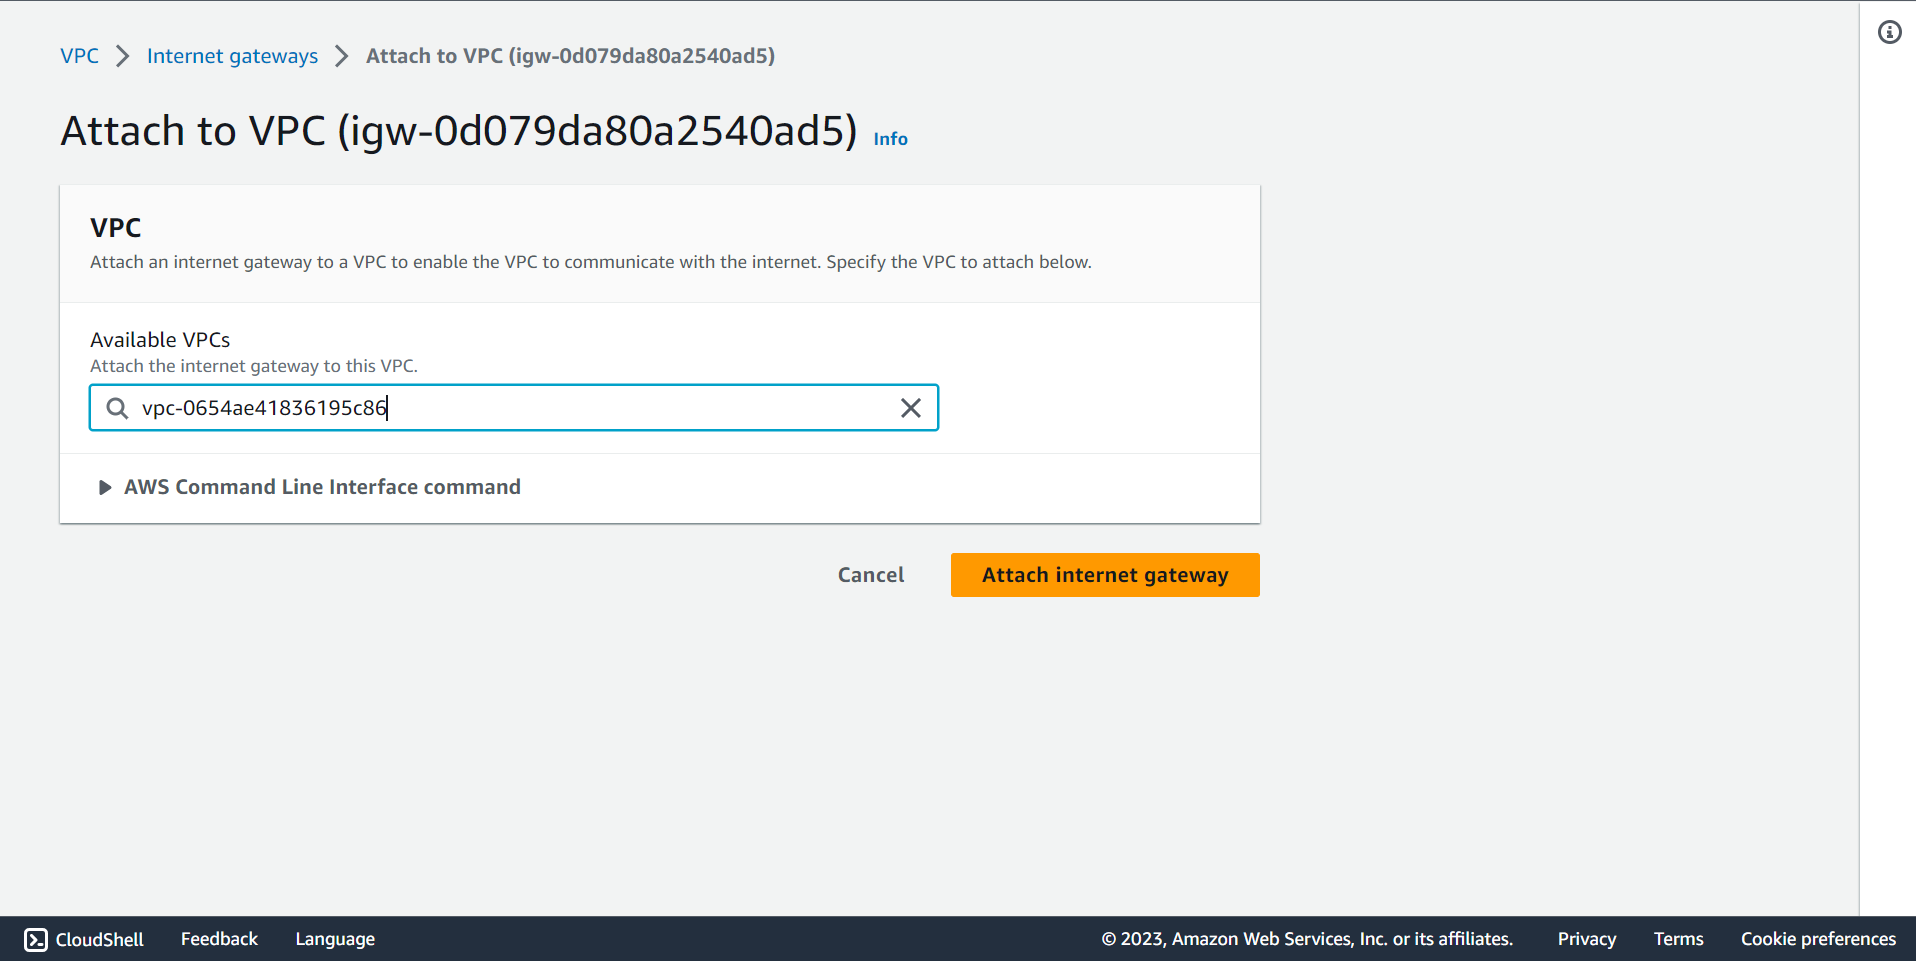
🔶 Internet Gateway attached to VPC completed.
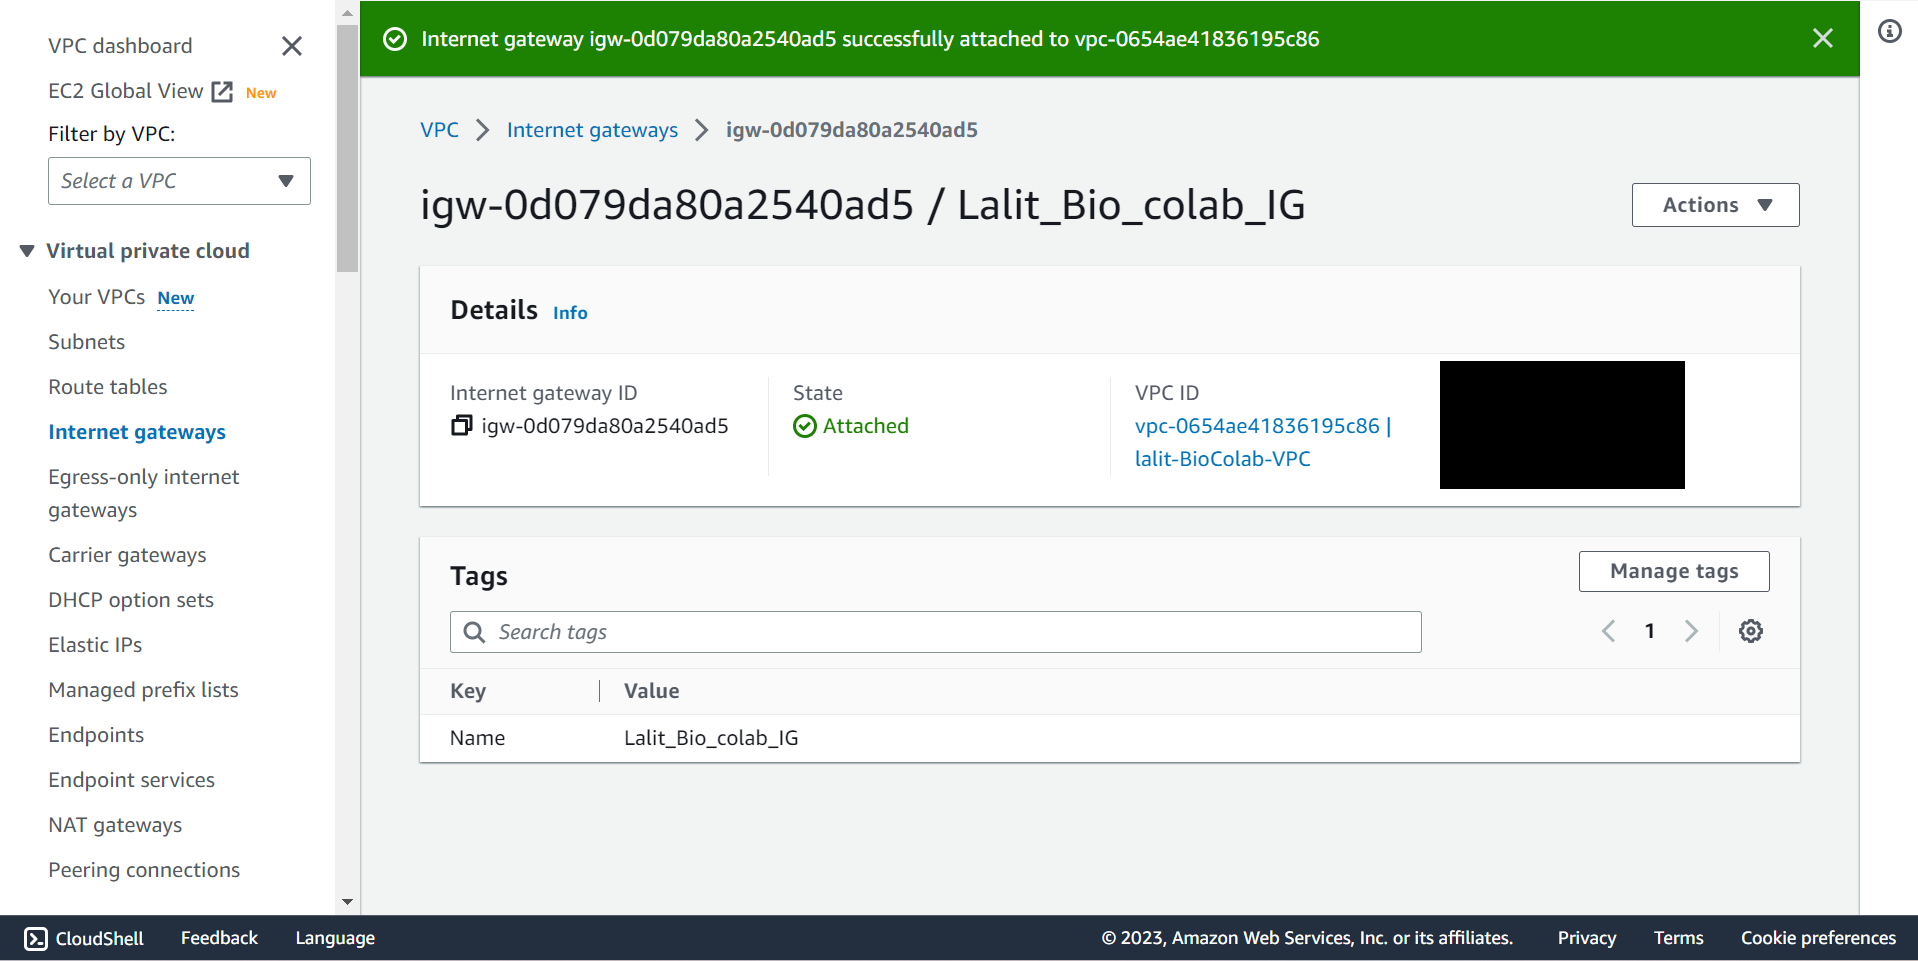
🔶 Now Update Route Table for Subnet association and add Route to use Internet gateway to router table.
🔶 Update Route Table for Subnet association.
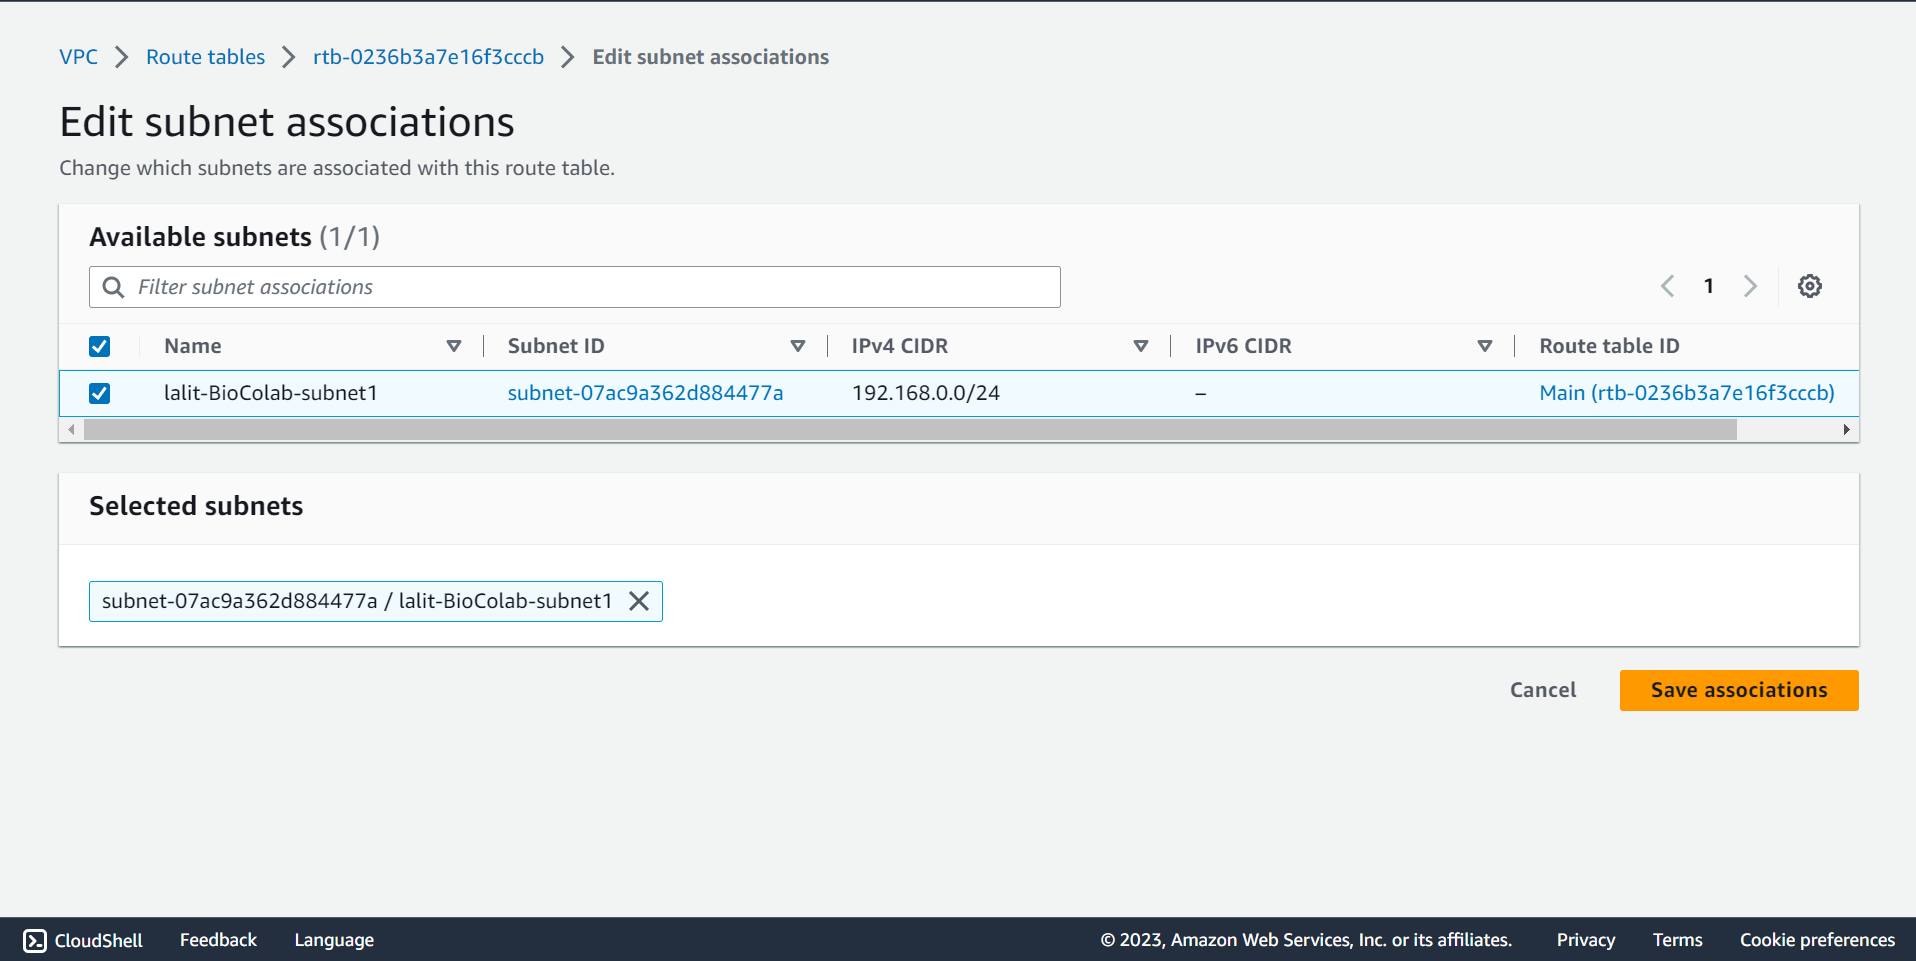
Subnet association to Router Table. 
🔶 Select Subnet associations from Route tables ▶️ Second tab.

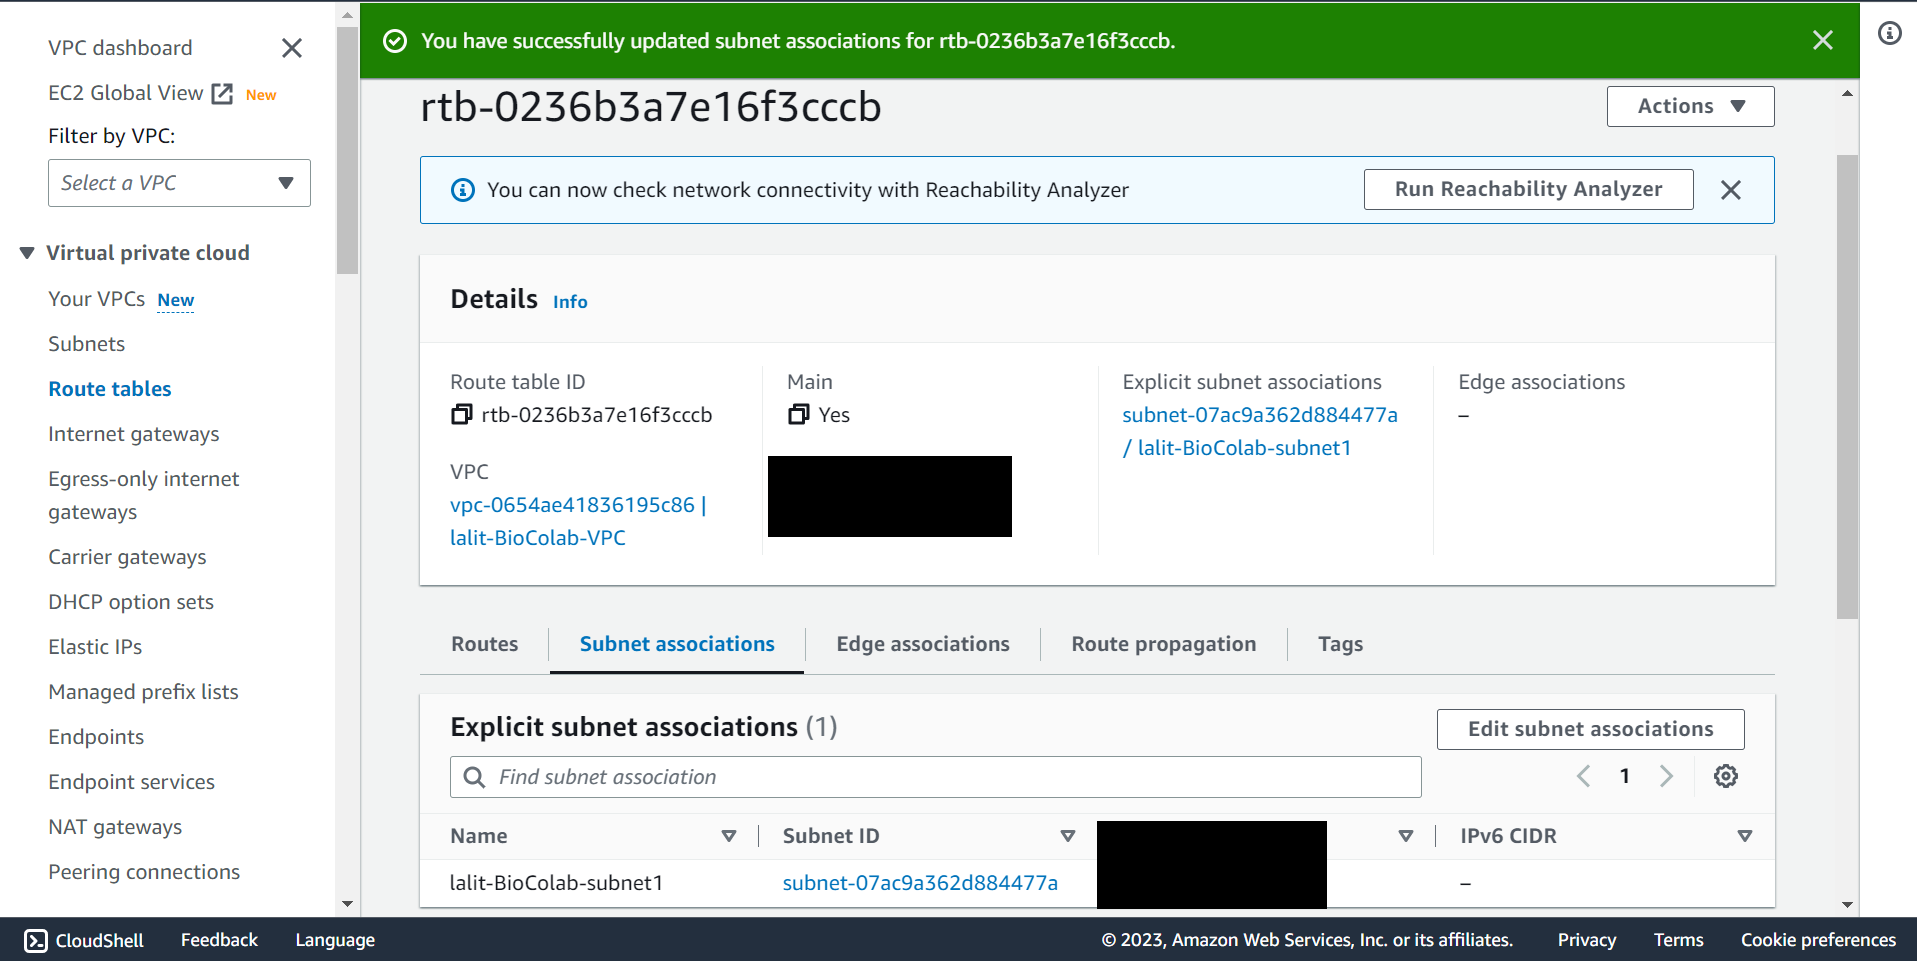
🔶 Click on Edit subnet associations and select Subnet name, which you would like to associate then Click on Save associations button.
🔶 Subnet association completed.
Update Router table to use Internet gateway. 
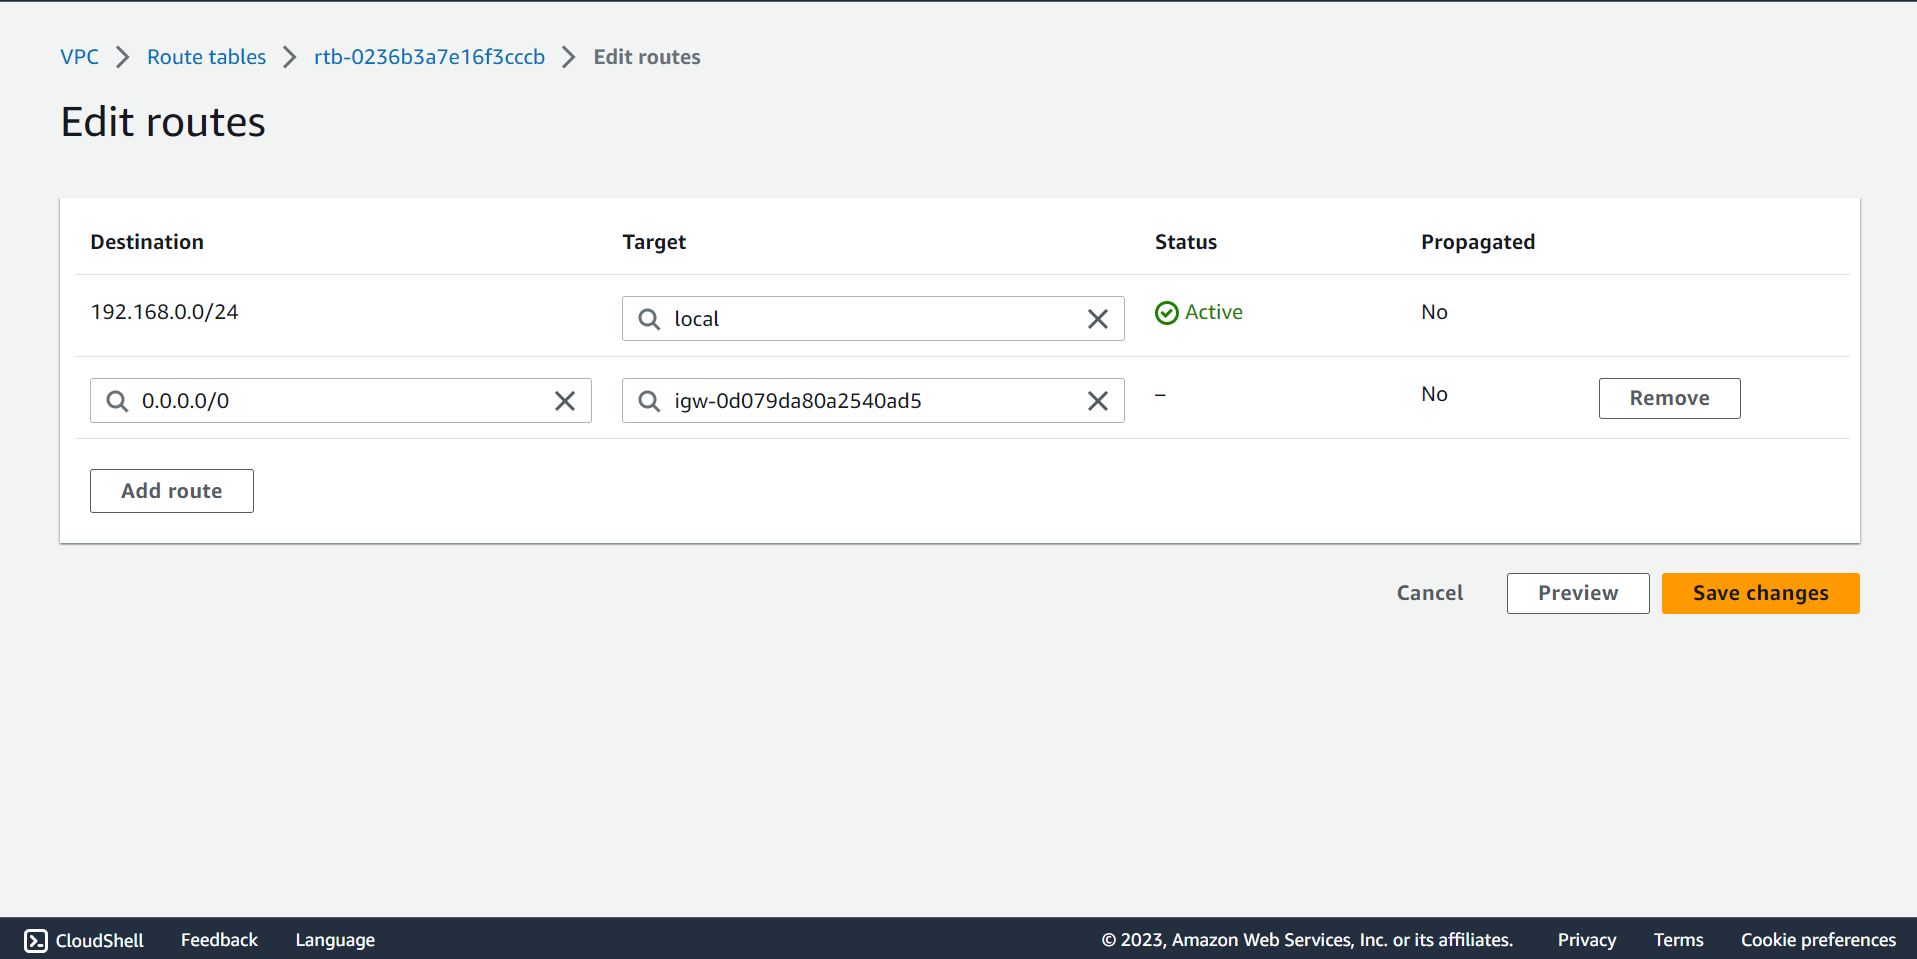
🔶 Select Routes from Route tables ▶️ First tab.
🔶 Click on Edit routes.
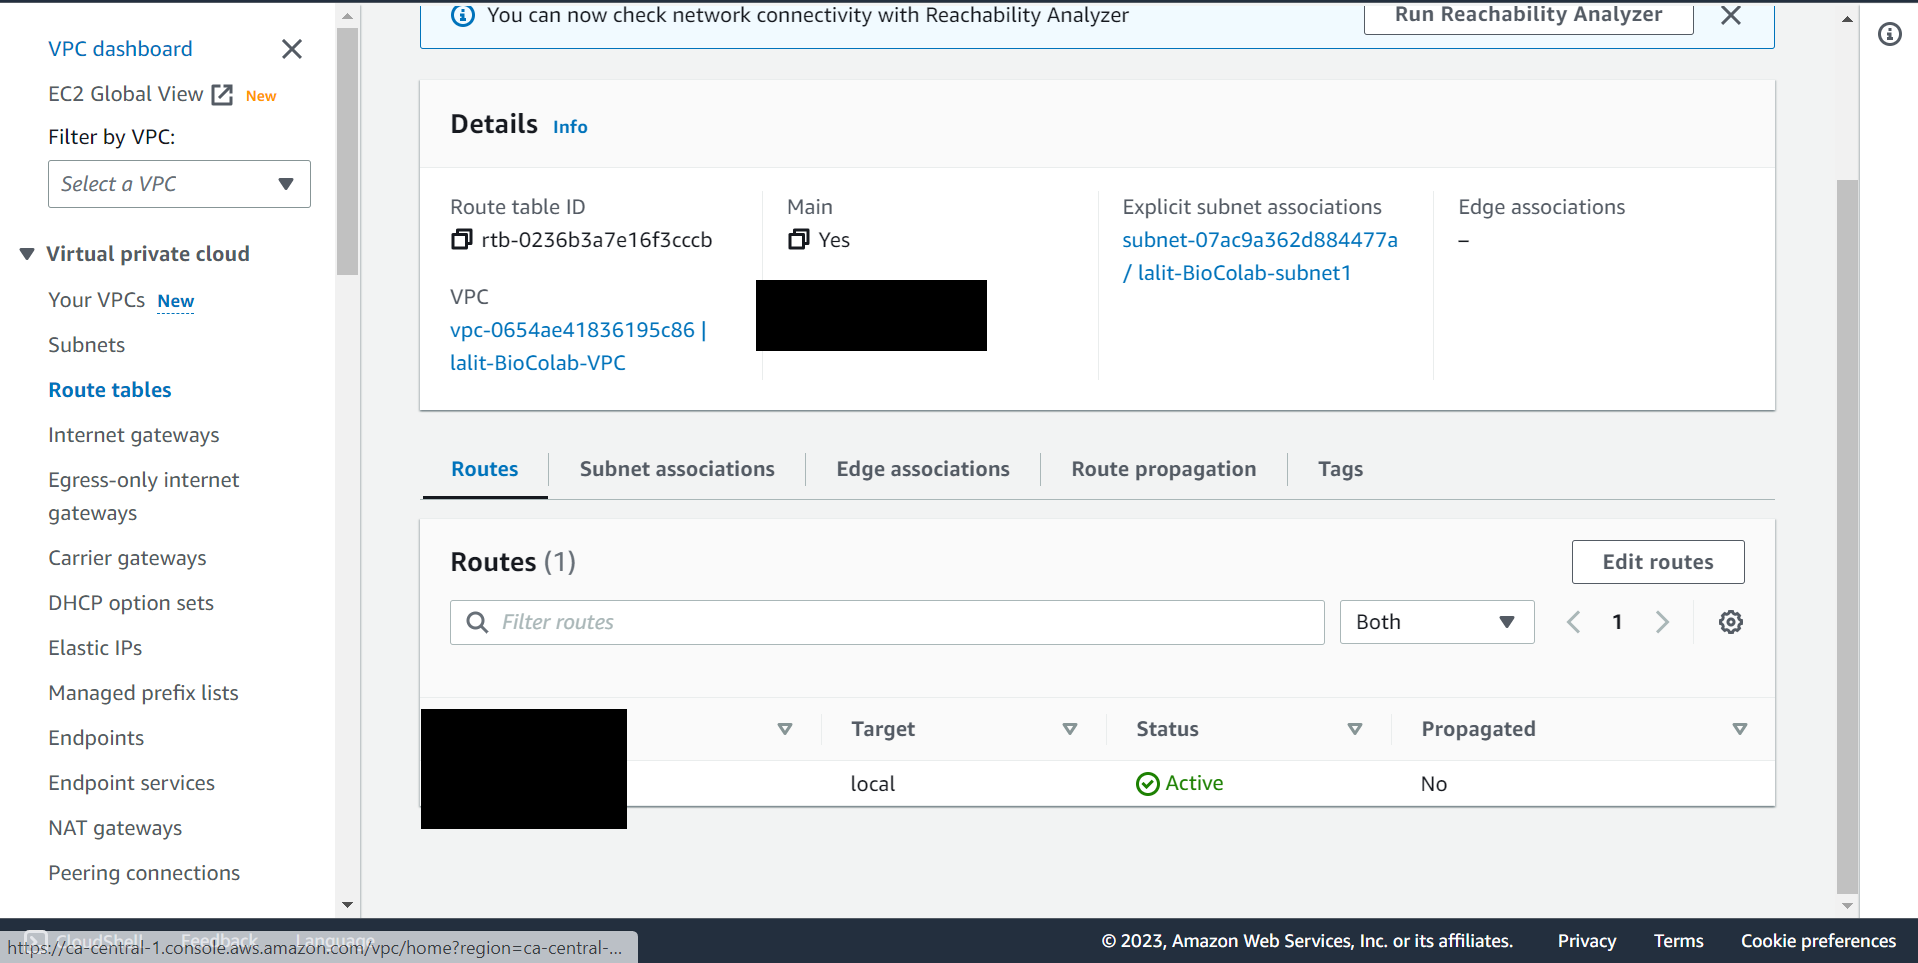
🔶 Fill the value 0.0.0.0/0 and select Internet gateway name as showing on below screenshot.
🔶 Click on Save change.
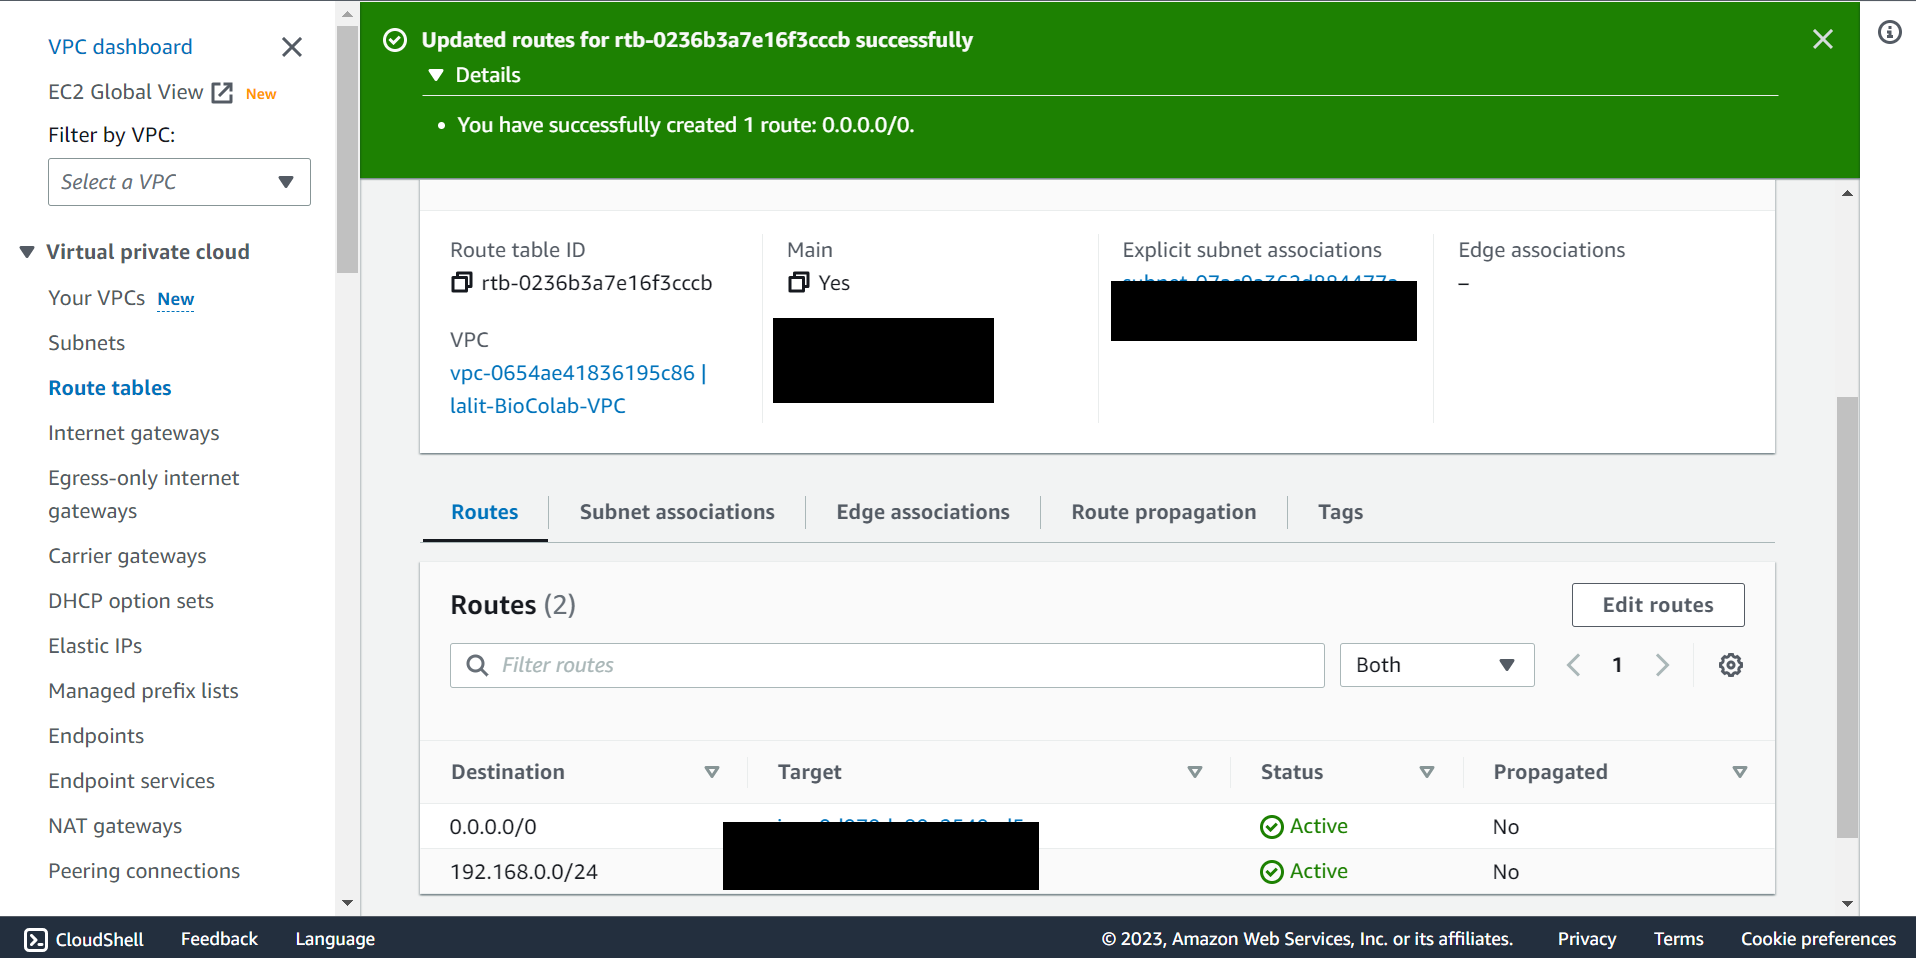
🔶 Router table updated.
Create ec2 Instance 
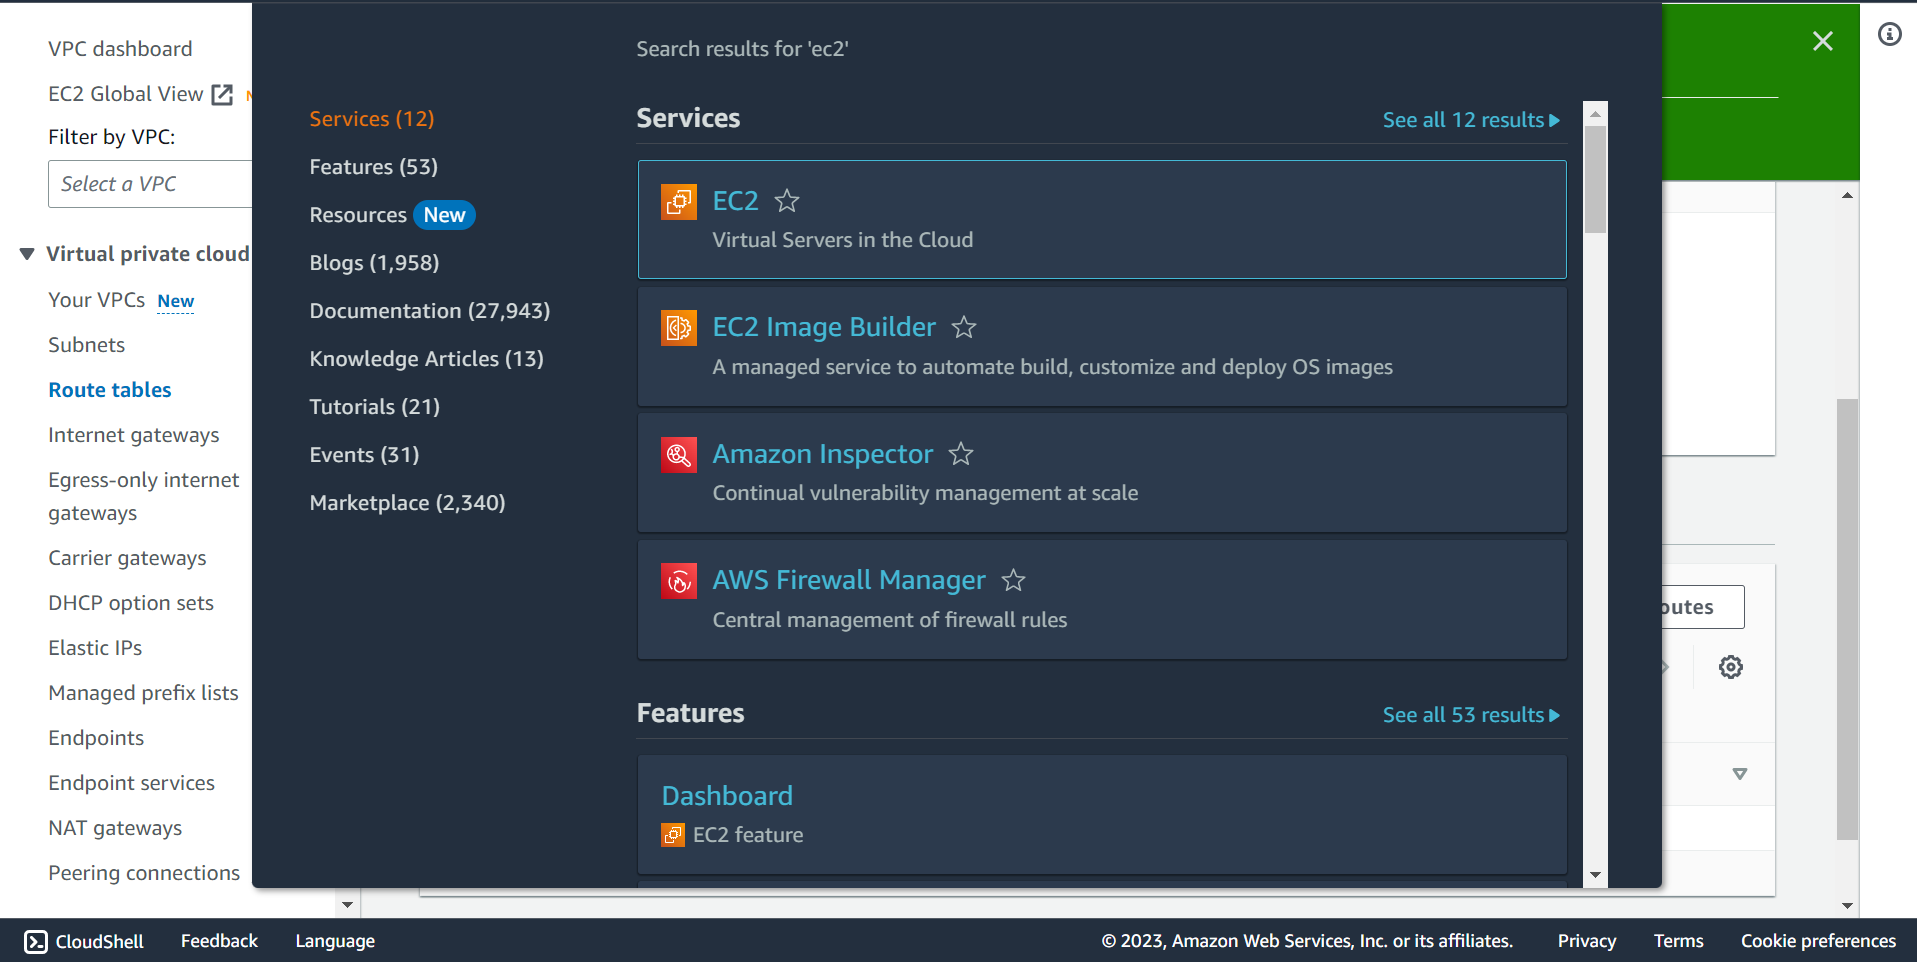
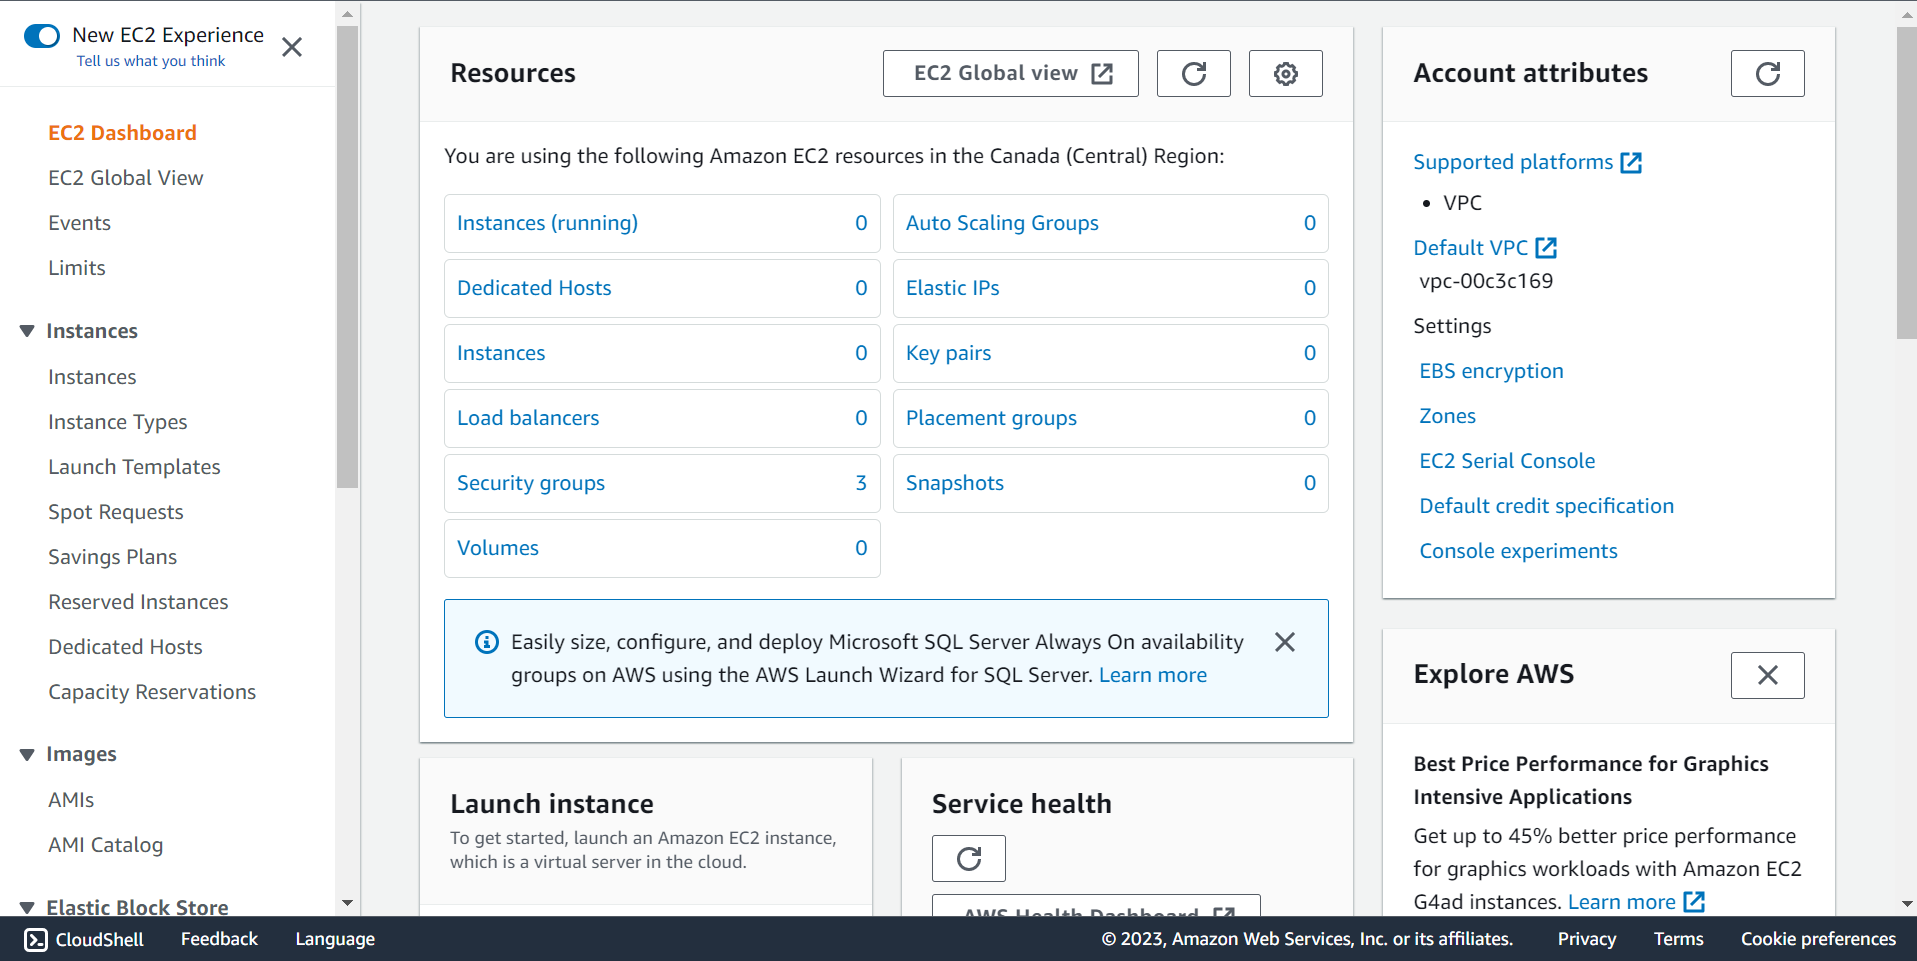
🔶 Click on Search Bar and type ec2.
🔶 Click on instances (running).
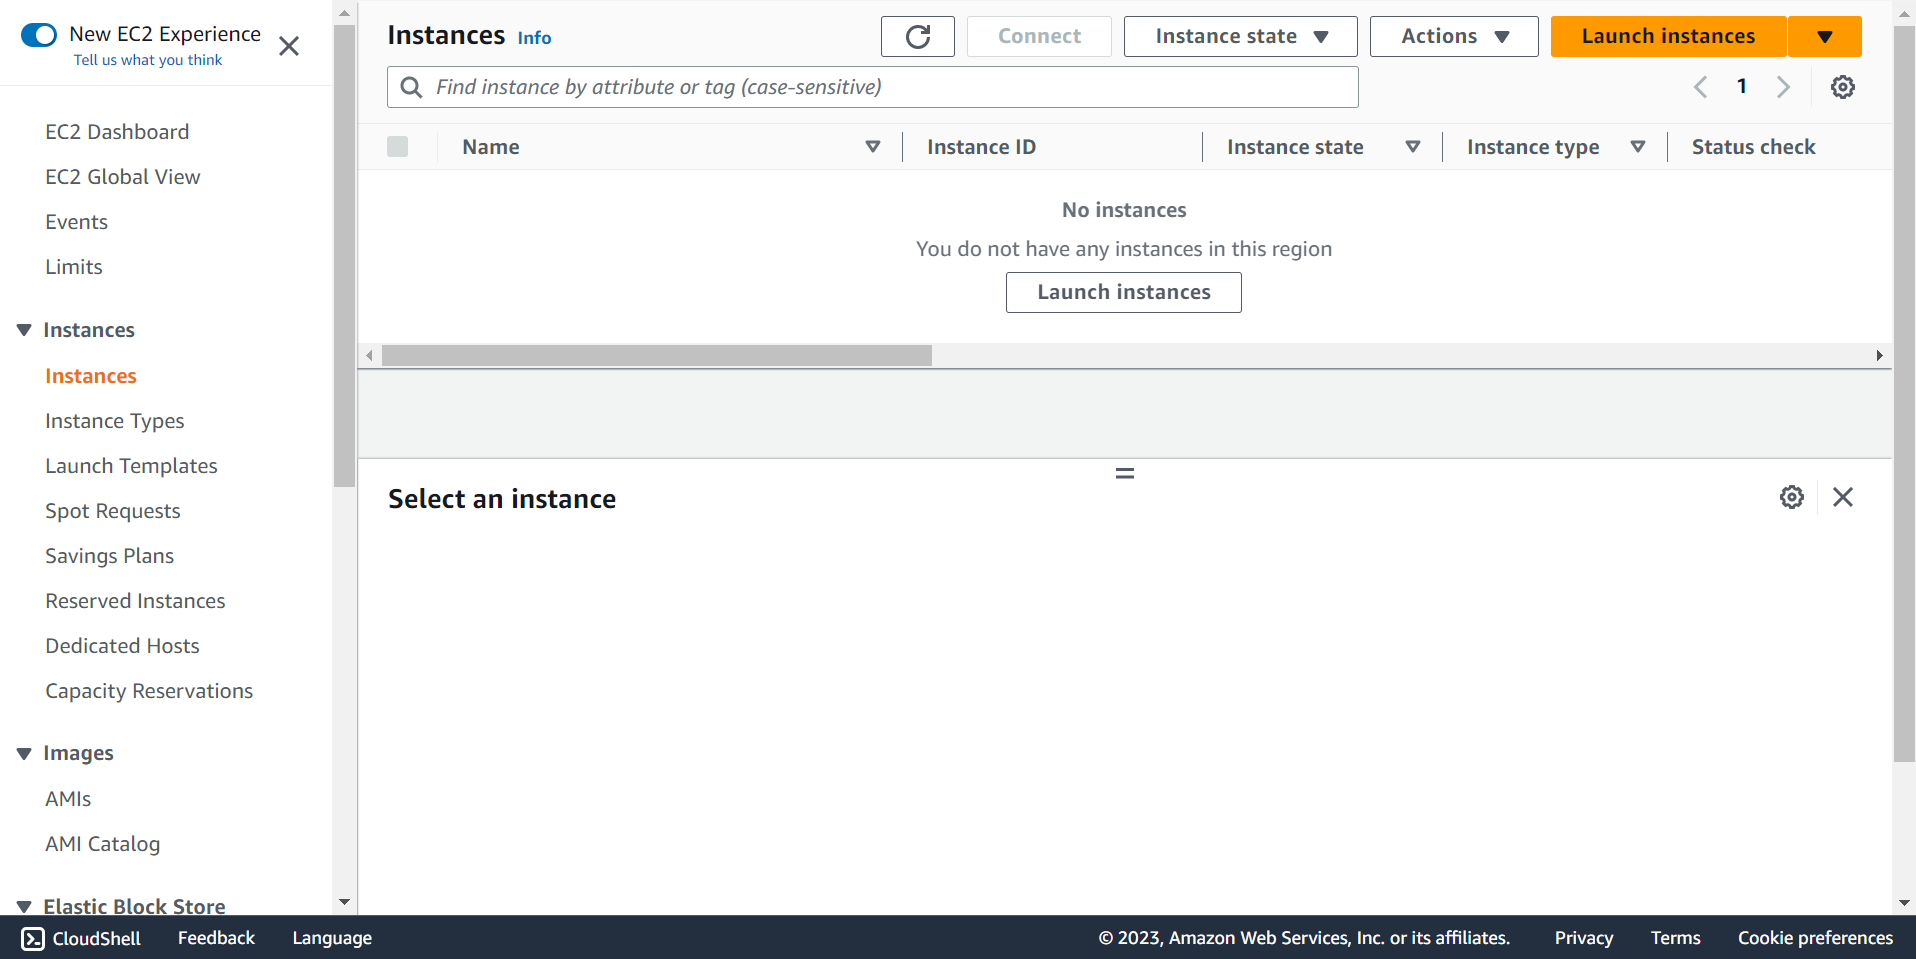
🔶 Click on Launch instances.
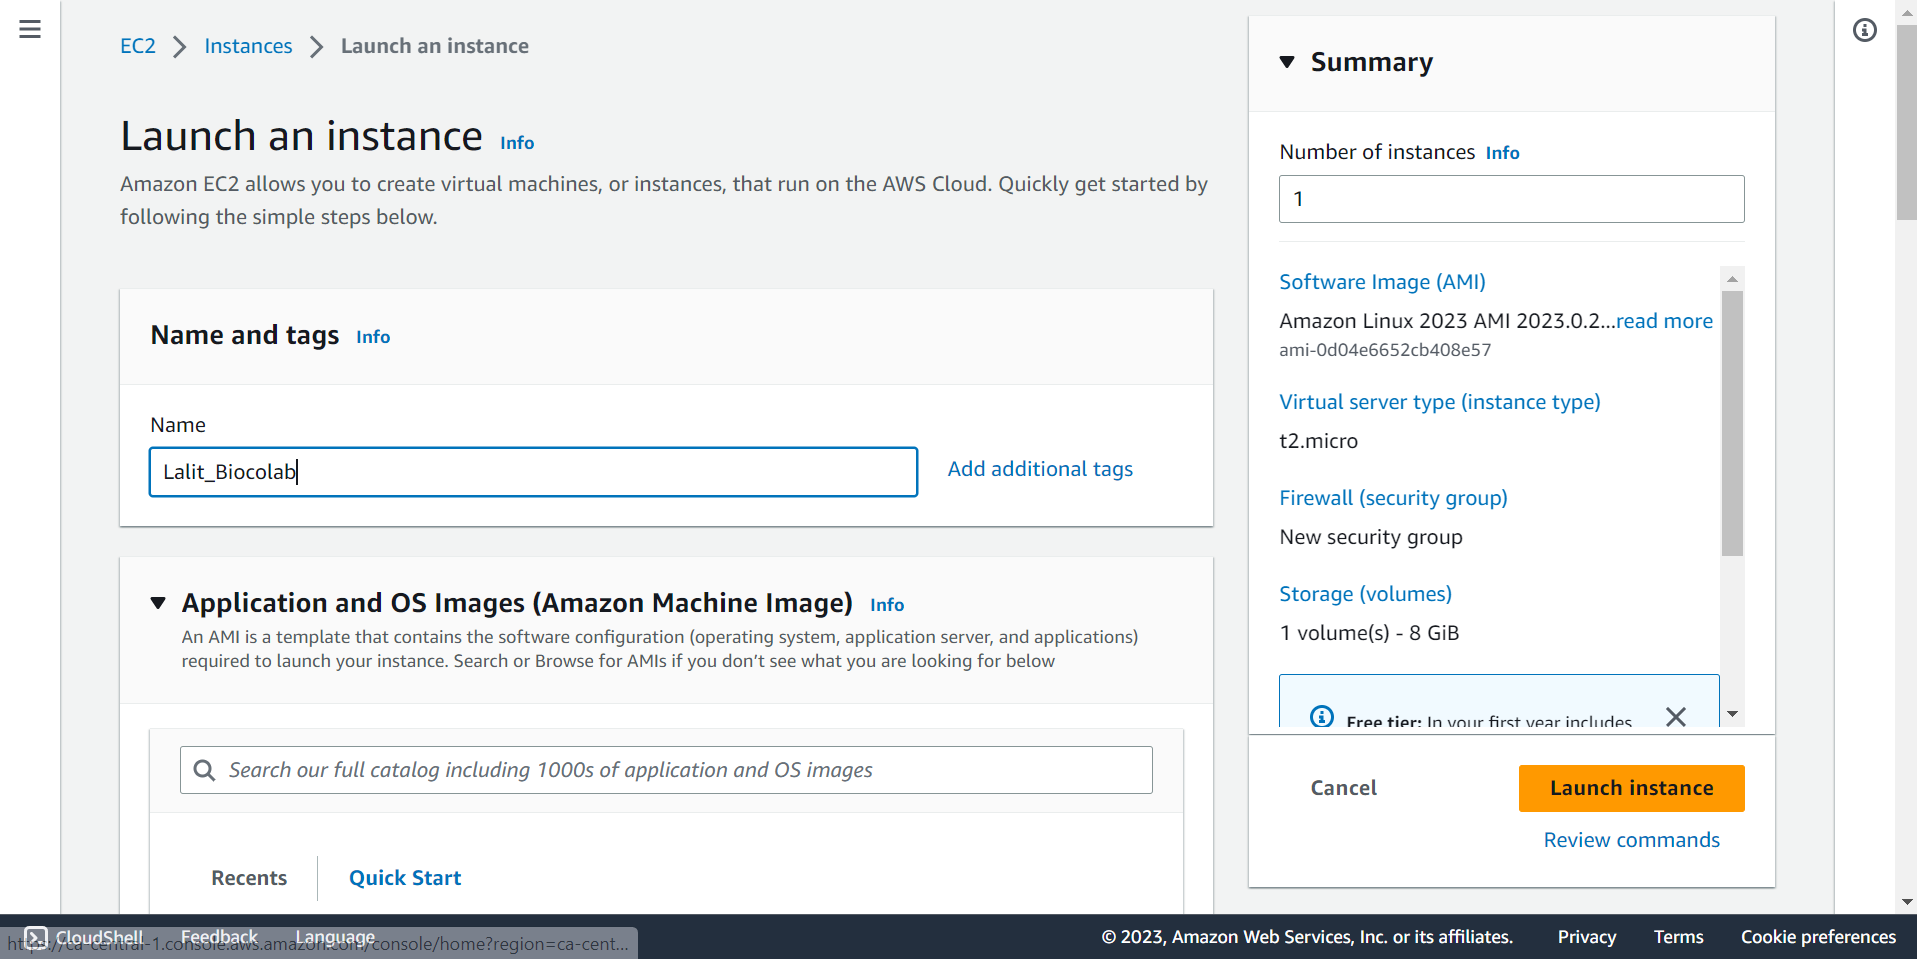
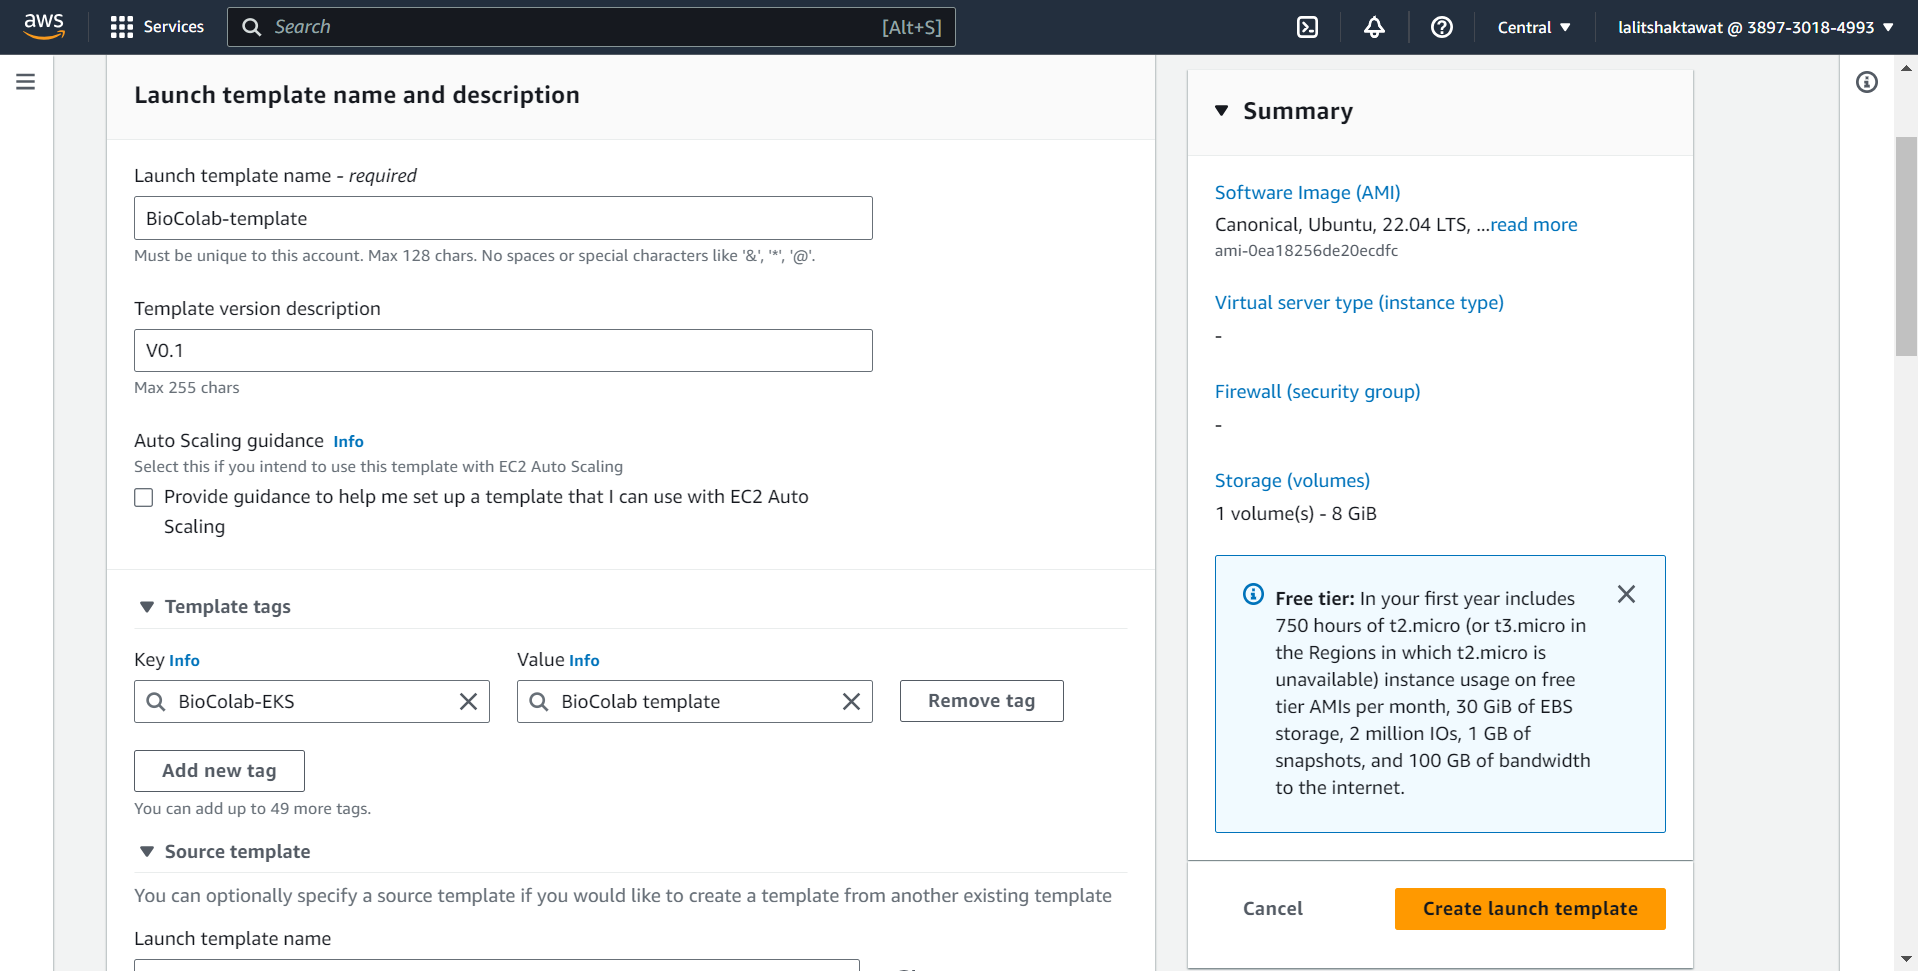
🔶 Type name of instance.
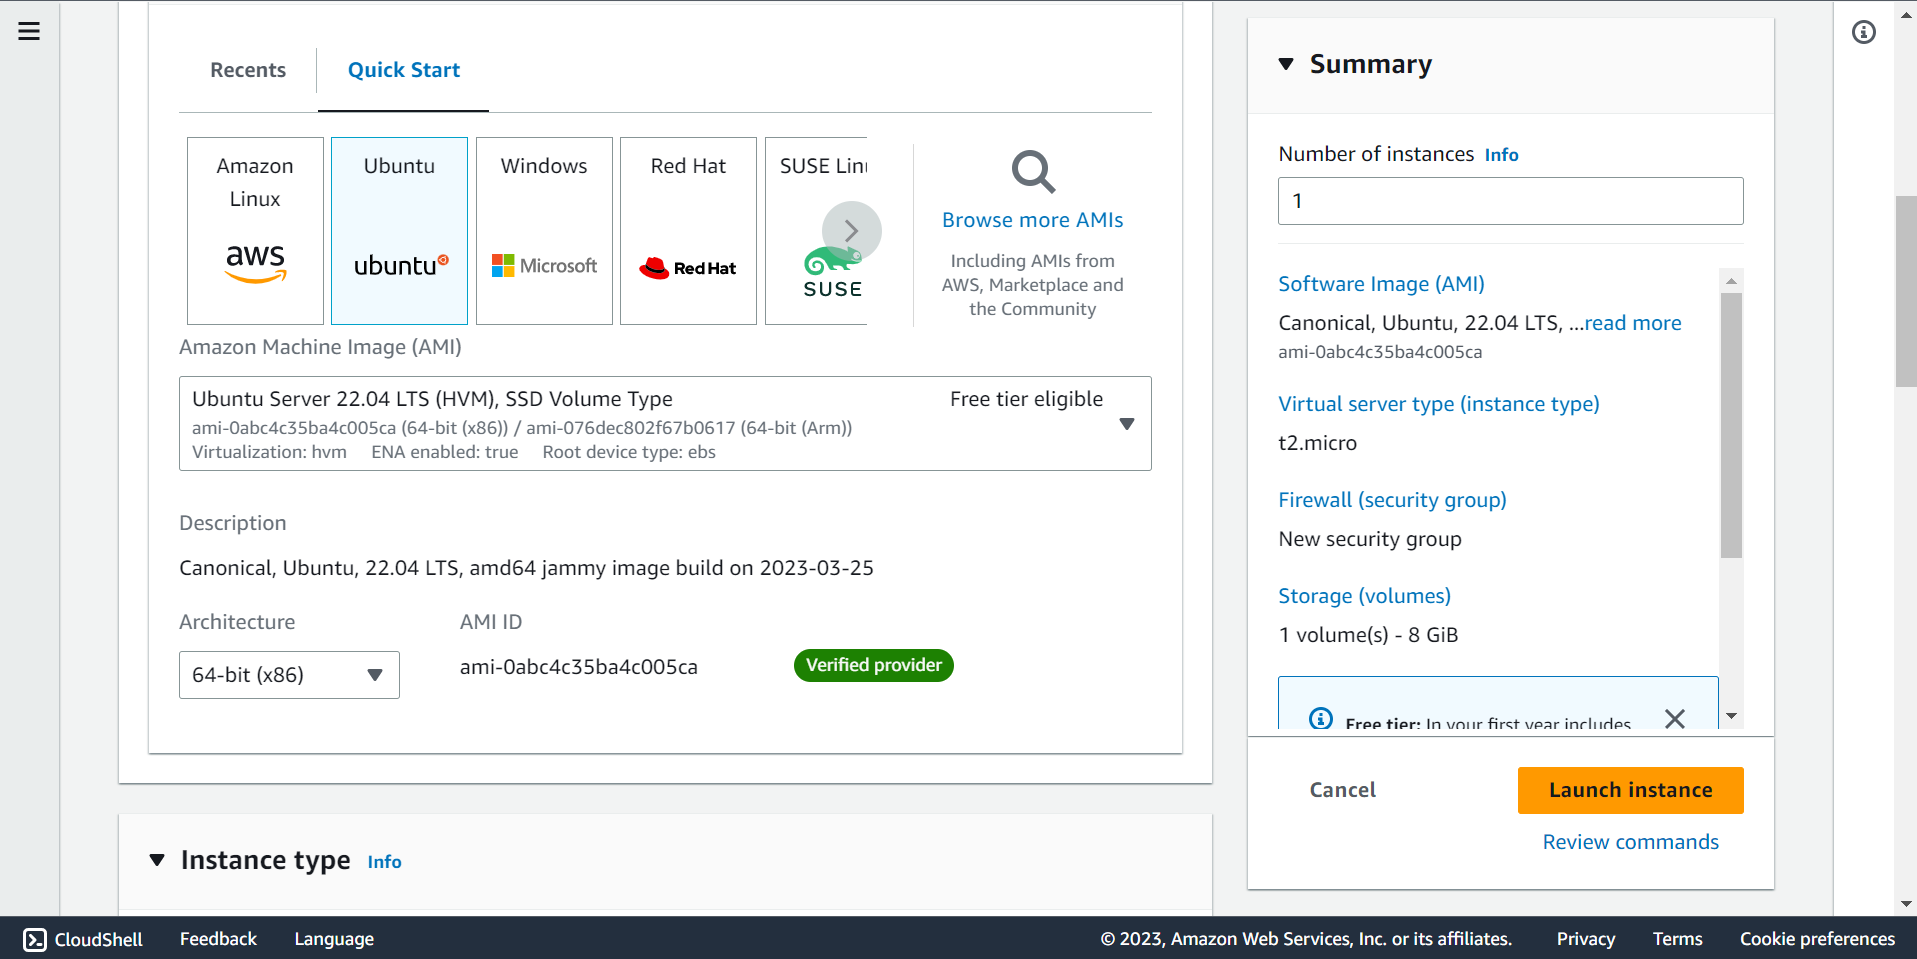
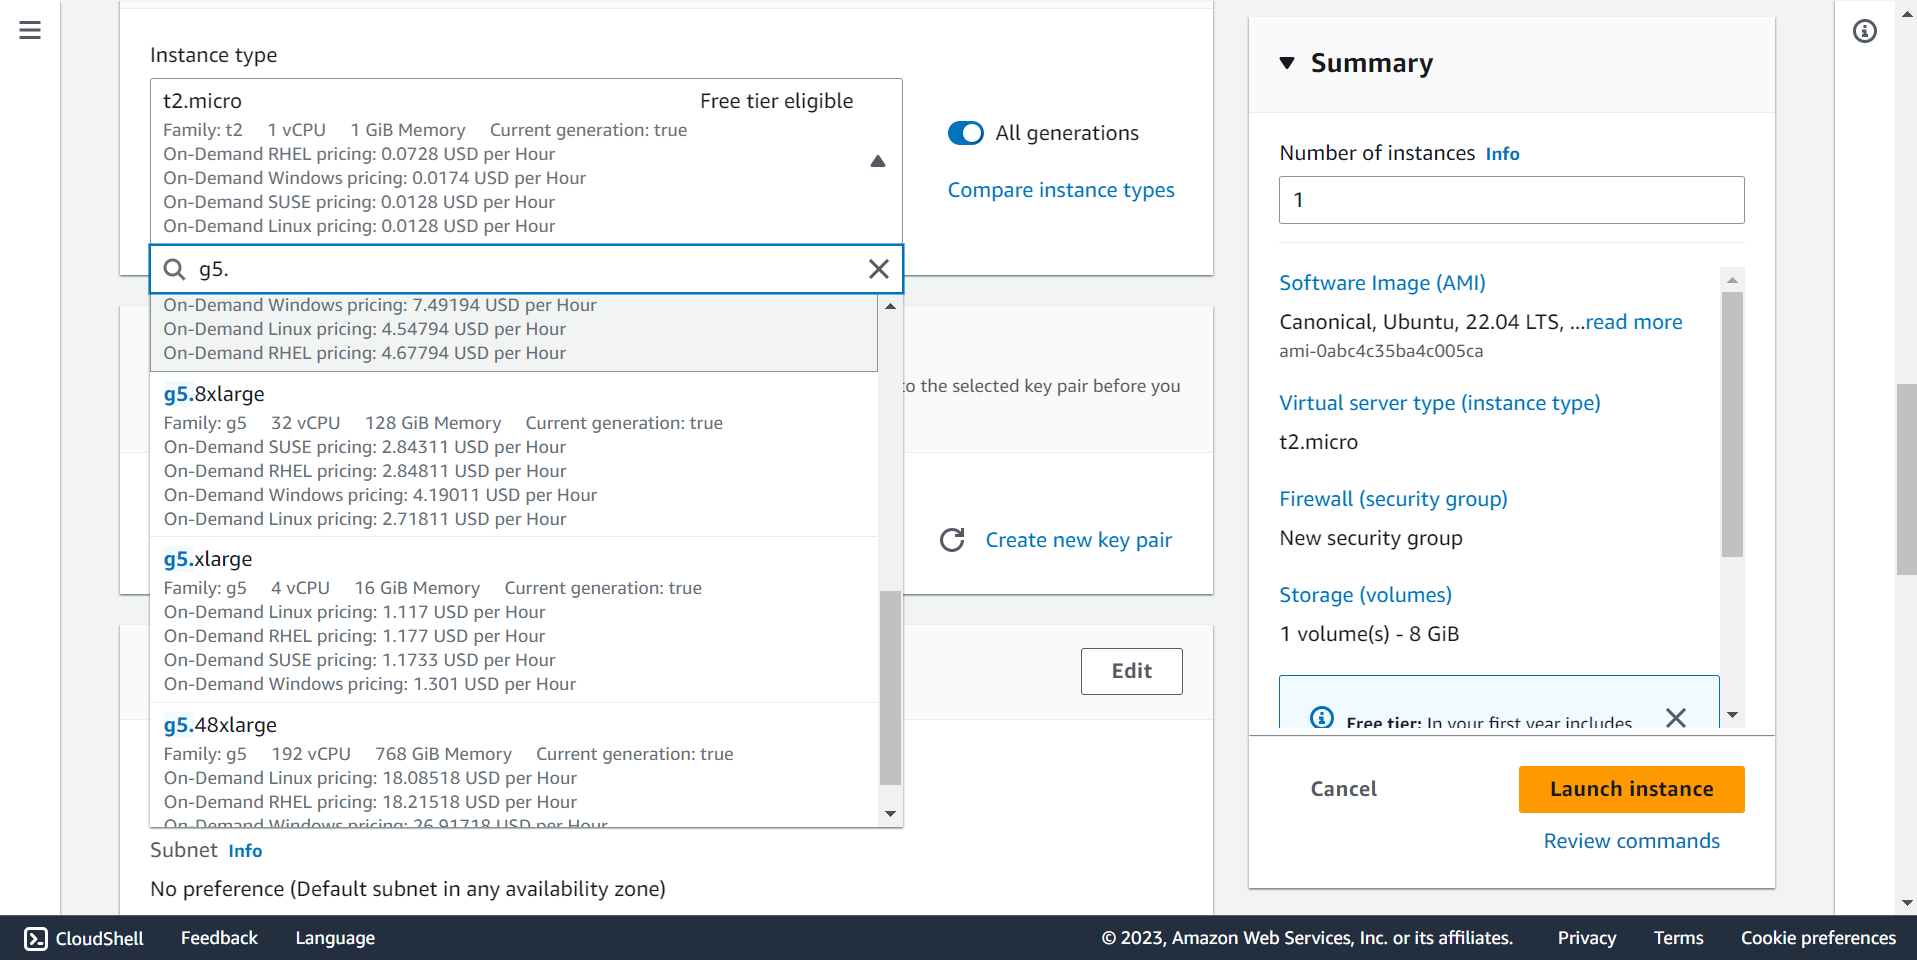
🔶 Select Operating System. Here, We are selecting ubuntu.
🔶 Select g5.8xlarge instance.
🔍 Select instance type based on your requirements.
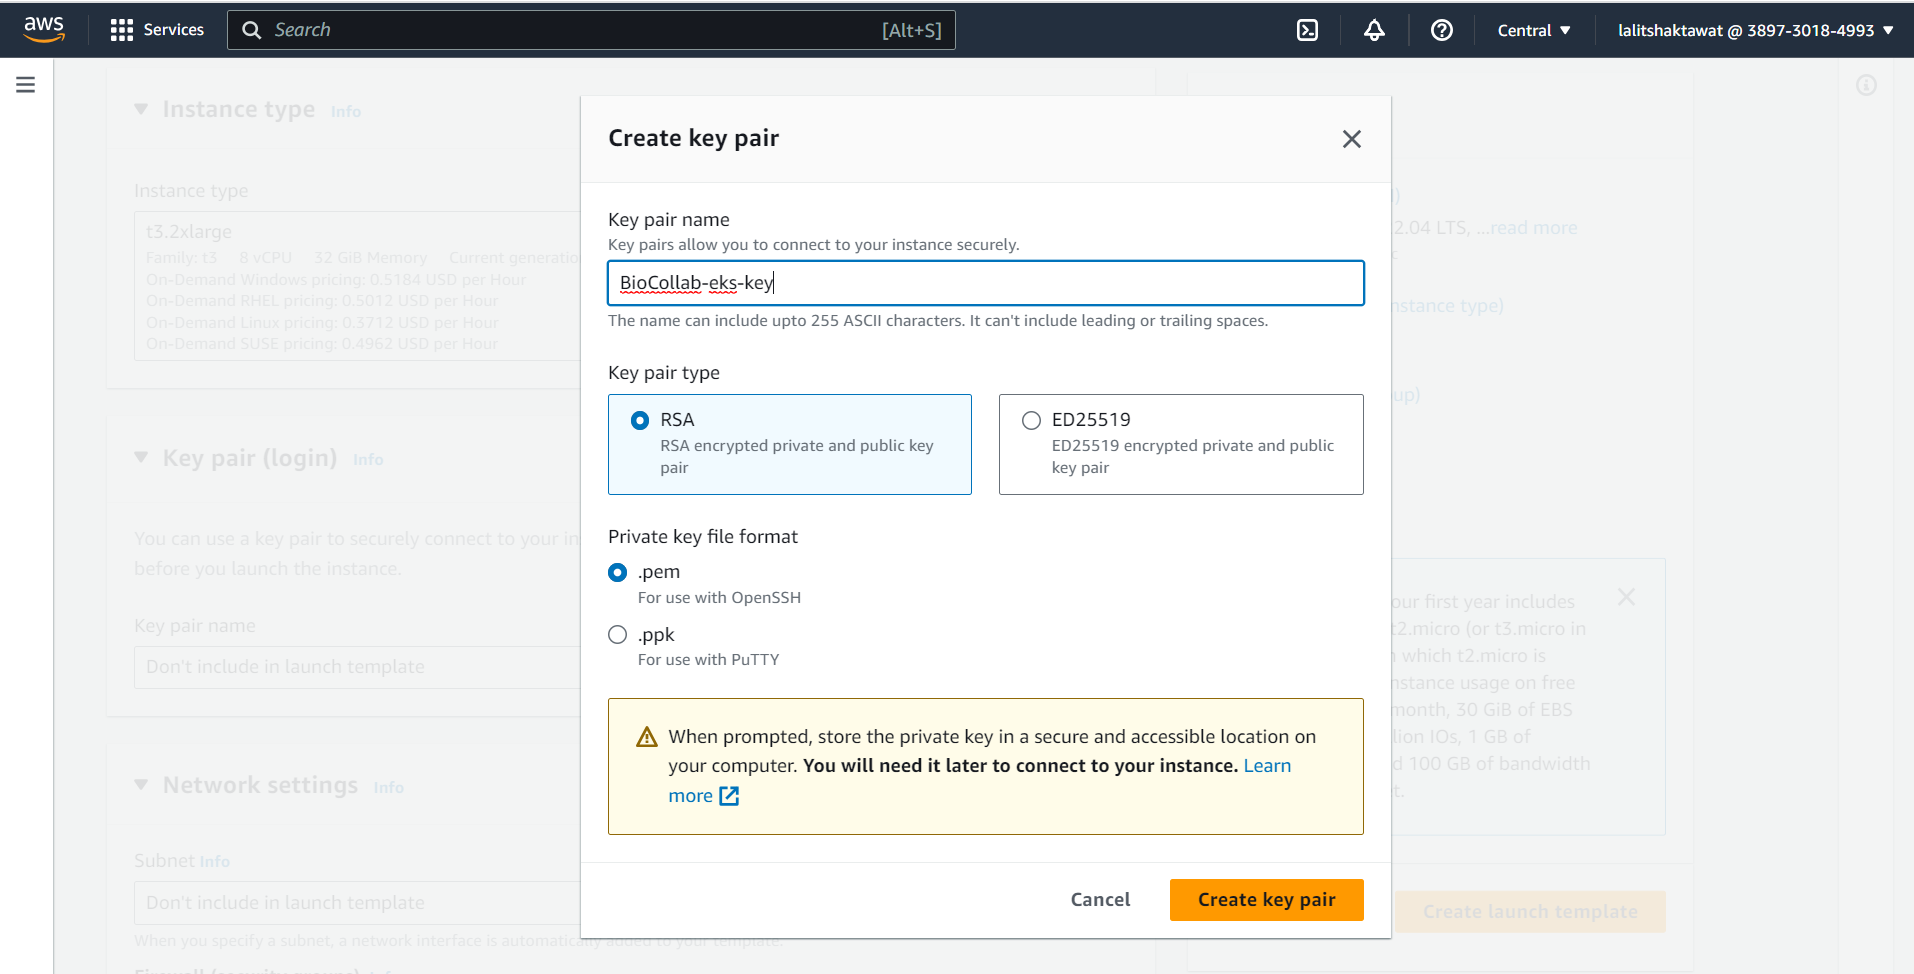
🔶 Create a Keypair to connect to ec2 instance. Type Key pair name and Click on Create key pair.
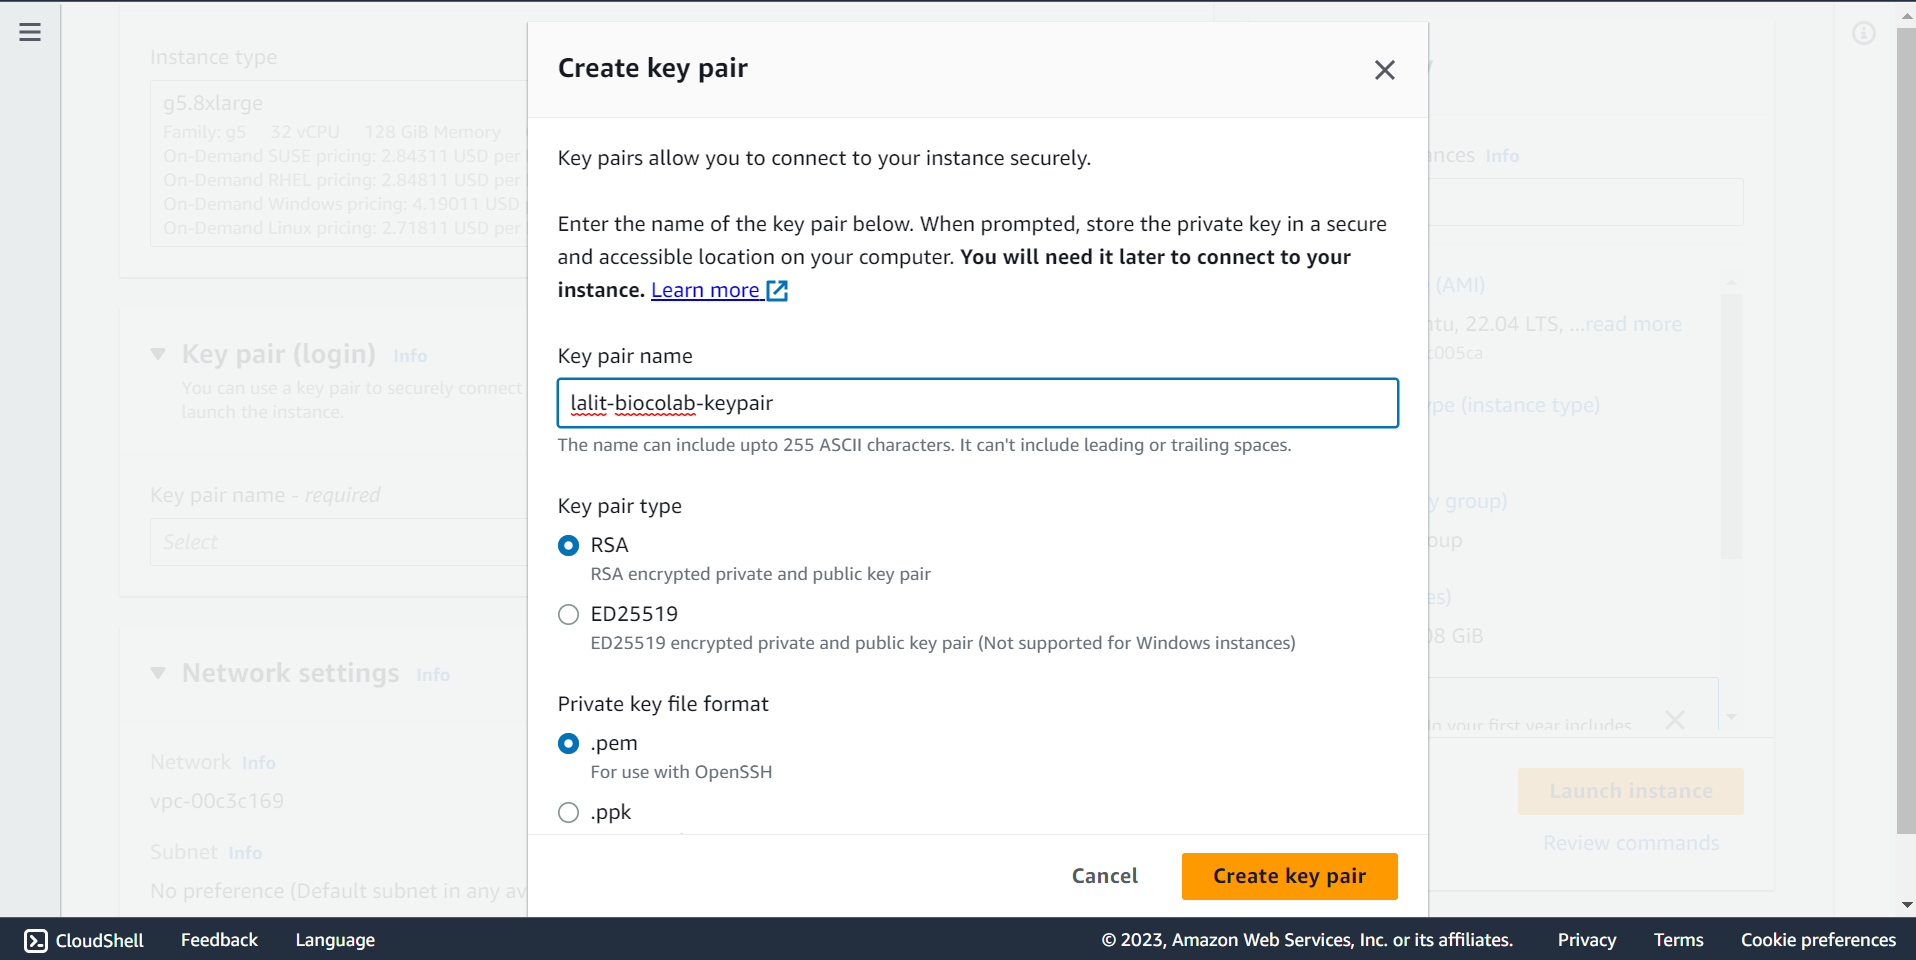
🔶 Key pair will download.

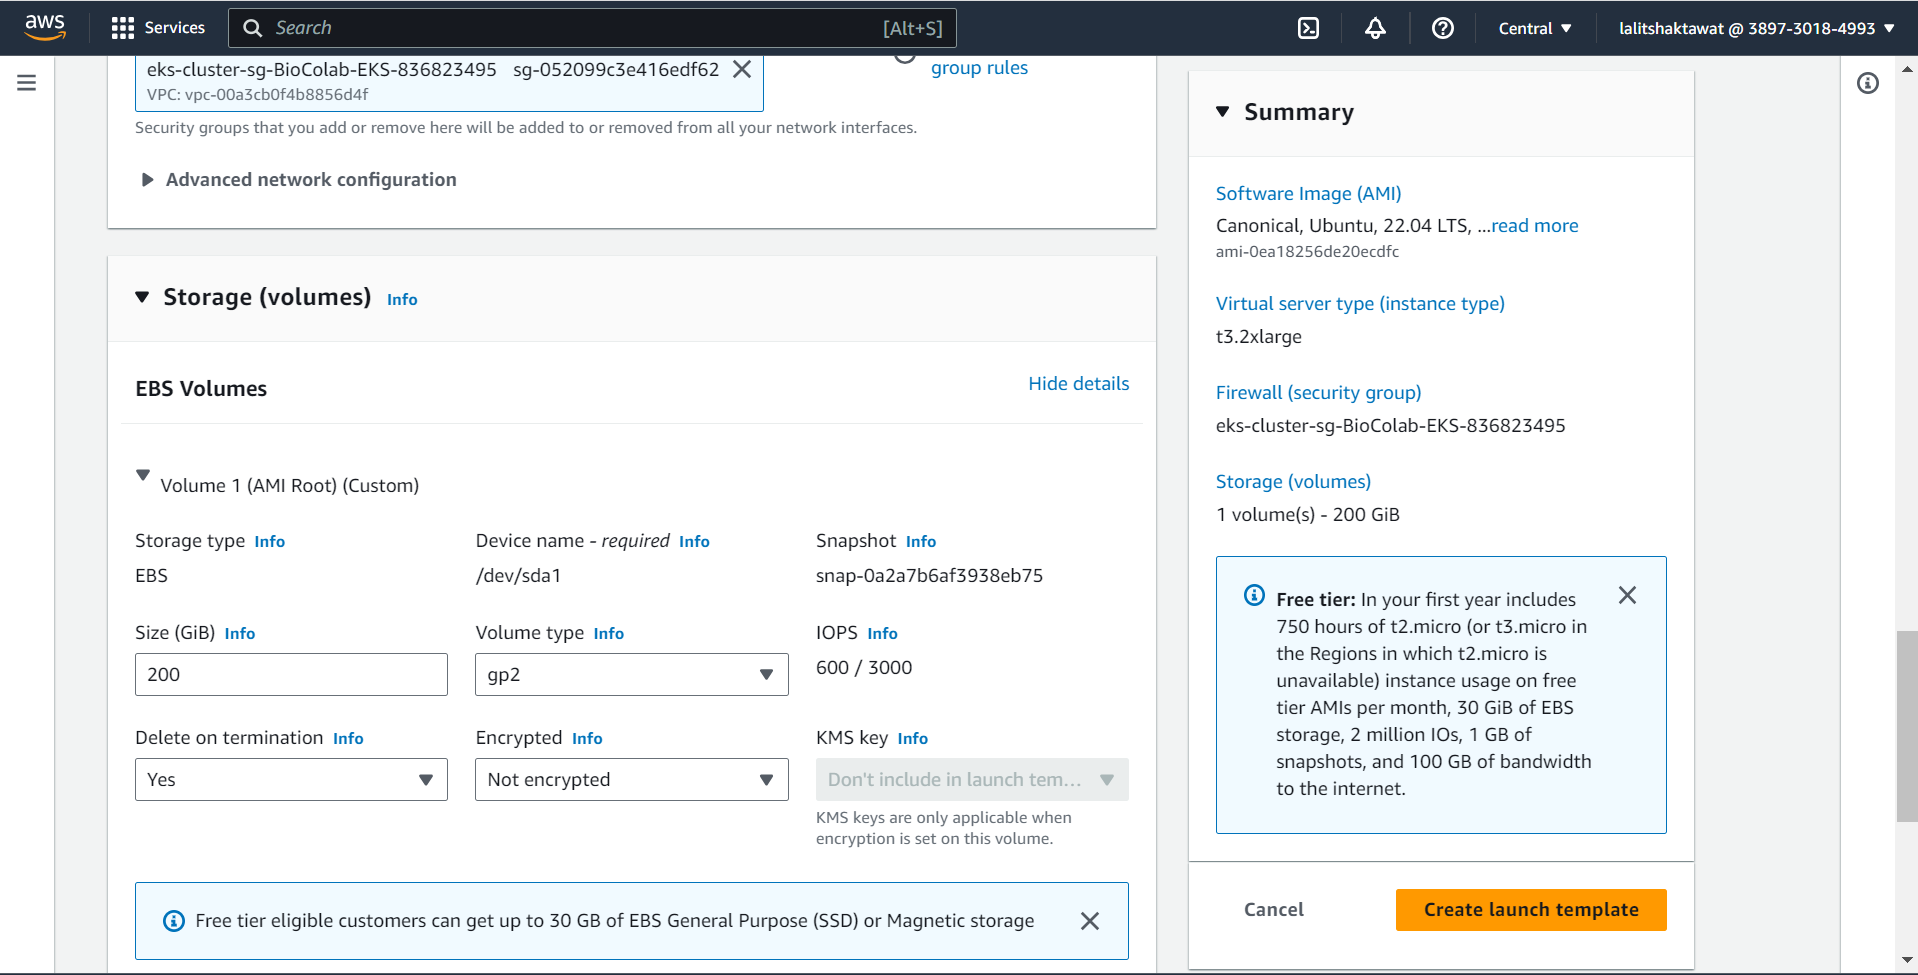
🔶 On the Network settings select correct VPC and Subnet ID
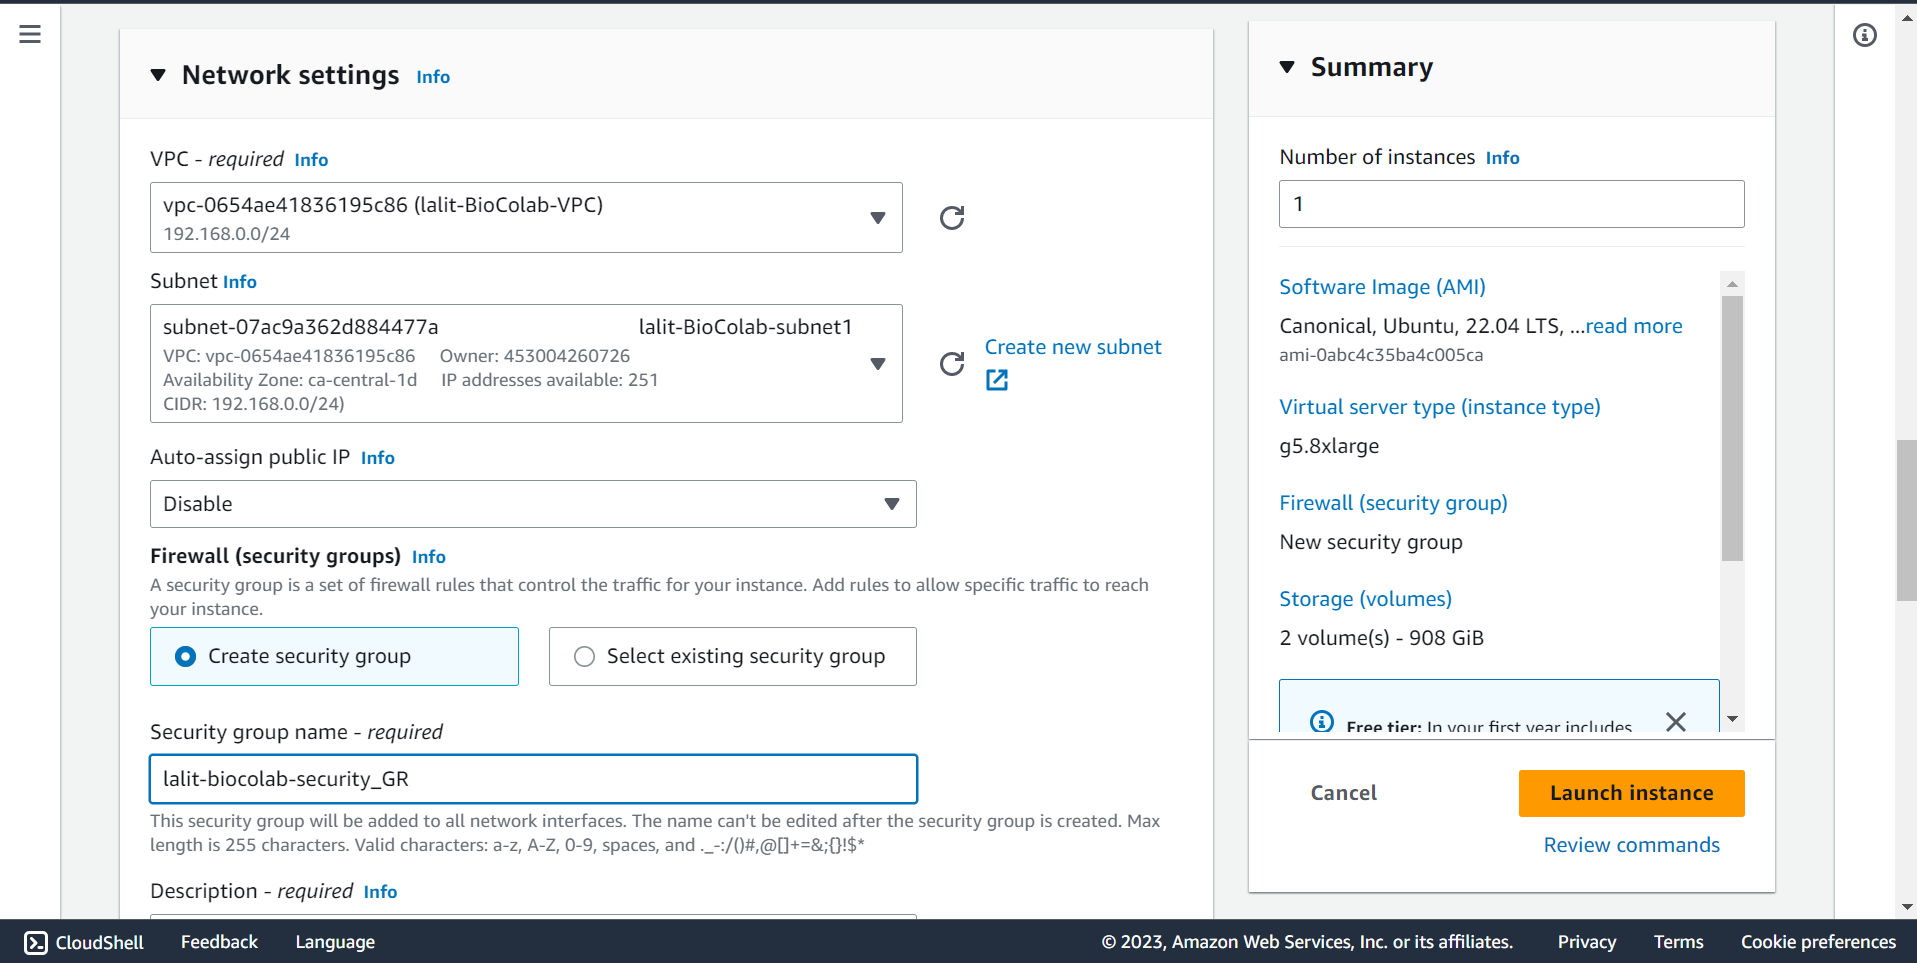
🔶 On the firewall (Security groups) section. Create new security group by giving appropriate name.
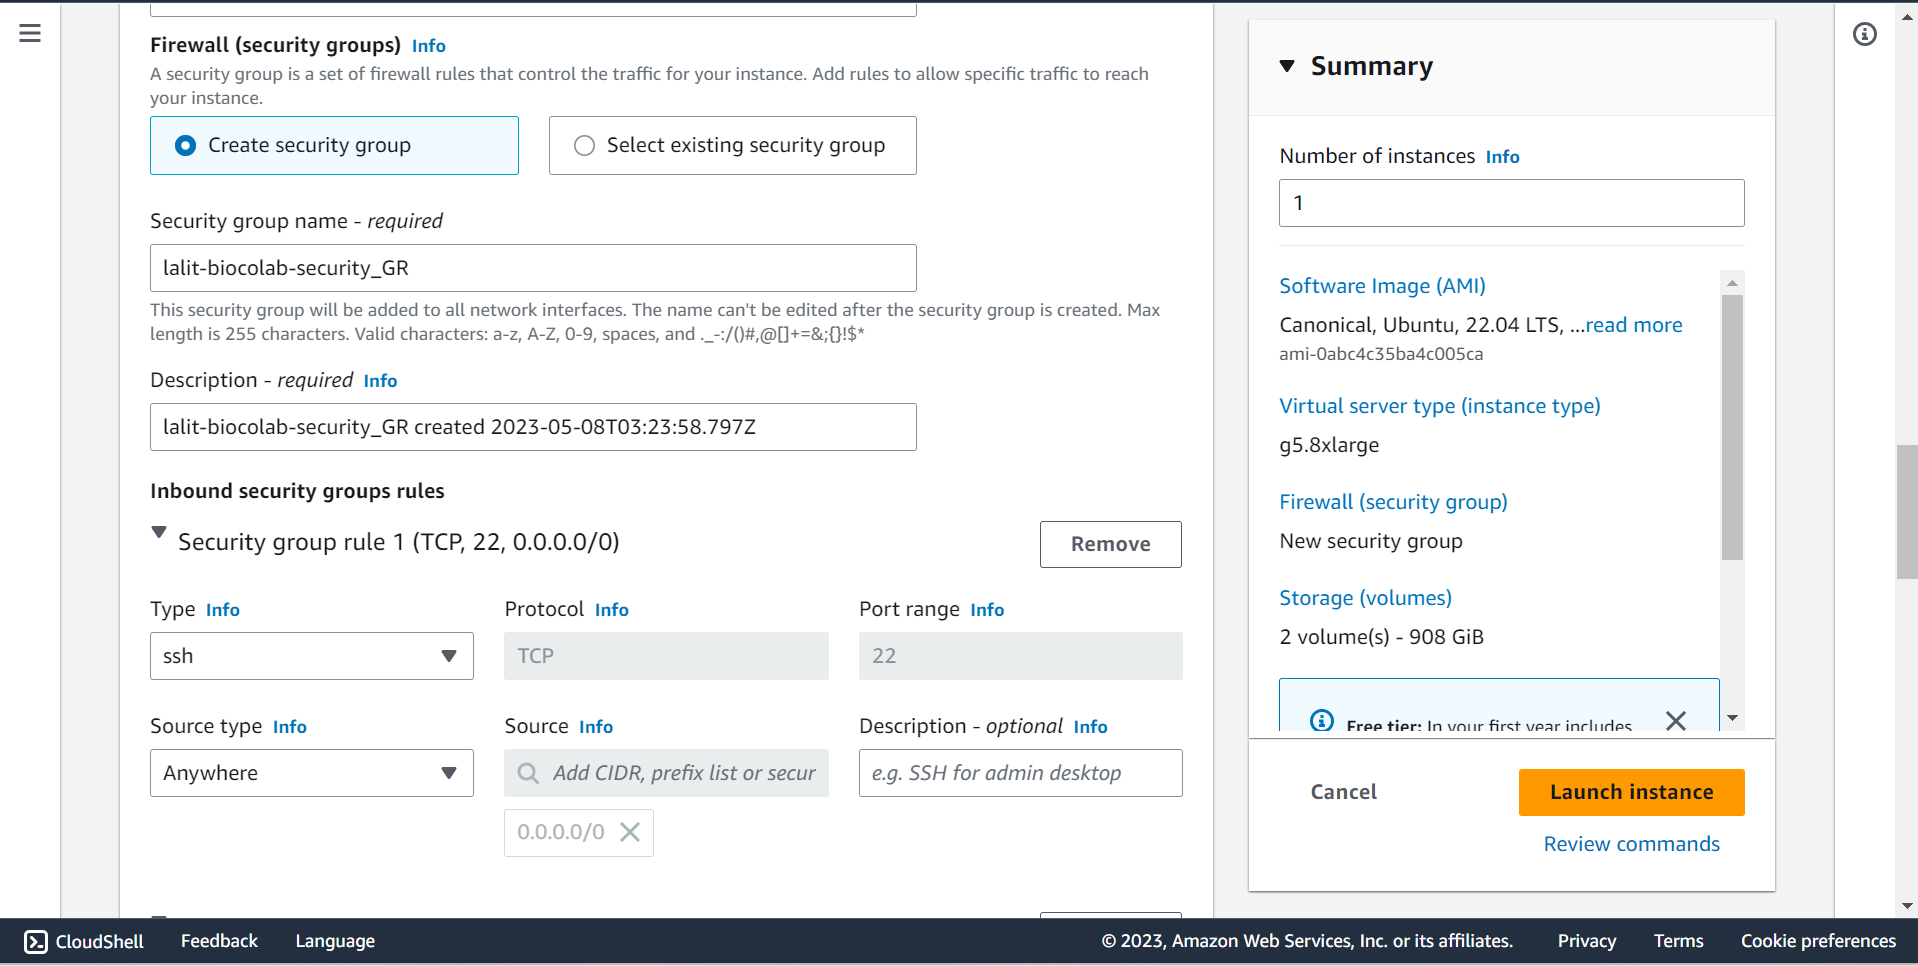
🔶 Allow SSH , HTTP and HTTPS. Source will be 0.0.0.0/0.
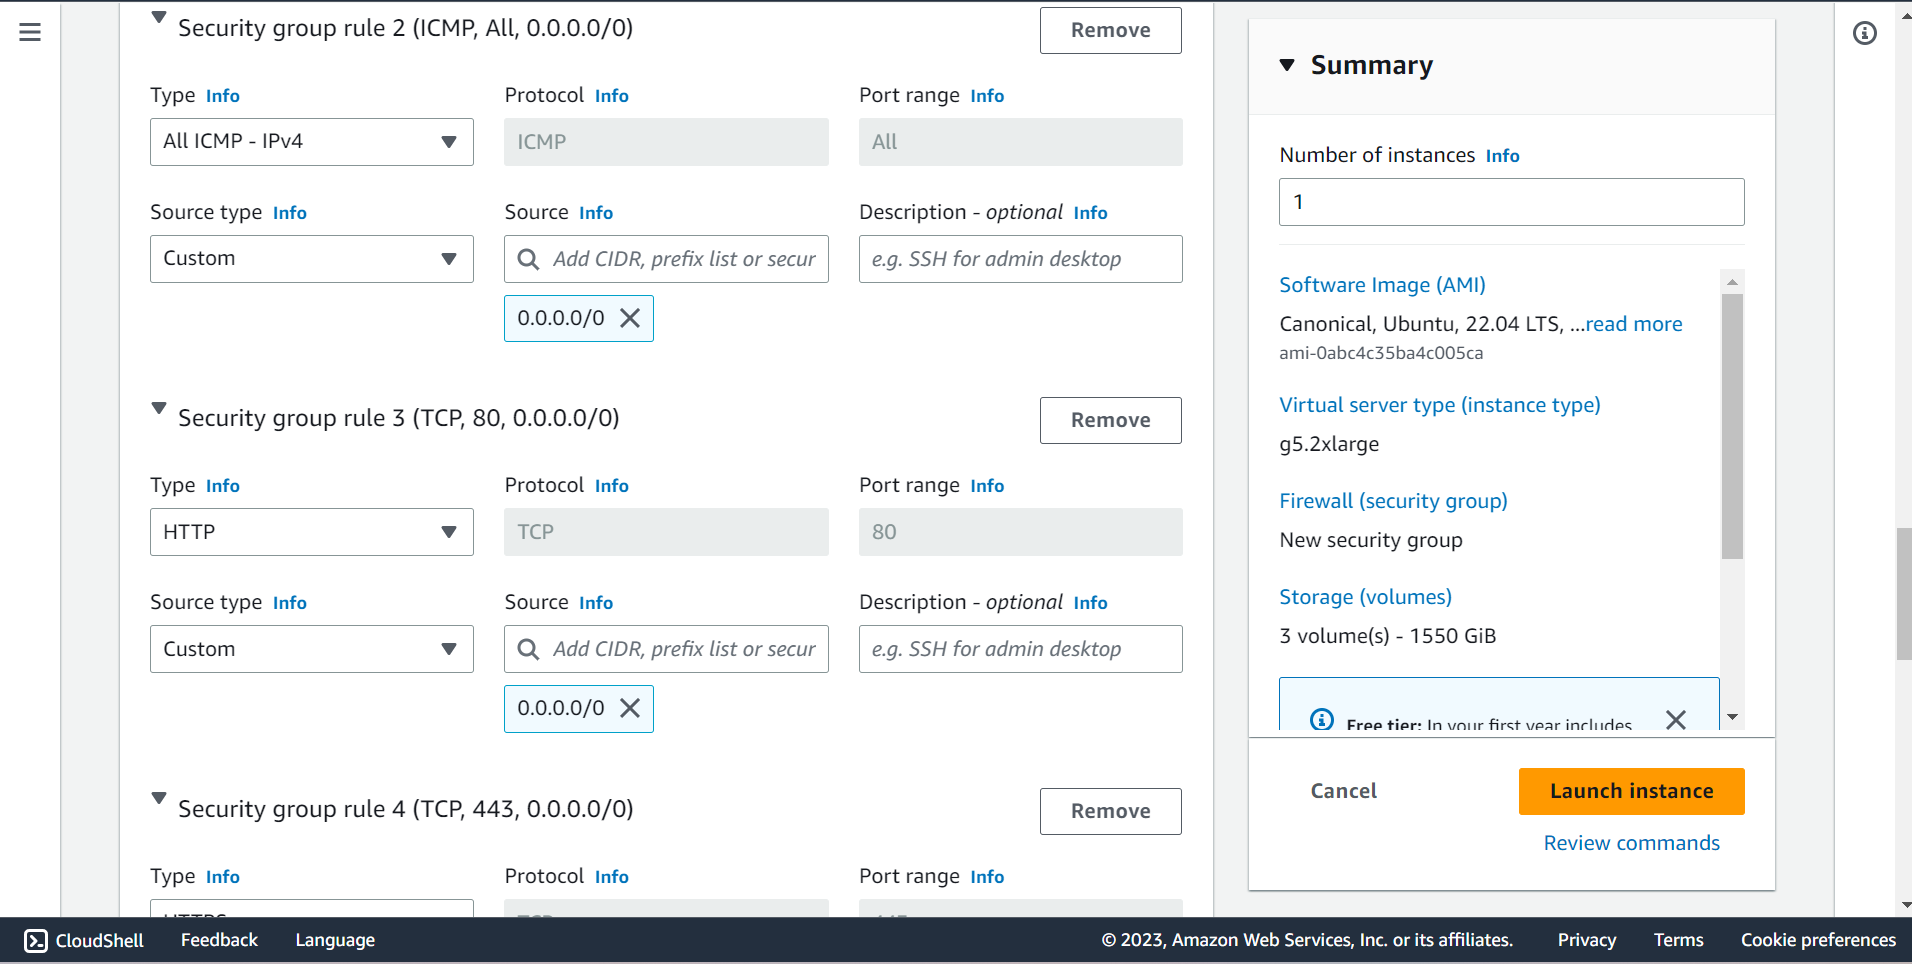
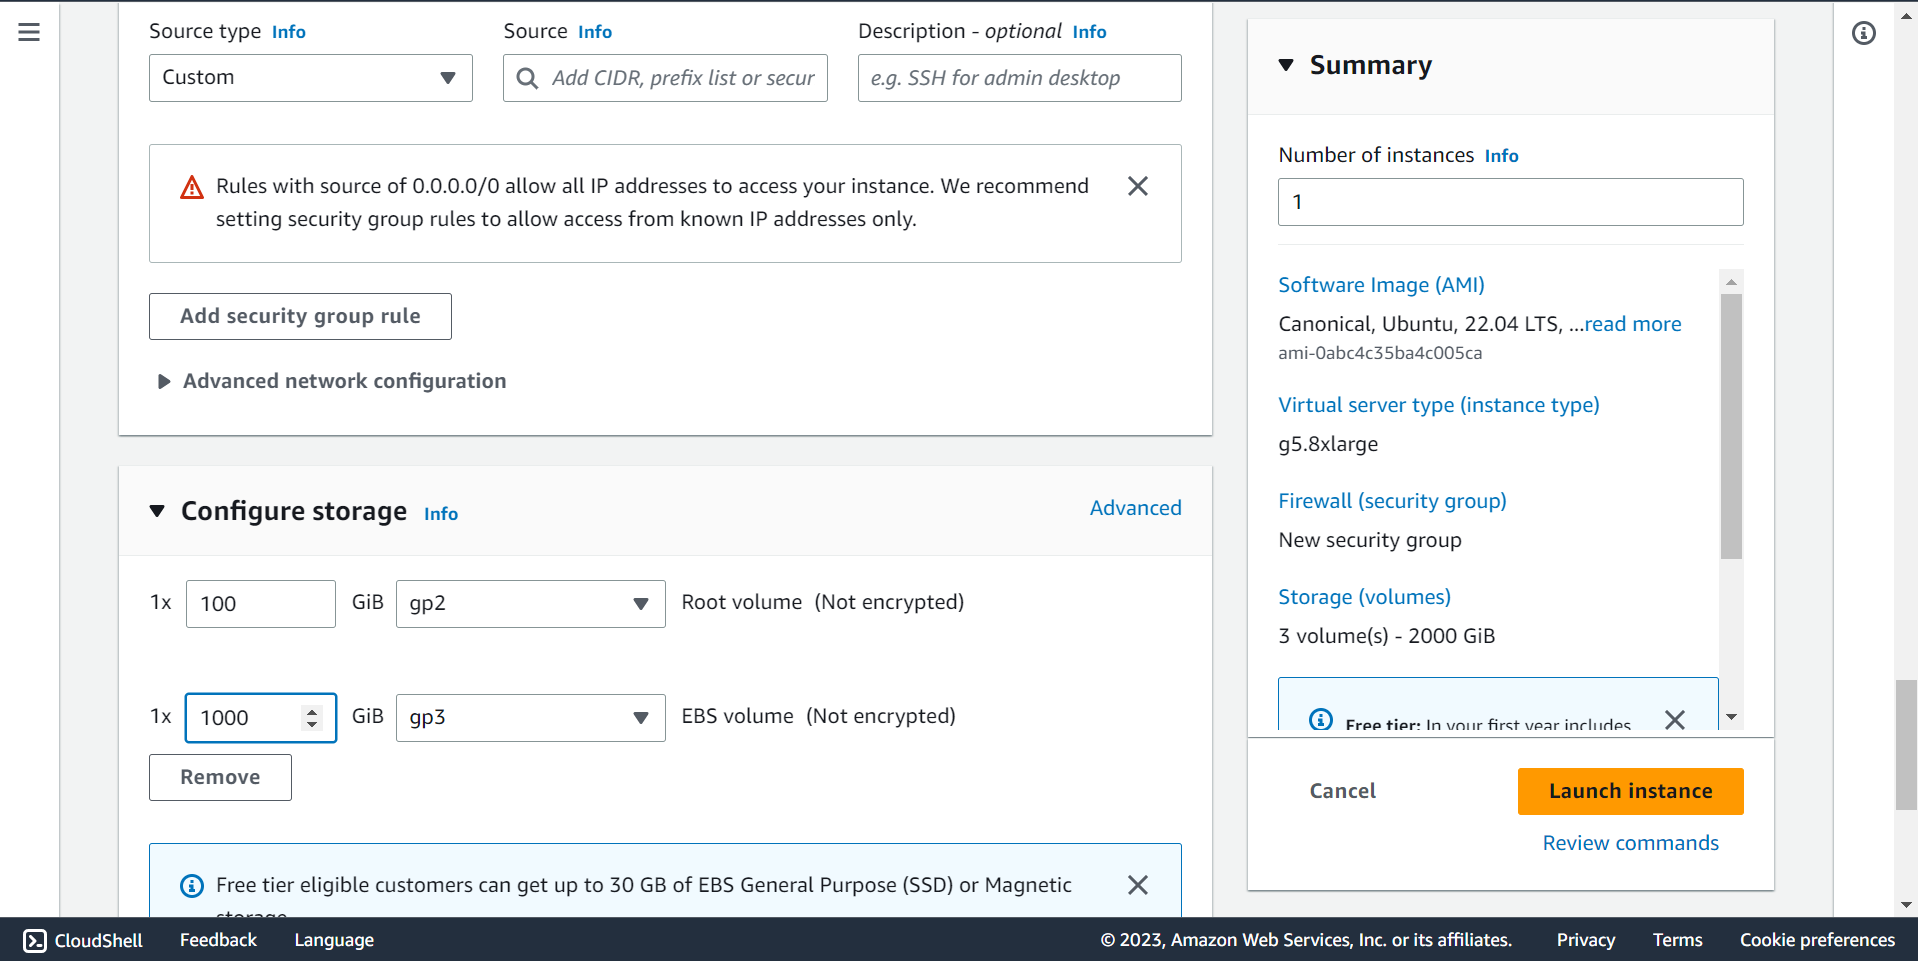
⭕ Configure Storage
🔶 Root Volume is 100GB
🔶 EBS Volume is 1000GB ~ 1TB
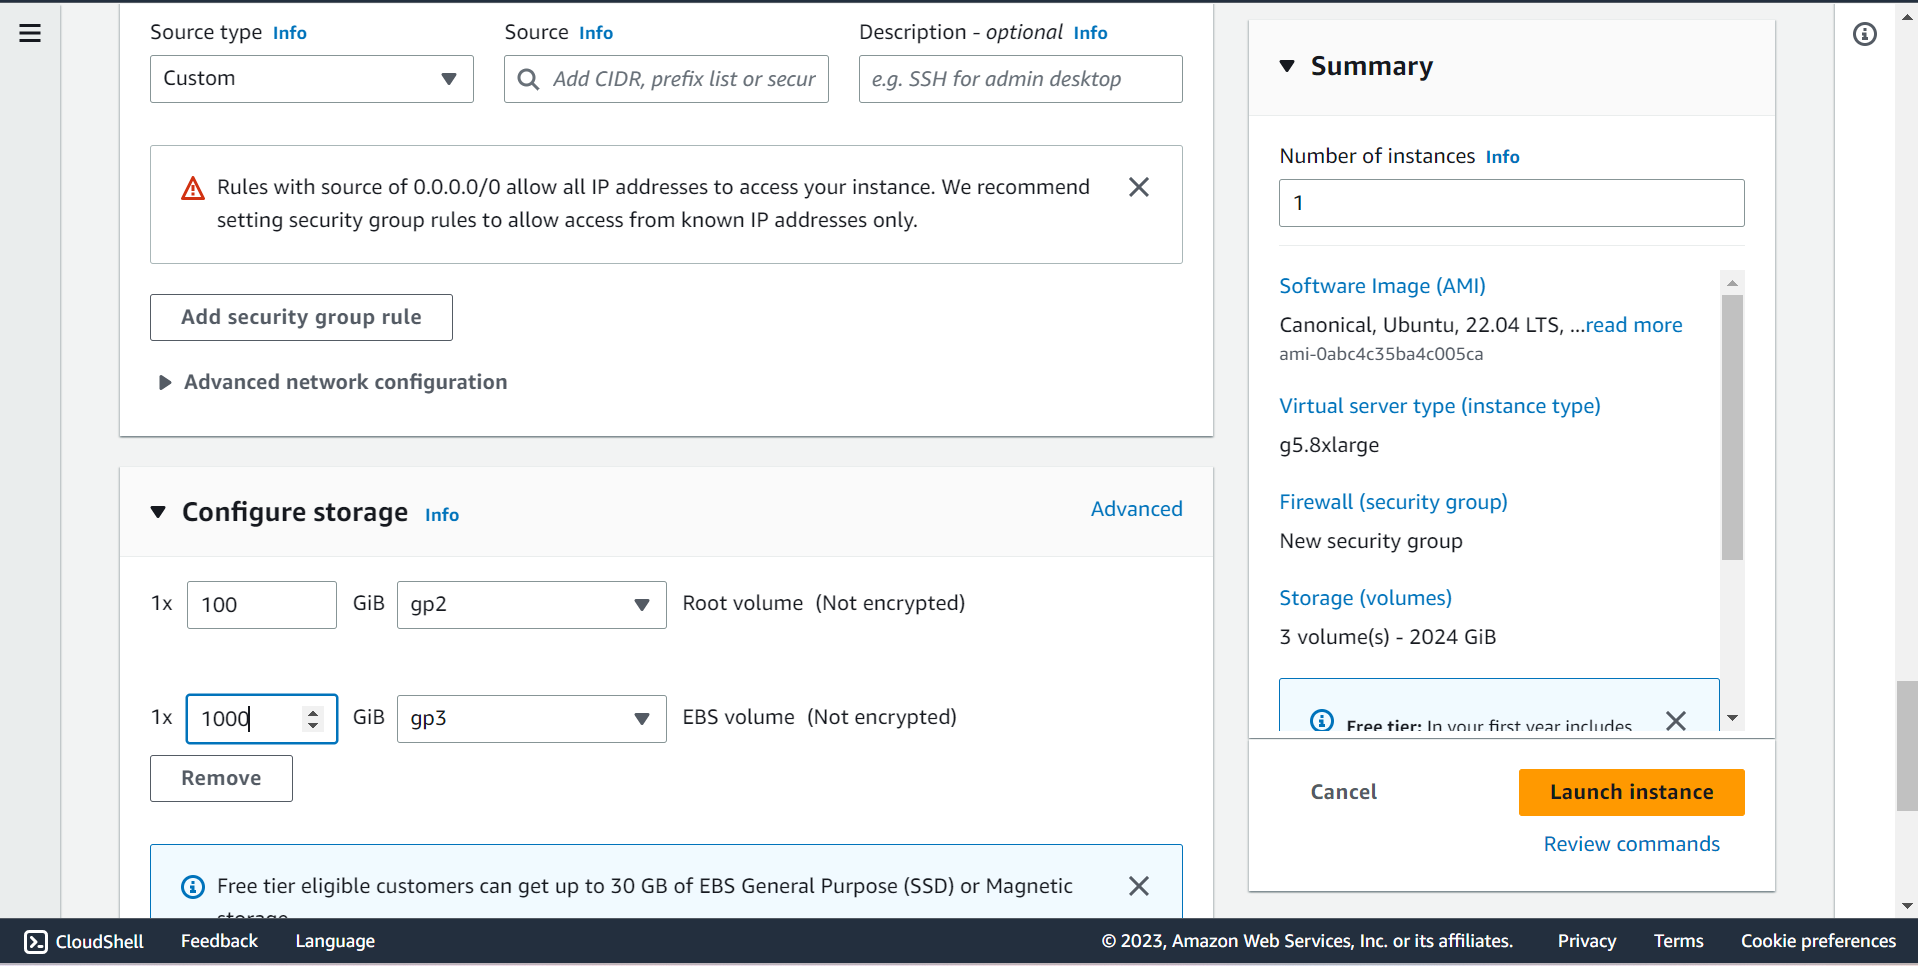
🔶 Click on Launch instance.
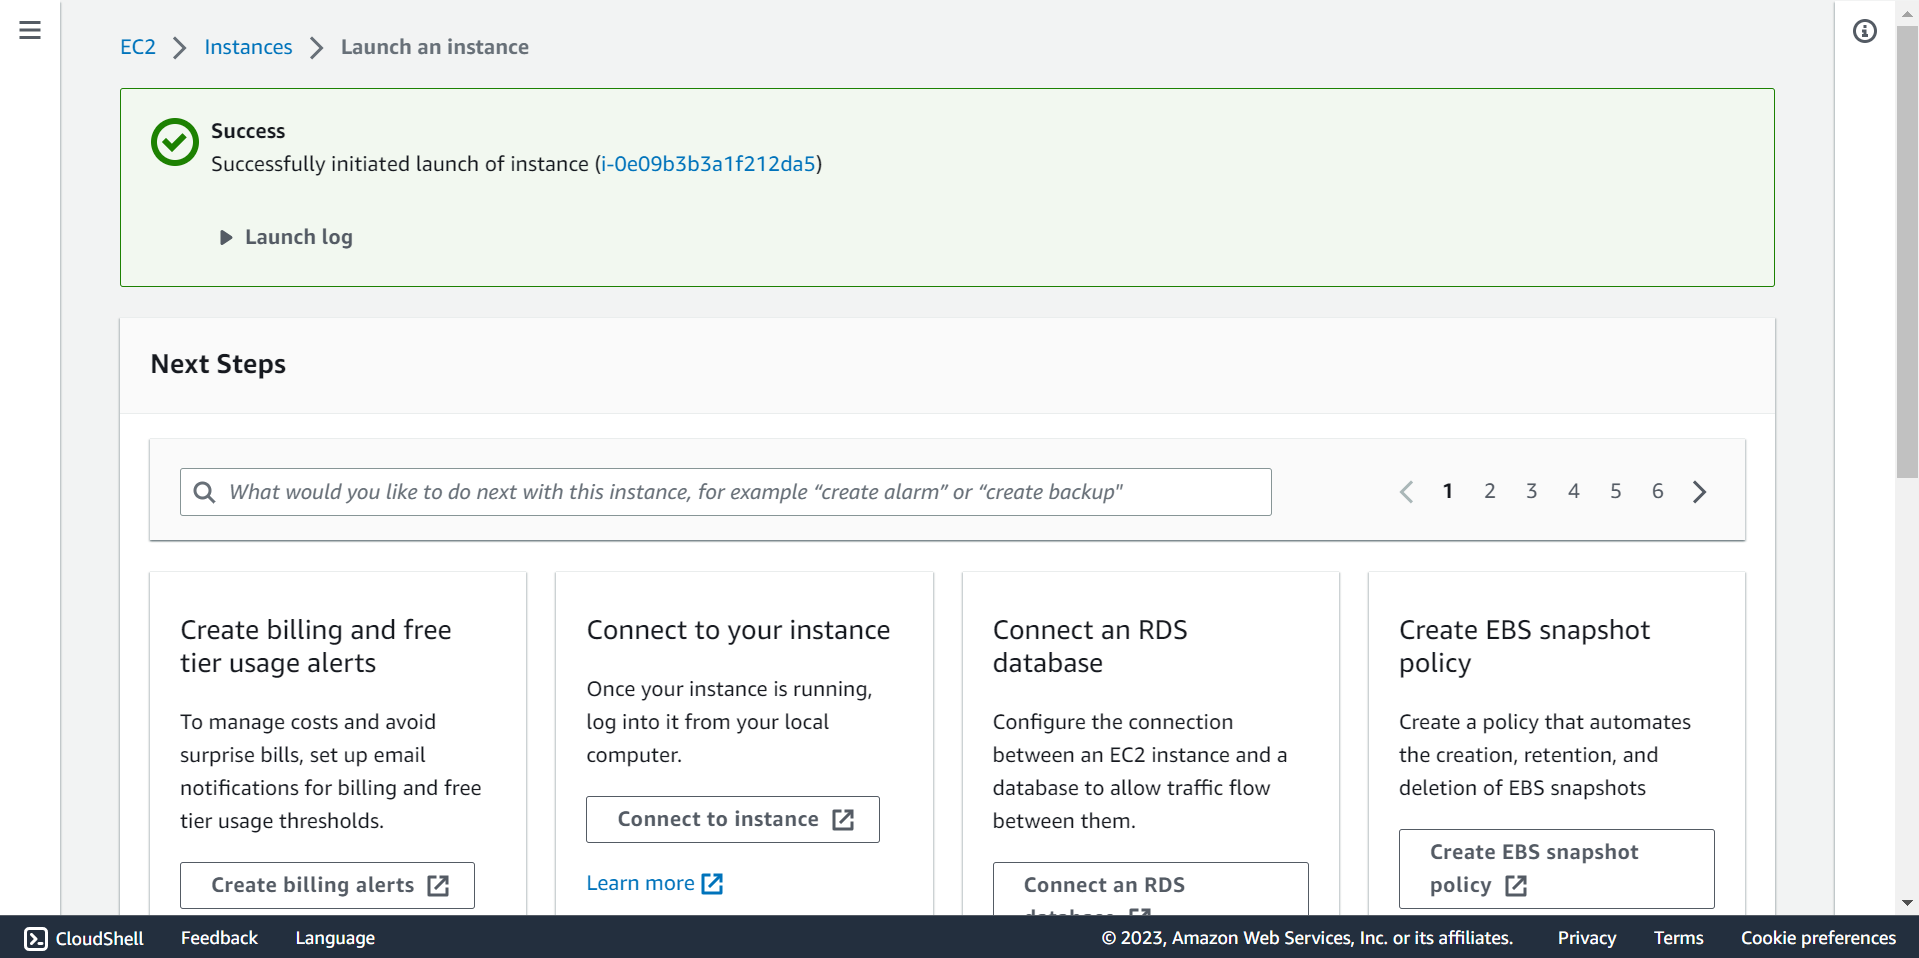
🔶 Instance creation will be in progress.
Assign Elastic IP to instance 
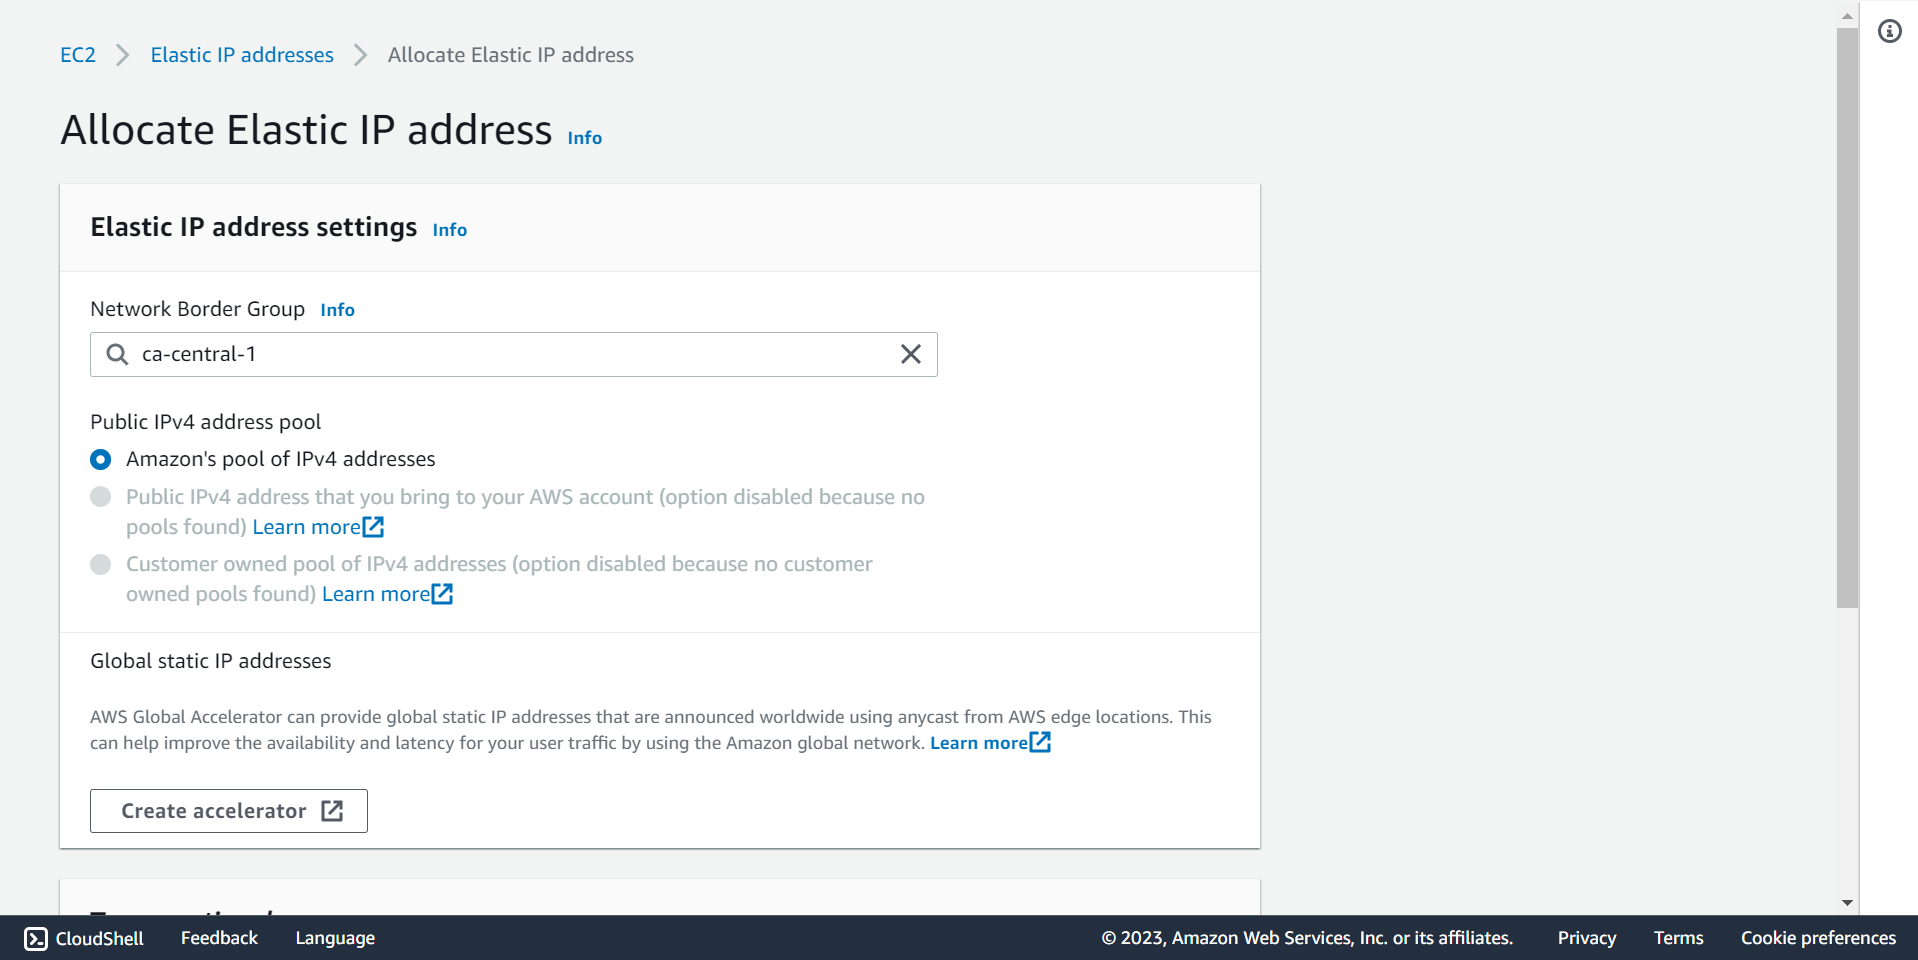
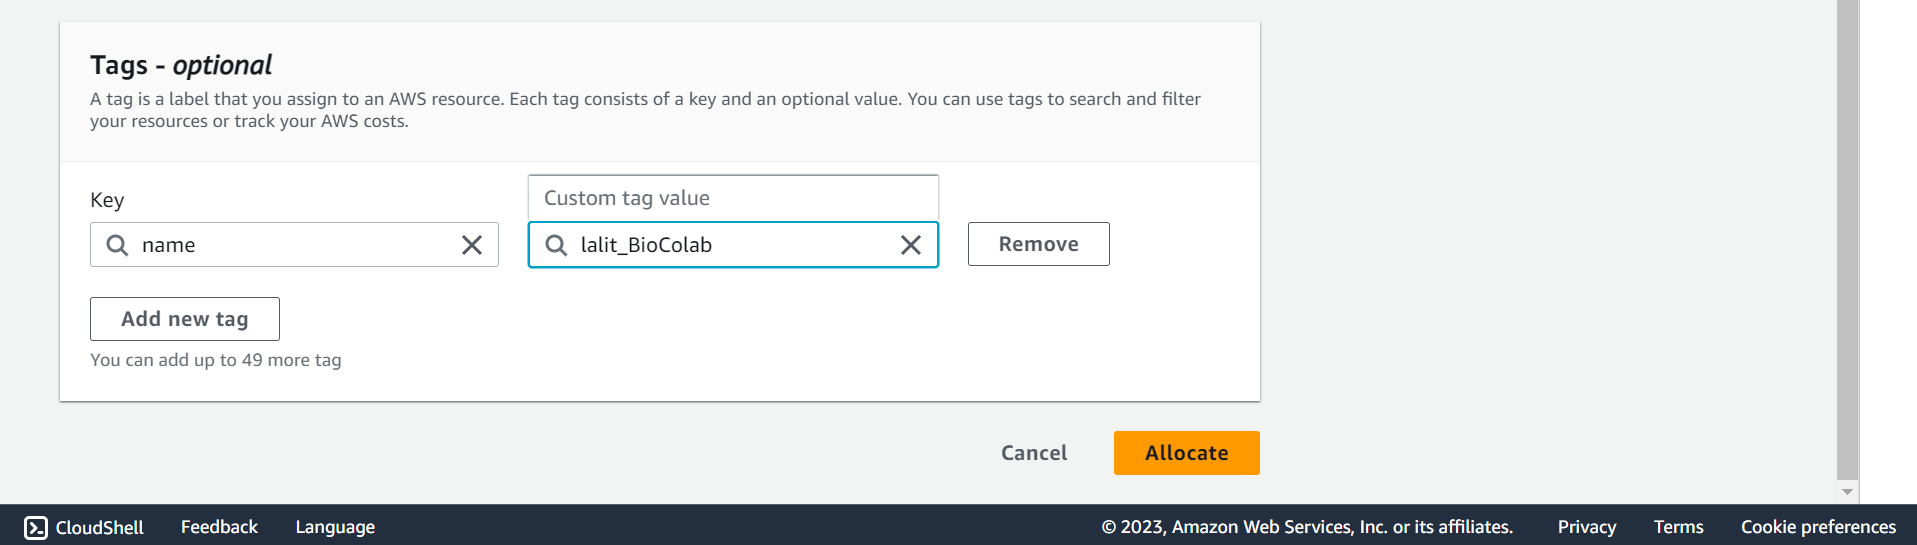
🔶 Click on Elastic IPs and Click on Allocate Elastic IP address.

🔶 Select Network Boarder Group and take Elastic IP address.
🔶 Click on Associate Elastic IP address.
🔶 Select Instance and Private IP address.
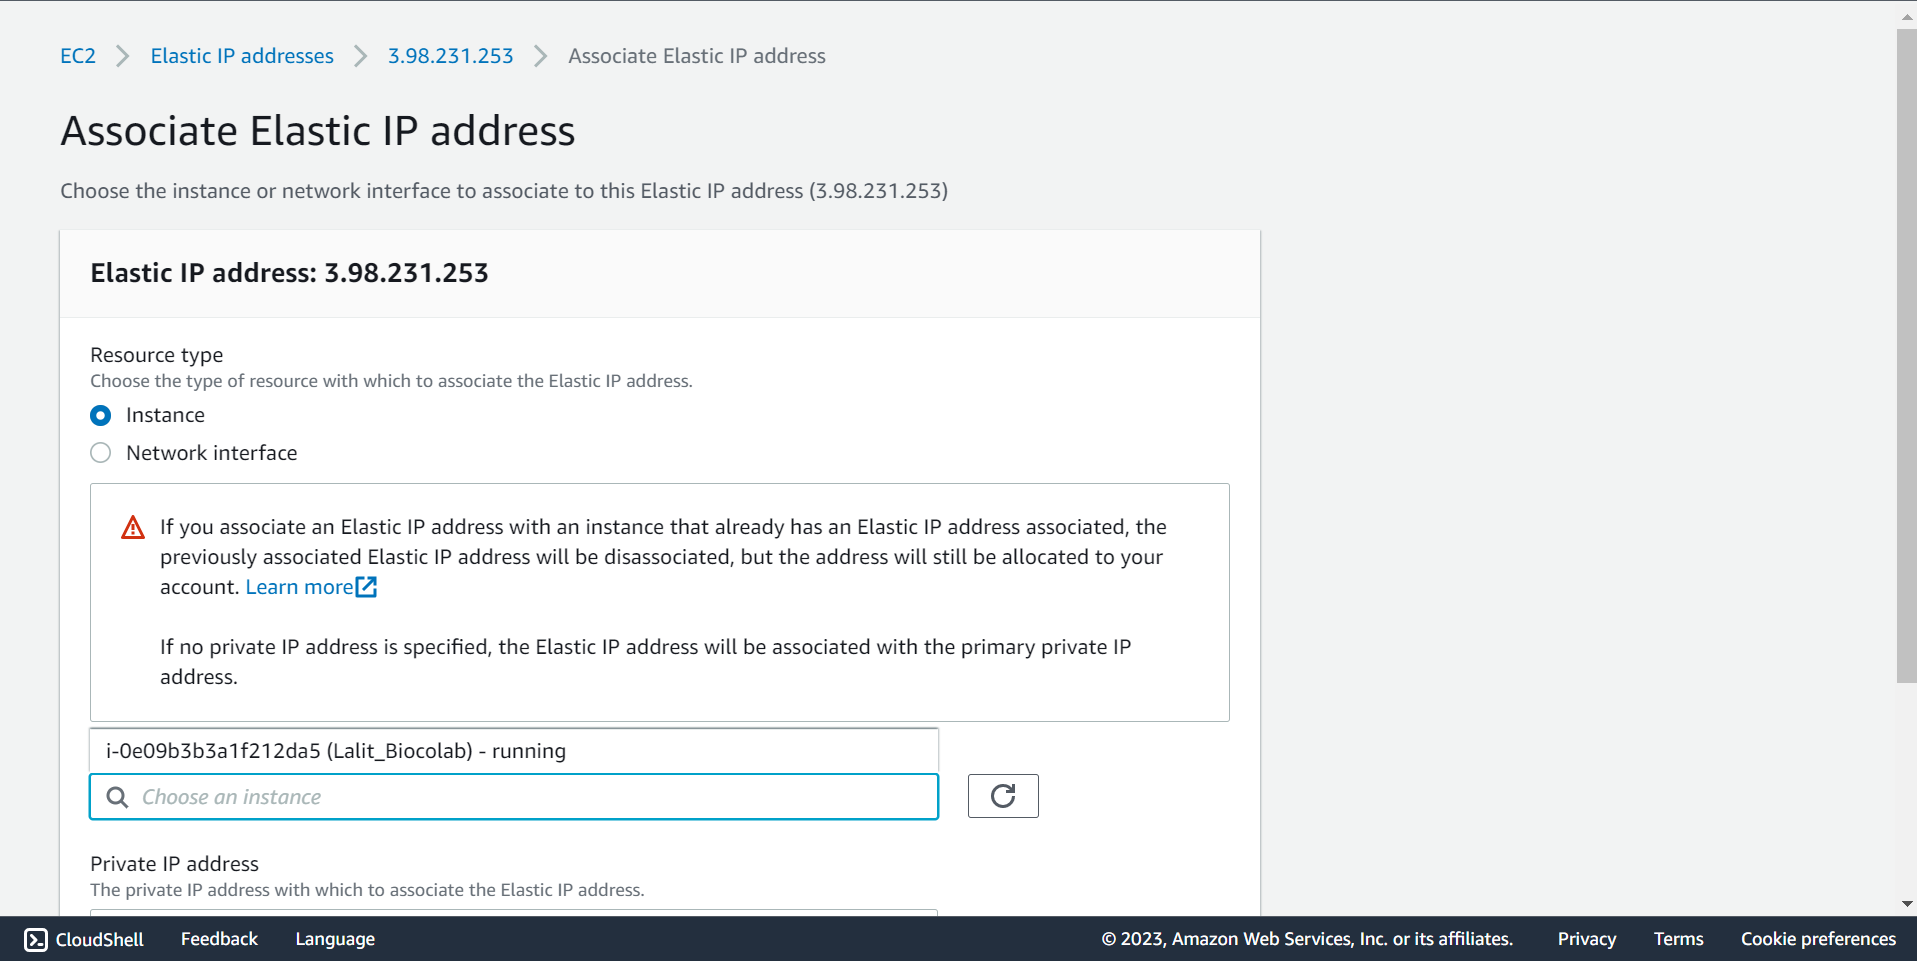
🔶 Click on Associate.
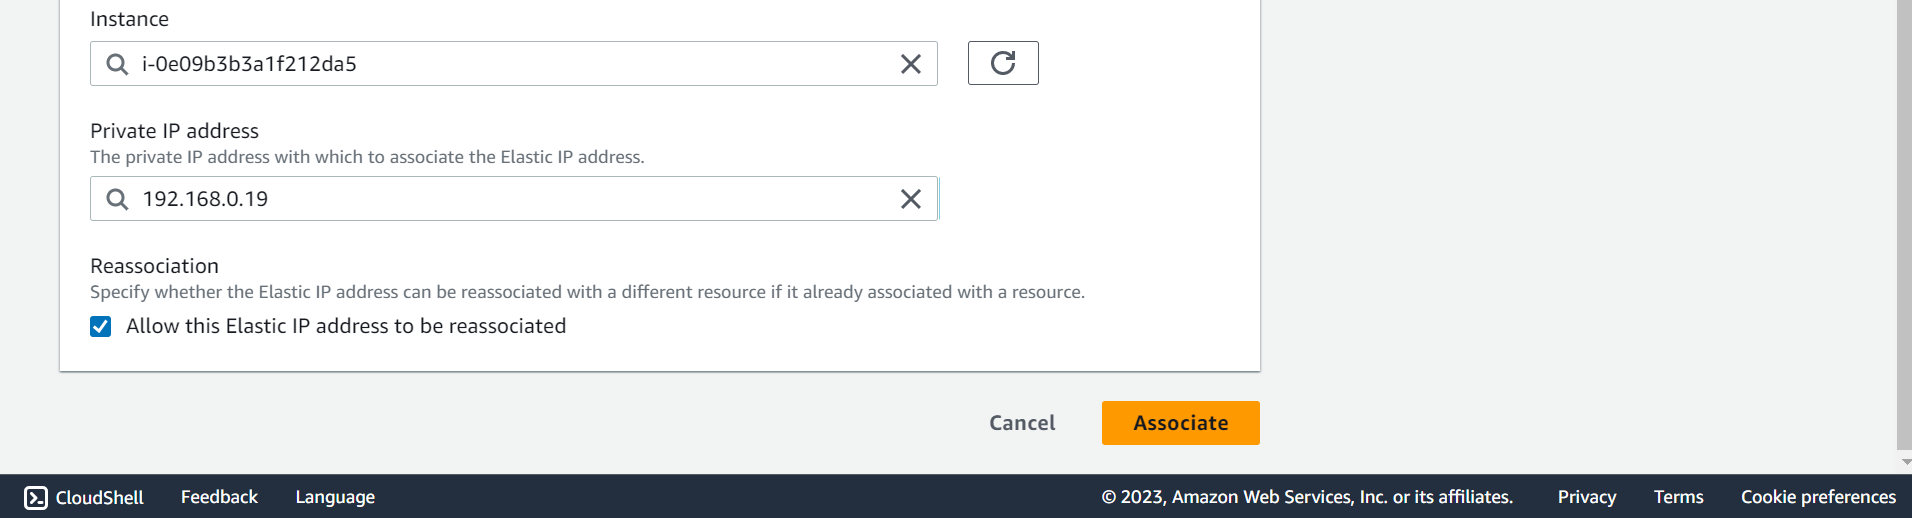
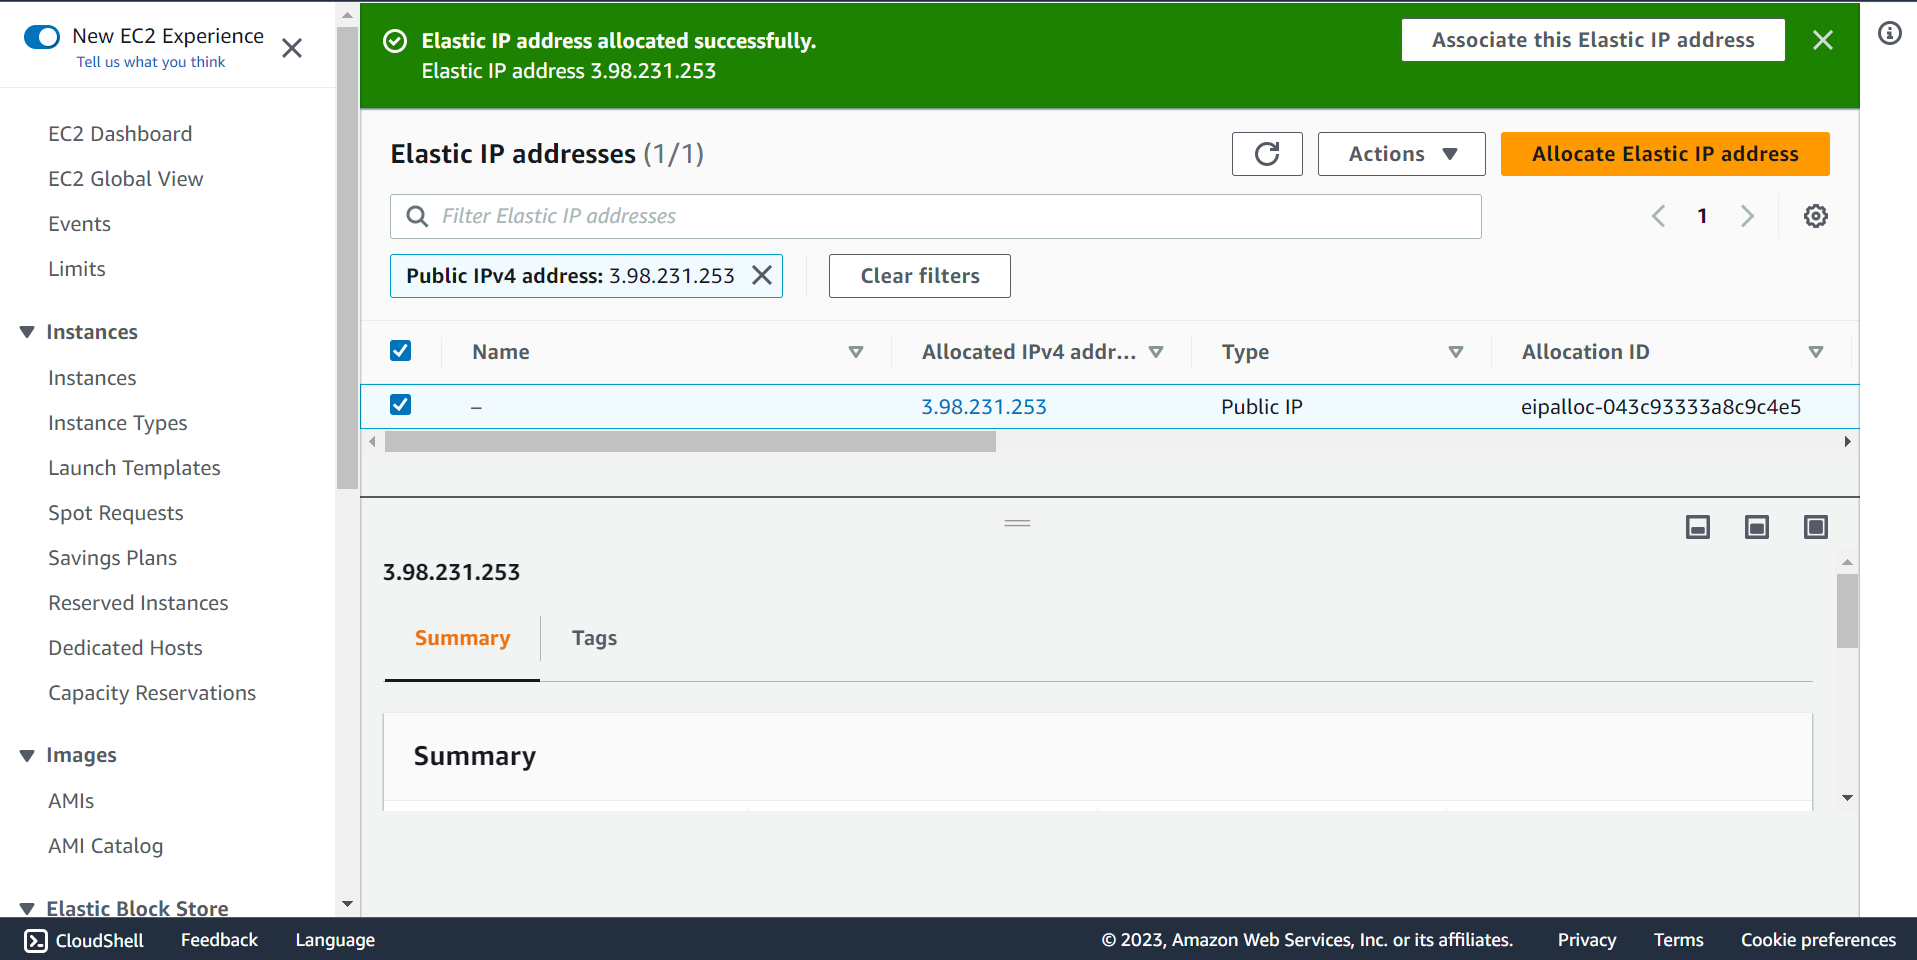
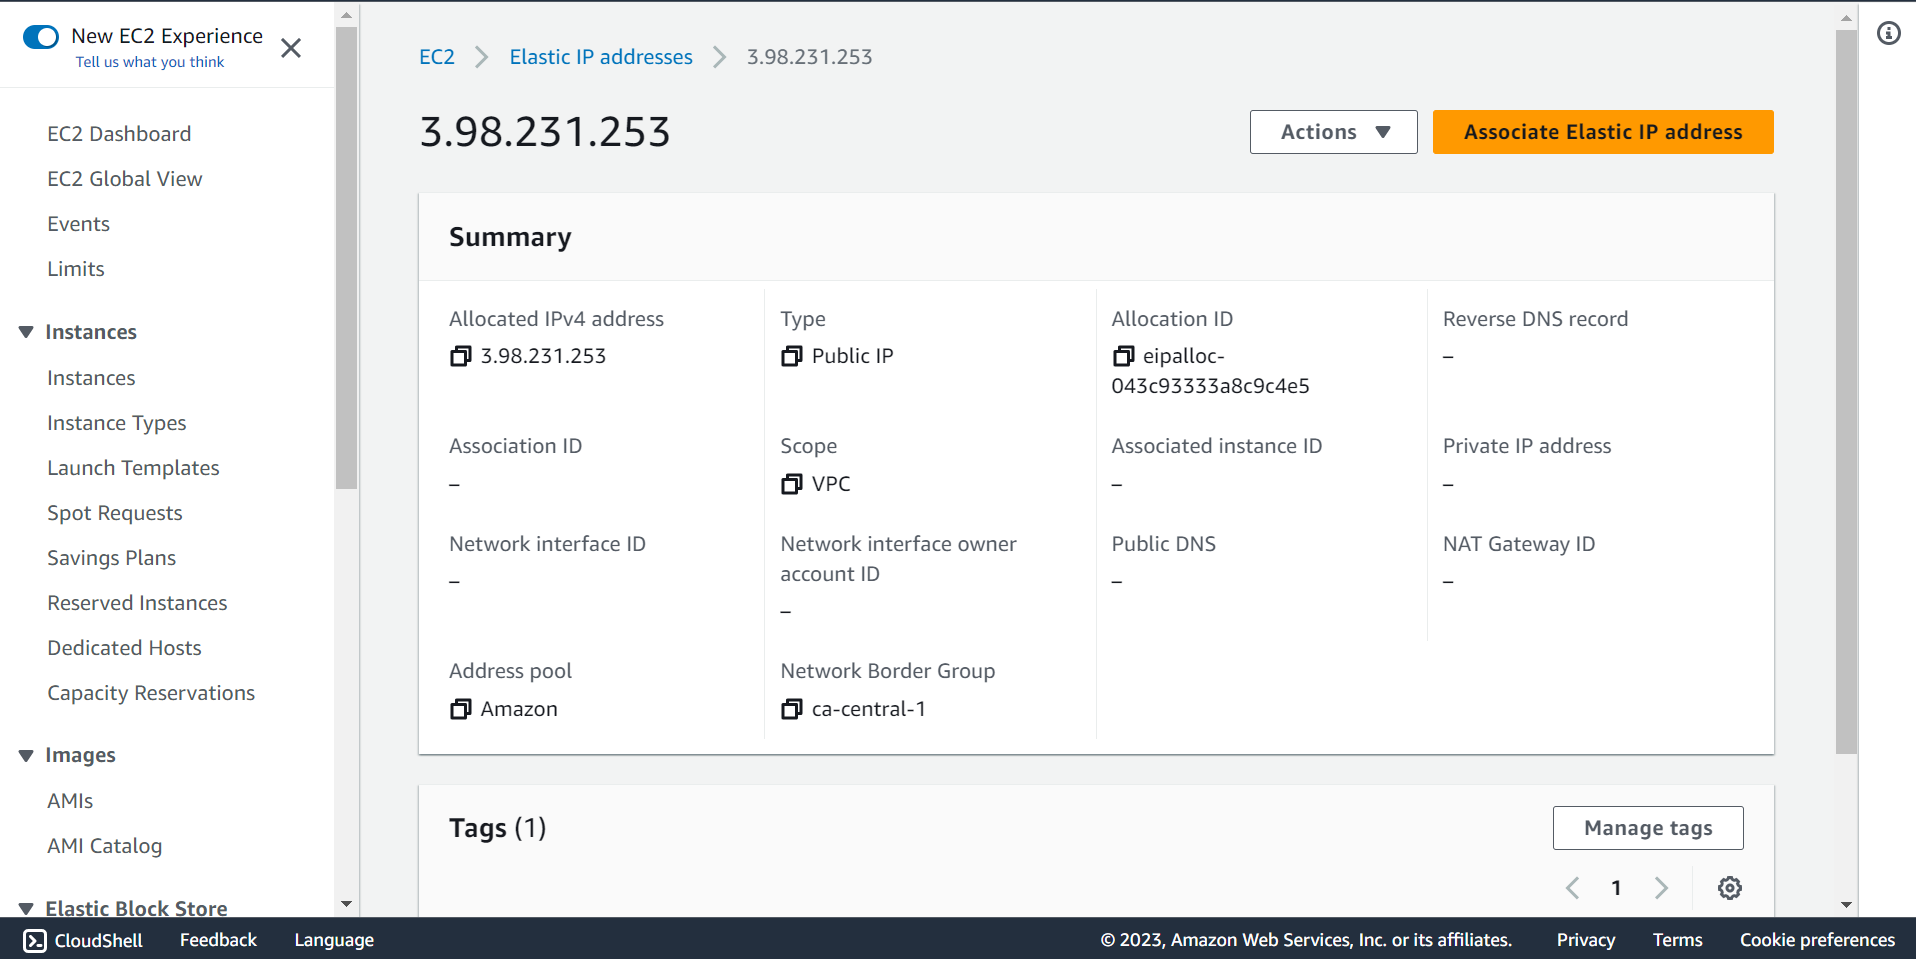
🔶 Elastic IP address associated successfully.
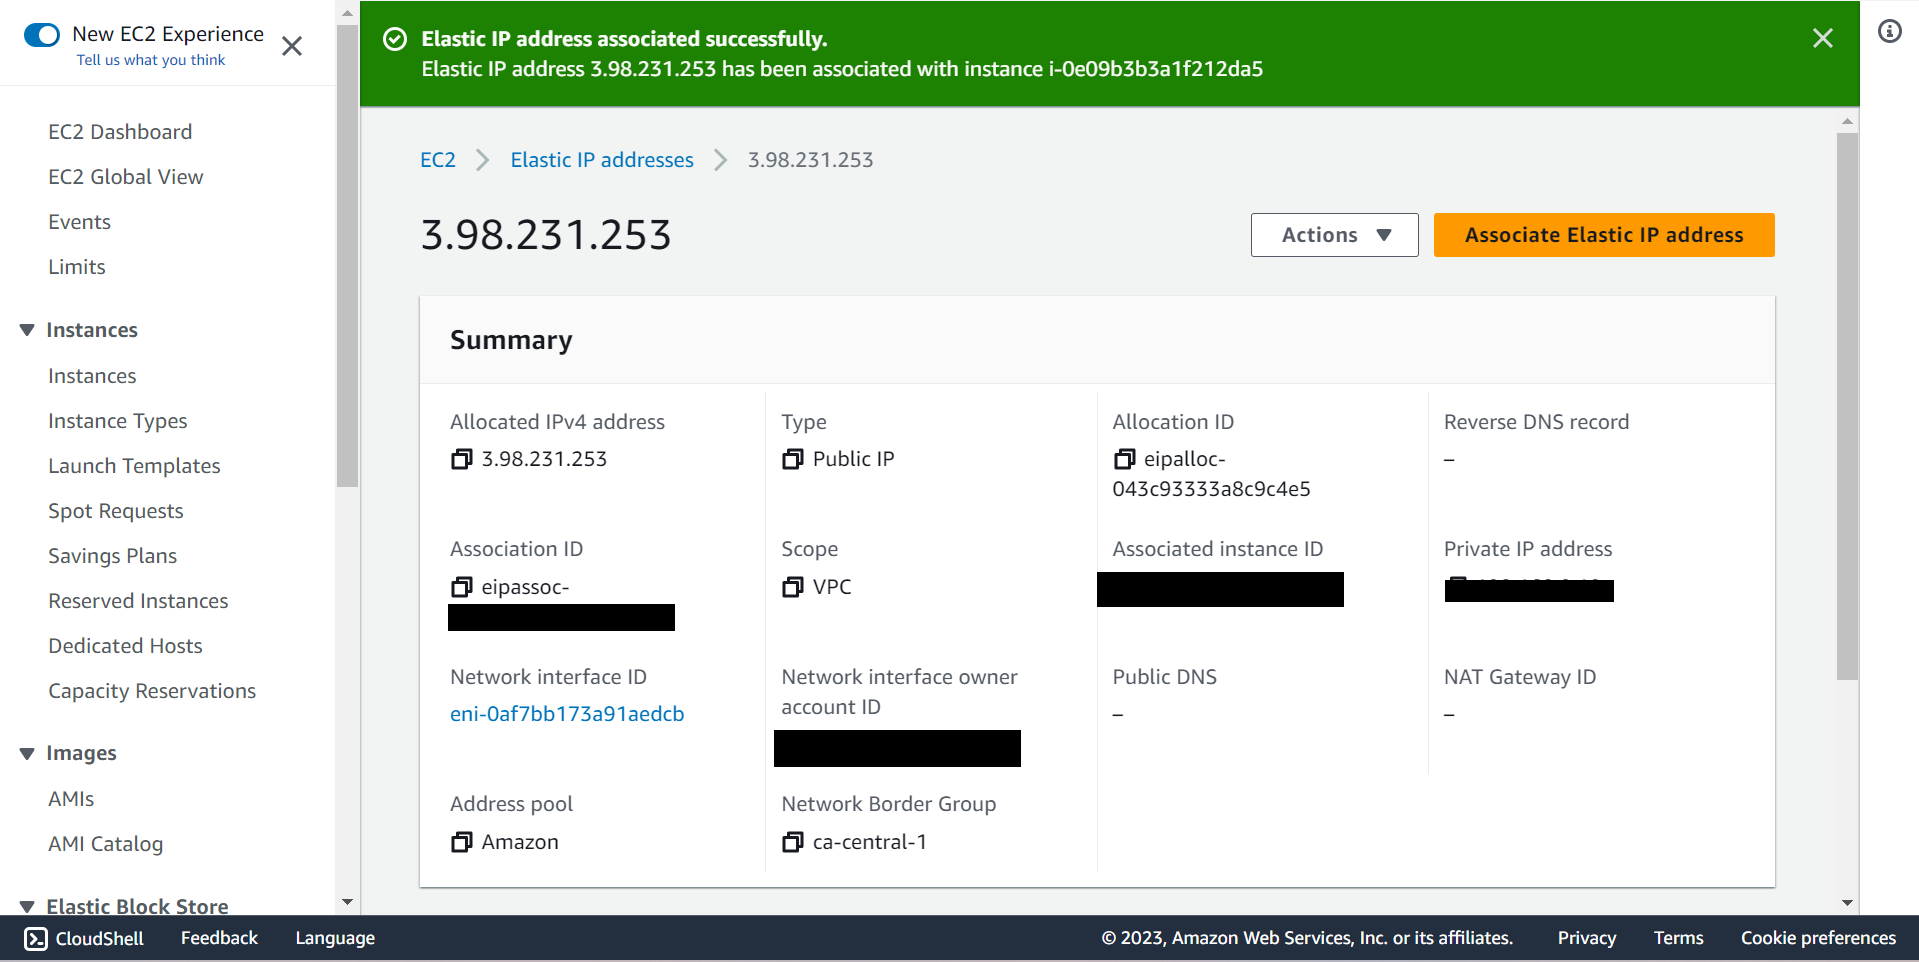
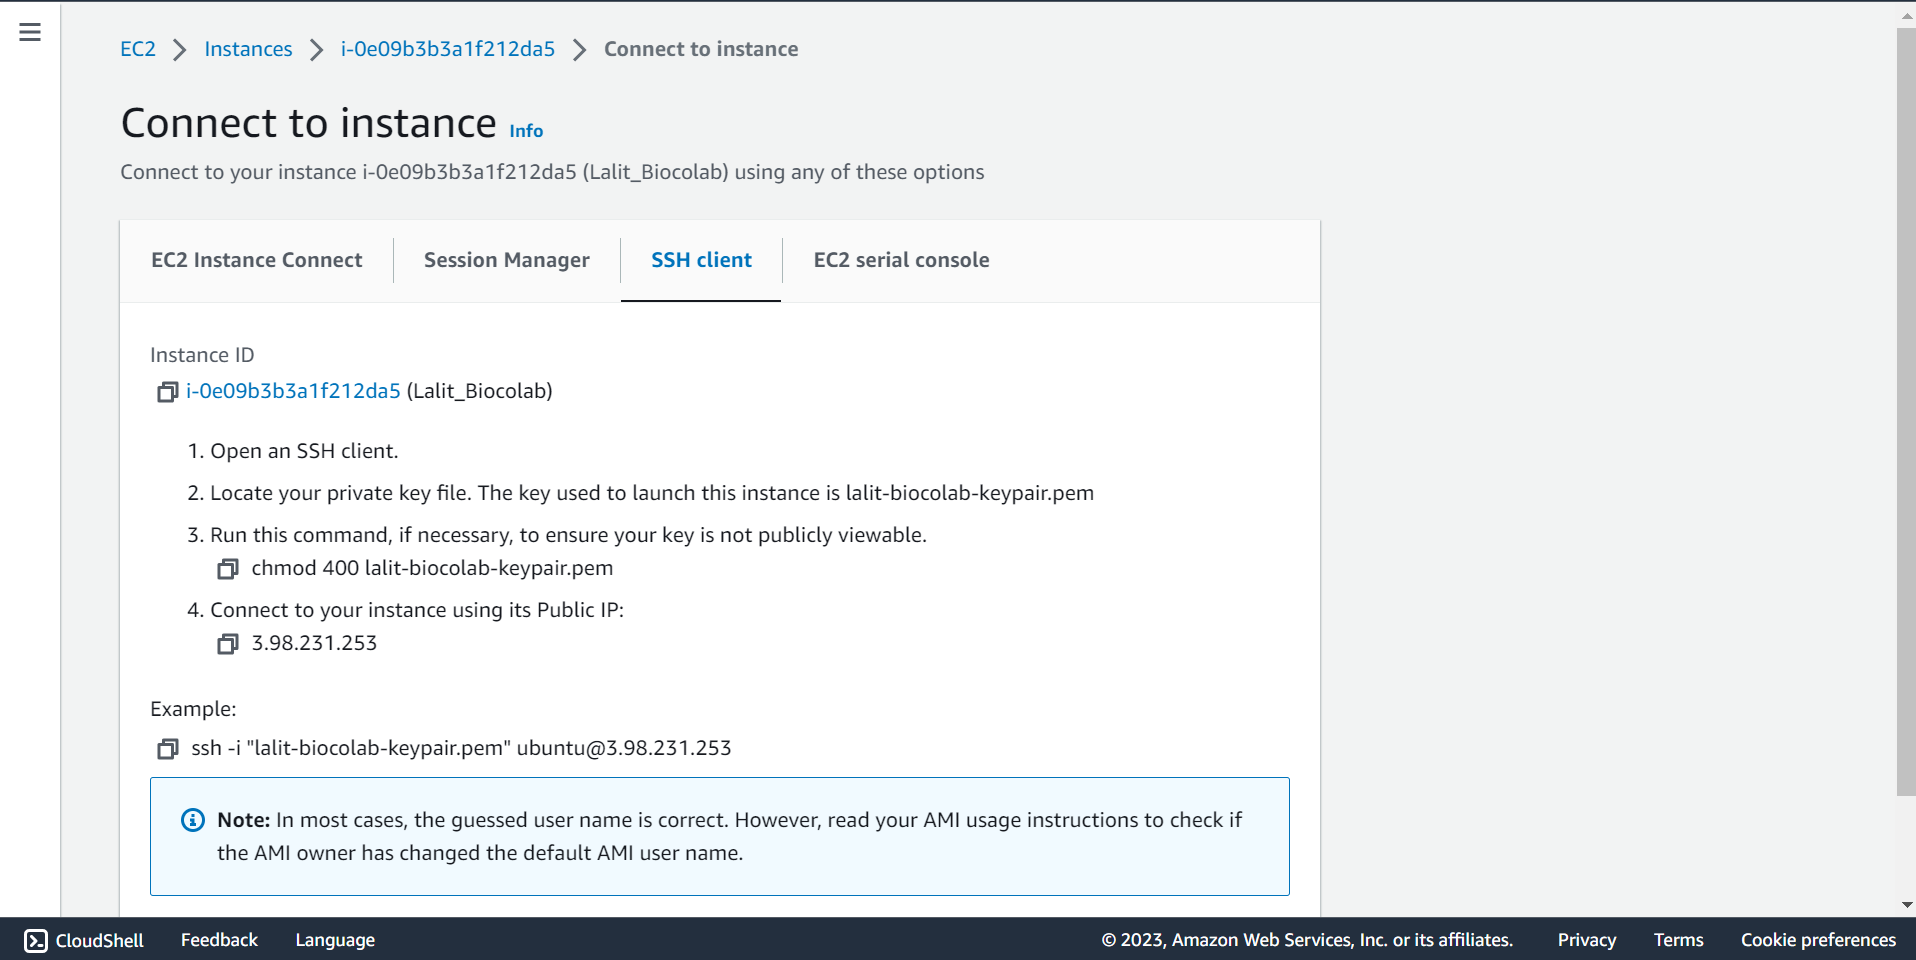
🔶 Take connection string and SSH to ec2 Instnace.
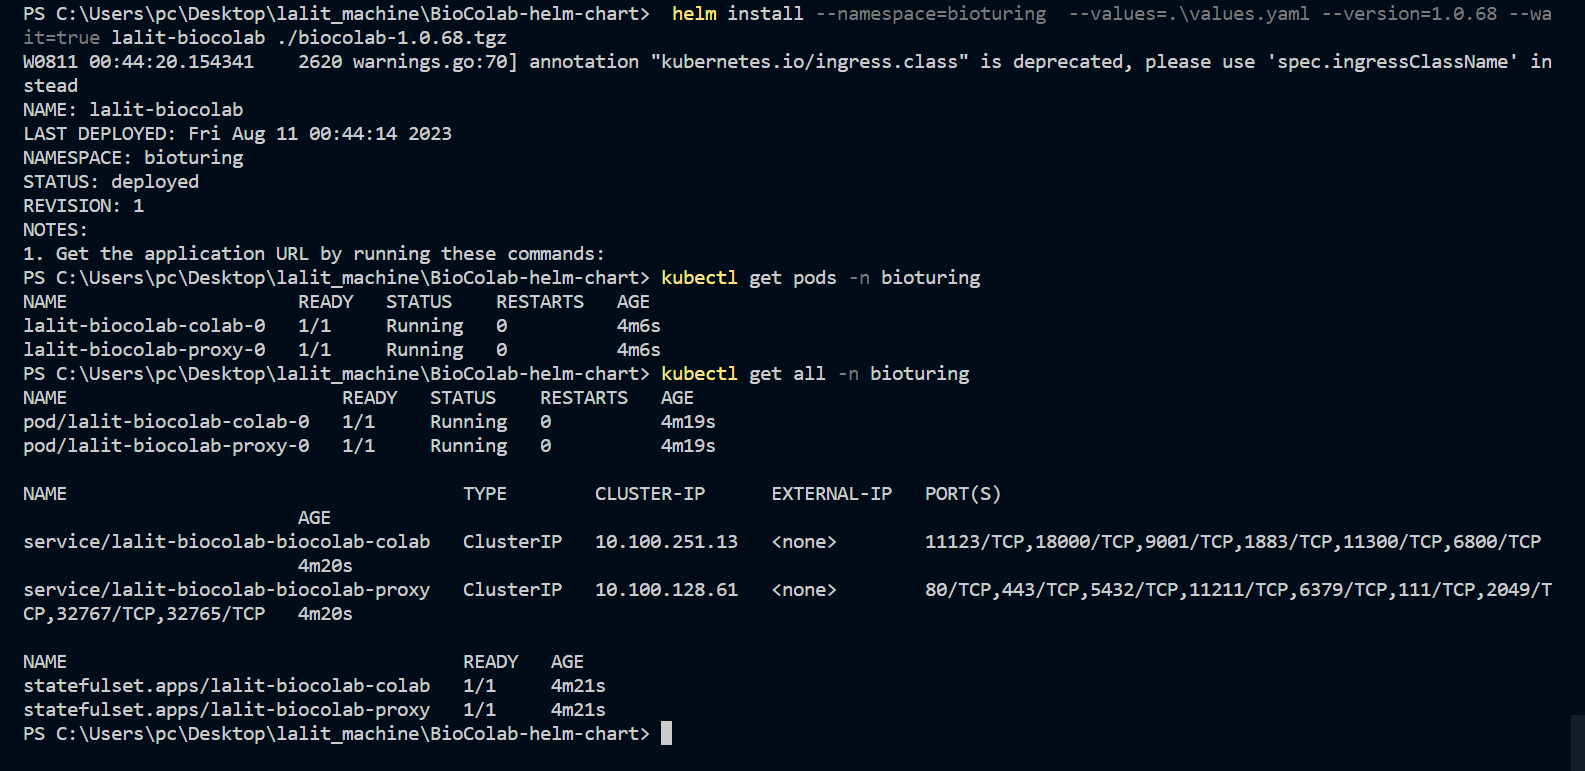
Installation Started. 
# Copy the connection string. Use SSH key pair and connect to ec2 instance.
ssh -i "lalit-biocolab-keypair.pem" ubuntu@3.98.231.253
# Before start installation. Kindly create below path.
| Item | Note | Size |
|---|---|---|
| BioStudio Token | To access our product. | |
| Application Domain | Access BioStudio on Browser. | |
| META_DATA Volume | This will use by Bioproxy to store database. [/biocolab/metadata] | 50GB |
| SSL Volume | Using by BioProxy. [/biocolab/configs] | 1GB or above |
| Data Volume | Using to store user data. [/biocolab/userdata] | 500GB or above |
| Application data Volume | Used to store application binary data.[/biocolab/appdata] | 150GB or above |
| Ethernet IP Address | Use to pass IP address during installation (eth0) |
Run the install.biocolab.docker.sh script for docker environment and install require software.
# Create required folder structure before execution.
mkdir -p /biocolab/metadata
mkdir -p /biocolab/configs
mkdir -p /biocolab/userdata
mkdir -p /biocolab/appdata
# Switch to /biocolab folder.
cd /biocolab
# Download script:
# Note: Installation script version would be changed based on updates.
# Our Team will get you updates and keep in touch with you during installation.
wget https://github.com/bioturing/installation/archive/refs/tags/v2.1.11.tar.gz
# uncompressed .gz
tar xvf v2.1.11.tar.gz
# Switch to installation folder
cd installation-2.1.11/
# Execute installation script
bash install.biocolab.docker.sh
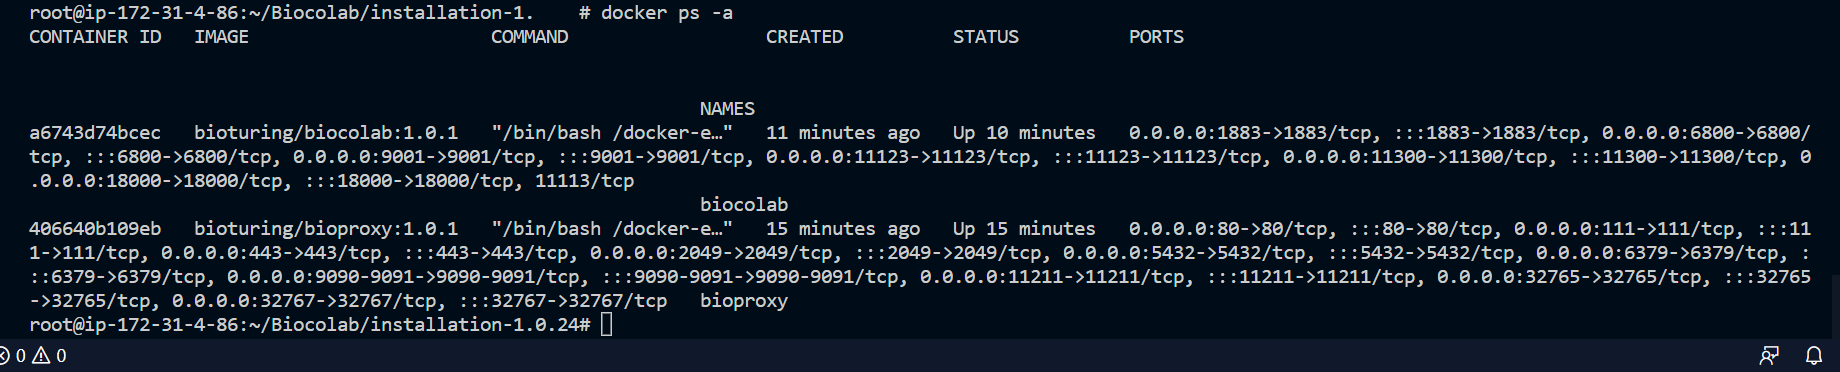
# Verify both container up and running.
docker ps -a
# Configure SSO login
http://<Your Domain>/dashboard/
🔶 Download v2.1.11.tar.gz, which content script to install BioStudio.
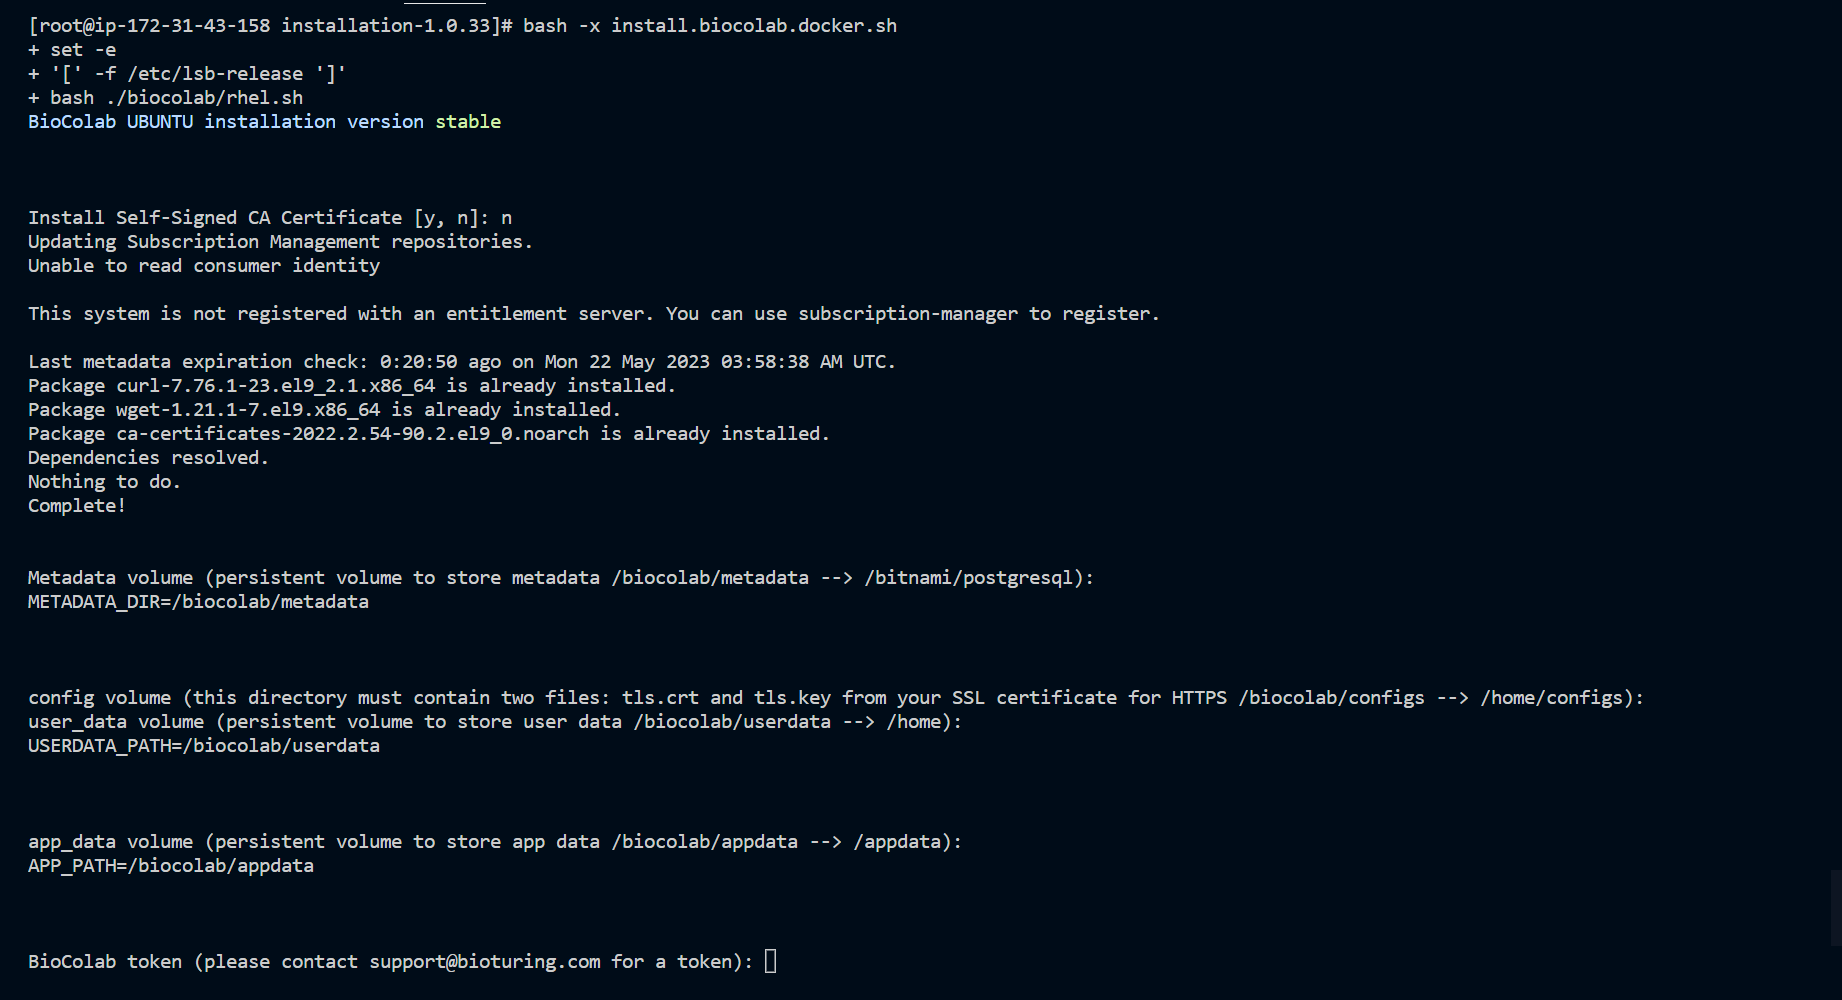
🔔 During execution of this script, It will prompt for input credential. Kindly note that user name is admin and keep store the password safely, which you are going to input. It needed to be performed admin activities.
🔶 Execute script.
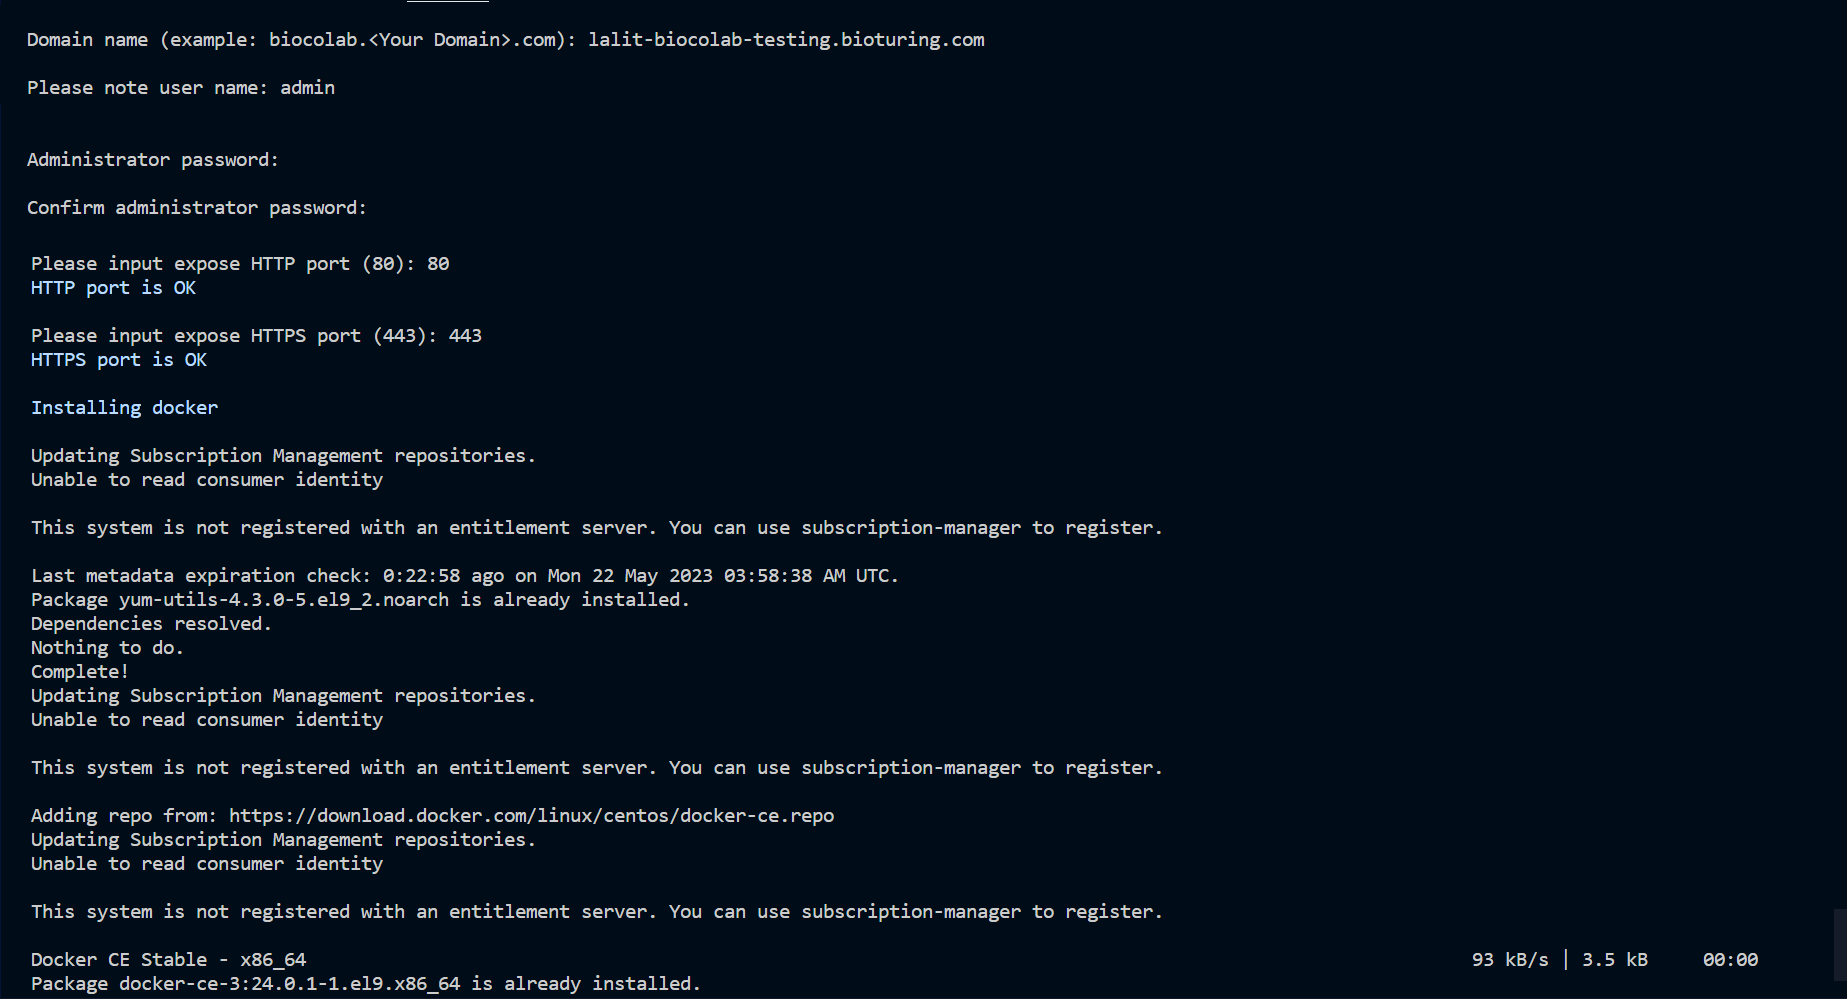
🔶 Follow execution script’s instructions and input values accordingly.
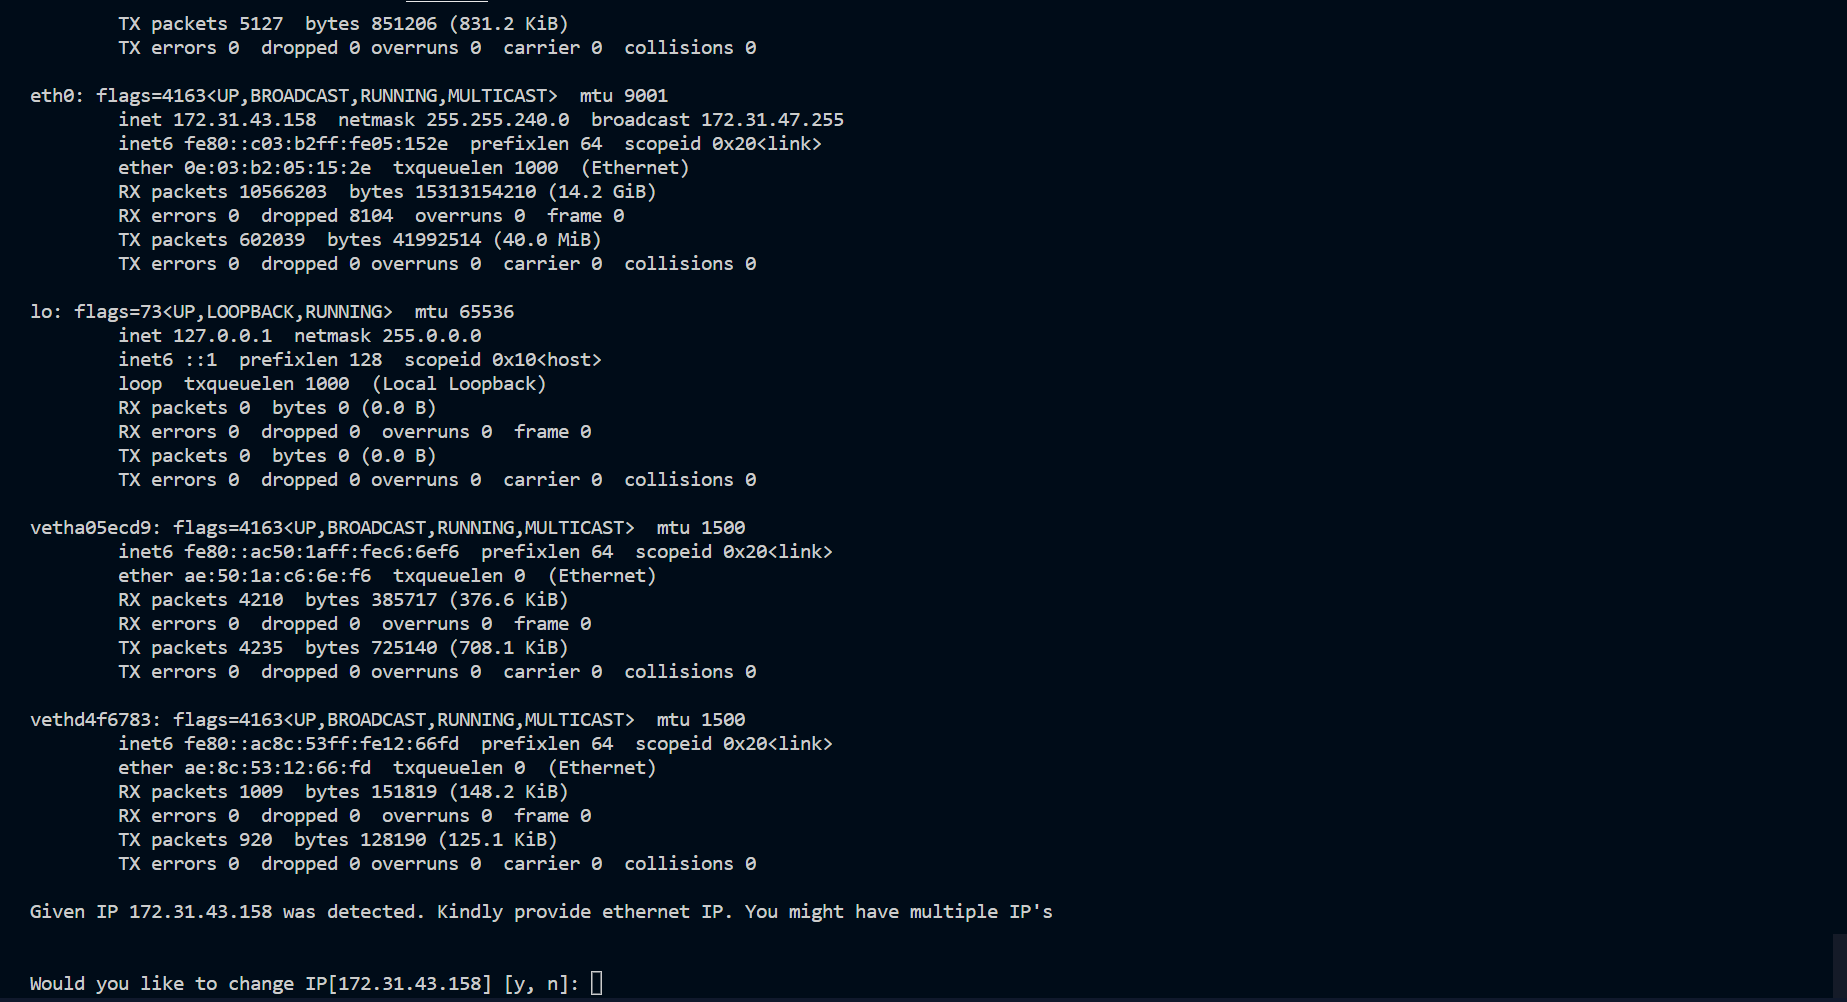
🔶 Change the IP, If we have many.
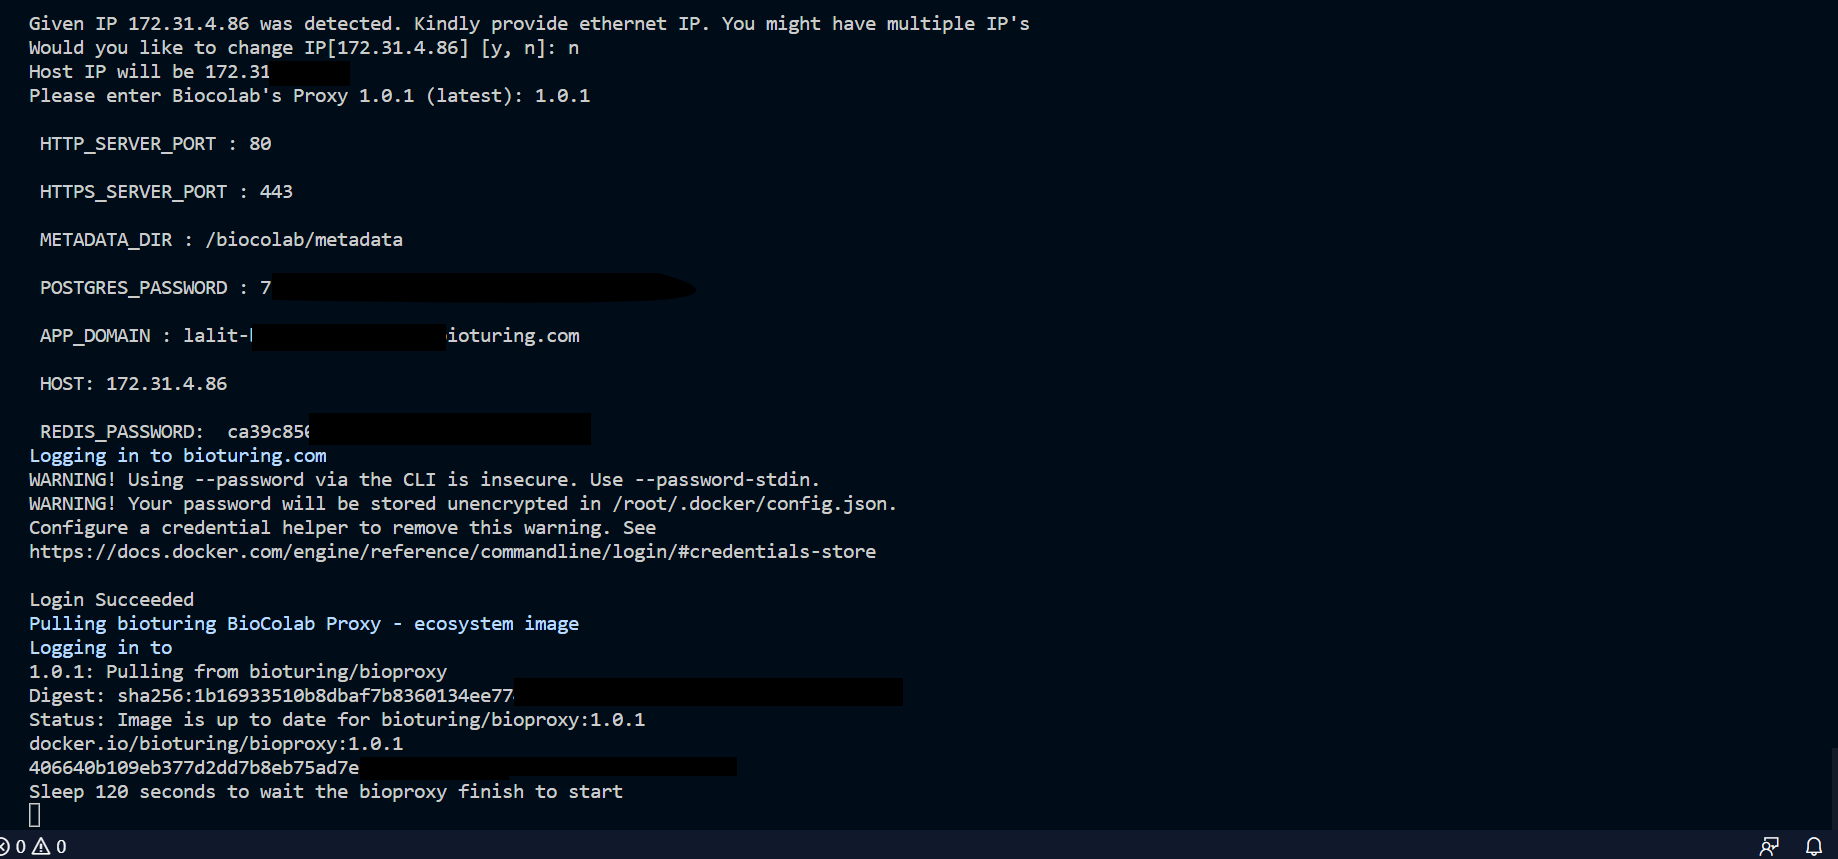
BioProxy version : 1.0.26
BioColab version : 2.0.50
# Please provide the version based on Bioturing instruction.
# It would be vary based on updates.
🔶 Verify both container status - UP and running.
🔶 Browser BioStudio.
# https://<Domain name>
⌚ Kindly wait for a while. BioStudio software will take time to download packages and install.
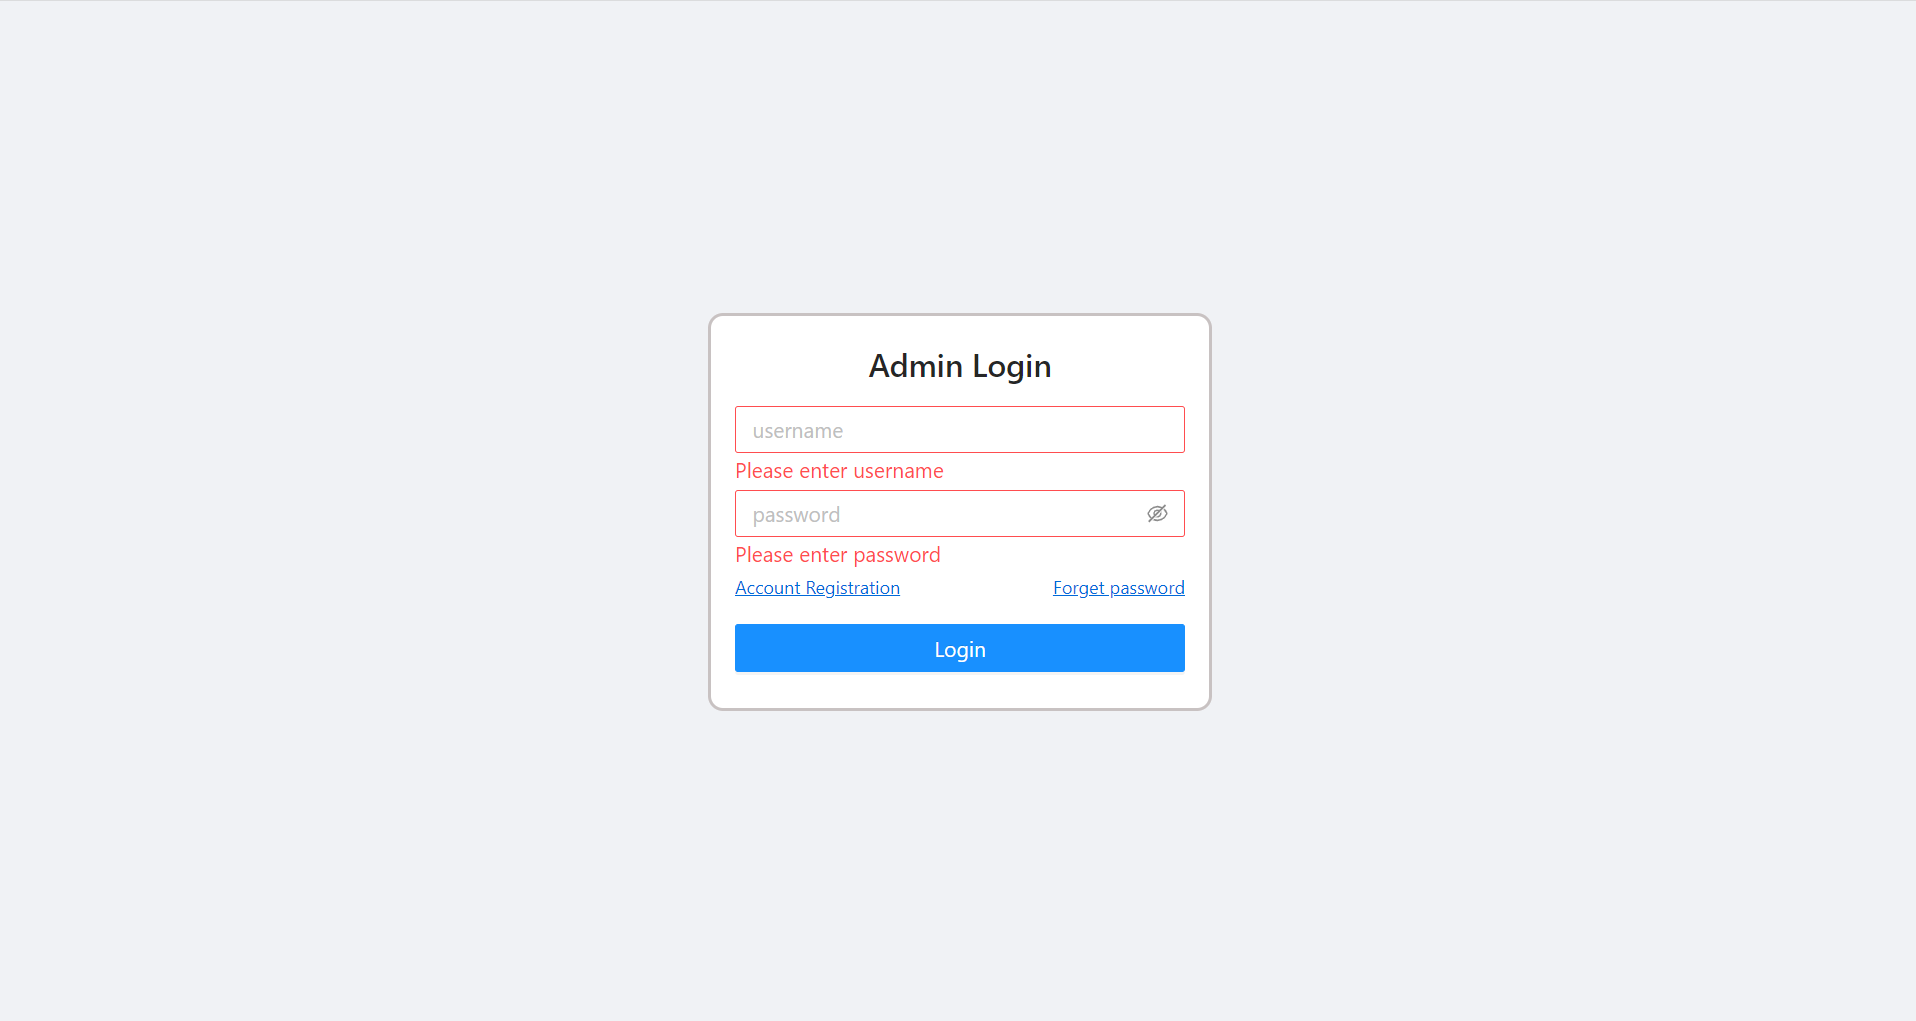
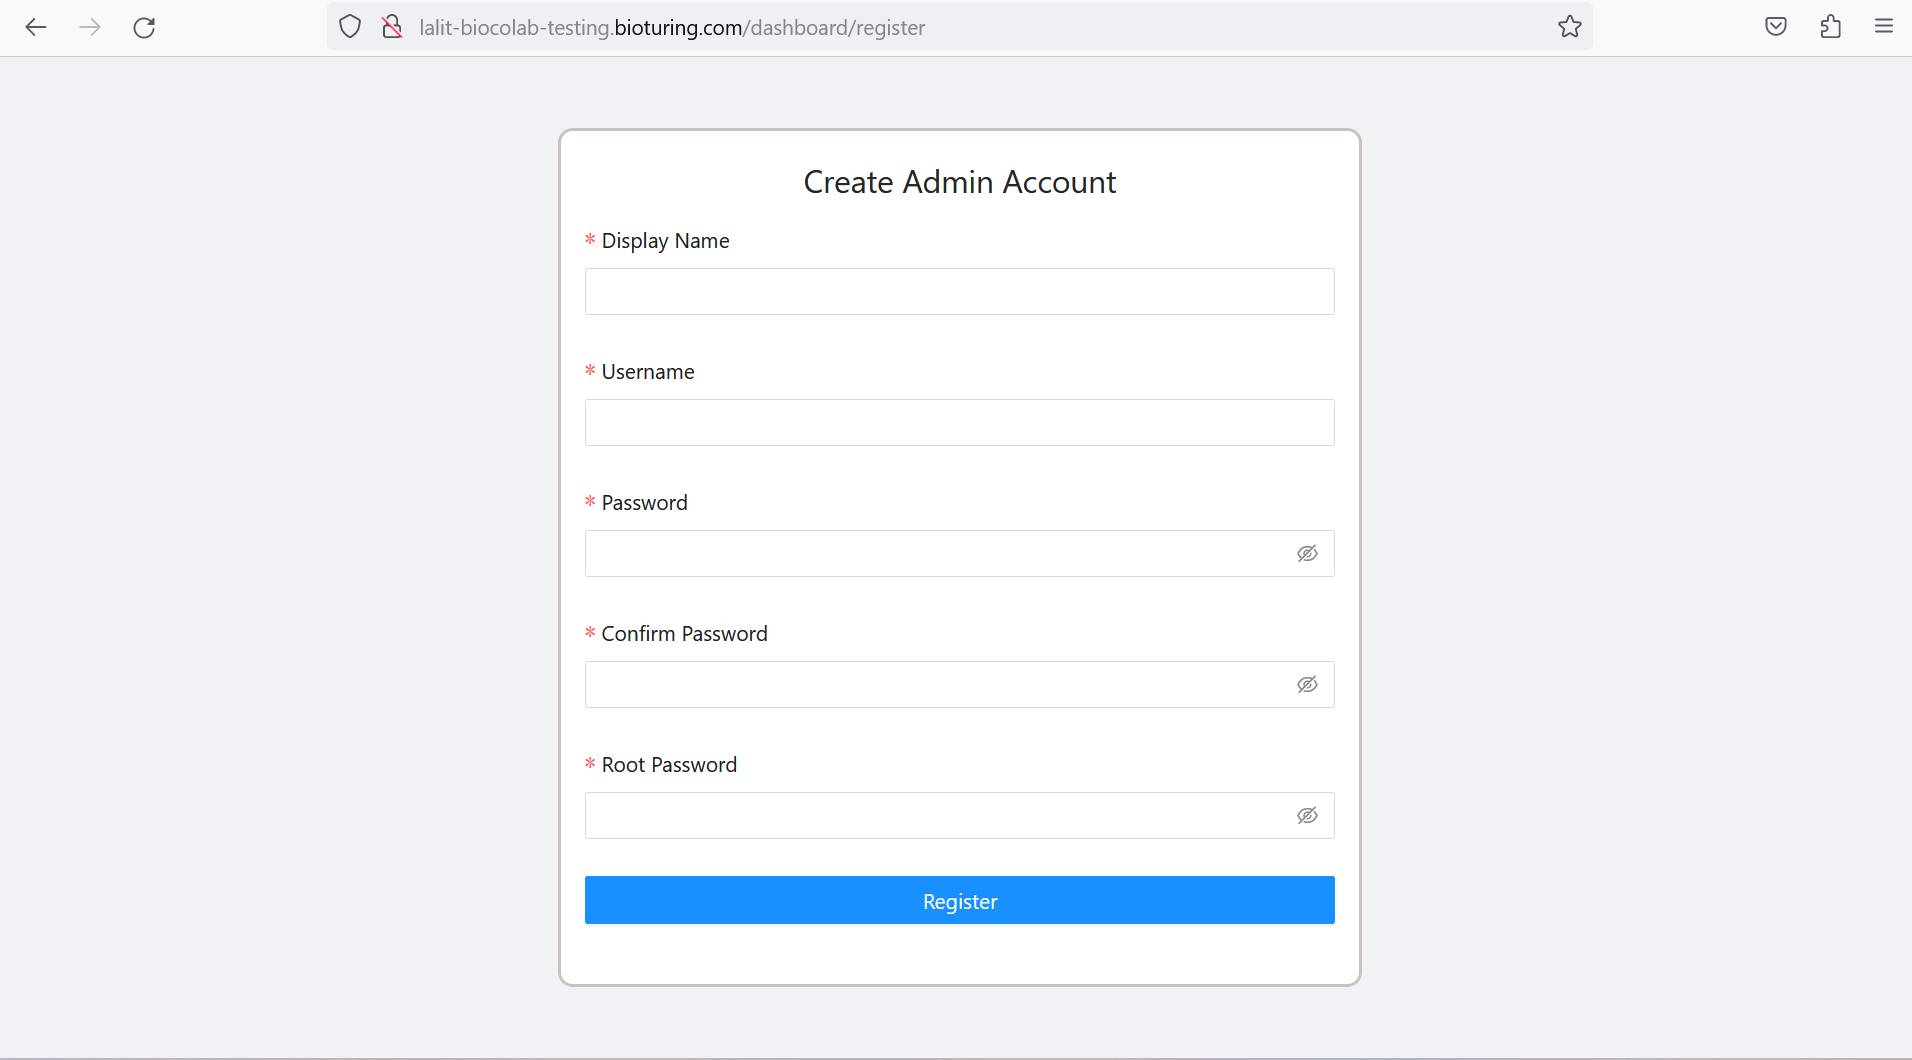
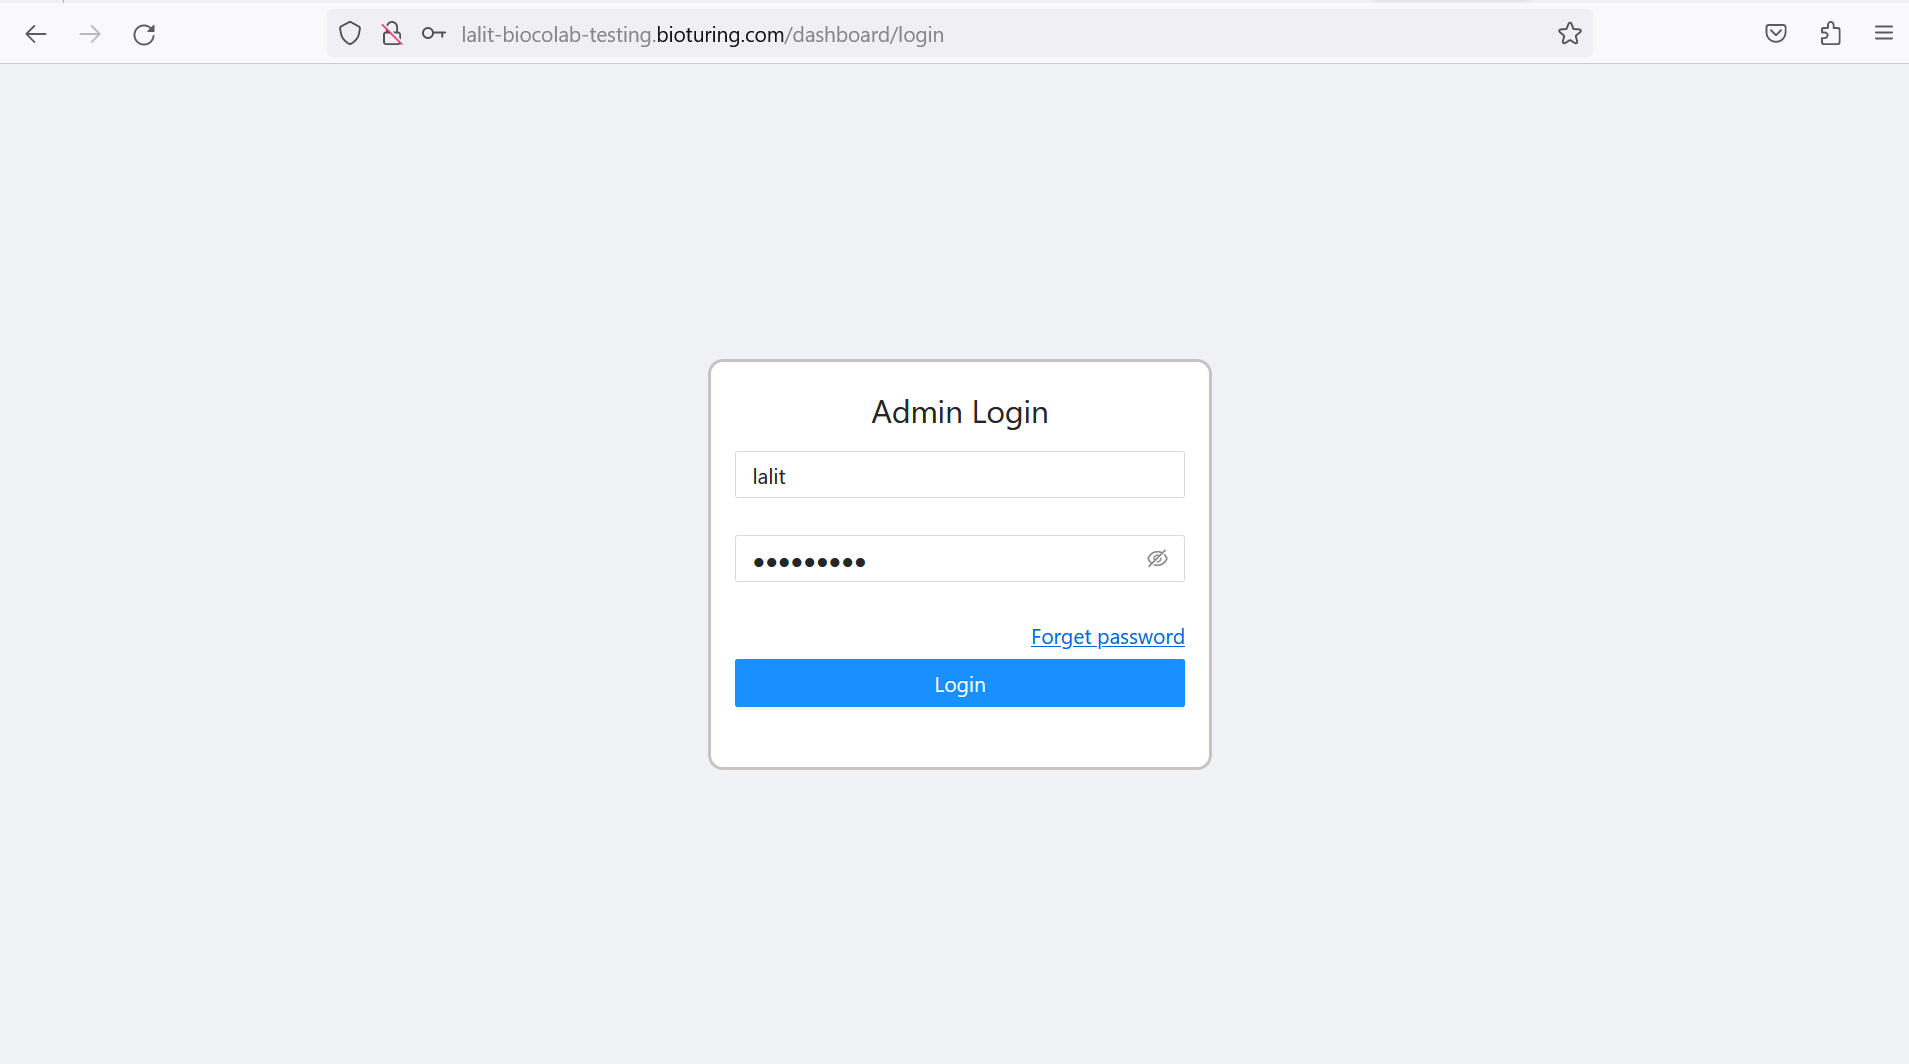
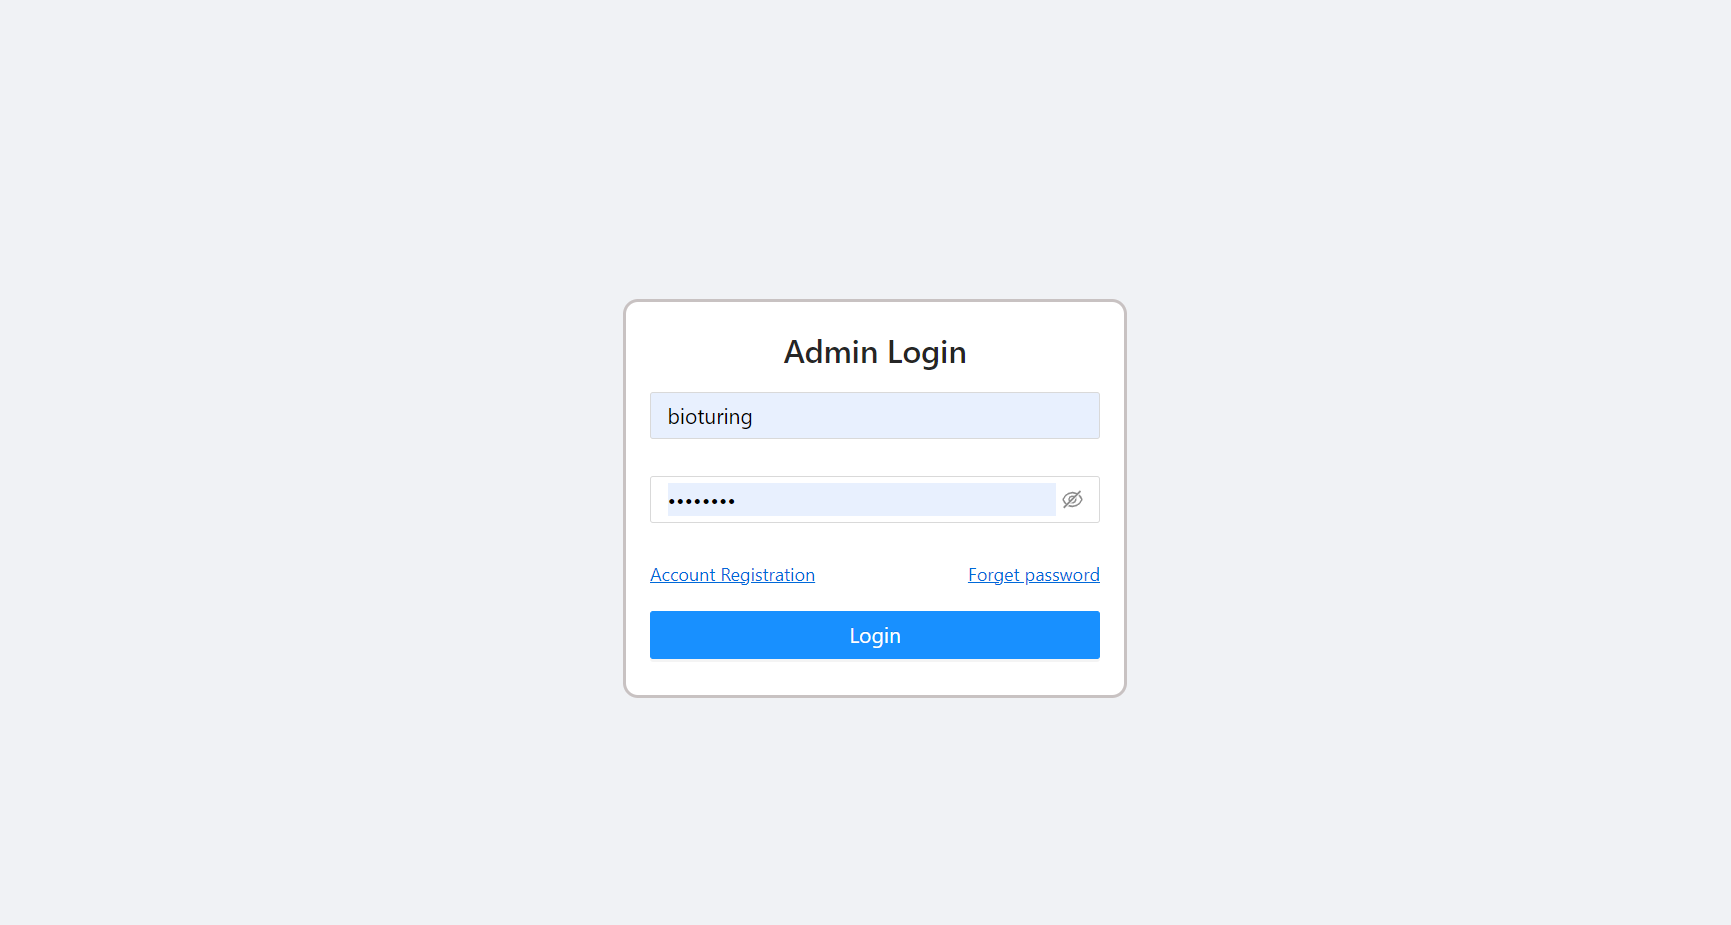
Register for root admin. 
https://<your domain>/dashboard
# It will prompt for Admin Login.
# Select Account Registration.
# Create admin account.
# Root Password is the one, we provided during installation.
# Login with the Dashboard using that account you registered earlier.
🔶 Account Registration.
🔶 Crearte Admin Account.
🔶 Login to dashboard.
https://<your domain>/dashboard
Workspace It is essential to create a machine and mount the volume before using the workspace.
Machine creation 
# Login with Dashboard using admin credential.
# Select Machines Tab form left-side menu.
# Select + Add New Machine.
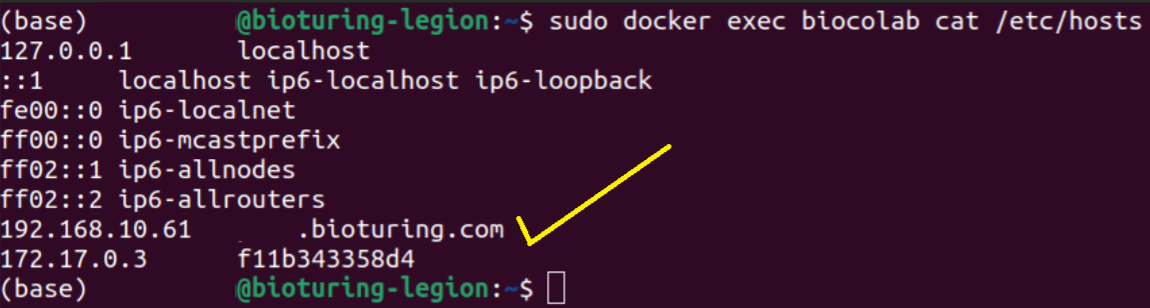
Name: You can select any name to this machine. This is a private IP of your machine, That can be find in /etc/hosts file on BioStudio pods.
I already added a machine, so I will go with the update machine.
🔶 Please fill out Update machine metadata.
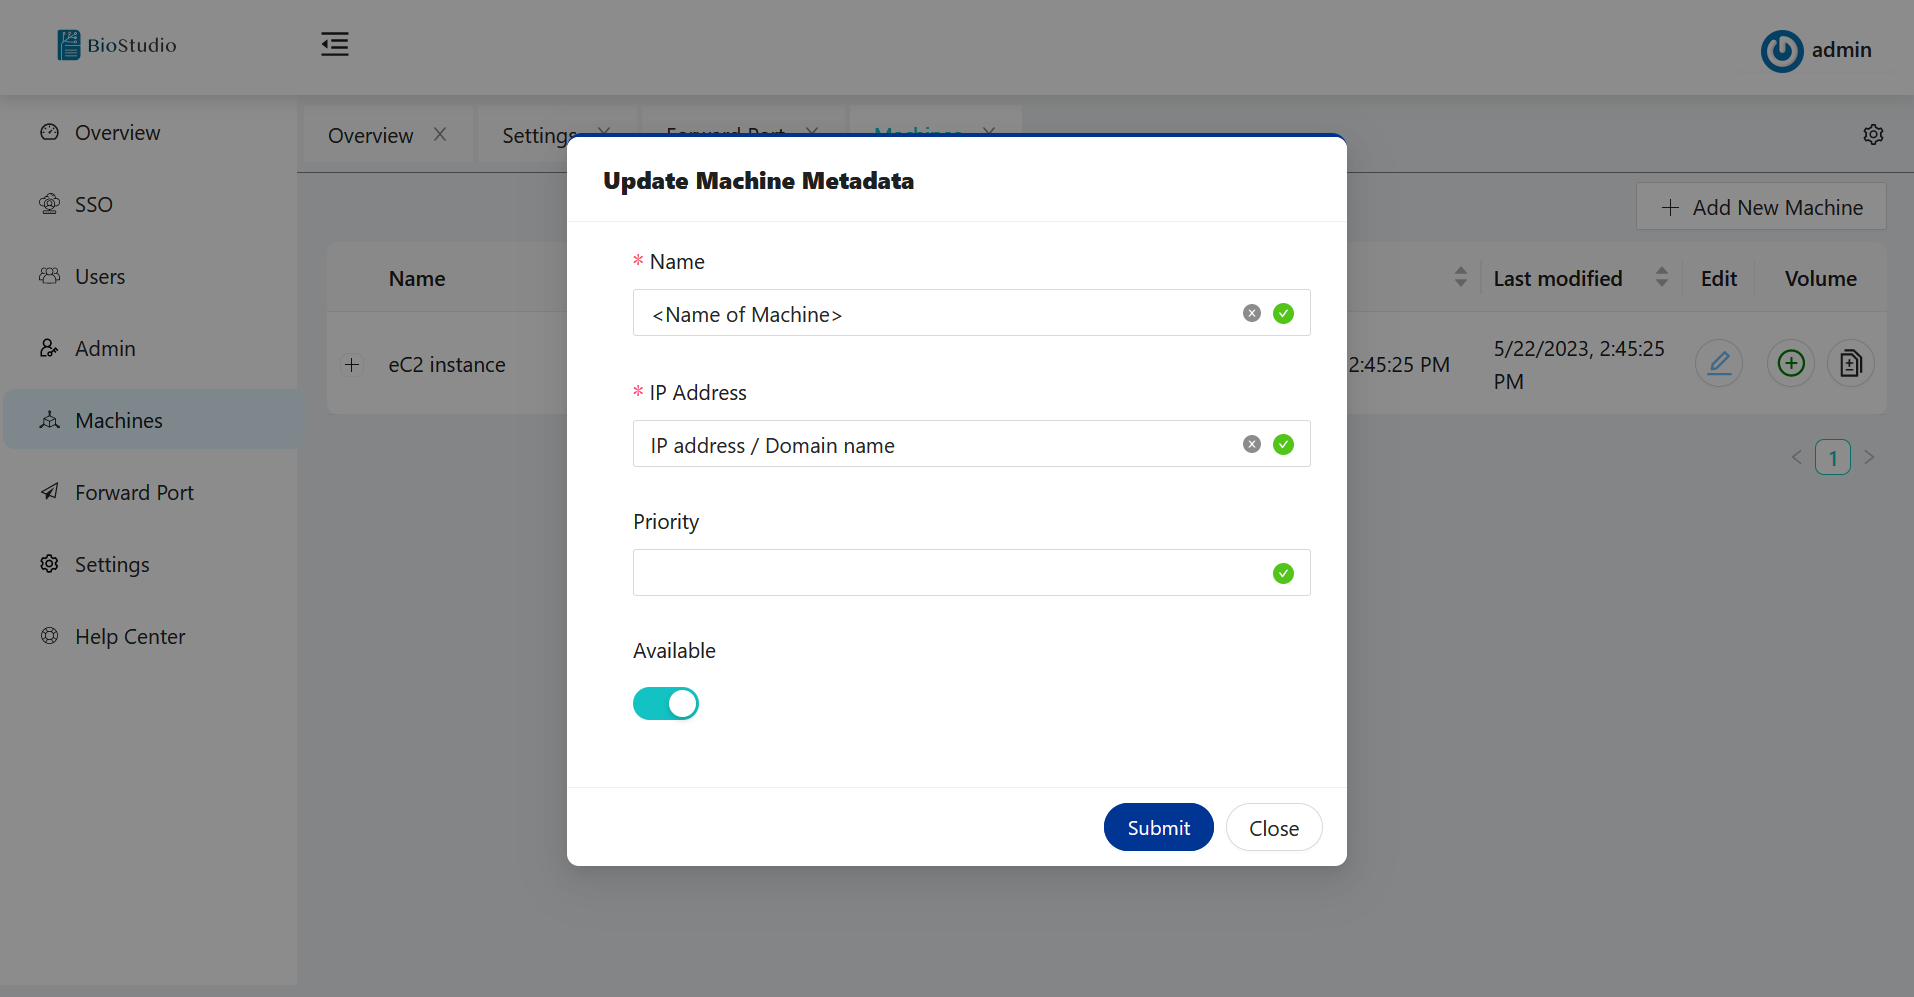
🔶 Please add volume - Update machine Metadata.
# Machines --> Click on + sign to add volume.
# You can use any name for volume, but the volume path will always be /home.
# Workspace is now ready for use.

SSO Set up
¶We are supporting three types of protocol below:
| PROTOCOLS |
|---|
| SAML |
| OPENID |
| OAUTH2 |
🔔 Please contact 📧 support@bioturing.com to add ➕ more protocols and types , If you are not able to find in the list based on your choice. 😊 We are always happy to add more variety of protocols and types.
| SAML : Identity and Access Management |
|---|
| Aliyun IDaaS |
| Keycloak |
| Default |
| OPENID : Identity and Access Management |
|---|
| Default |
| OAUTH2 : Identity and Access Management |
|---|
| Adfs |
| Amazon |
| Apple |
| Auth0 |
| AzureAD |
| BattleNet |
| Bilibili |
| Bitbucket |
| Box |
| Casdoor |
| CloudFoundry |
| Custom |
| Dailymotion |
| Deezer |
| DigitalOcean |
| Discord |
| Douyin |
| Dropbox |
| EveOnline |
| Fitbit |
| Gitea |
| Heroku |
| InfluxCloud |
| Infoflow |
| Intercom |
| Kakao |
| Lastfm |
| Line |
| Mailru |
| Meetup |
| MicrosoftOnline |
| Naver |
| Nextcloud |
| Okta |
| OneDrive |
| Oura |
| Patreon |
| Paypal |
| SalesForce |
| Shopify |
| Slack |
| Soundcloud |
| Spotify |
| Steam |
| Strava |
| Stripe |
| TikTok |
| Tumblr |
| Twitch |
| Typetalk |
| Uber |
| VK |
| Wepay |
| Xero |
| Yahoo |
| Yammer |
| Yandex |
| Zoom |
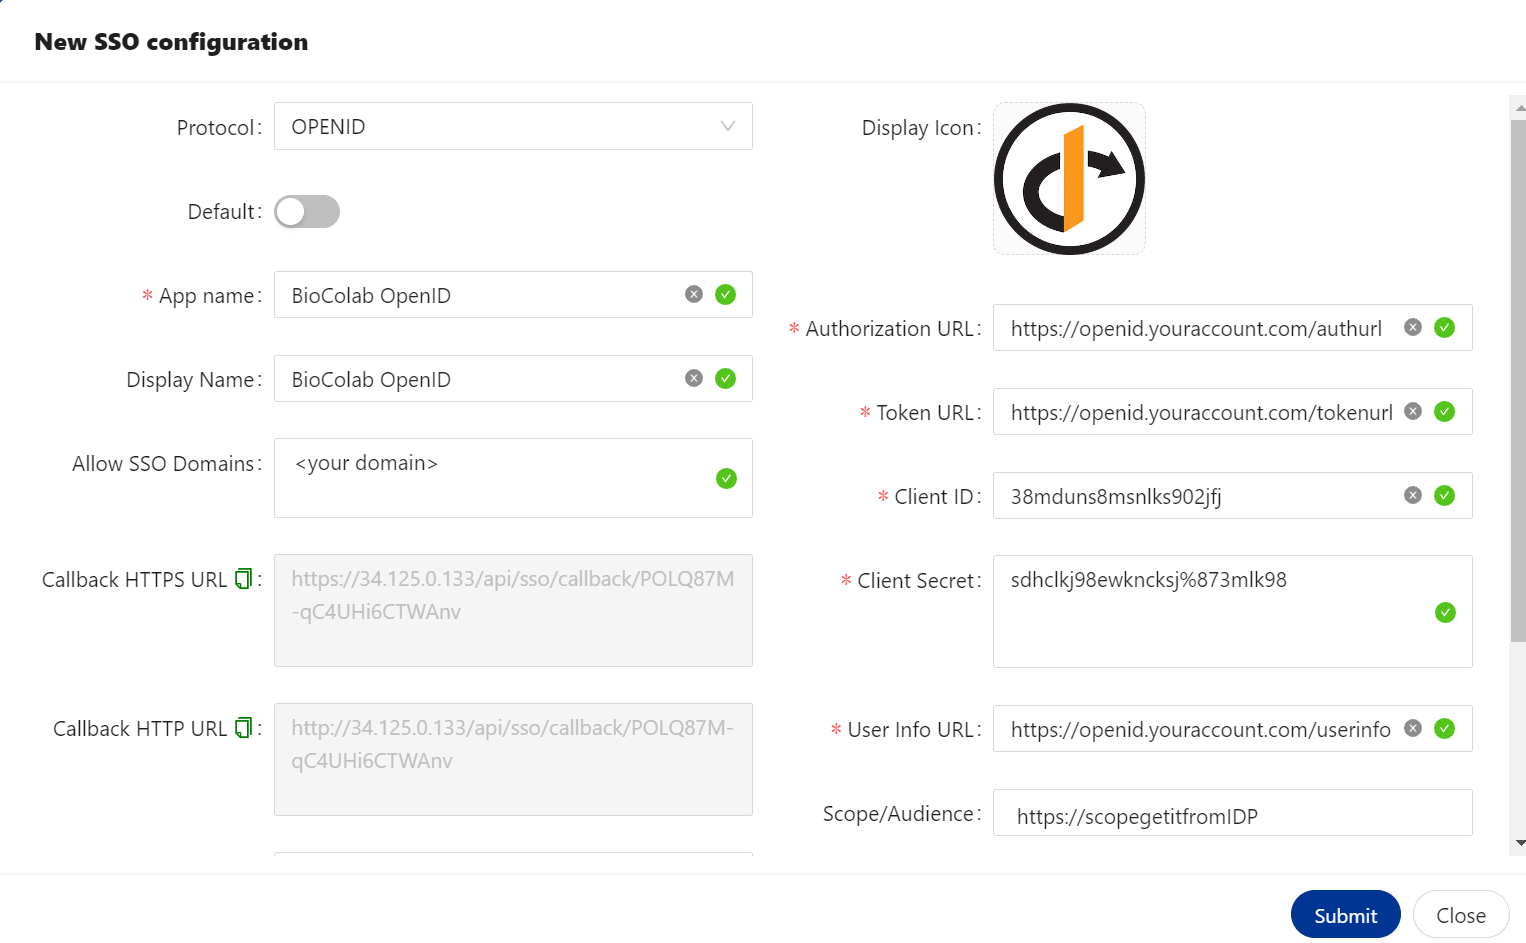
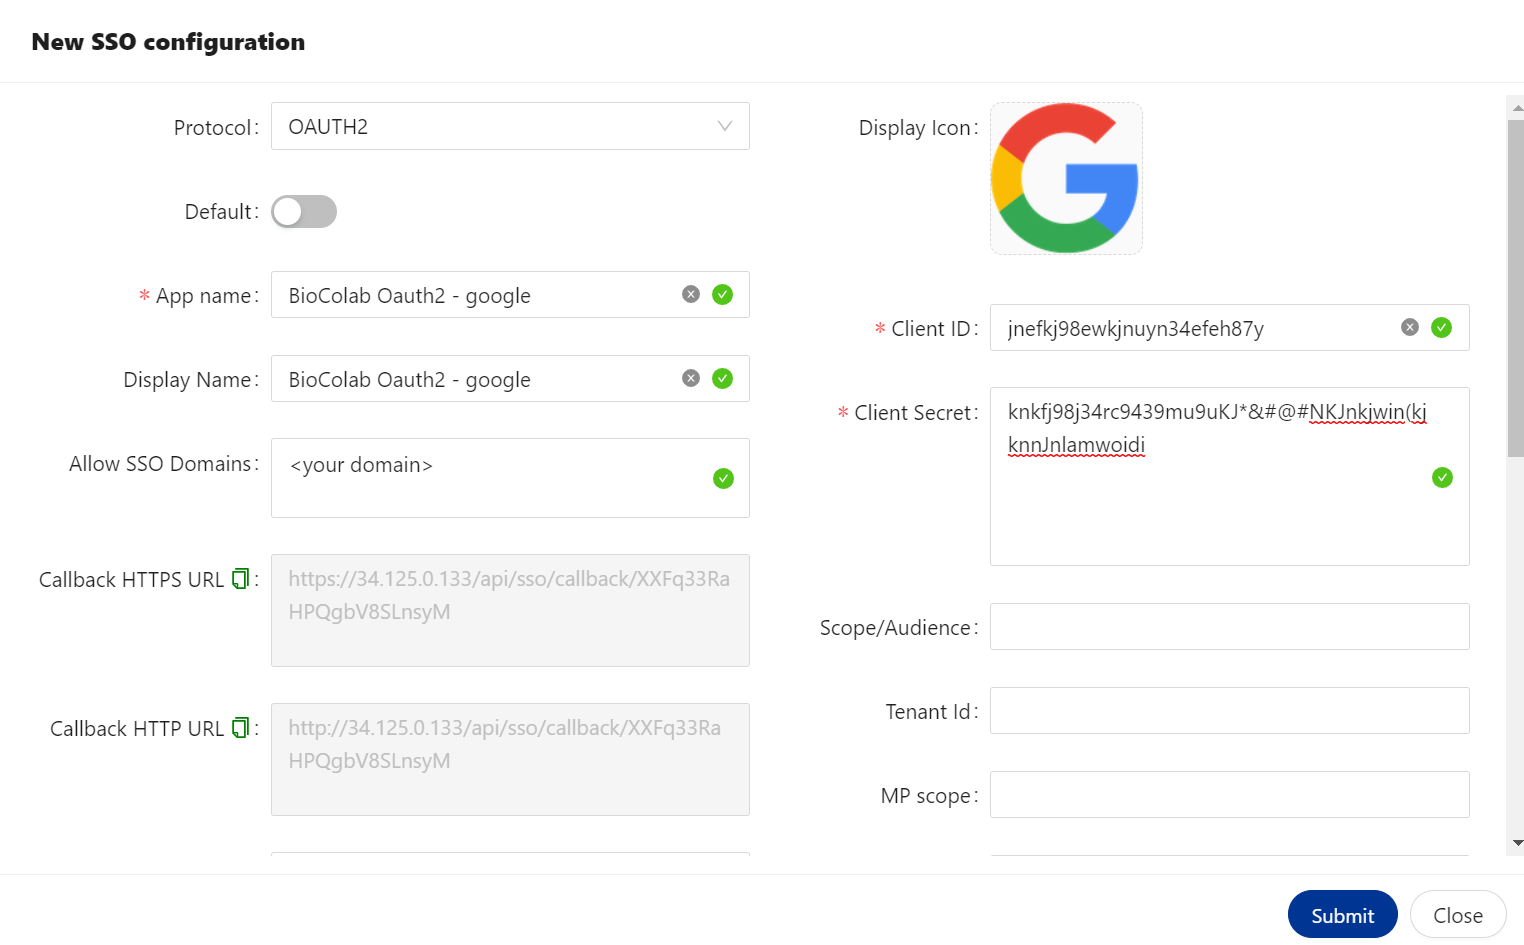
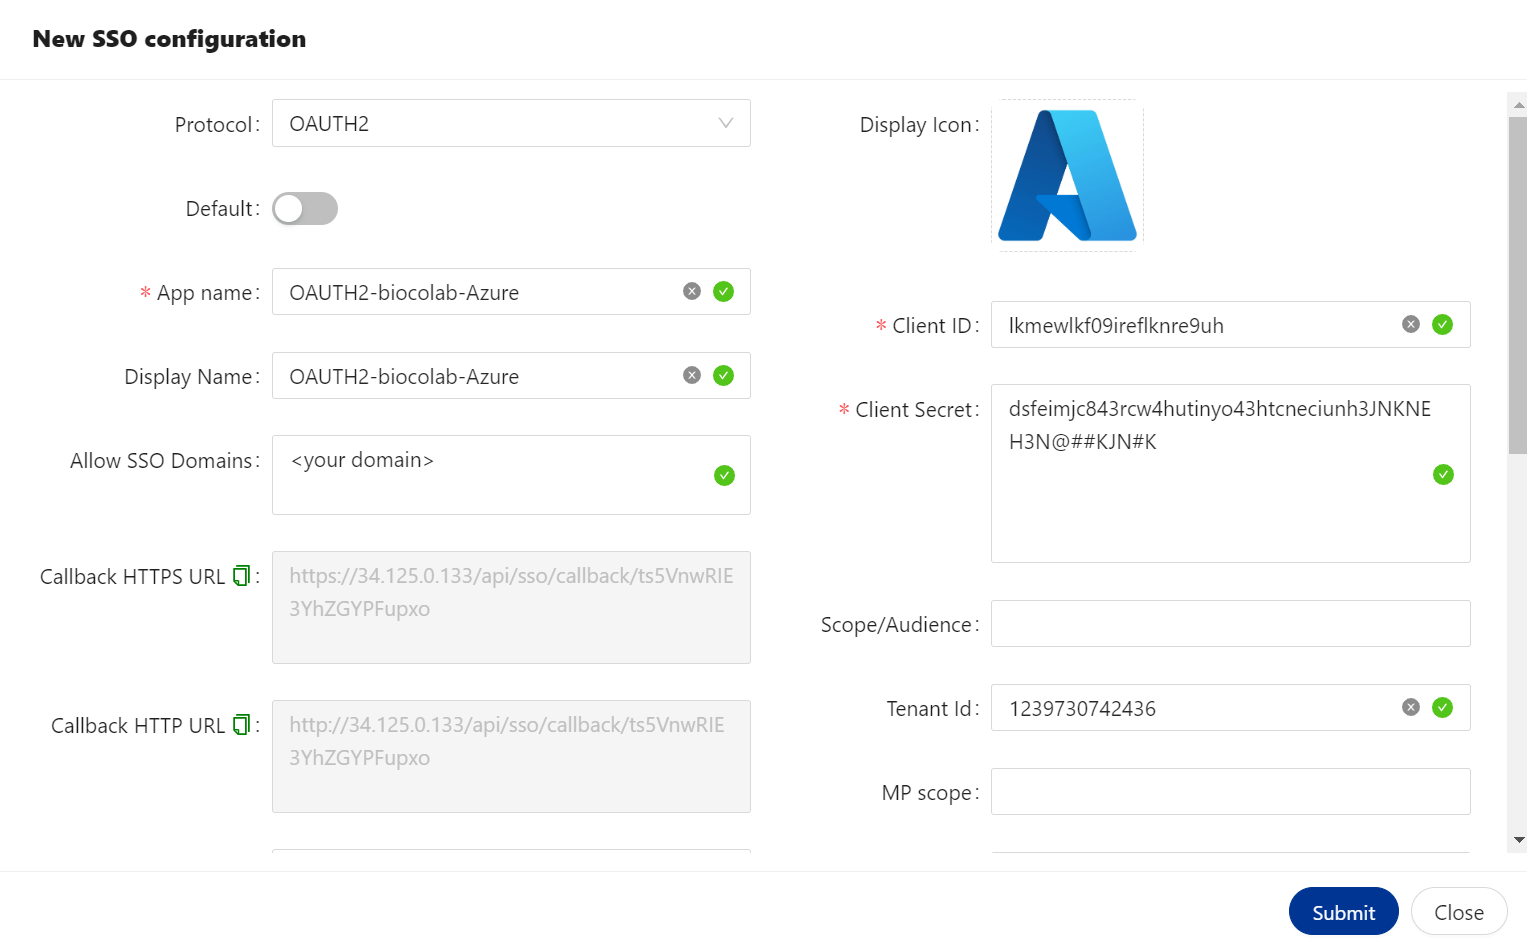
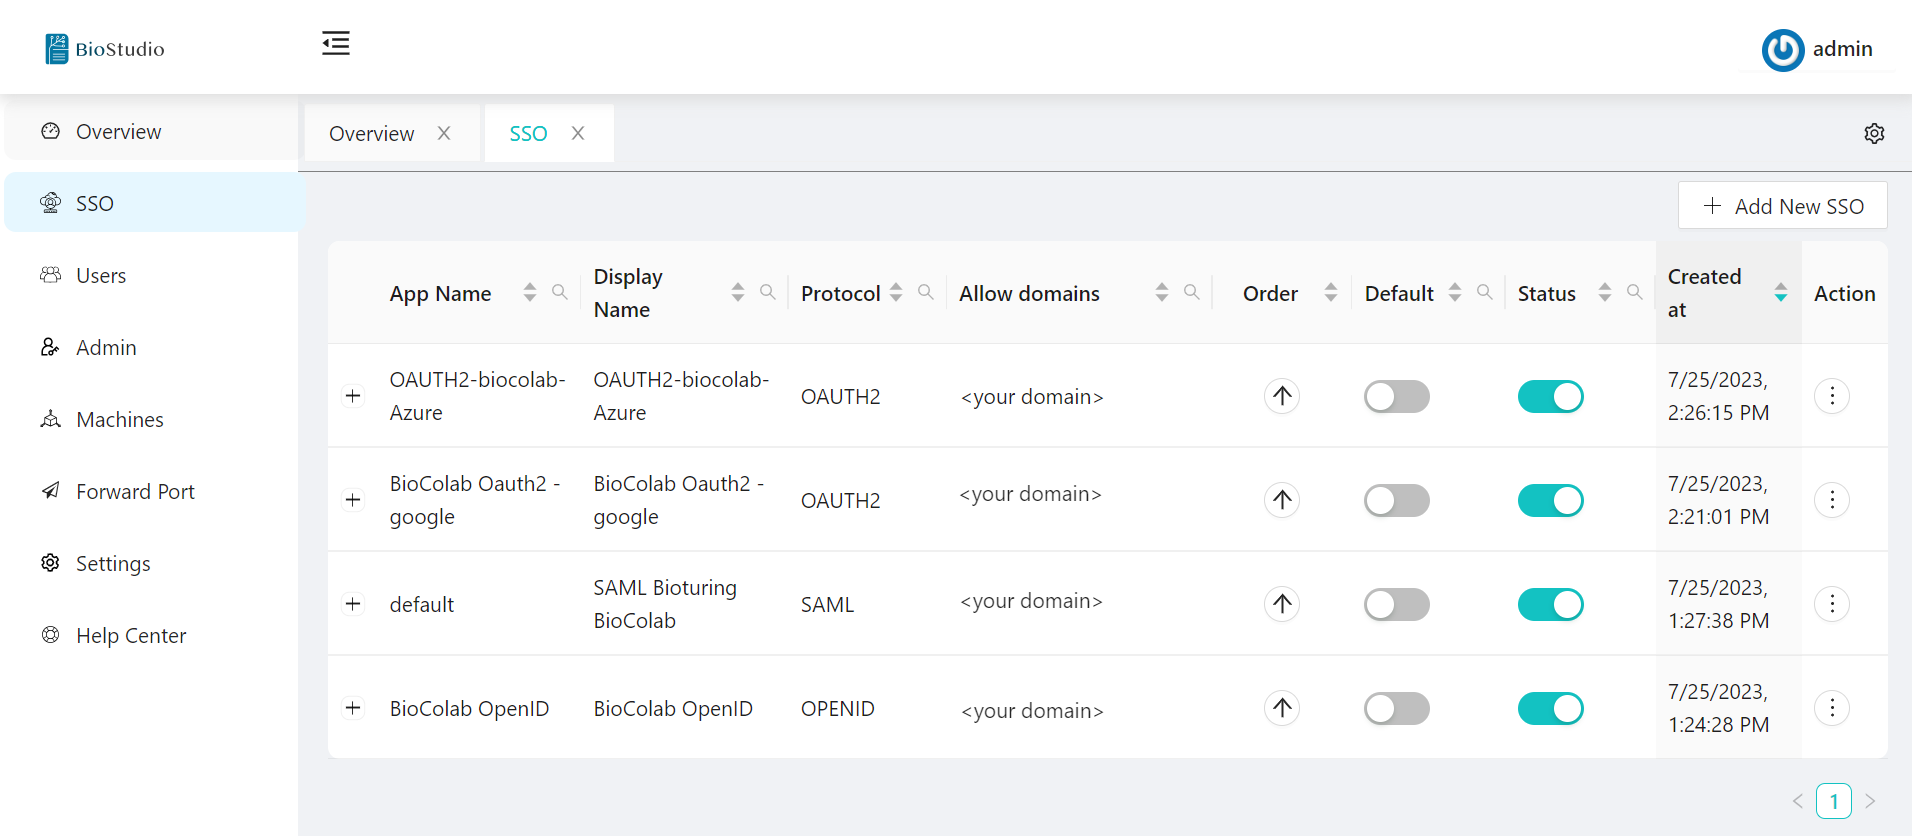
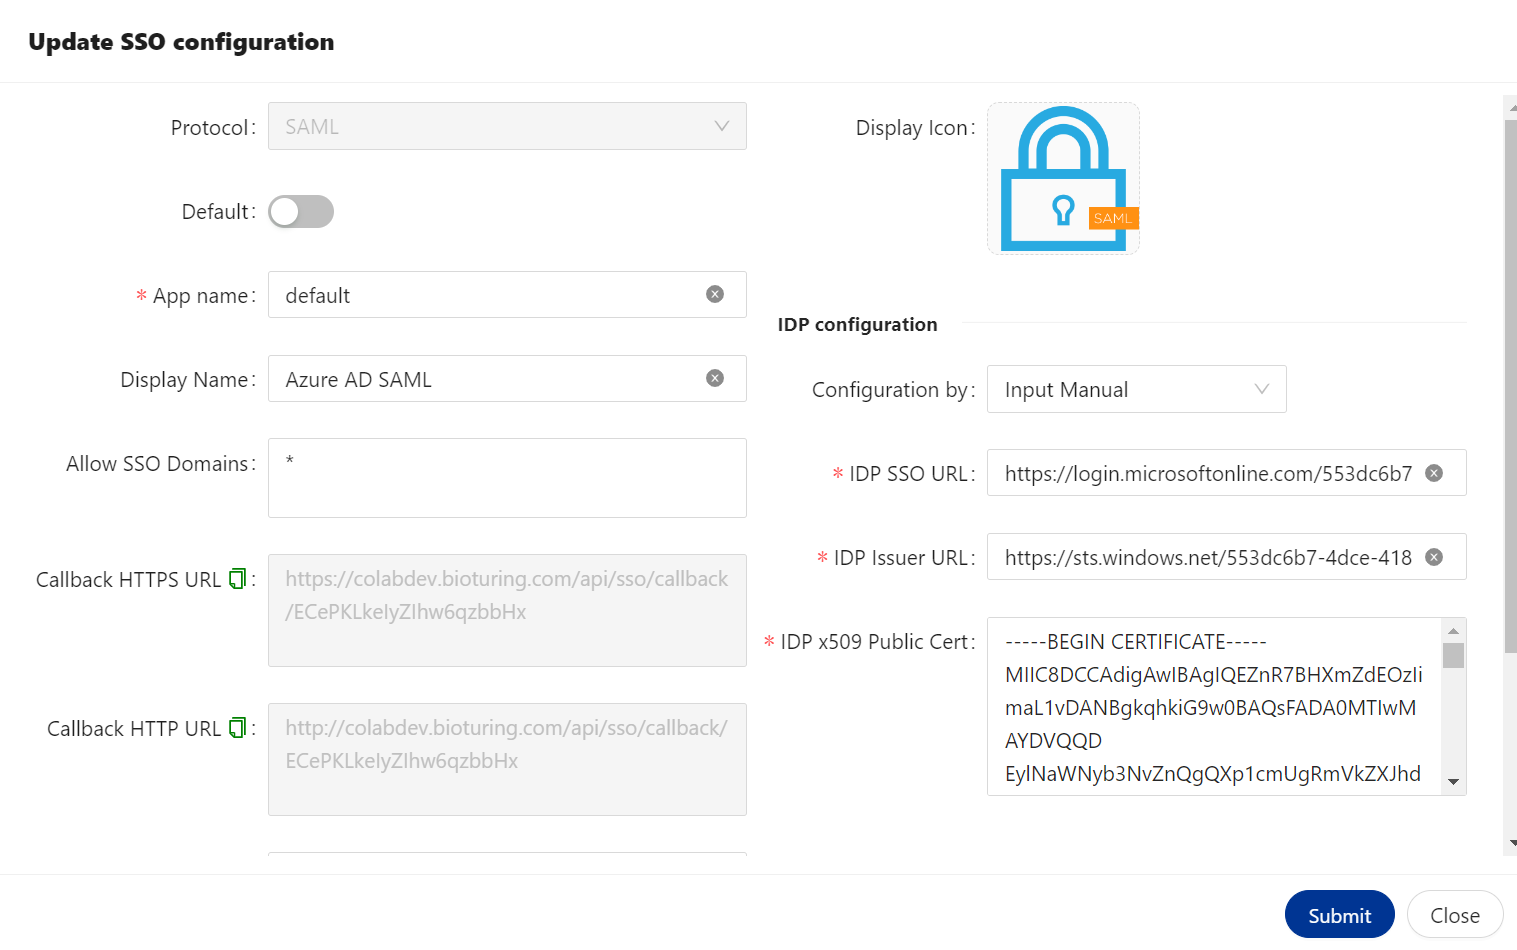
SSO configuration
¶🔆 Login to Dashboard using admin credential.
🔗 https://<Domain Name>/dashboard
🔗 http://<Domain Name>/dashboard
🔆 Select SSO on ⬅️ left side menu.
🔆 Click on ➡️ + Add New SSO push button.
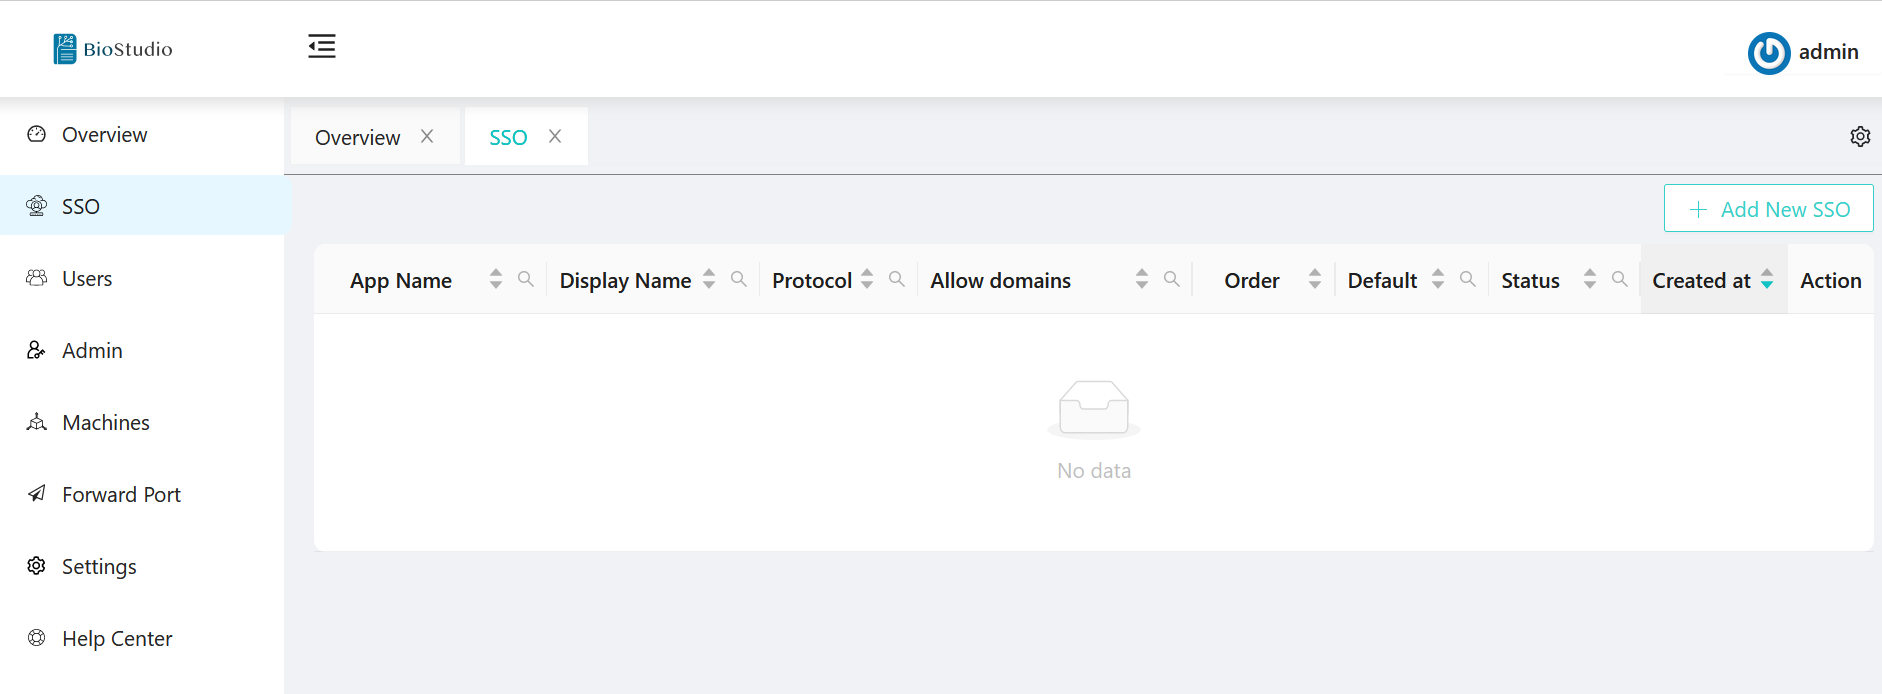
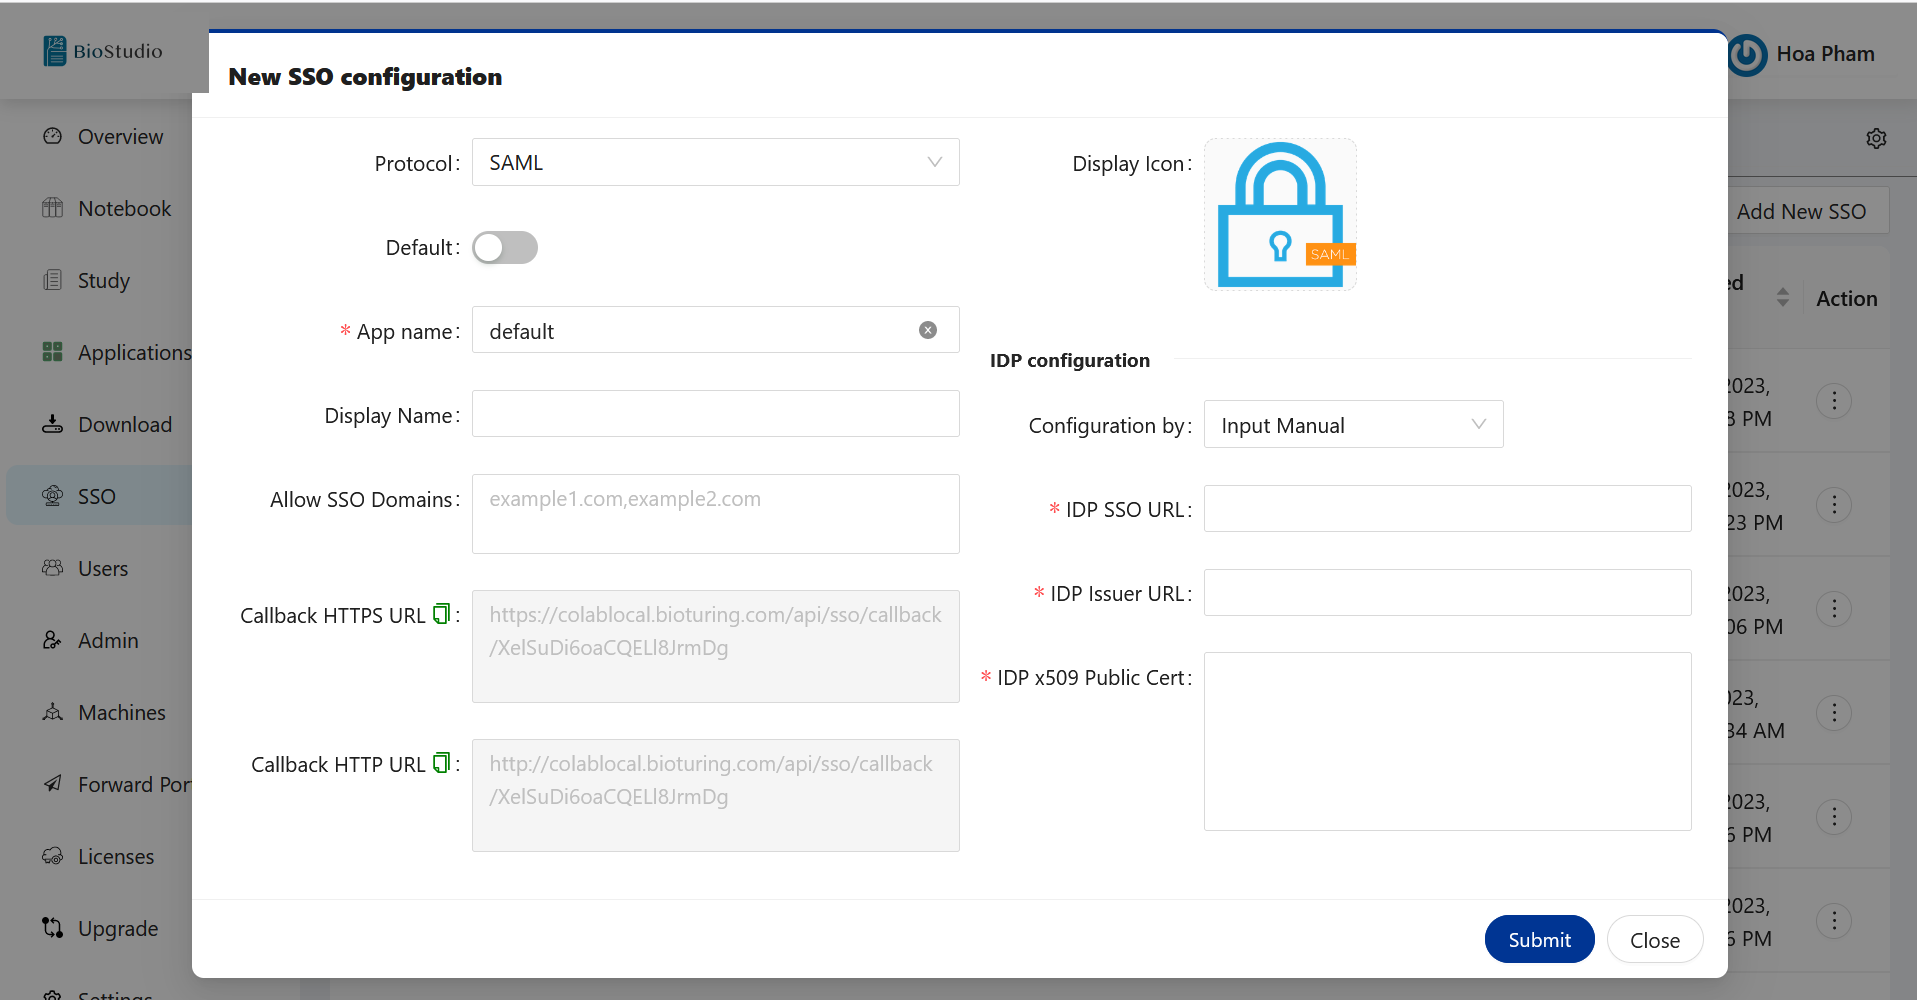
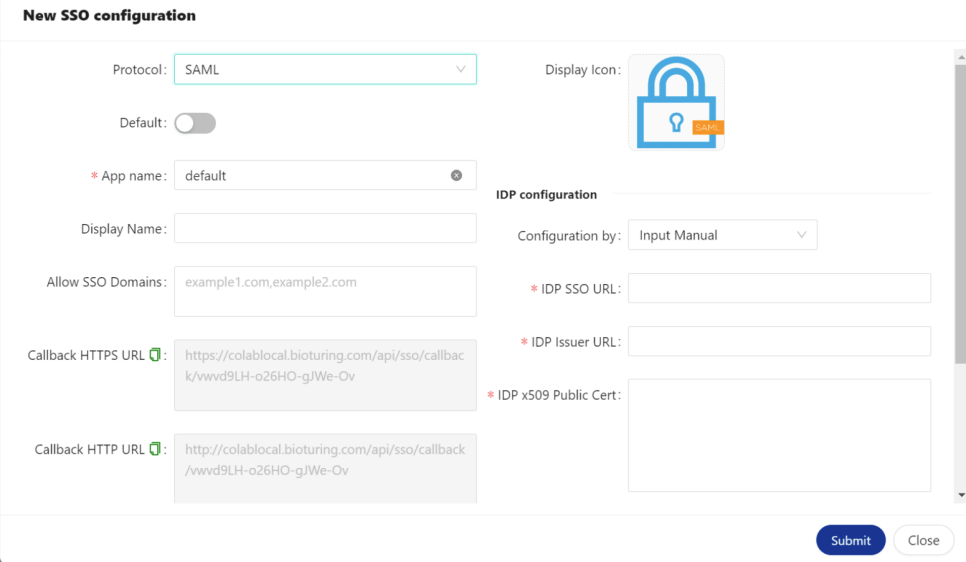
🔶 New SSO configuration.
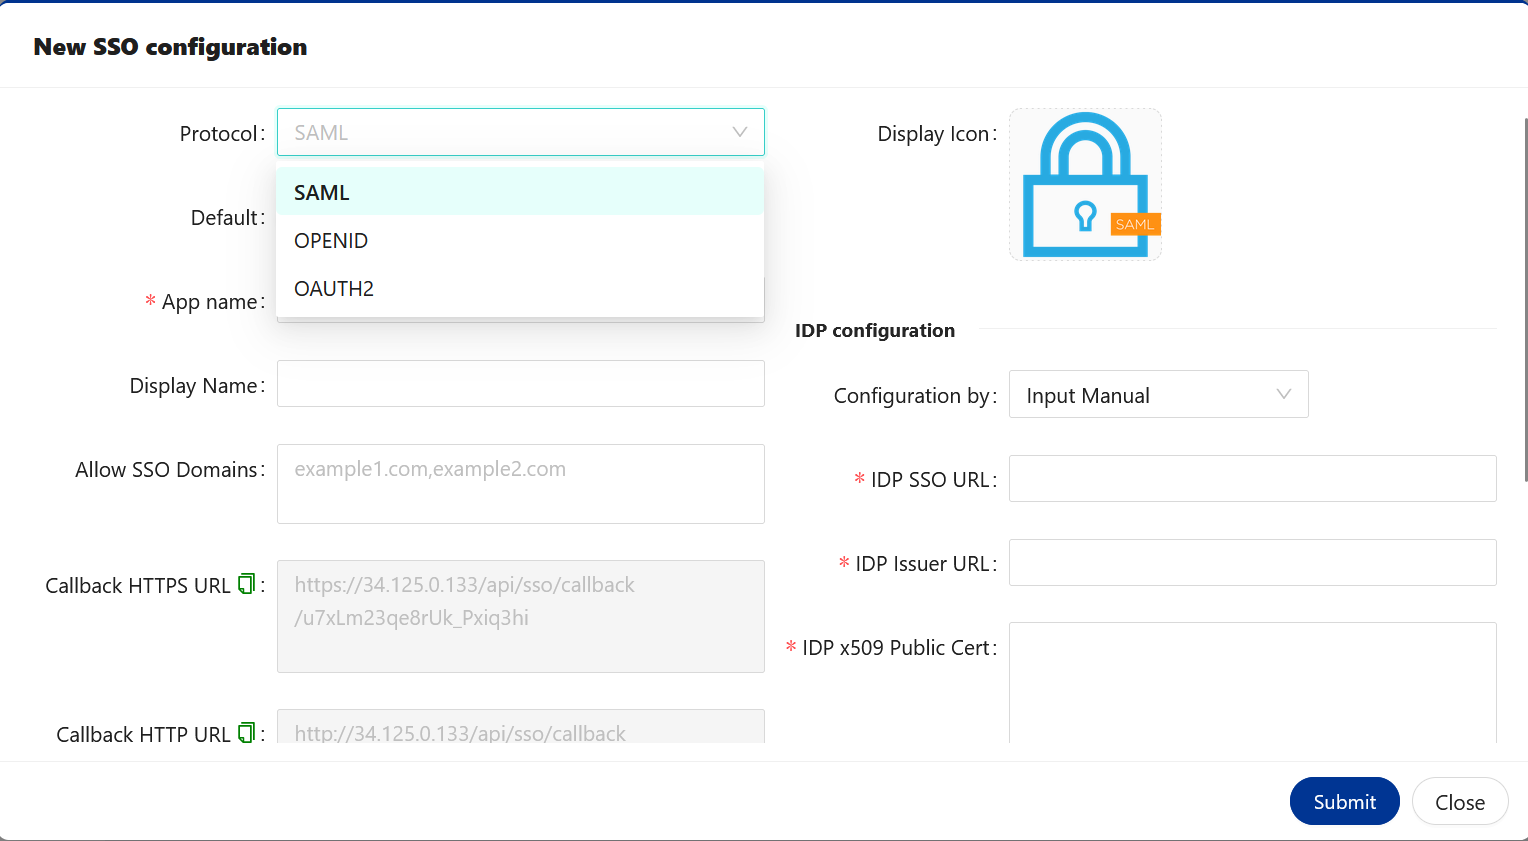
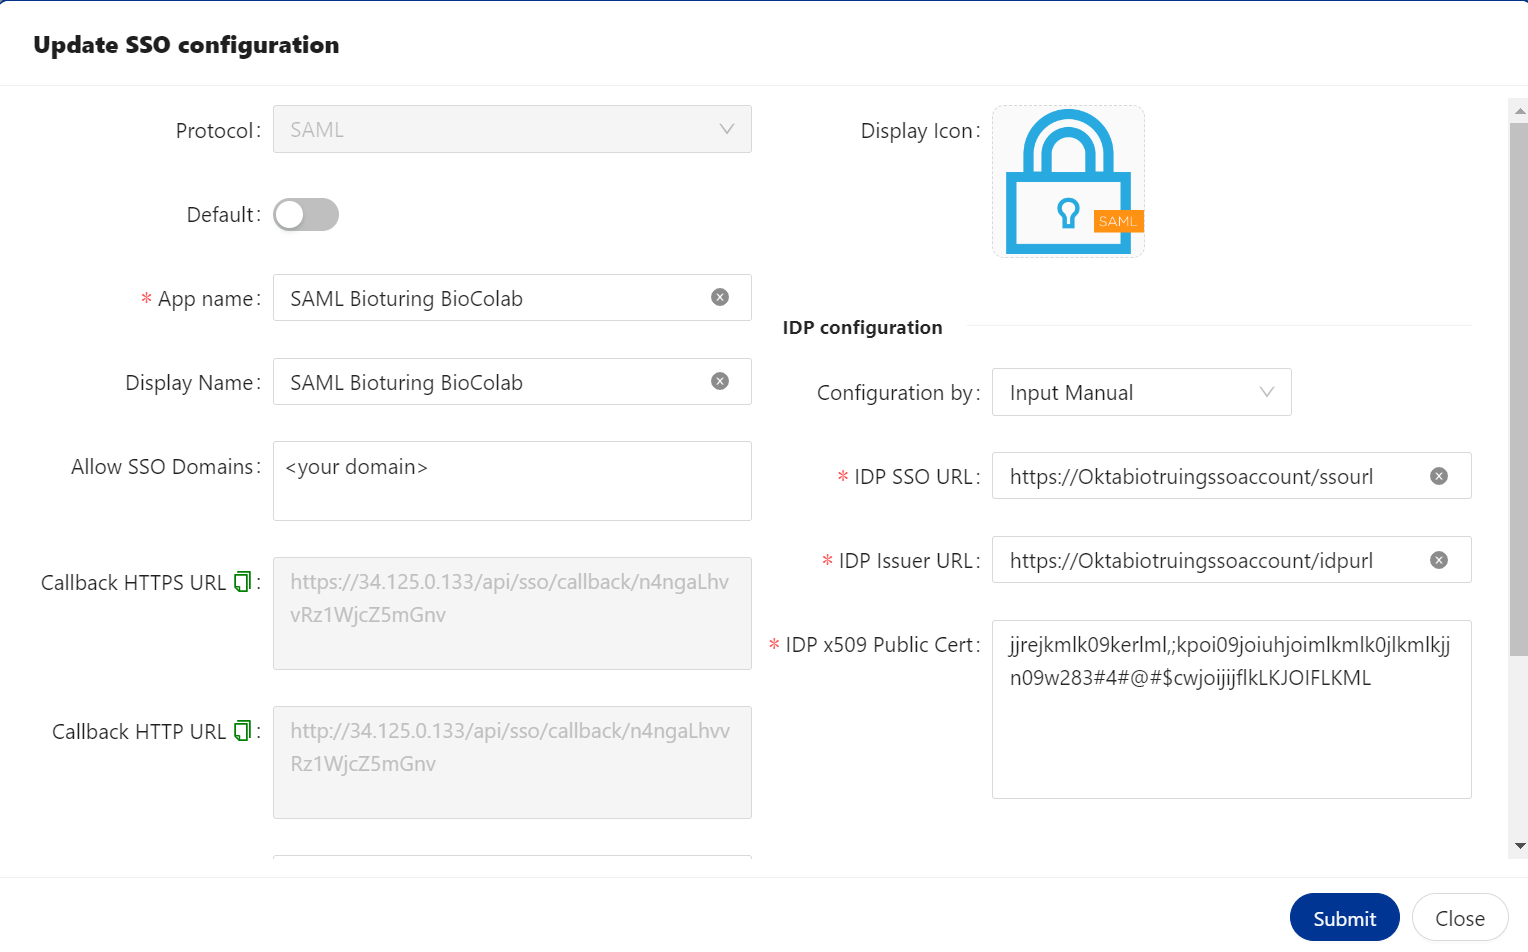
| Option | Description |
|---|---|
| Protocol | Rules that you would like to select for SSO configuration. It could be SAML, OPENID or OAUTH2. |
| Default | If you are configuring - multiple SSO service providers. You can mark one of them to use as a default by enabling Default option. |
| App name | Specified application name. You can provide any name. |
| Display Name | Name that you would like to use for SSO configuration. You can provide any name. |
| Allow SSO Domains | This option allow you to restrict access to an application. Only selected domain are allow to access this application. Kindly provide your domain name, if you wish to allow to access user’s belongs to your domain. |
| Callback HTTPS URL | We must use this URL to configure SSO, if BioStudio configured with SSL access. So that once Authentication Successful. User will allow to access BioStudio application. |
| Callback HTTP URL | We must use this URL to configure SSO, If BioStudio configured without SSL. So that once Authentication Successful. User will allow to access BioStudio application. |
| Type | Select what type of IDP service provider you are going to use. value will be changed based on selected Protocol. |
| Subtype | If you have more type of IDP. Type vlaue in Subtype. |
| Disable SSL | By default SSL is disabled. If you would like to auth. with server’s keys. Enable it and you can have public and private key to configure SSO. |
| Configuration by | You can select to provide value by manual, Ready from XML content or Ready from XML file URL. |
| IDP SSO URL | Identity Provider SSO URL that you can get it from IDP. |
| IDP Issuer URL | Identity Provider Issuer URL that you can get it from IDP. |
| IDP x509 Public Cert | Identity Provider certificate. That you can download or copy the content and provide it here. |
🔔 Note: Callback HTTPS URL, Callback HTTP URL is not static and will change each time for new SSO configuration for the same potocol.
🔐 Solution: We can provide dummy values to mendatory fields and click on Submit button to 💾 save. Once saved, We can provide Callback URL to SSO IT department for further configuration. Collect all required values after configuring Callback URL from IDP and configure it further by update SSO.
🔶 SAML Protocol
SAML is an XML-based authentication protocol in which Identity Providers (IdP) -- entities that manage and store user credentials -- exchange digitally signed XML documents (SAML Assertions) allowing an end-user to access a **Service Provider **(SP).
Here IDP could be Aliyum IDaas, KeyCloak, auth0, or any of IDP service provider, which come under default.
BioStudio is comes under service provider.
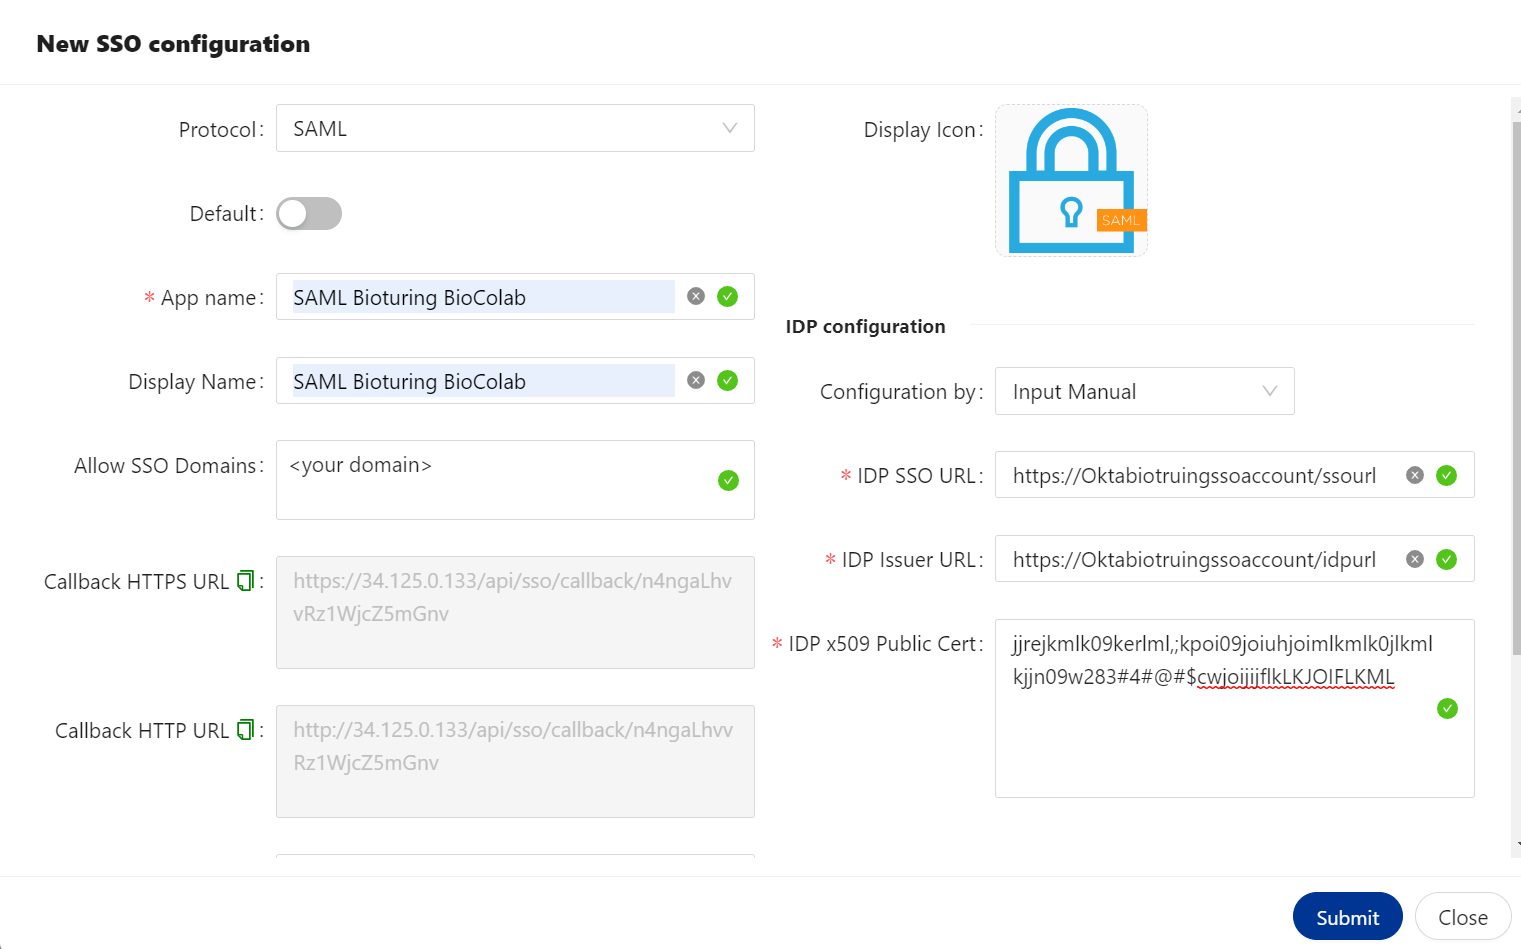
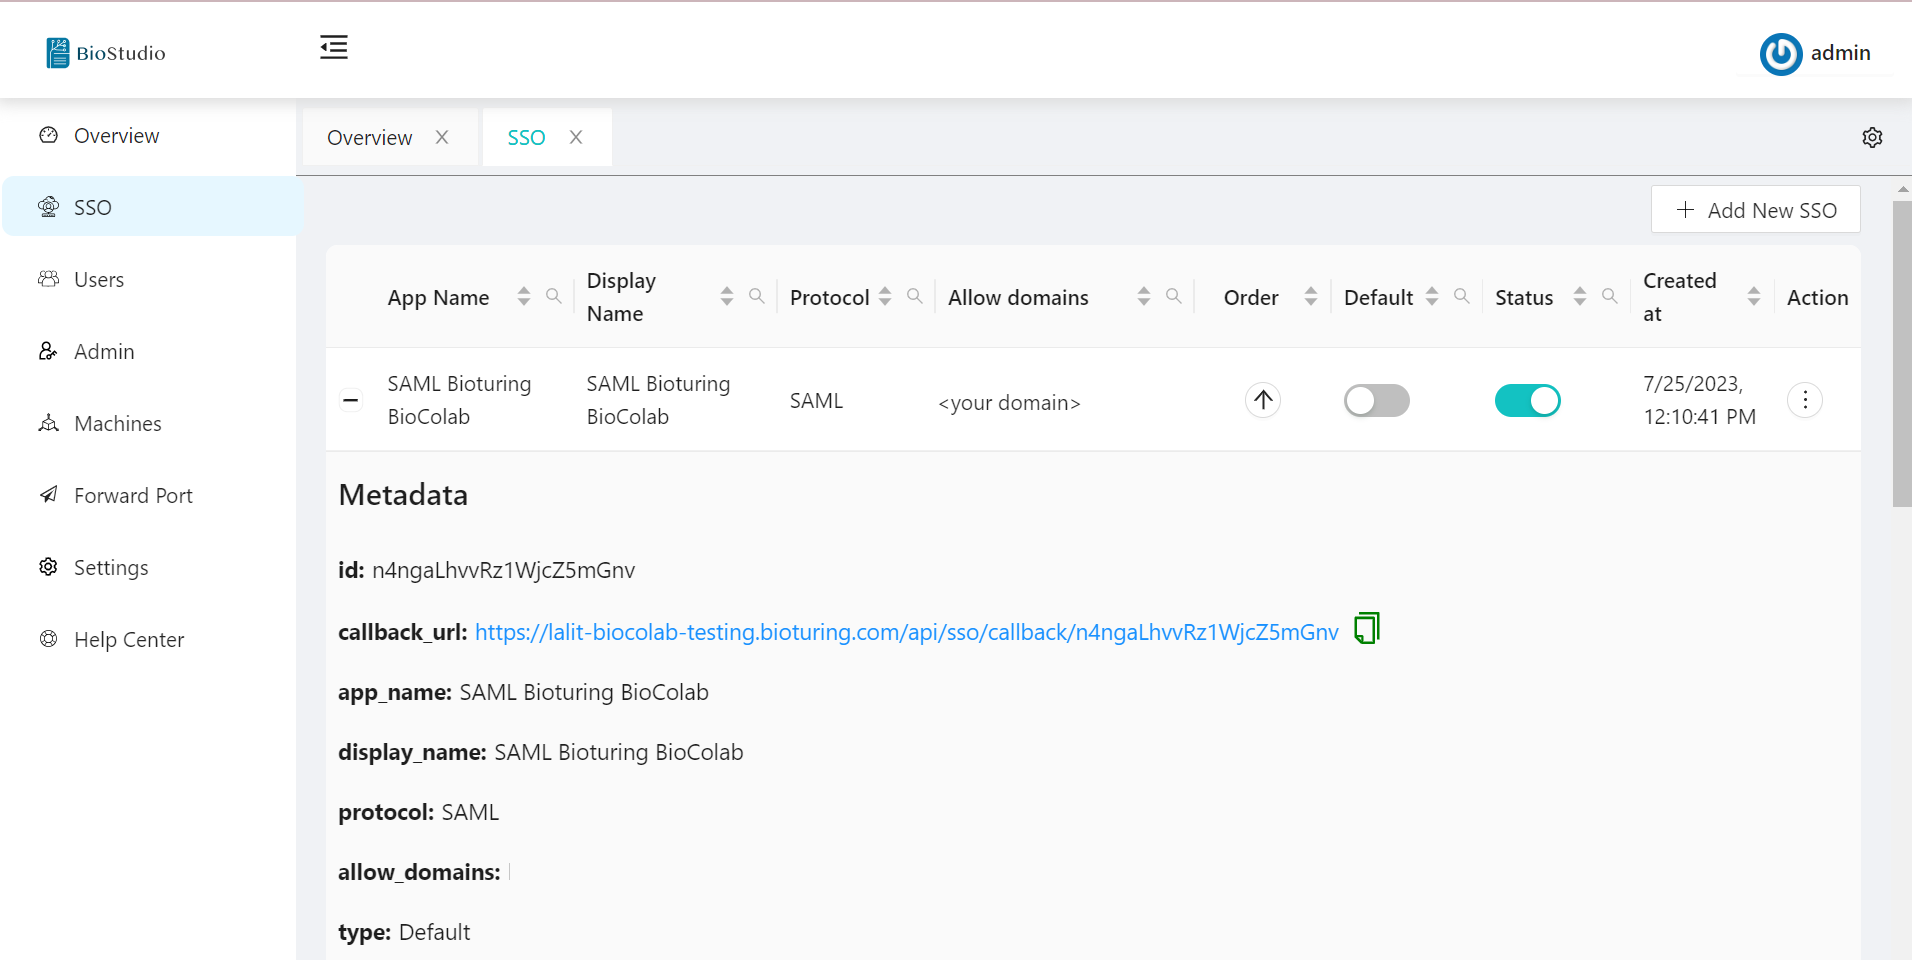
🔷 SAML Protocol Configured.
🔷 SAML Protocol view metadata.
# Once clicked on Submit button. You can view metadata by clicking + ( Plus sign)
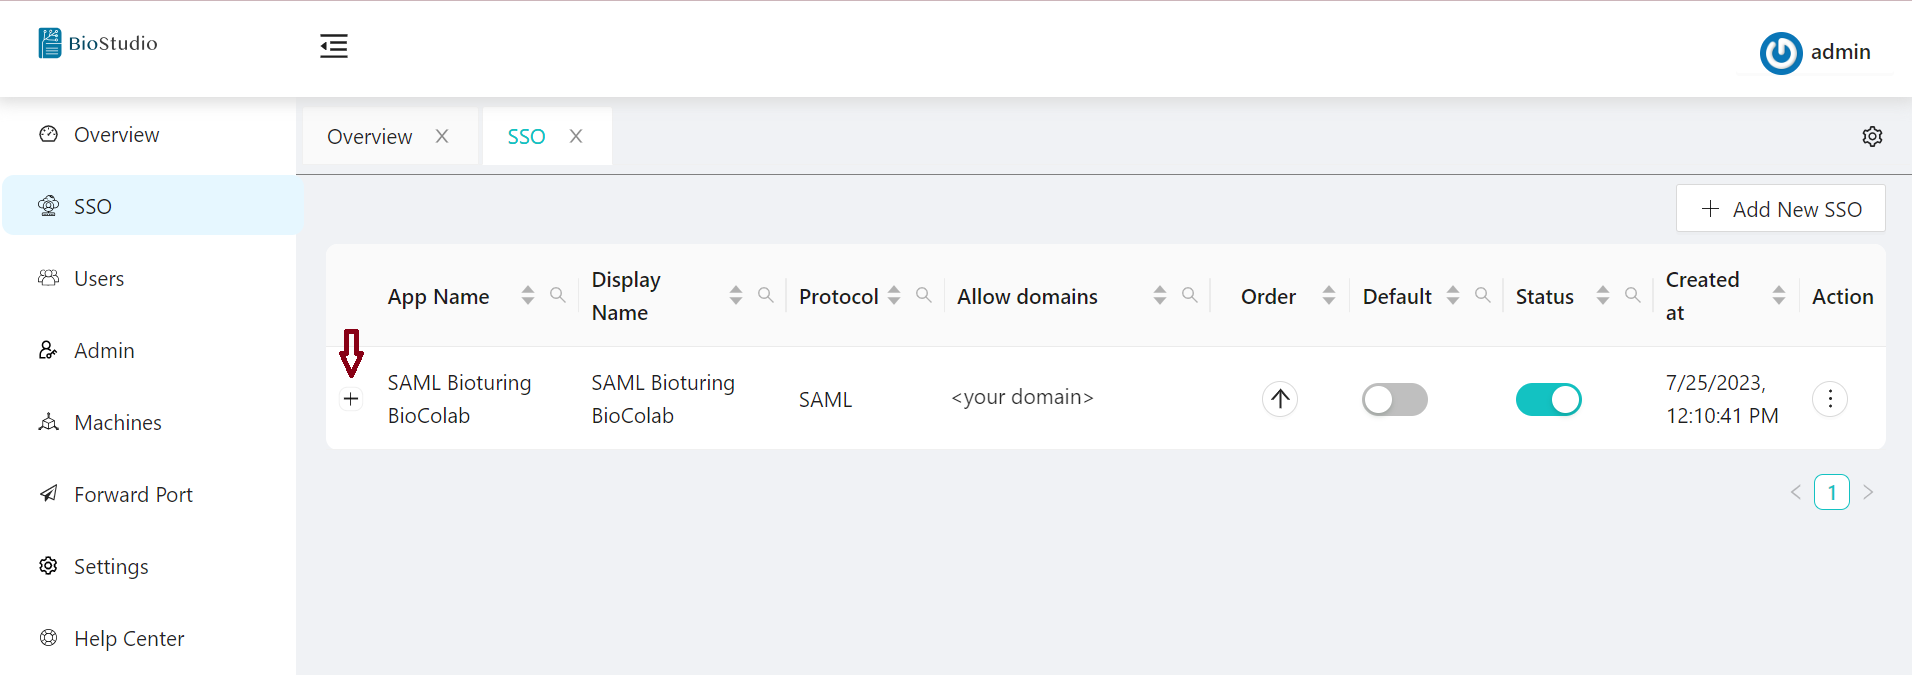
🔷 SAML metadata.
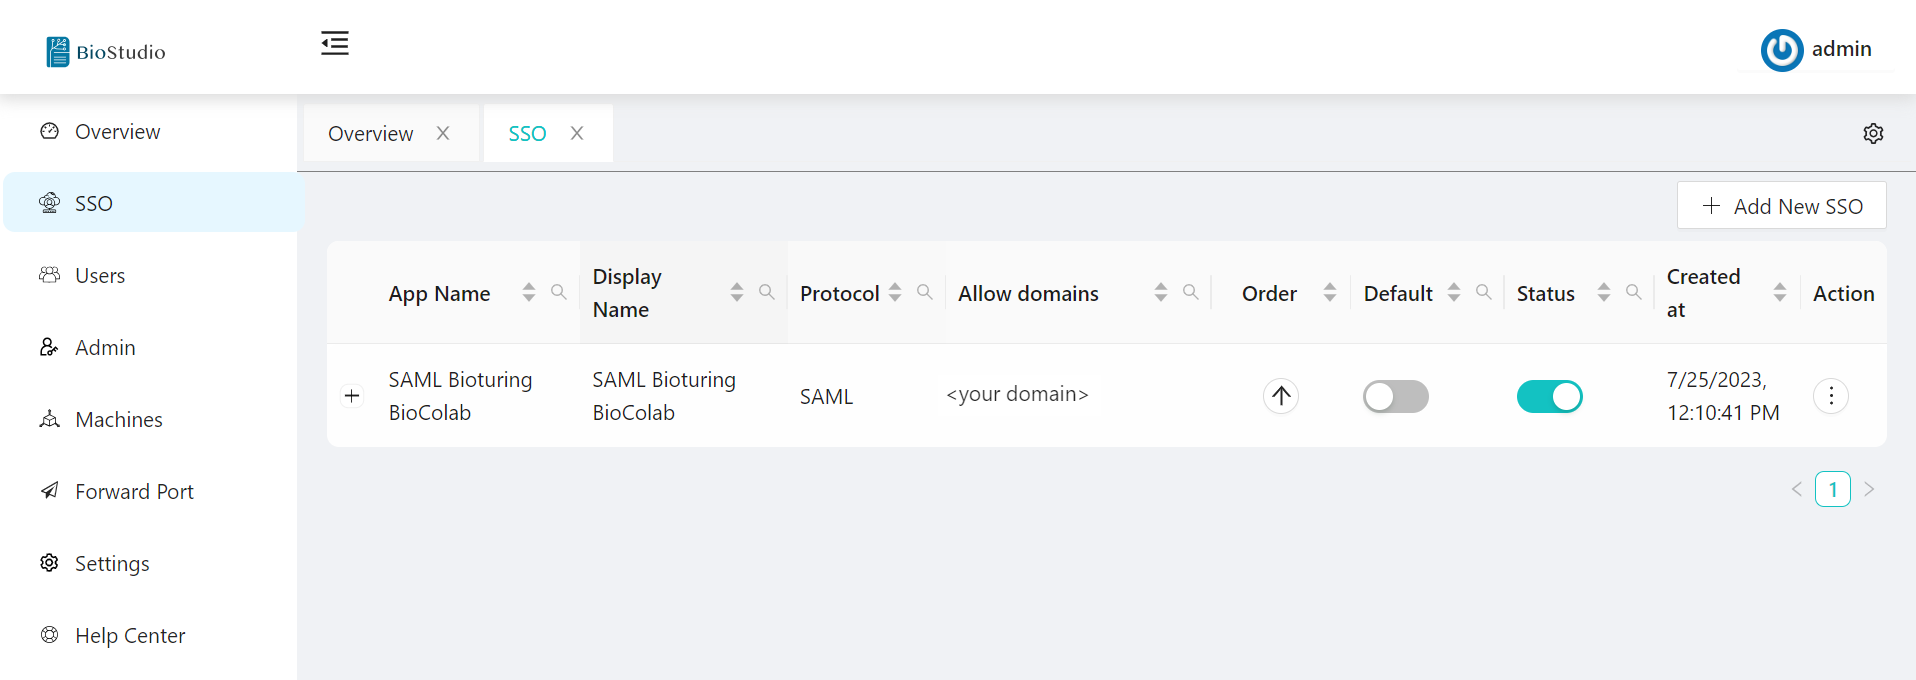
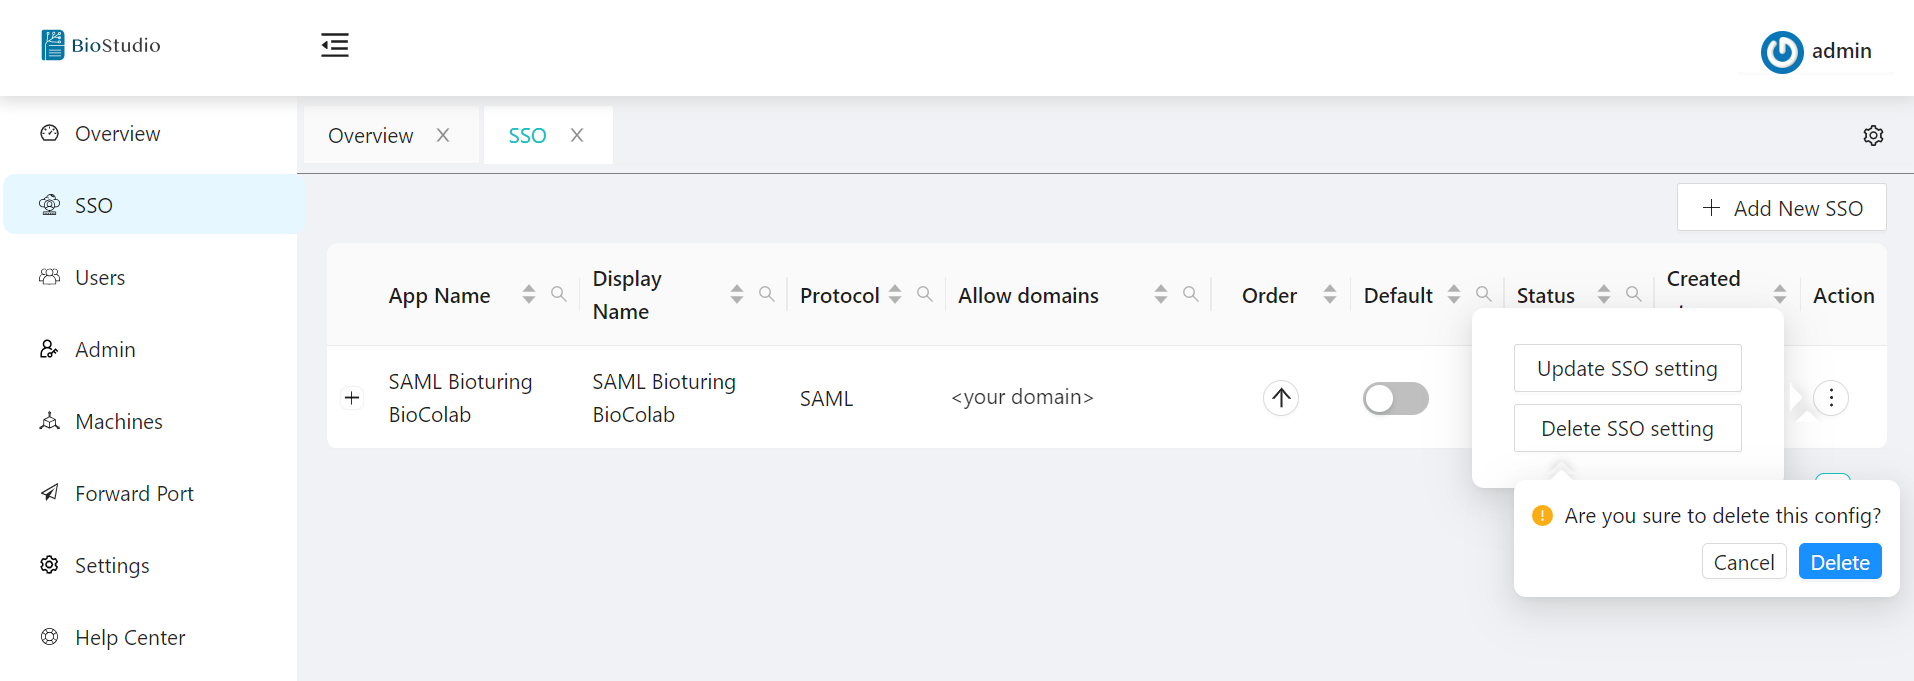
🔷 SAML Protocol update / delete method.
You can update the values of an existing SSO configuration whenever you want by selecting the update option for SSO.
# In Order to update or delete existing SSO configuration. Please follow steps are given below.
1. Login to the dashboard using Admin credential.
2. Select SSO option available on left side menu.
3. Select SSO Application -- Action three DOTS to select your choice to update or delete.
# option - Action.
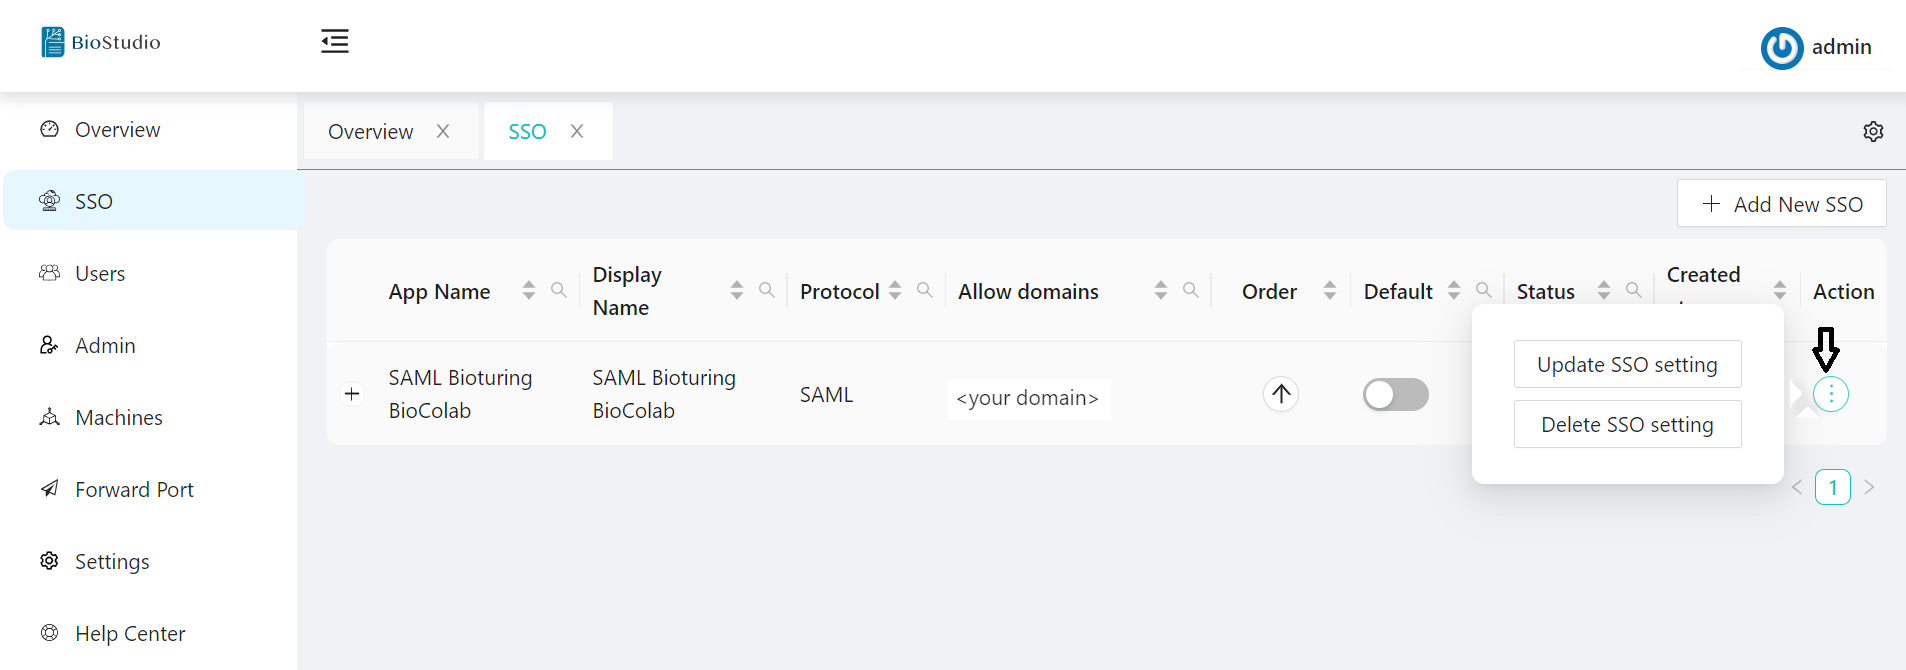
# option - Update.
# option - Delete.
🔶 OPENID Protocol.
OpenID Connect is an interoperable authentication protocol based on the OAuth 2.0 framework of specifications (IETF RFC 6749 and 6750). It simplifies the way to verify the identity of users based on the authentication performed by an Authorization Server and to obtain user profile information in an interoperable and REST-like manner.
🔷 OPENID configured.
🔶 OAUTH2 Protocol.
The OAuth 2.0 is the industry protocol for authorization. It allows a user to grant limited access to its protected resources. Designed to work specifically with Hypertext Transfer Protocol (HTTP), OAuth separates the role of the client from the resource owner. The client requests access to the resources controlled by the resource owner and hosted by the resource server. The resource server issues access tokens with the approval of the resource owner. The client uses the access tokens to access the protected resources hosted by the resource server.
We are providing all type of IDP’s to configure SSO using OAUTH2. List is given above.
🔷 OAUTH2 configured with Google.
🔷 OAUTH2 configured with Azure.
In above explanation, We configured four types of SSO. It will appears to users during login to decide login method.
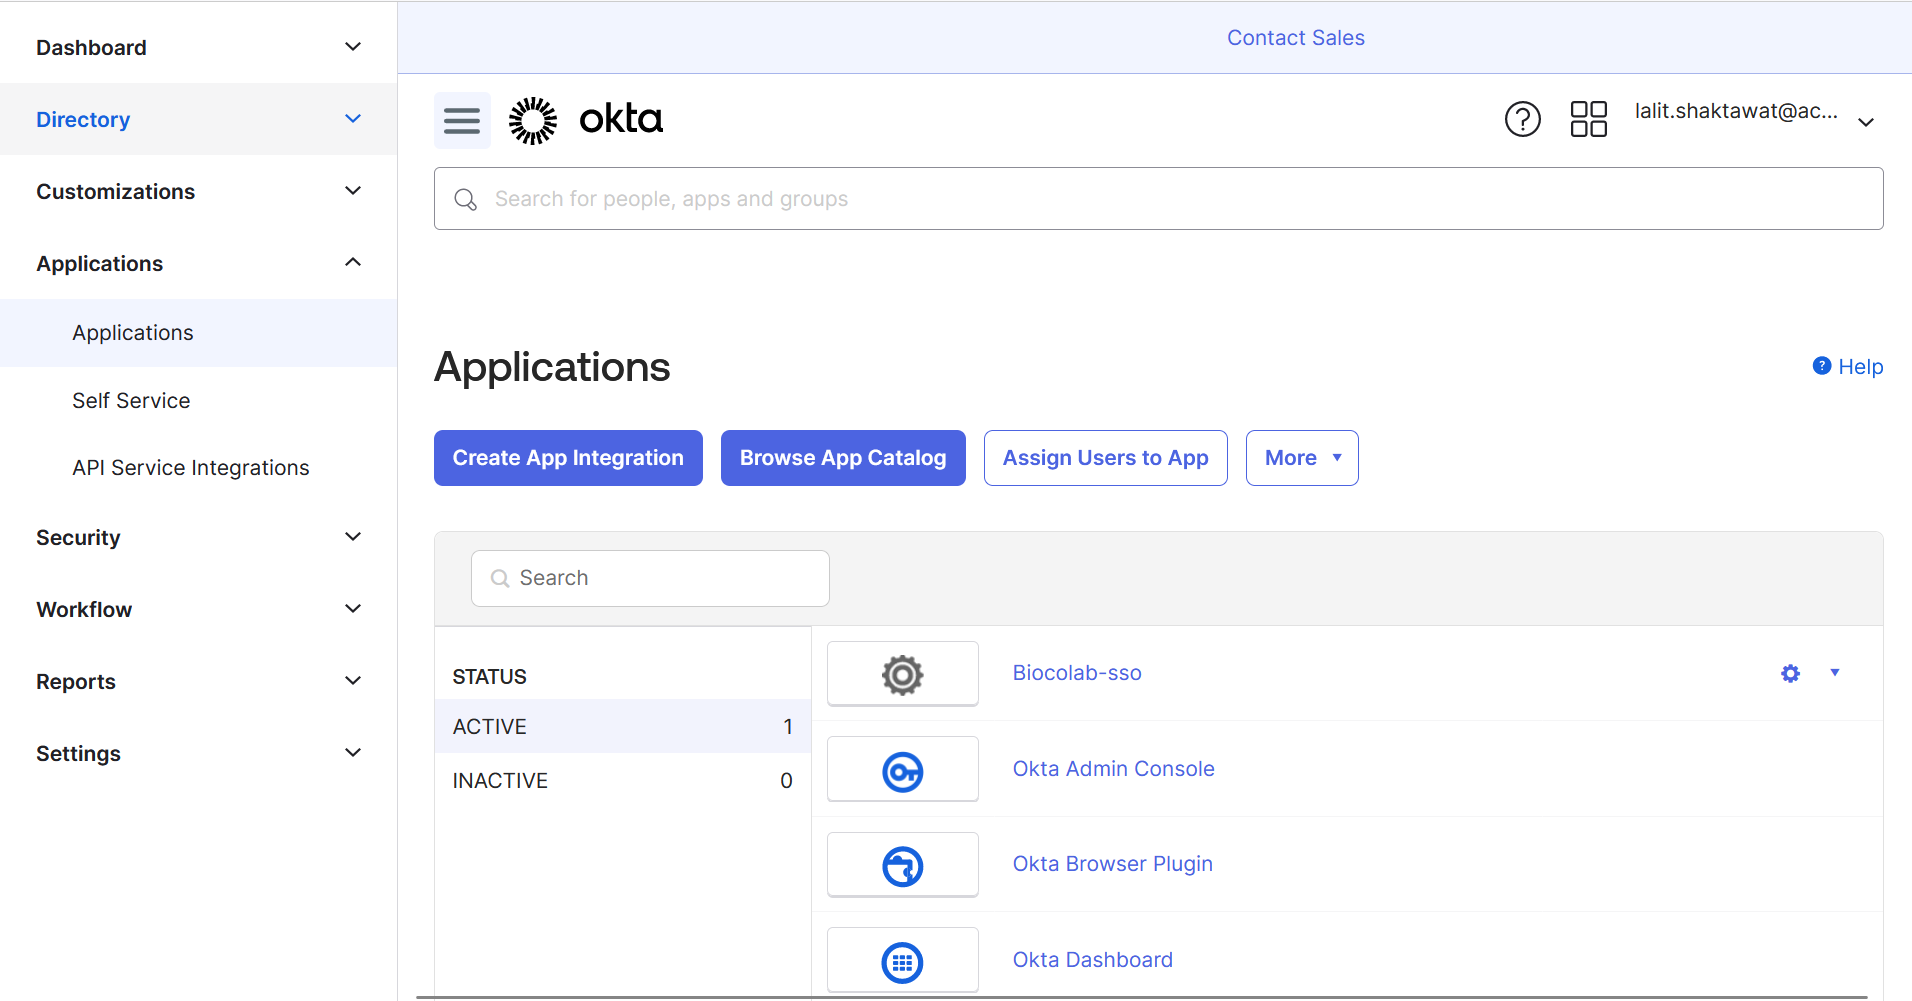
SSO set up with Okta 
⭕ Login to Okta Account for SAML / OPENID.
⭕ We are illustrating for SAML.
⭕ Click on admin account push button and login to your Okta admin account.
NOTE: Kindly follow the instructions and steps based on your infrastructure / IT department team.
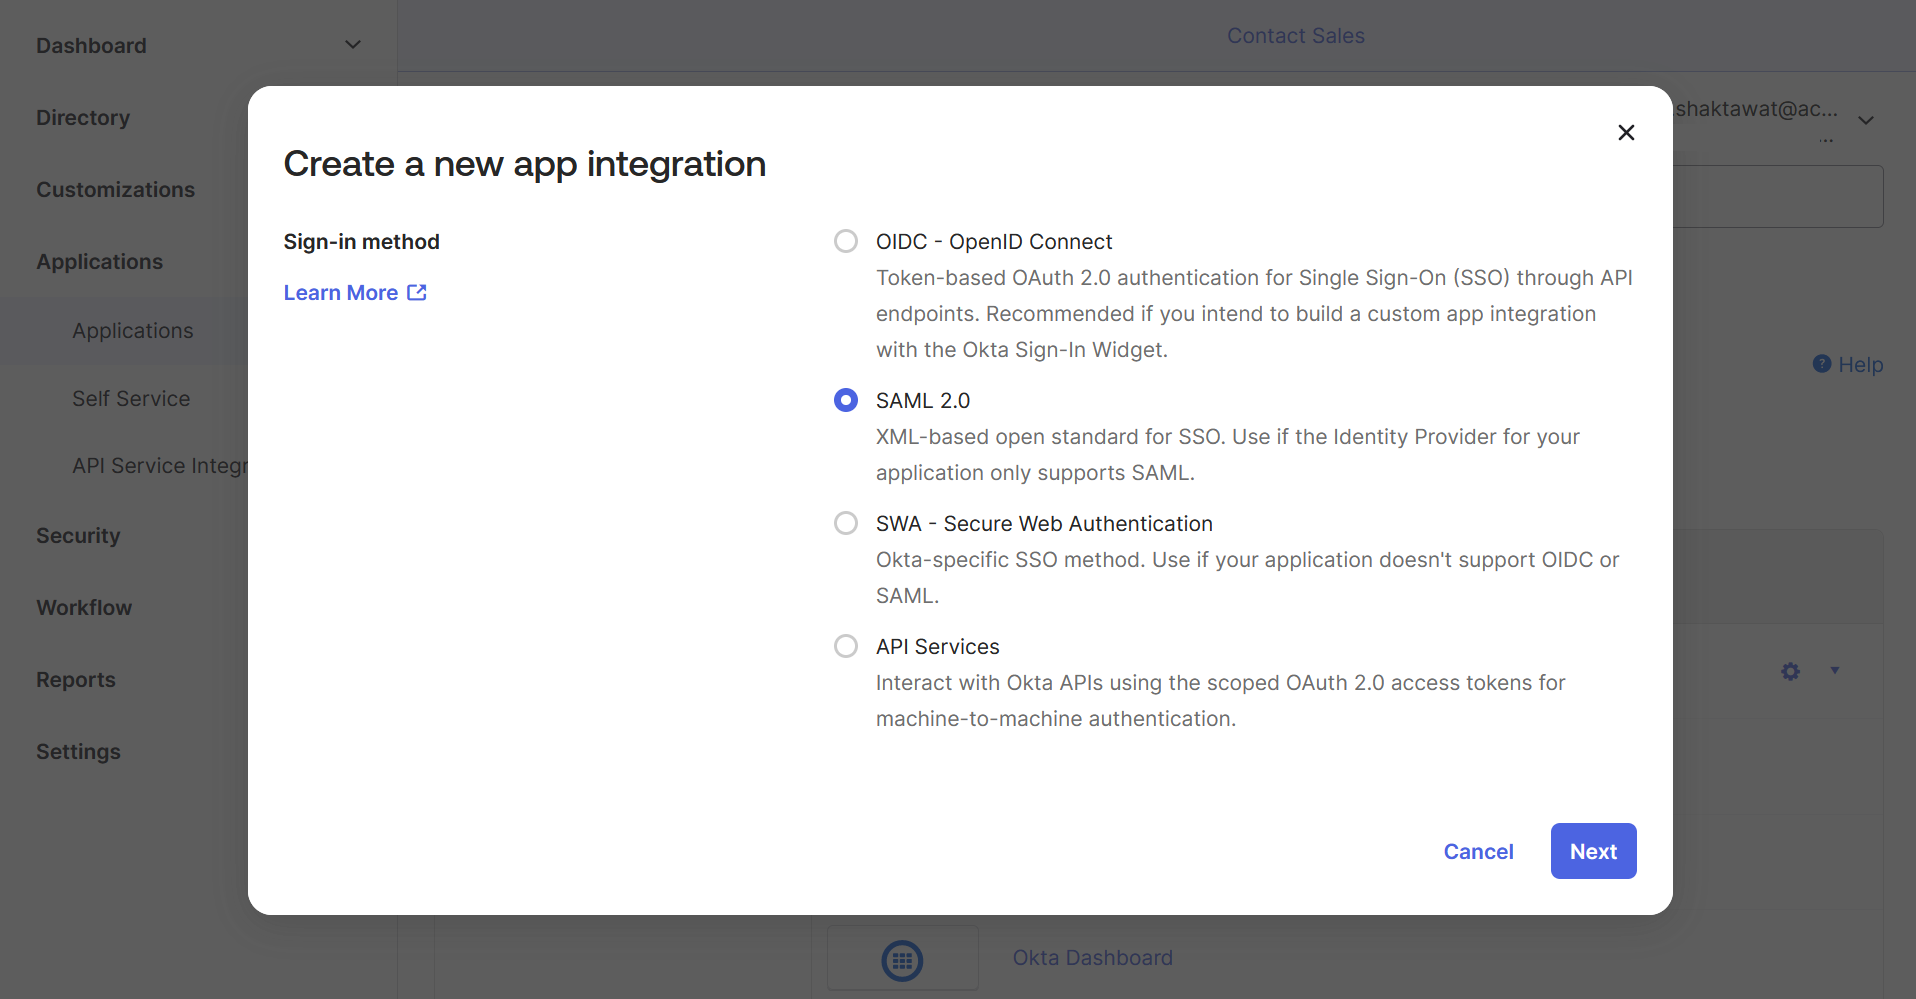
🔶 Click on Create App Integration.
🔶 Select SAML 2.0
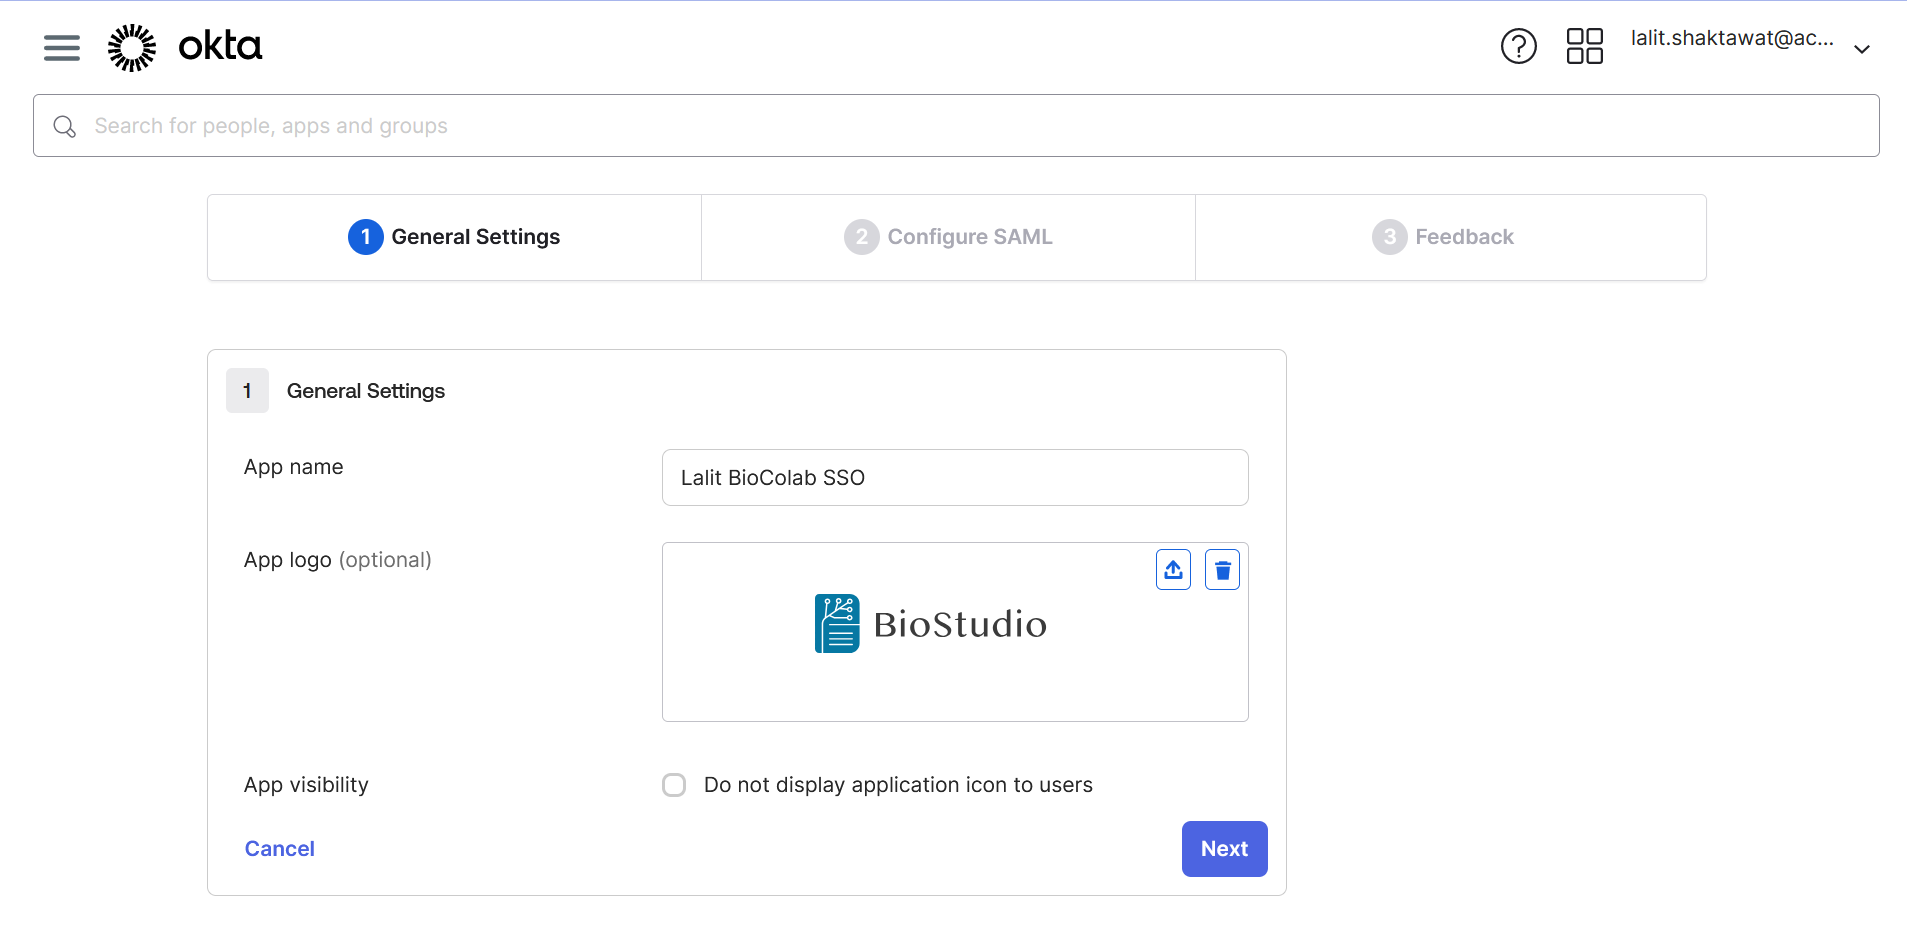
🔶 Write App name

🔶 Upload application logo ( If you wish ).
🔶 On BioStudio dashboard login. Select SSO ➡️ Add New SSO.
🔶 Copy callback URL from New SSO login and update on Okta.
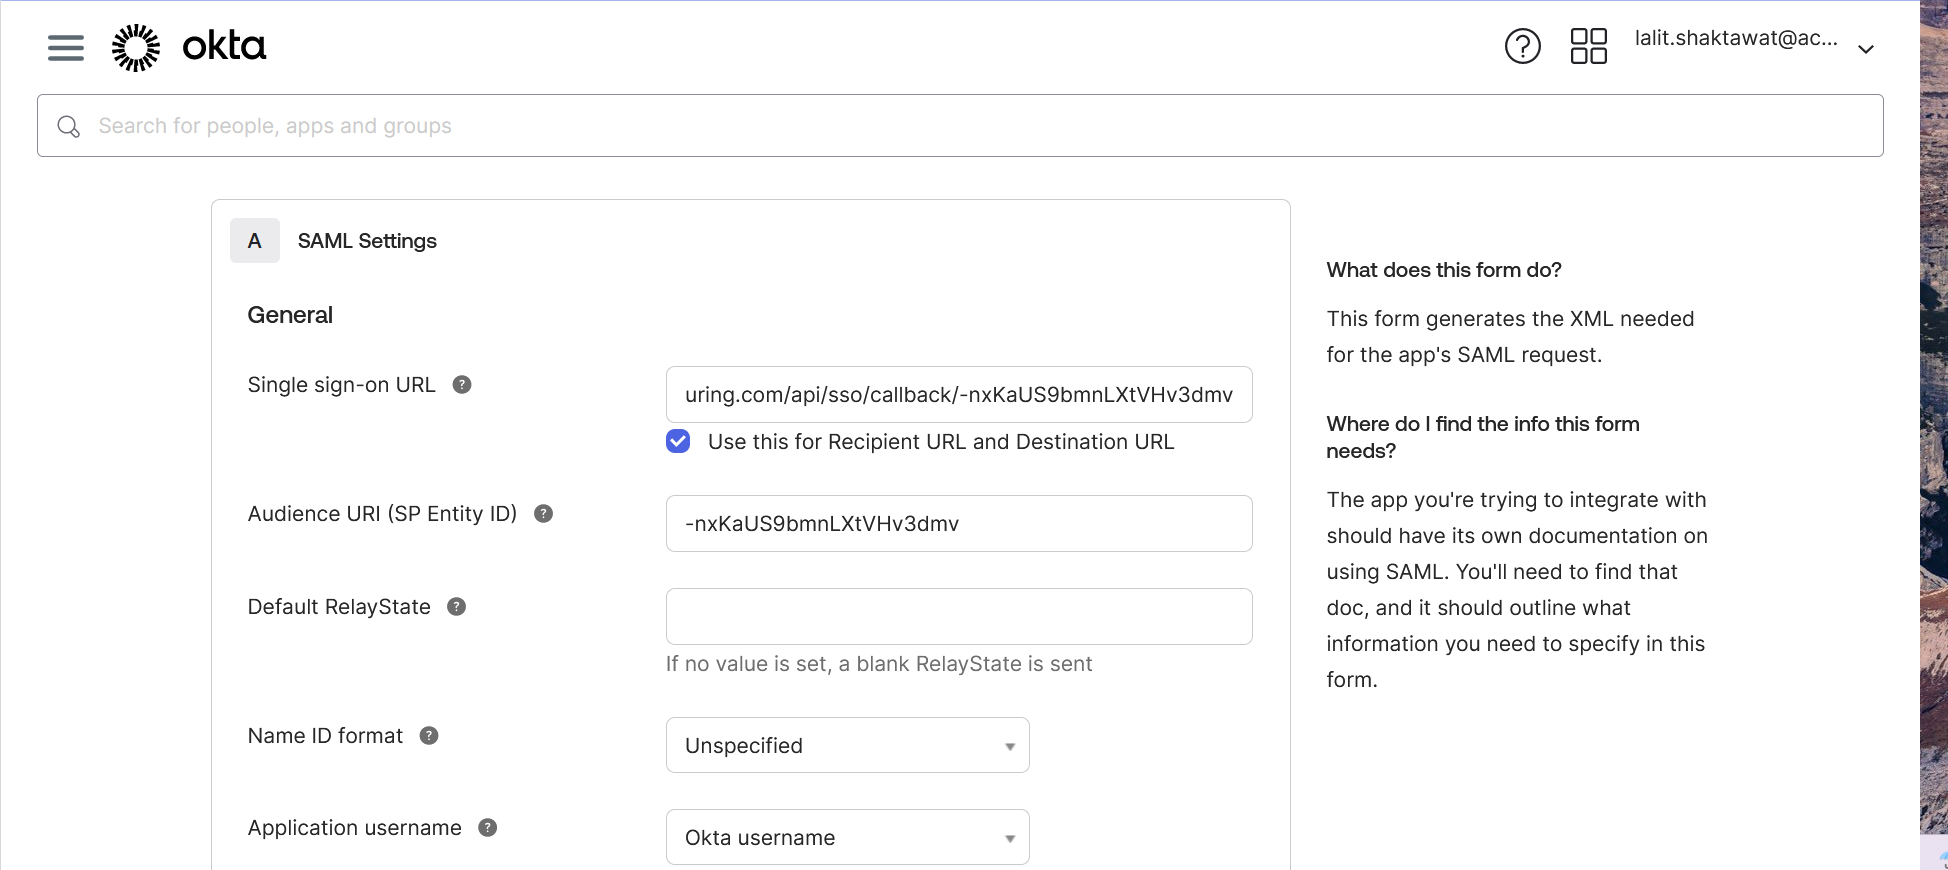
🔶 Scroll down and click on Next
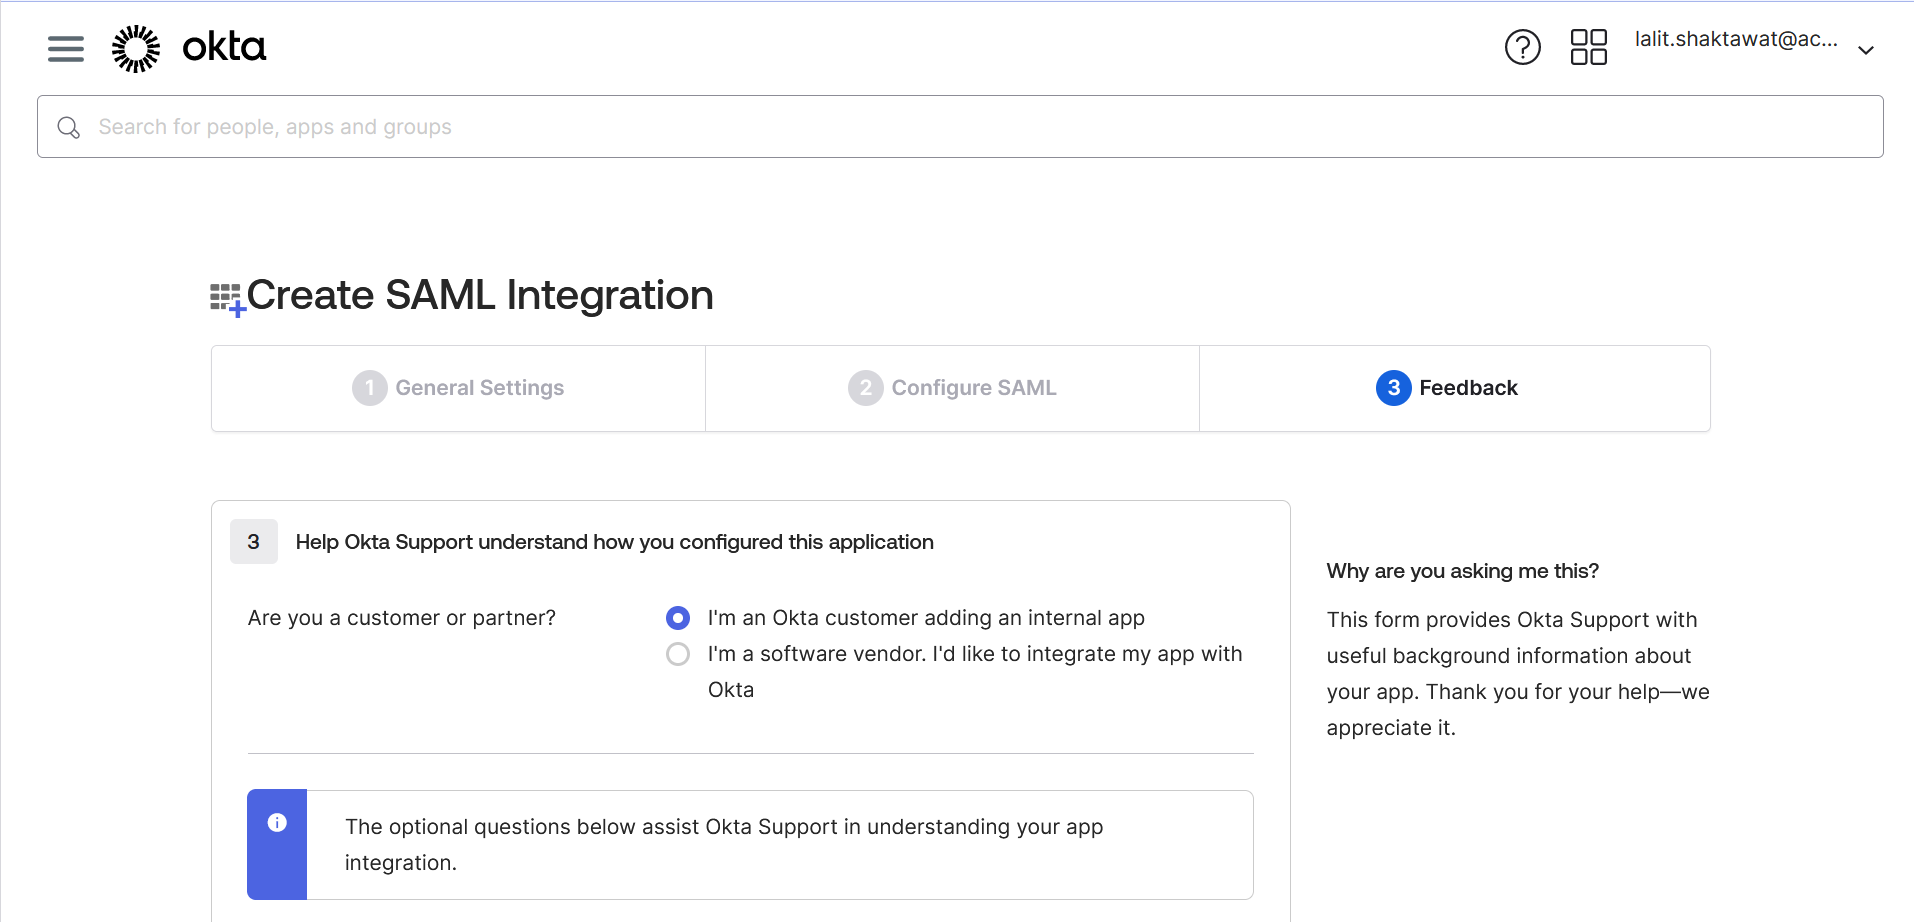
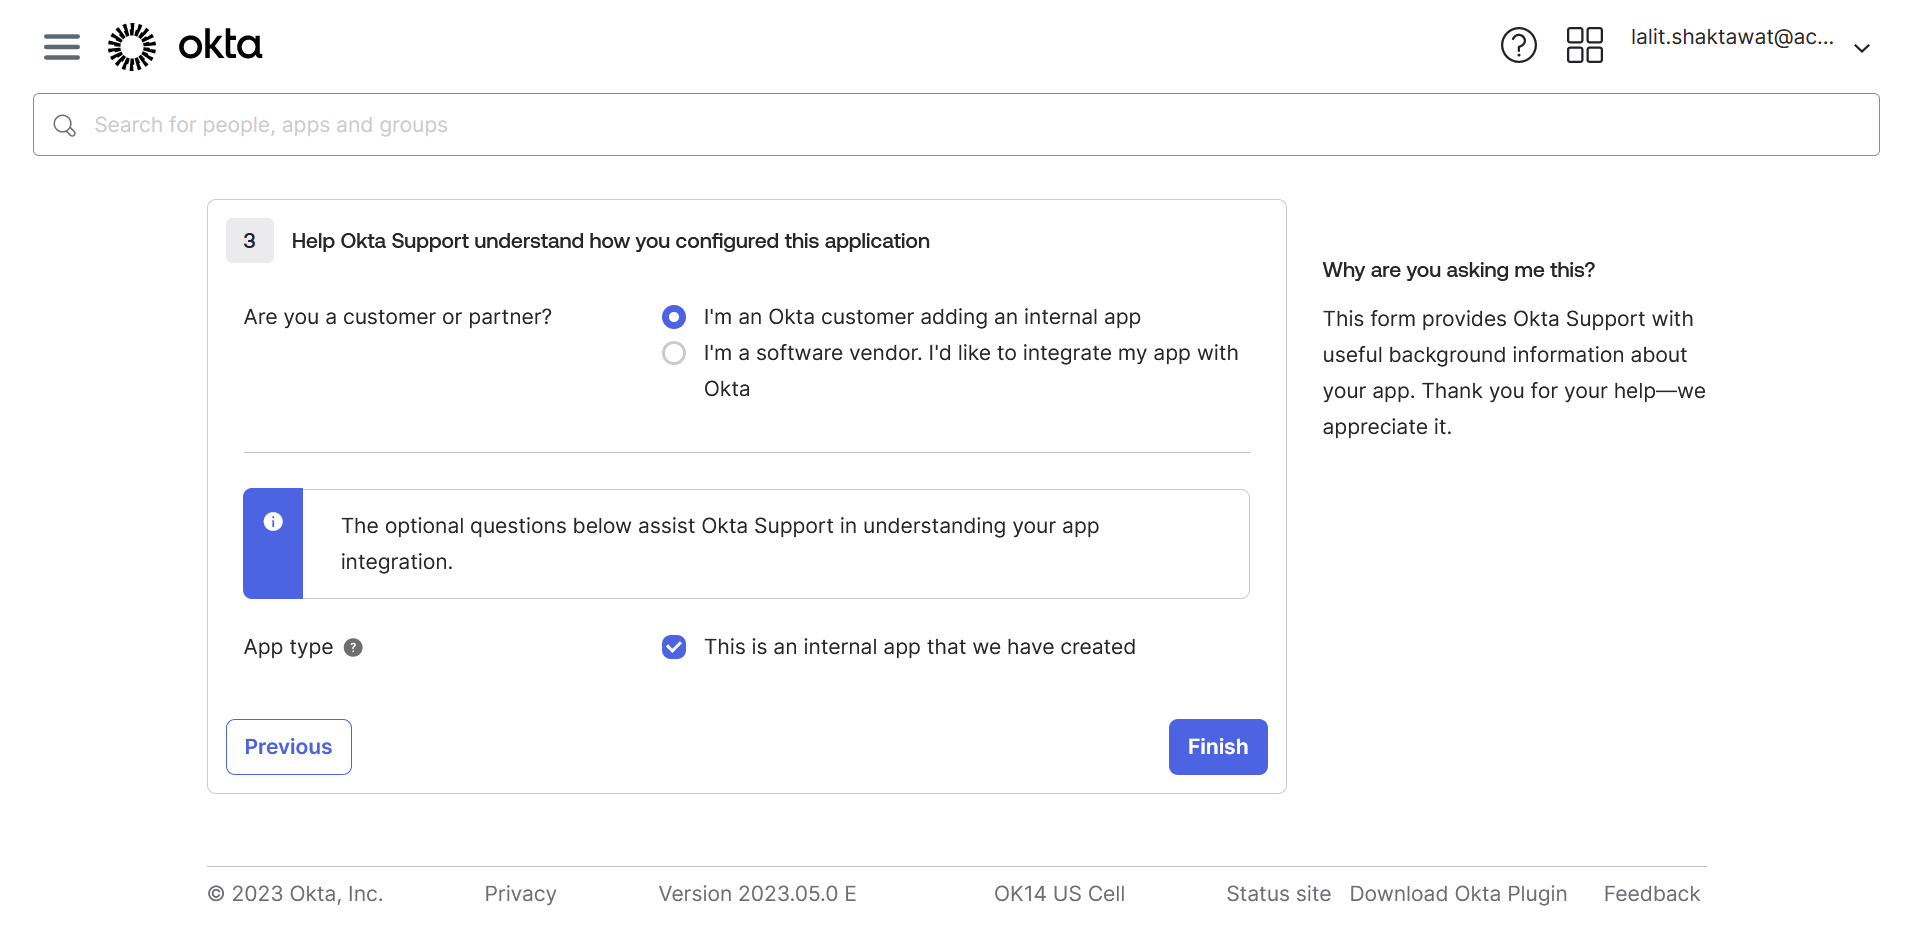
🔶 Follow Step3: I’m an Okta customer adding an internal app.
🔶 Click on Finish.
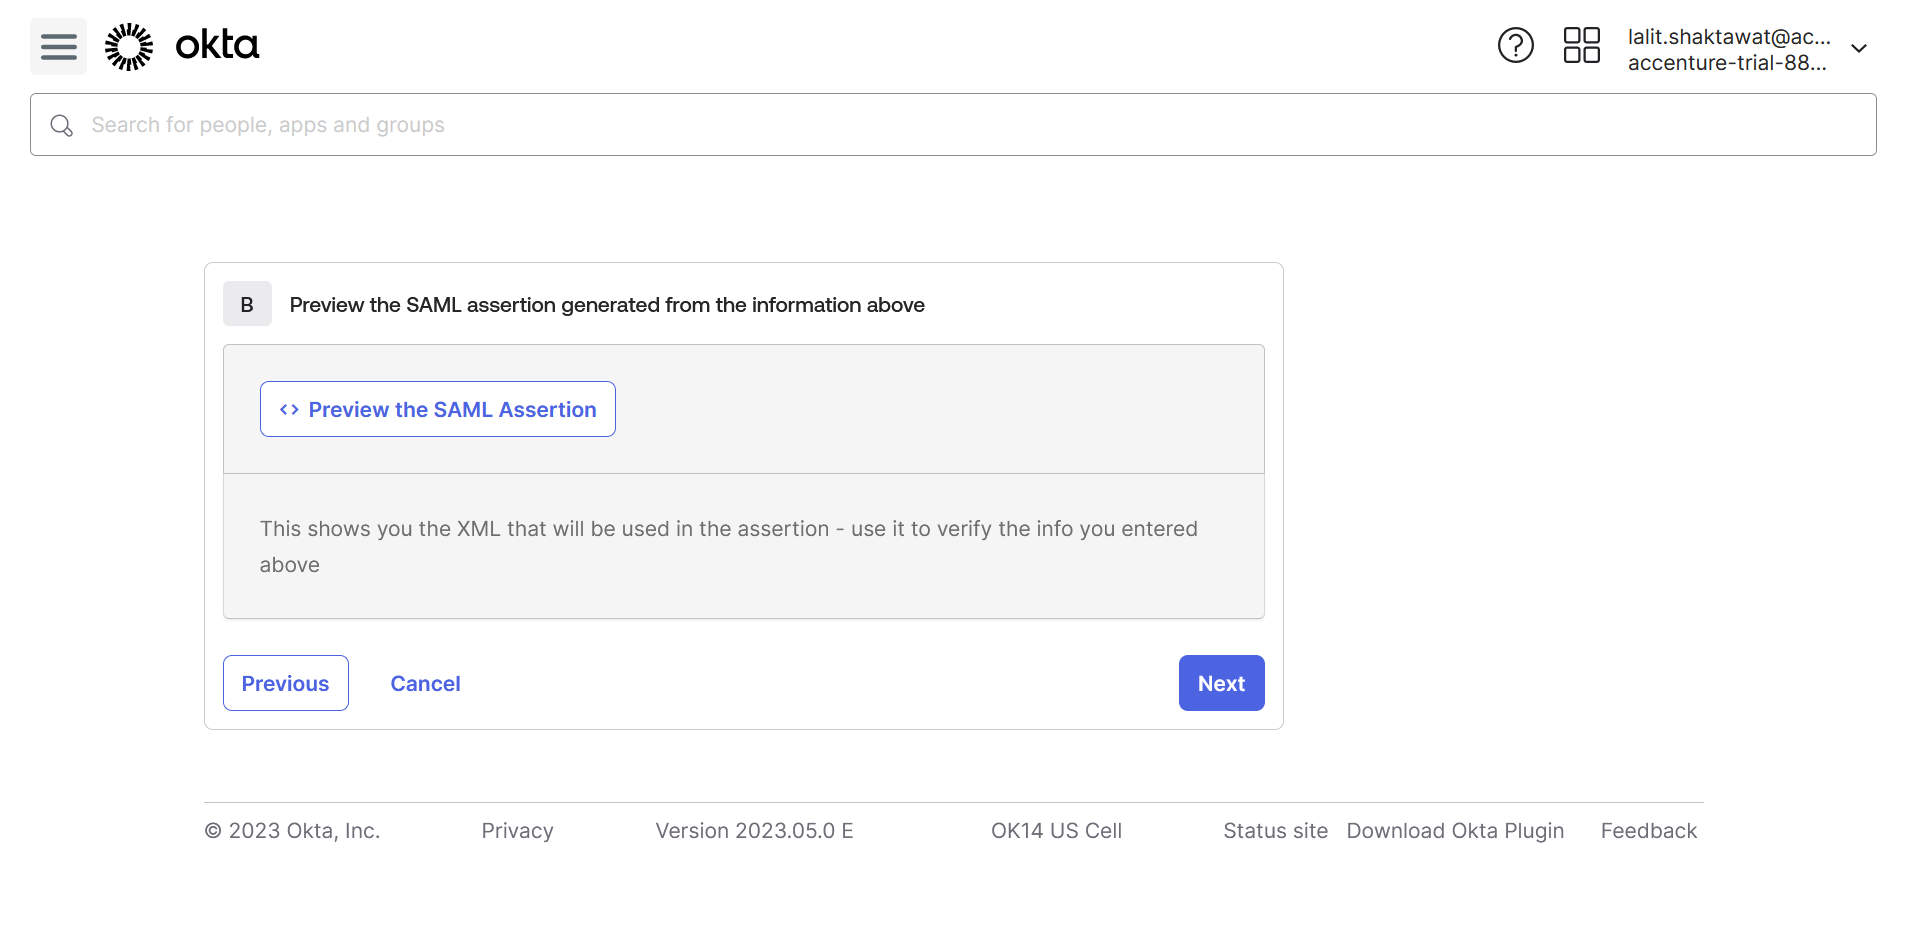
🔶 SAML config data is ready.
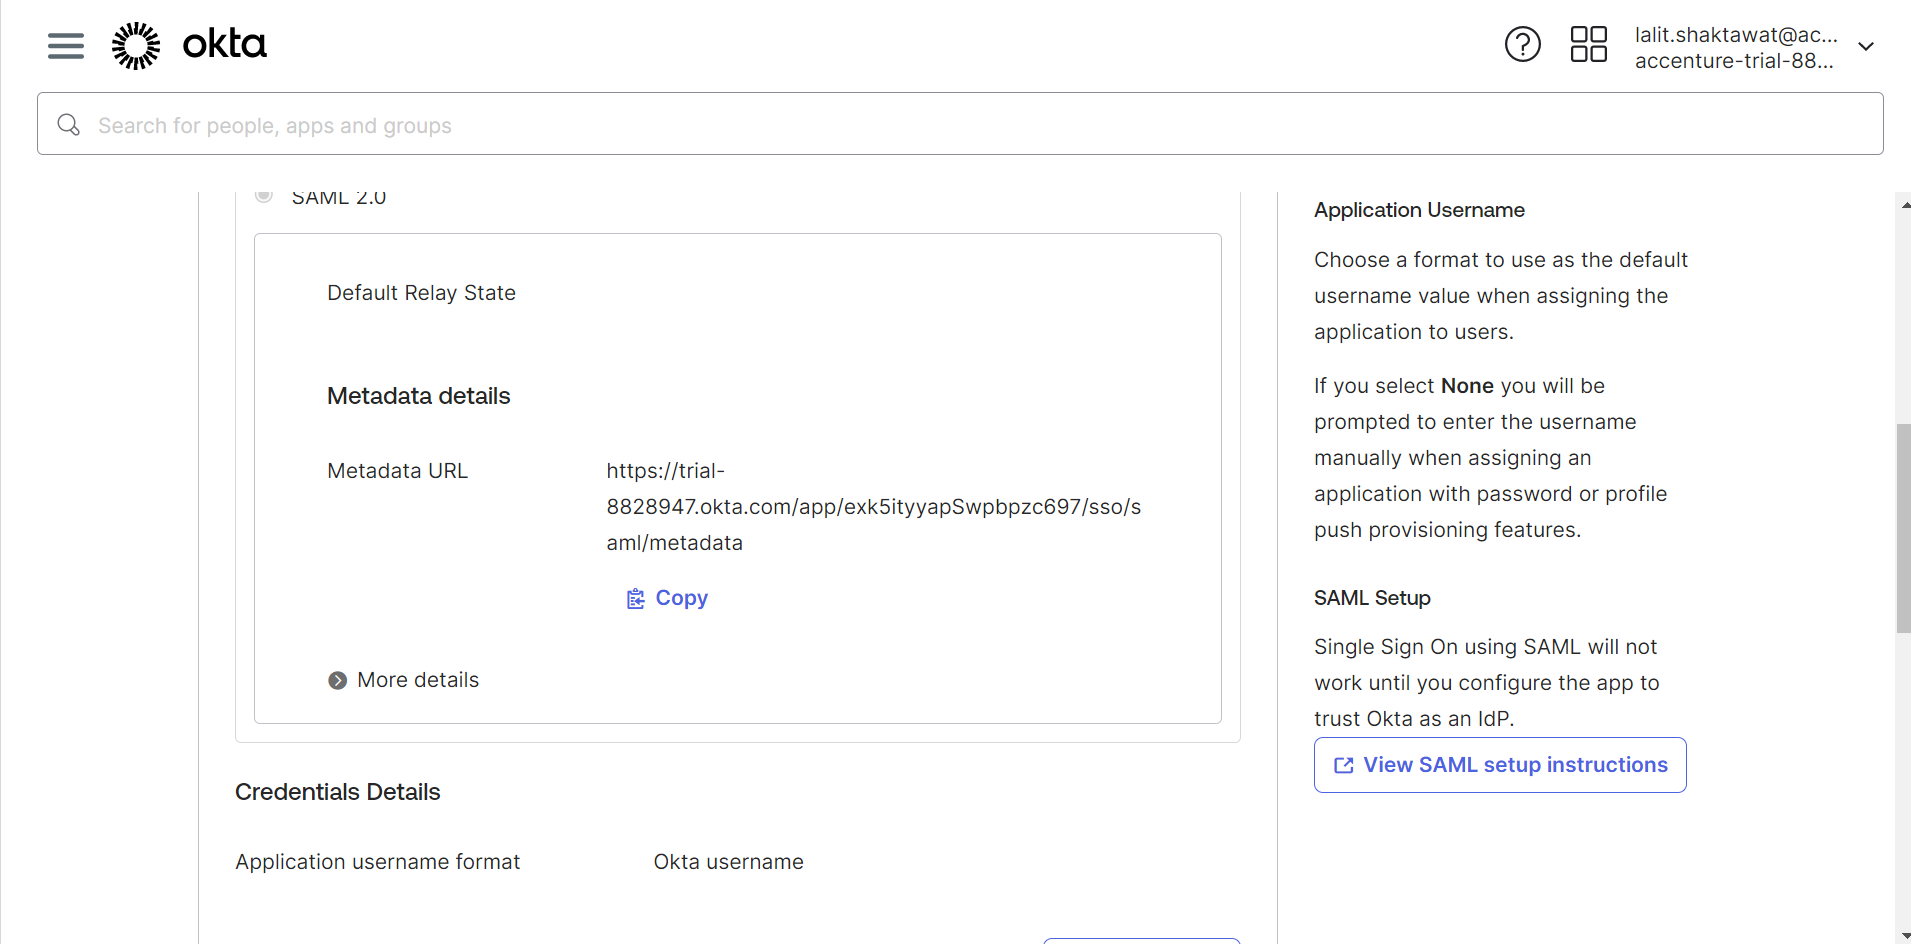
🔶 View SAML setup instructions.
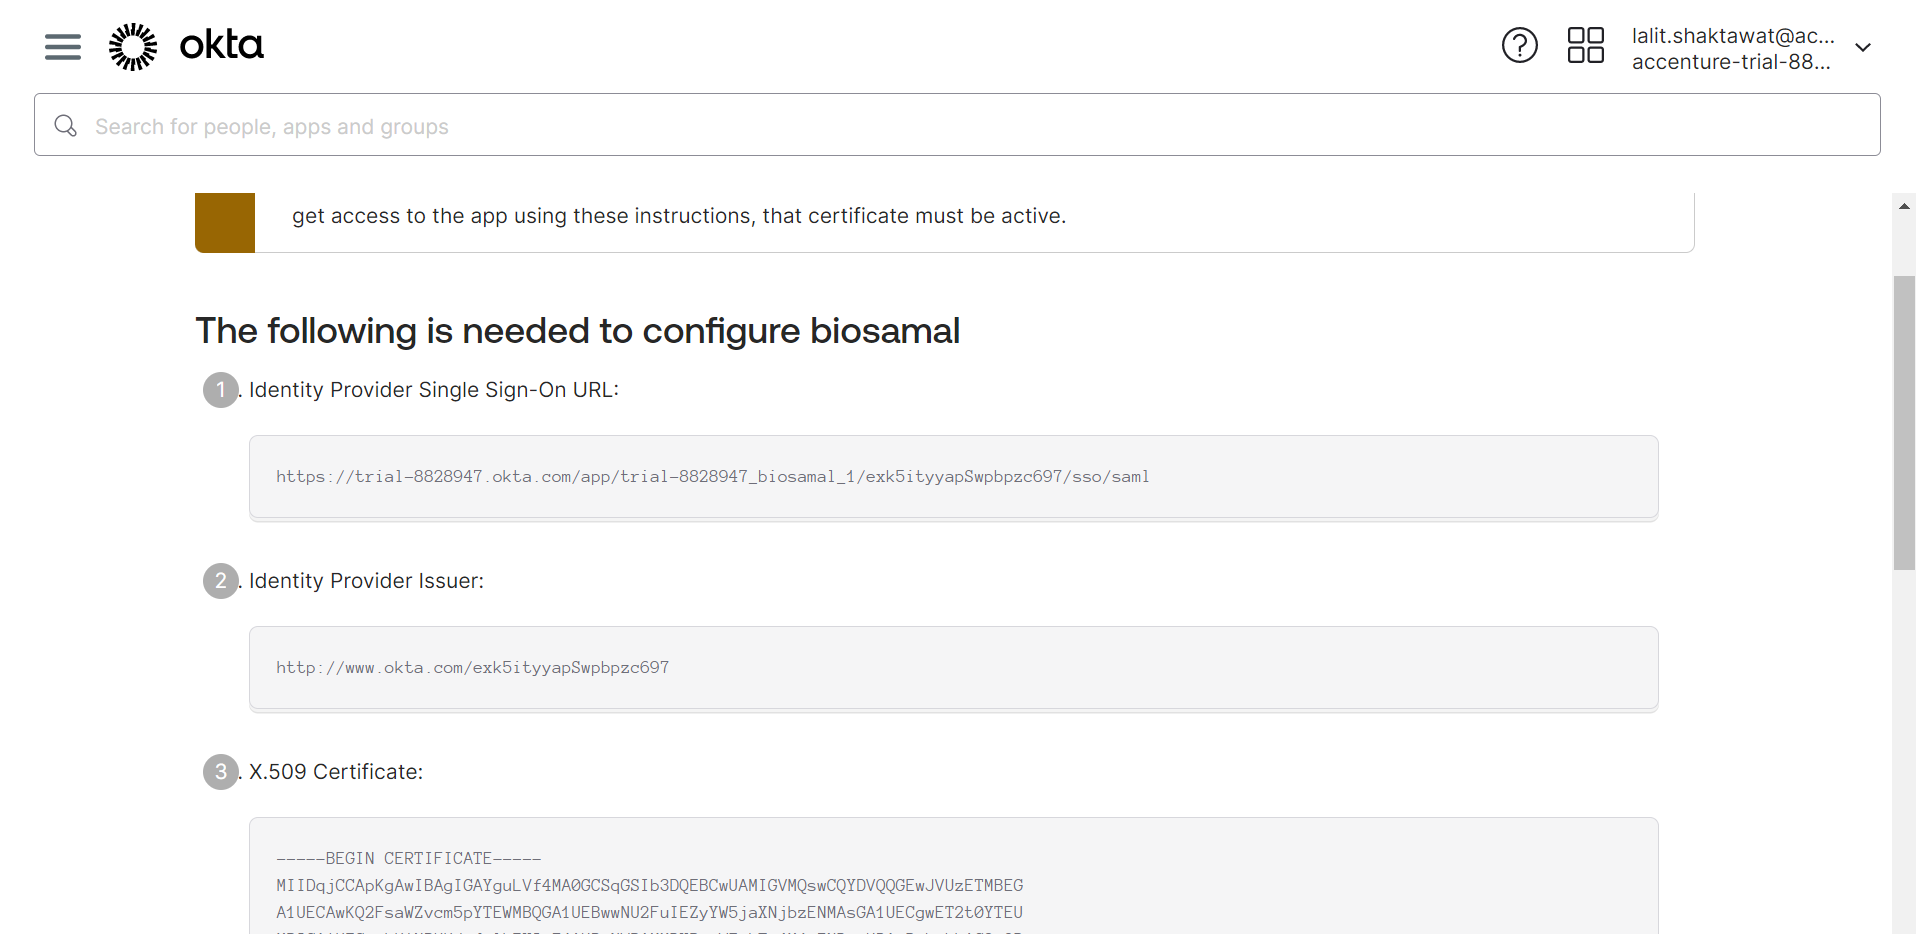
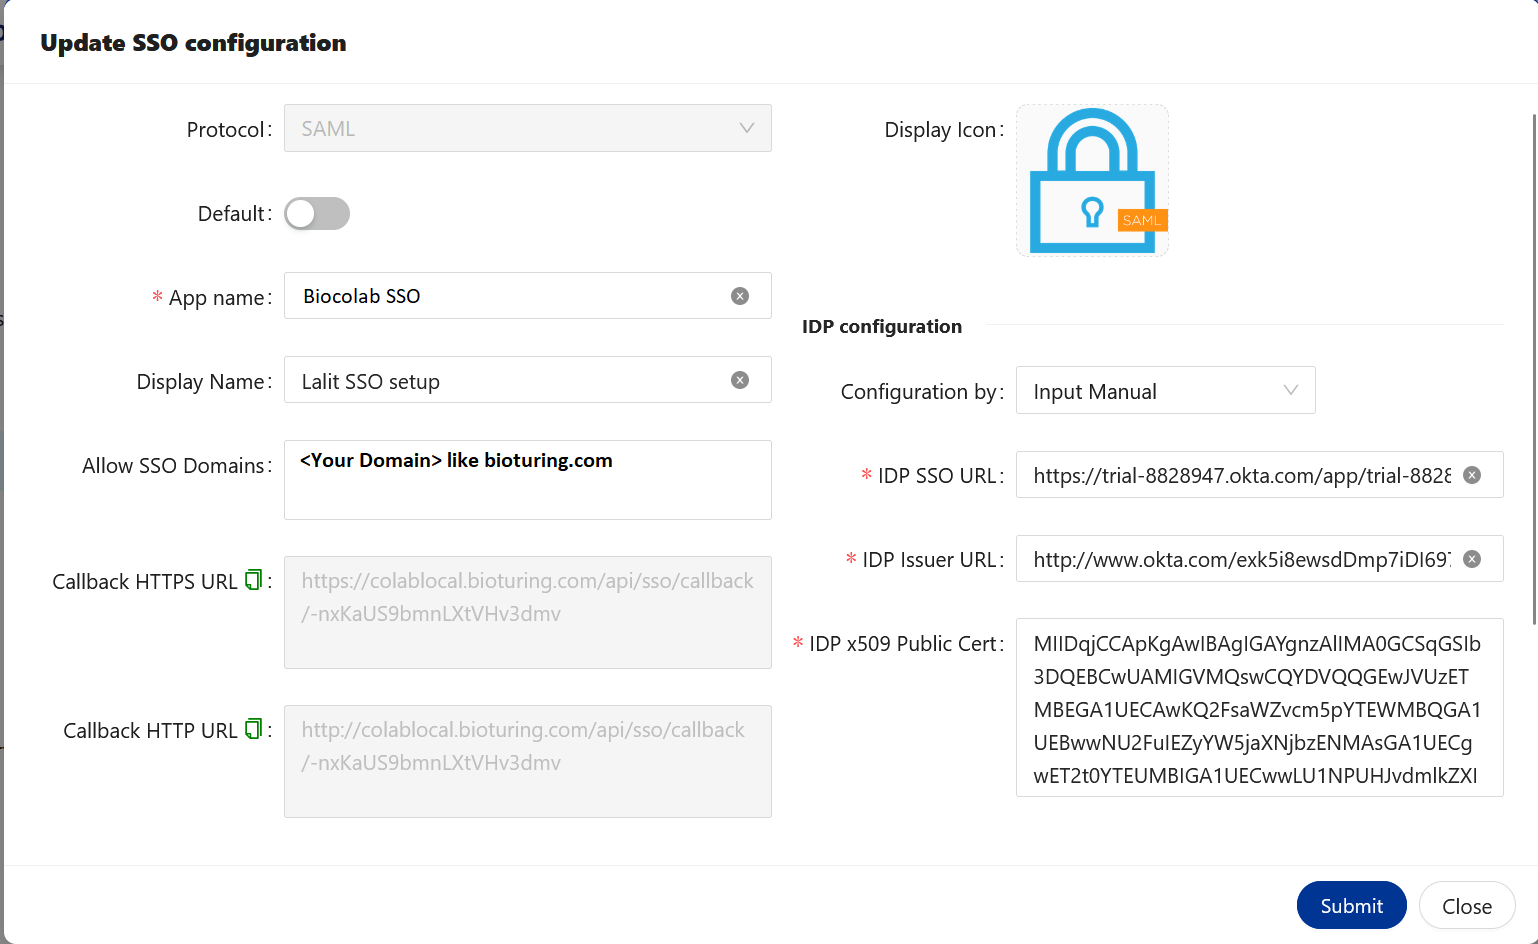
🔶 Get the value from Okta and fill on SSO BioStudio. Click on Submit.
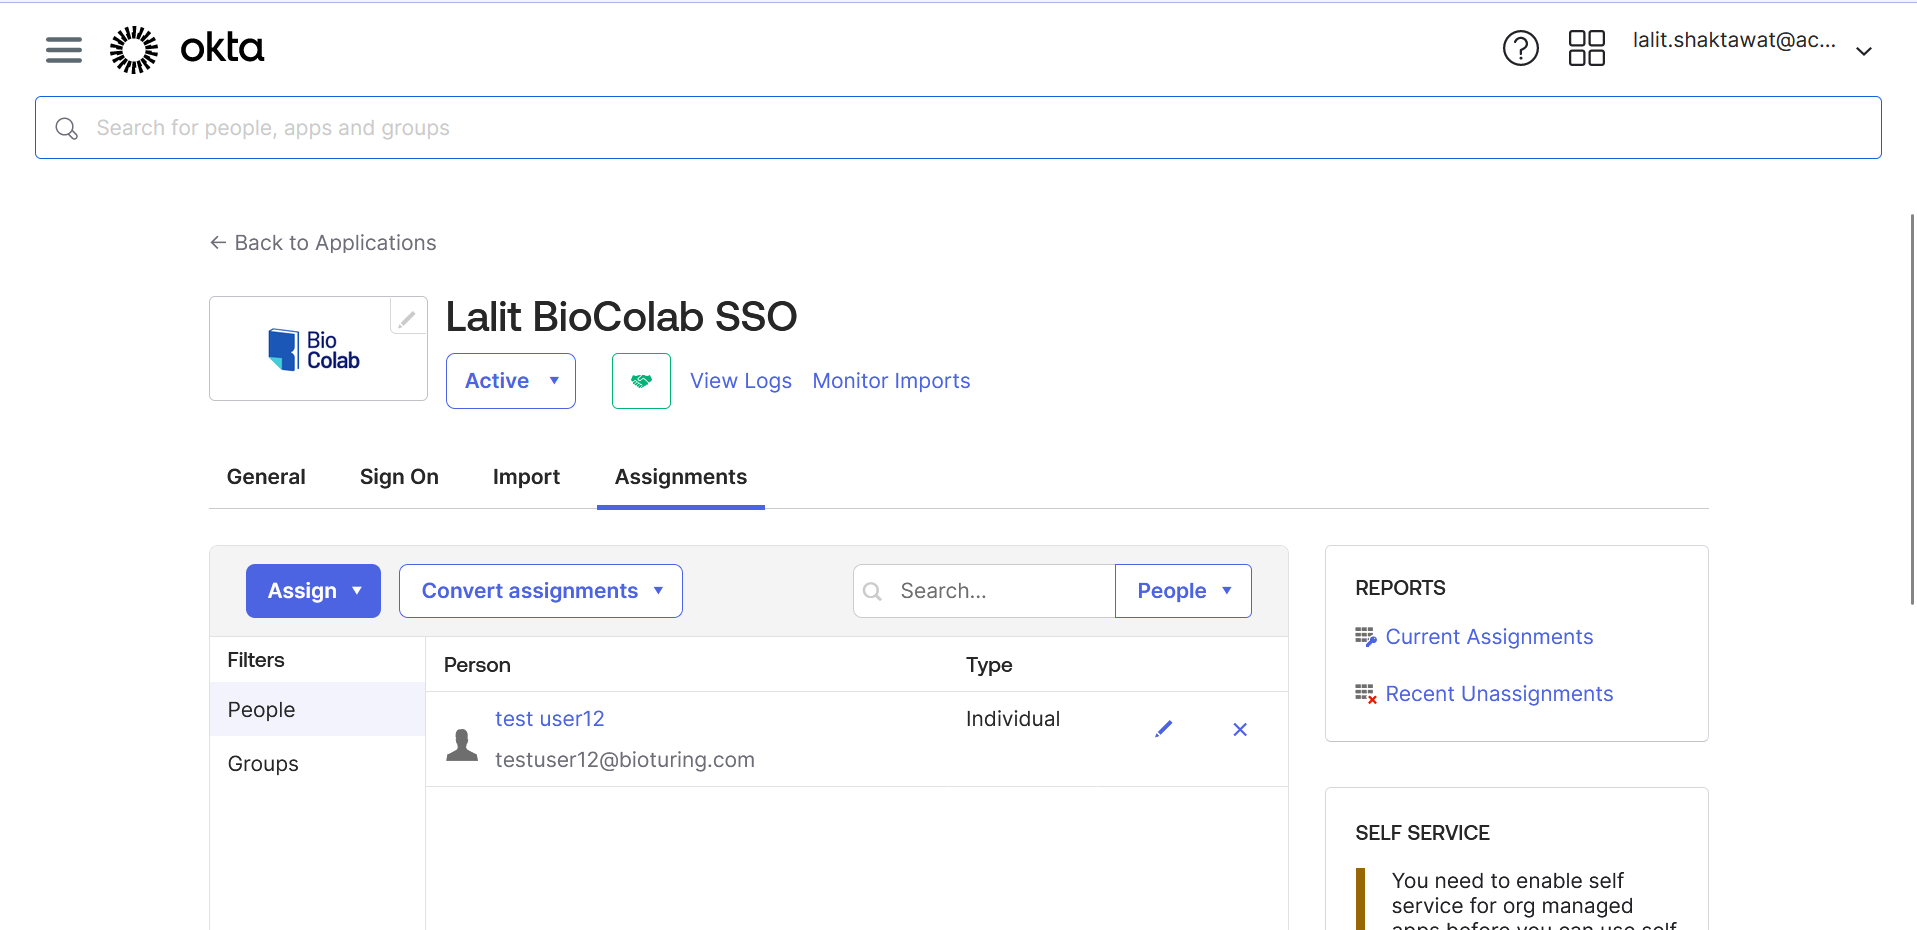
🔶 User assignment to Application.
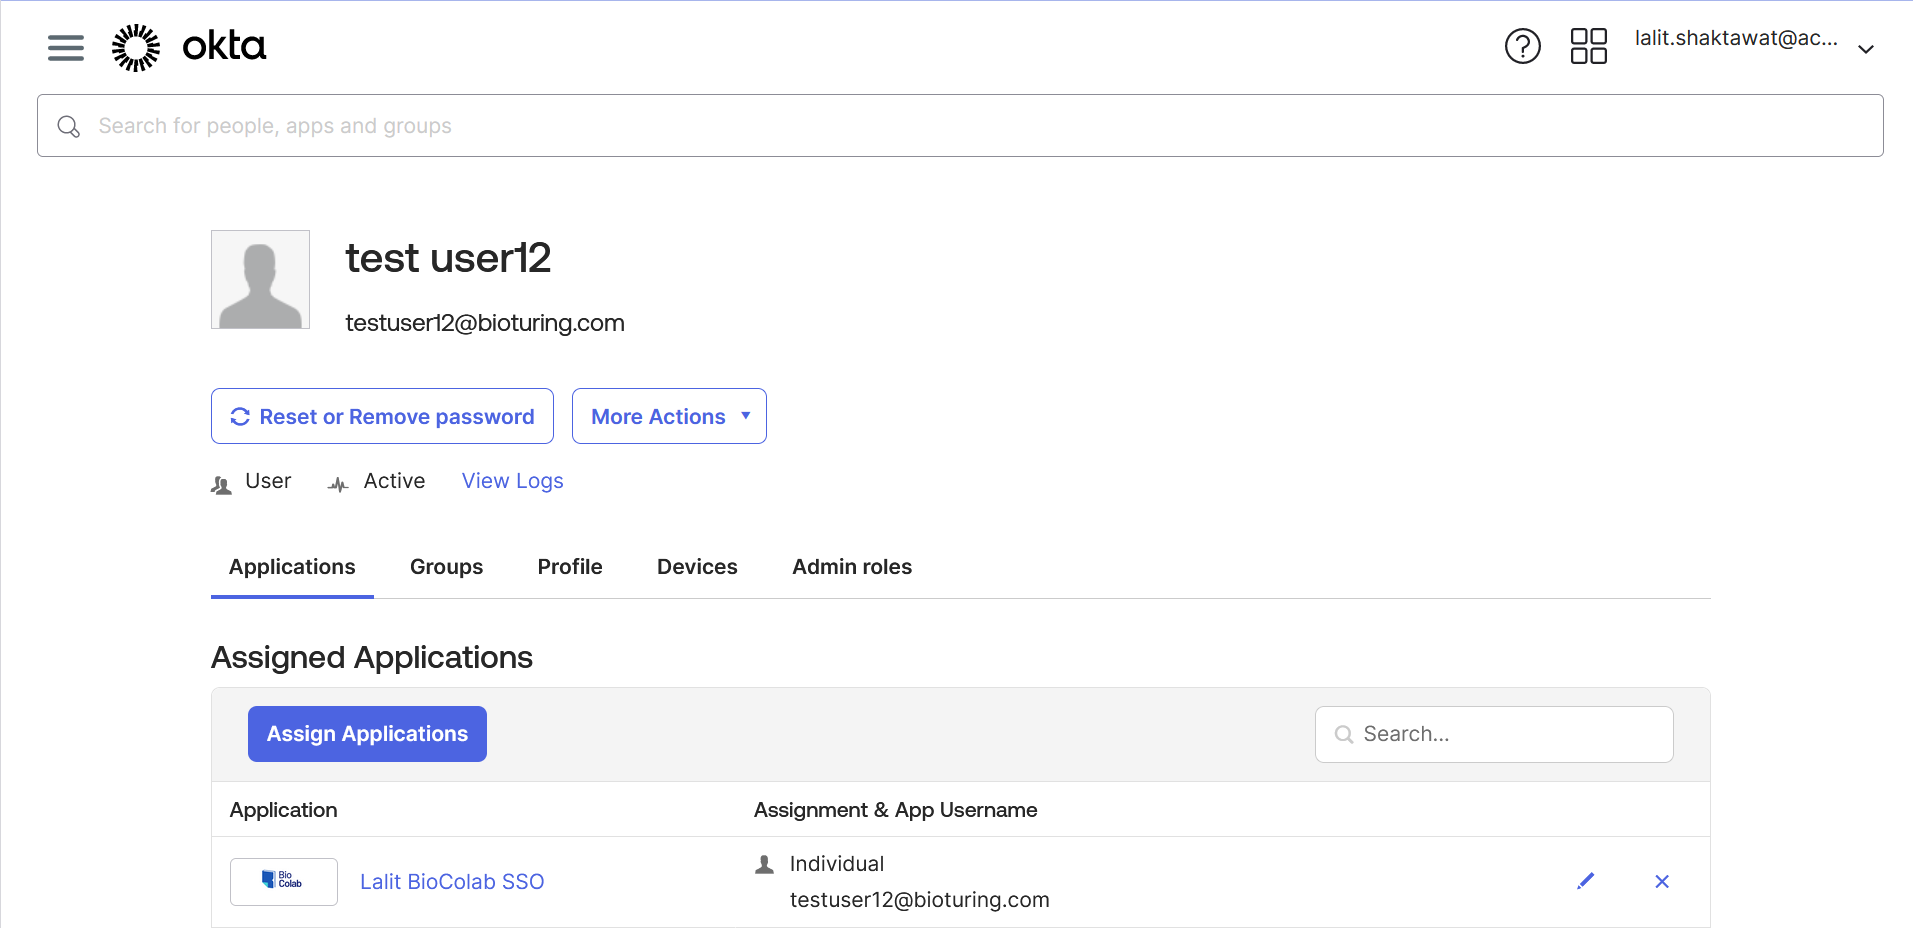
🔶 Assign User to Application.
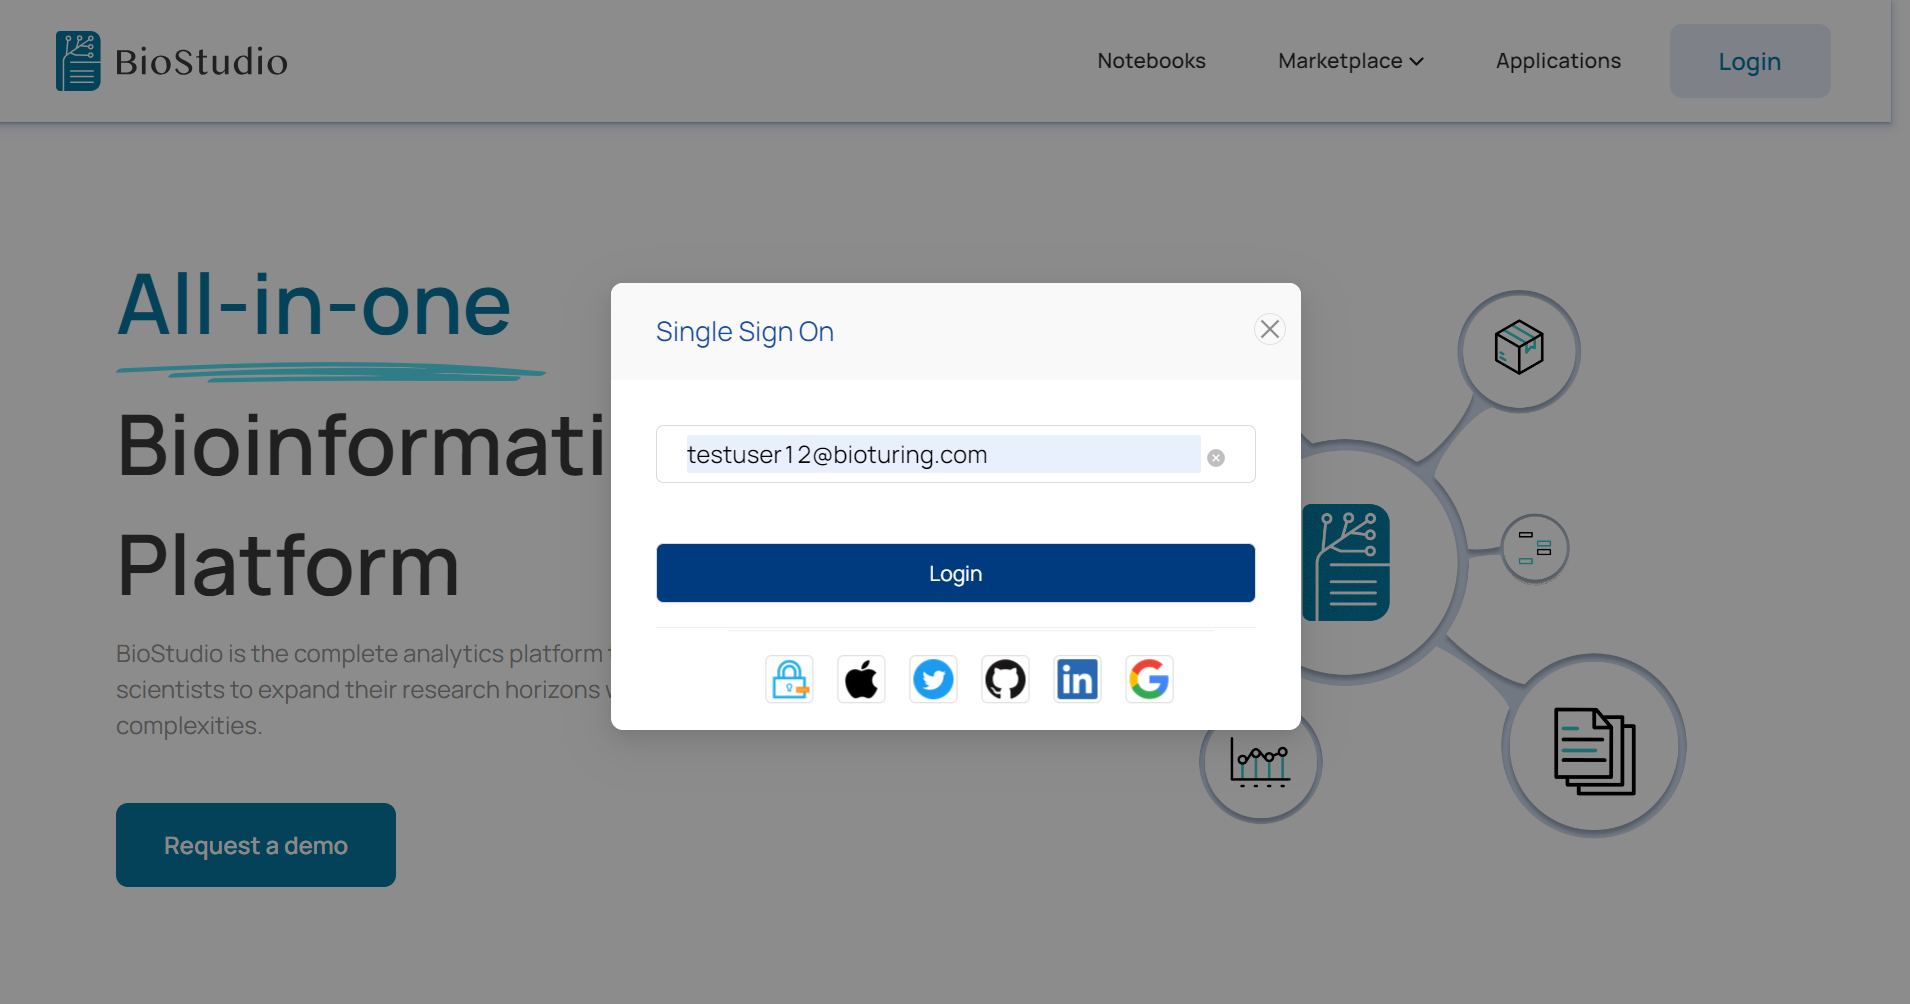
🔶 Login to BioStudio.
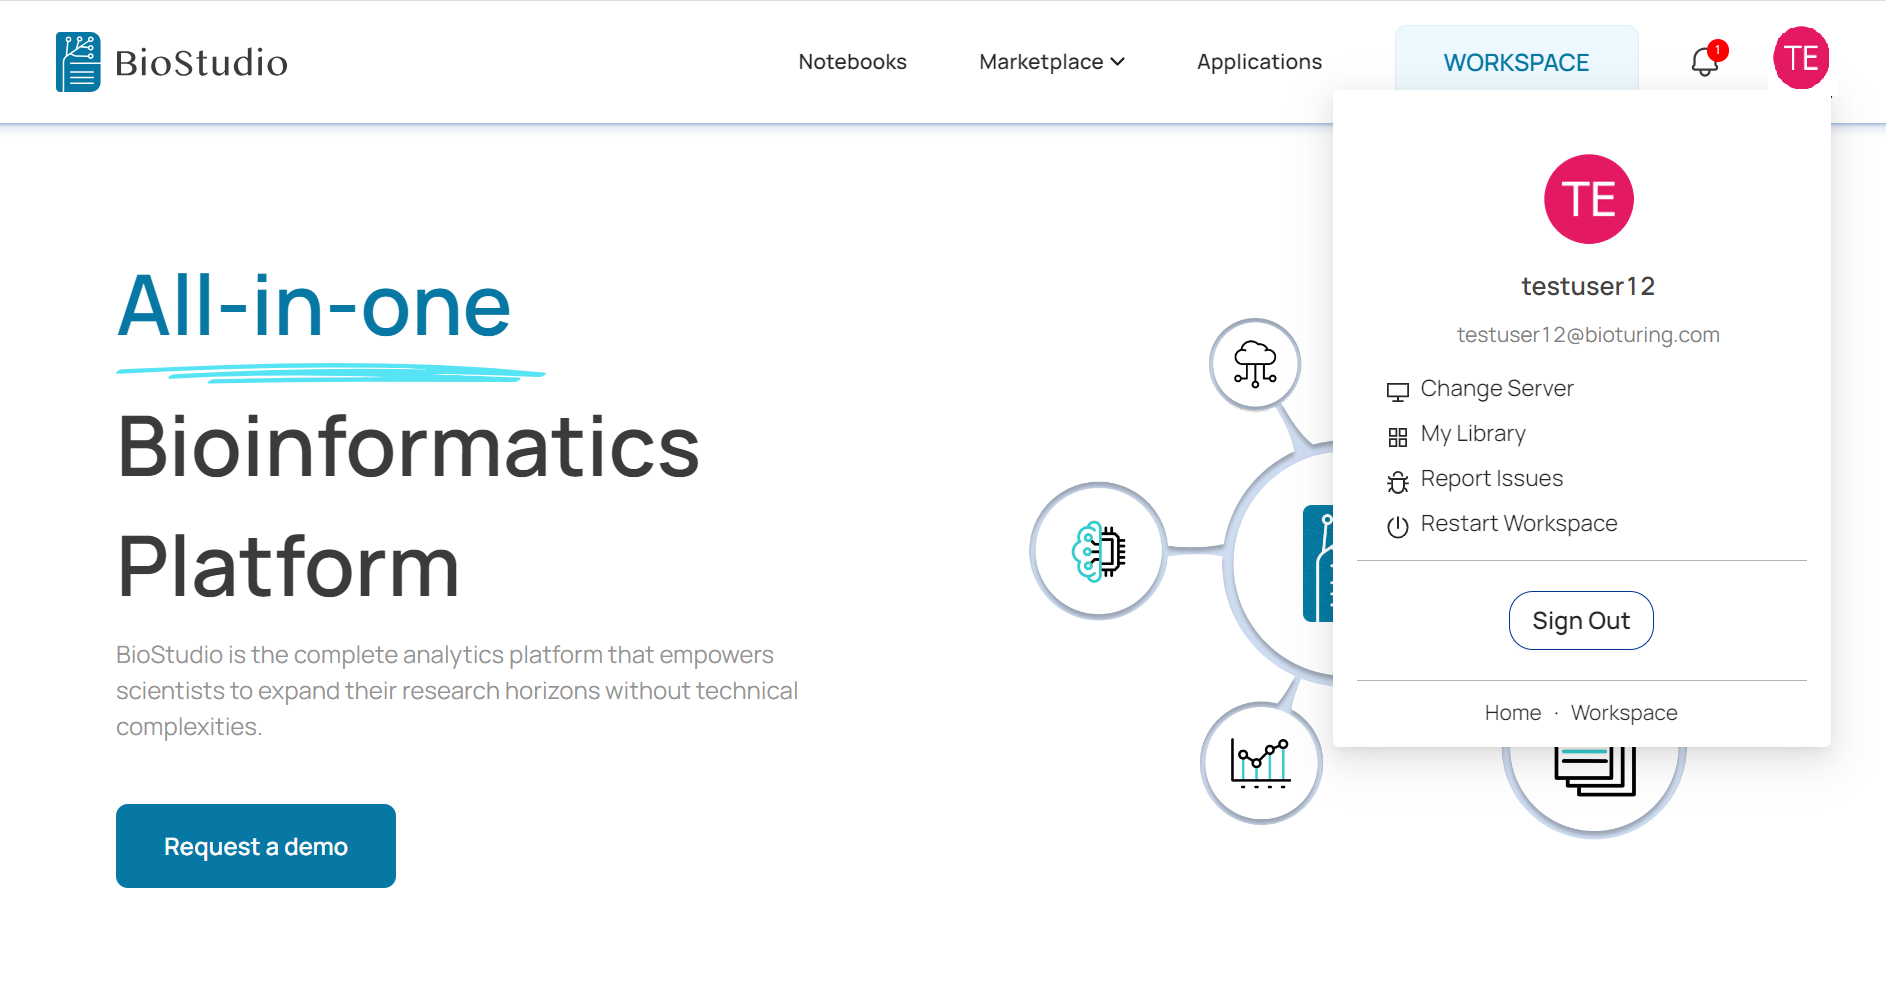
🔶 Login Succeed.
🔶 Before access WORKSPACE. It is necessary to access dashboard and create machine and well as create volume to be mounted.
🔗 Machine Creation and volume addition
🔶 Access BioStudio services.
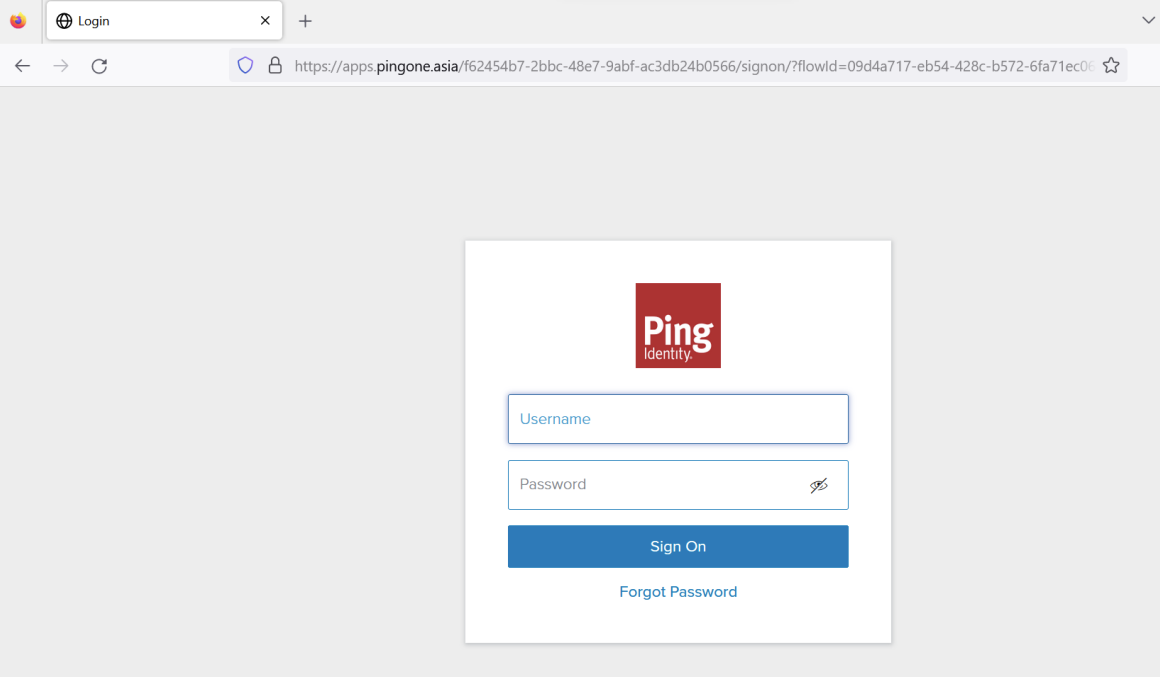
SSO set up with PingID 
🔶 Add an application to PingID
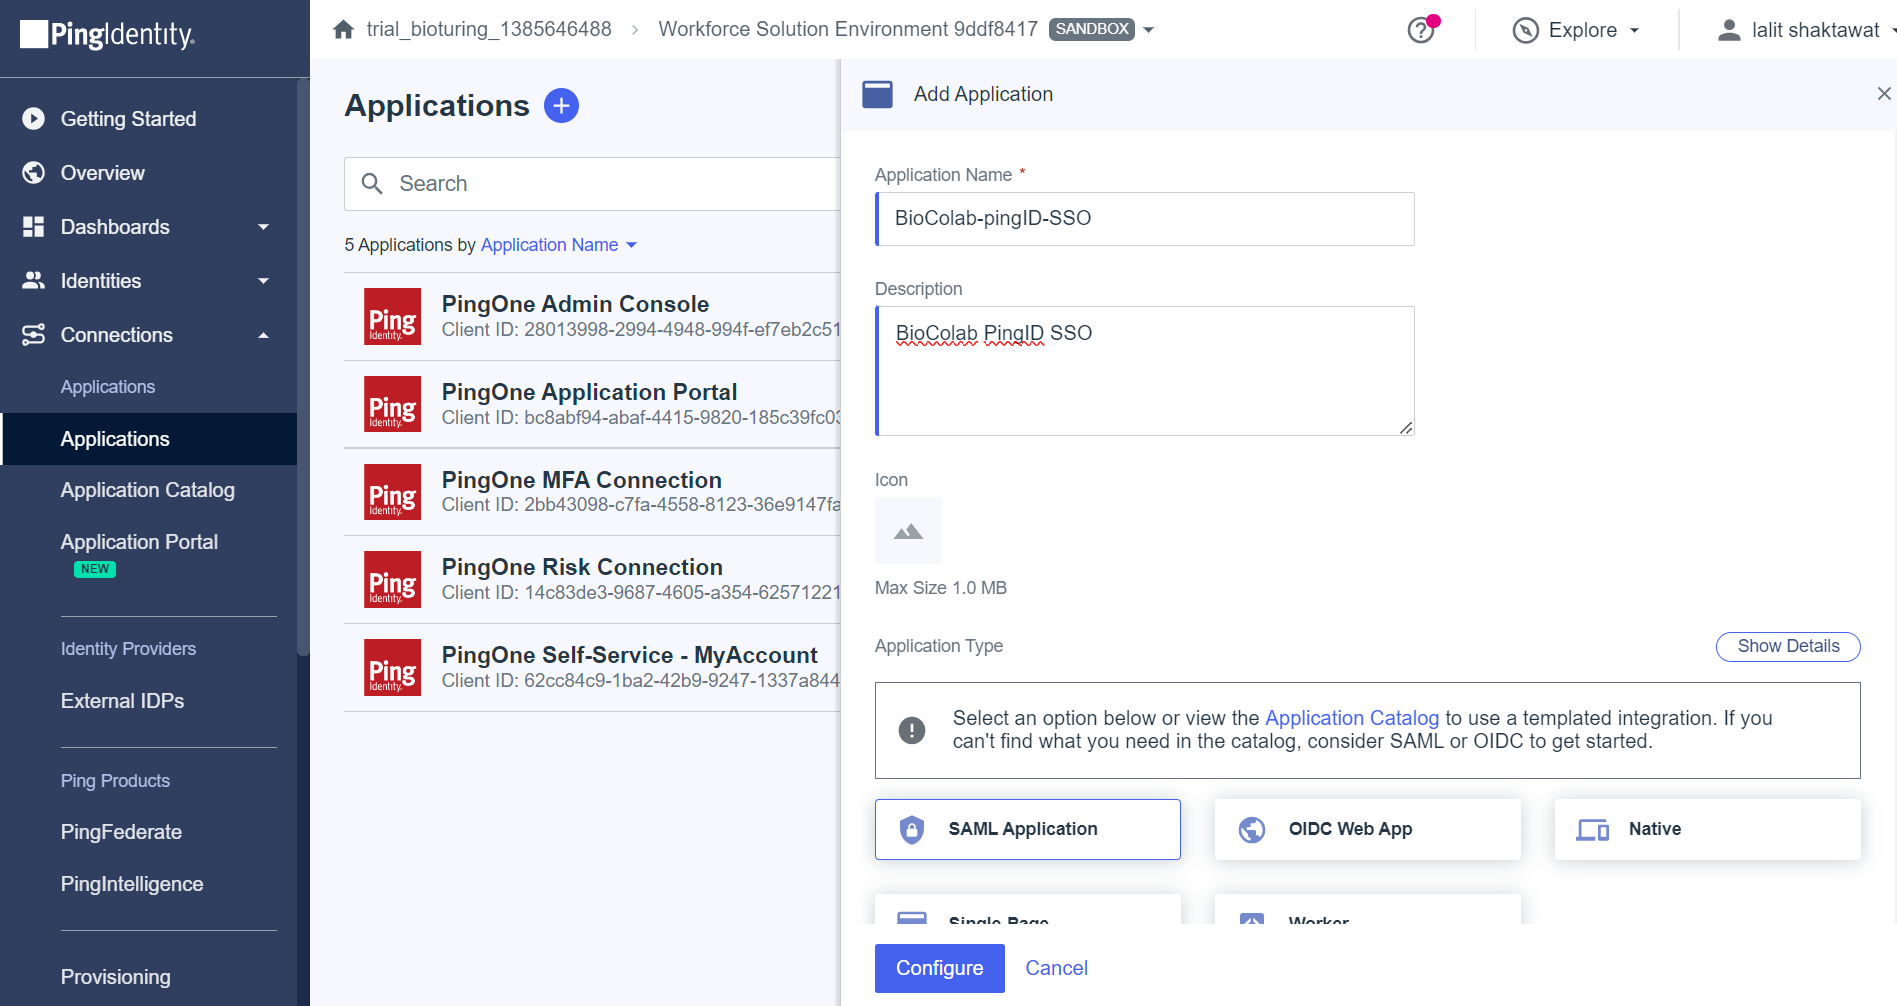
🔶 Select SAML Application method and click on Configure
🔶 Login to BioColab Admin Dashboard
# https://<Domain name>/dashboard
It will prompt for Admin credentials. Please provide Admin credentials to login.
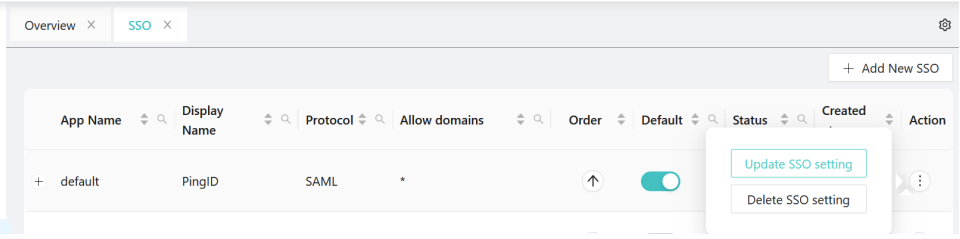
🔶 Select SSO setting from left side menu and click on + Add New SSO. If you are going to
set up SSO at the same time.
🔔 Note: If we are going to provide a Callback URL to another team to configure with IDP. Then we must provide dummy values to the mandatory field and click on submit button to save. Later we can update.

🔶 Copy Callback HTTPS URL that needs to be configured with IDP.
🔶 Select Manually Enter and fill callback URL to ACS URLs and Entity ID would be the last value of that URL.
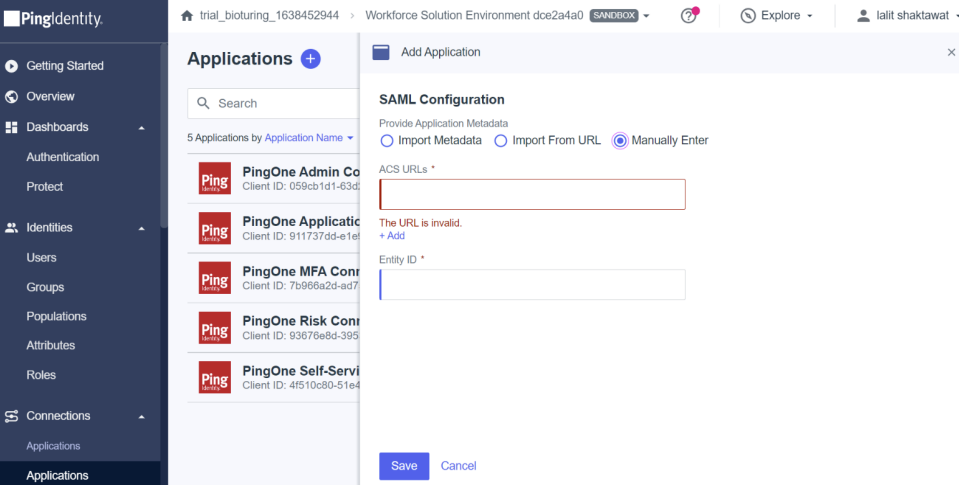
🔶 Fill the value based on over instruction.
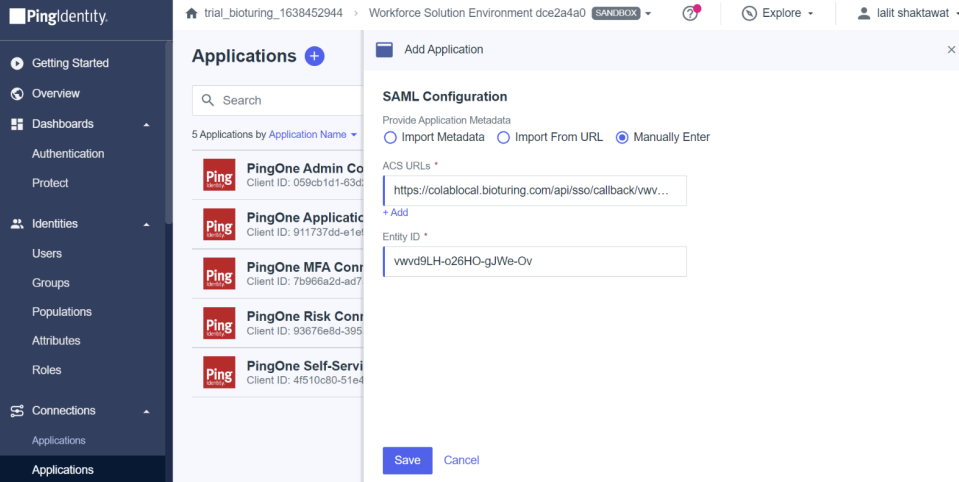
🔶 Click on Save button.
- Now update attribute mapping.
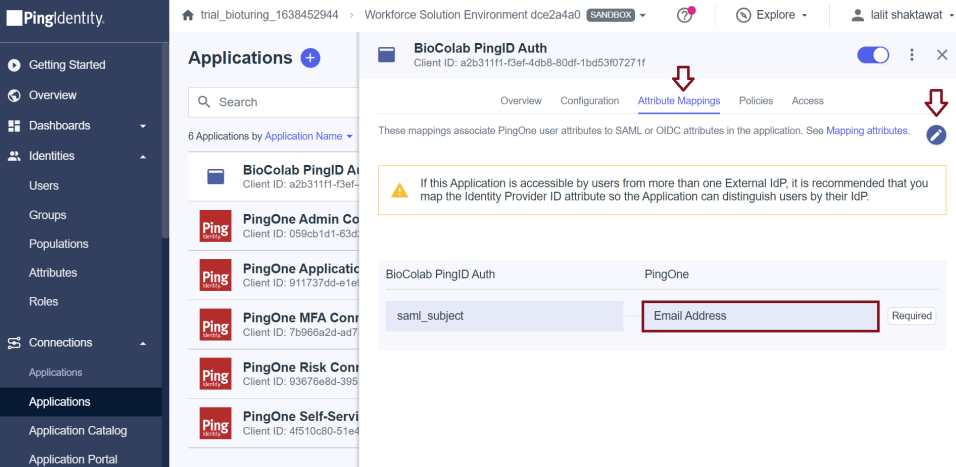
🔶 Select Configuration Tab and get all required values.
1️⃣ Issuer ID = IDP Issuer URL
2️⃣ Initiate Single Sign-On URL = IDP SSO URL
3️⃣ Download singing certificate = IDP x509 Public Cert
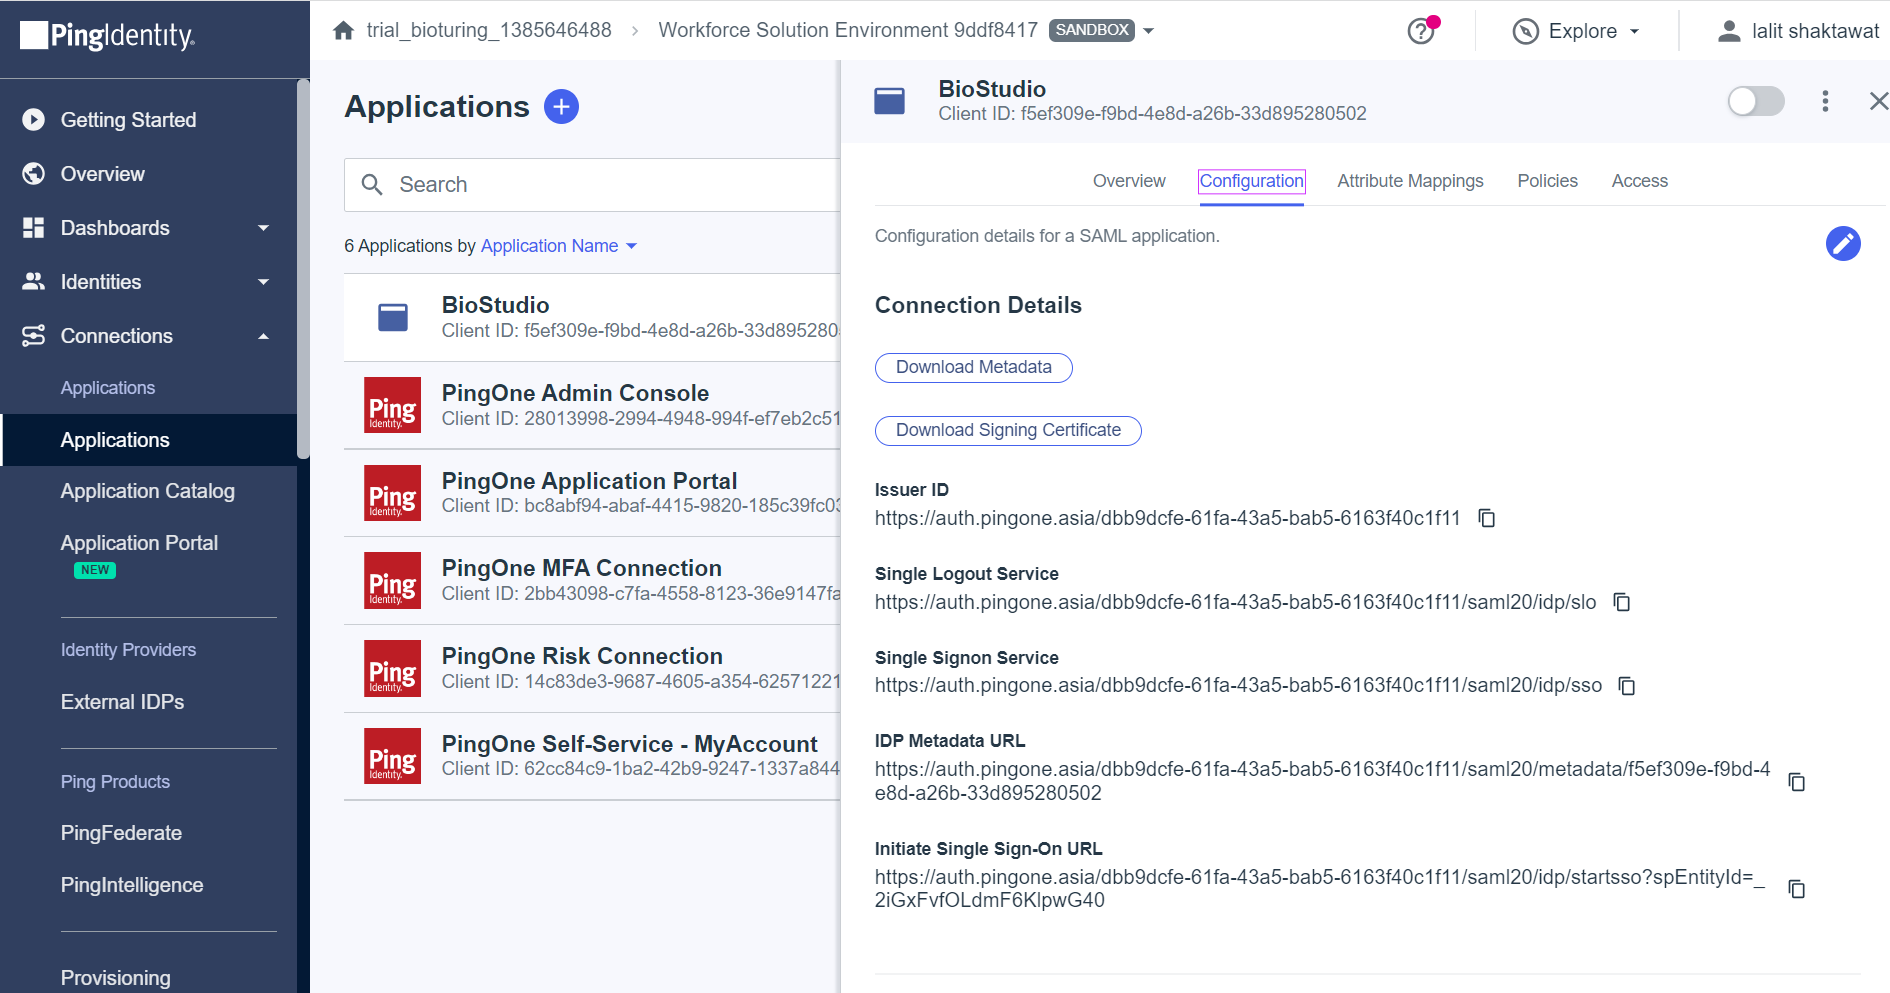
🔶 login to Biocolab dashboard admin and fill those values to required fields by updating SSO settings.
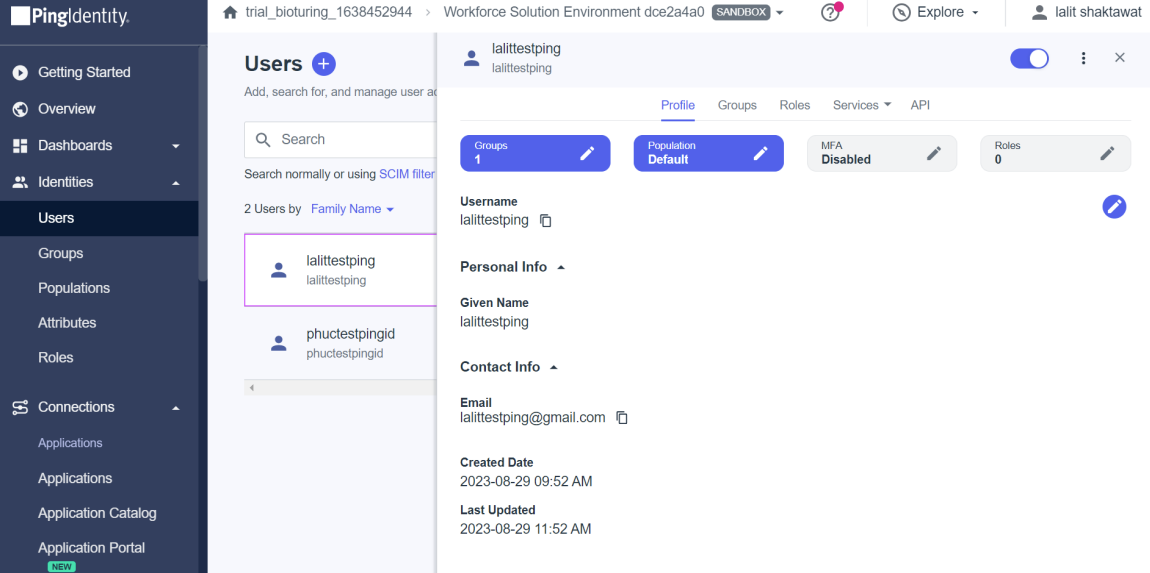
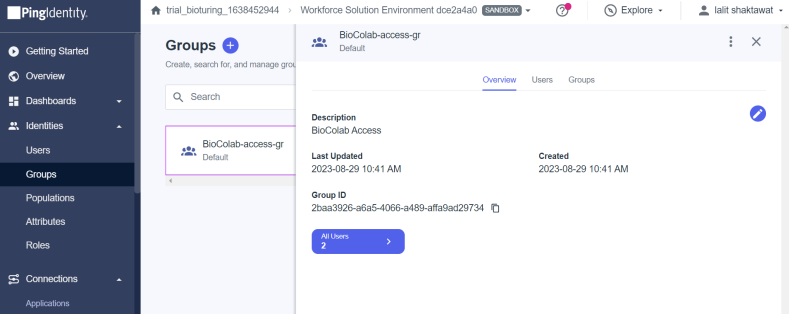
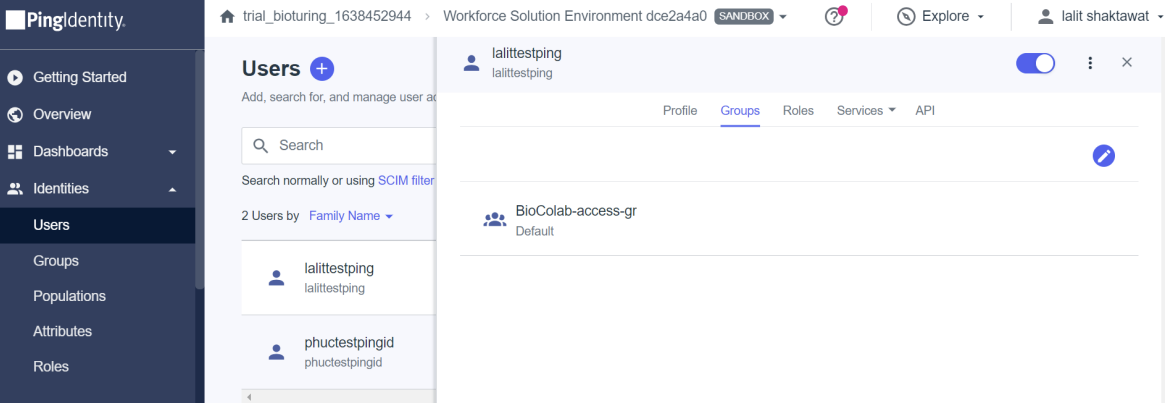
🔶 I created two users but on the existing set up you might have a user’s list already on the portal with a specified group to assign applications.
- On the Identity. I configured two users below.
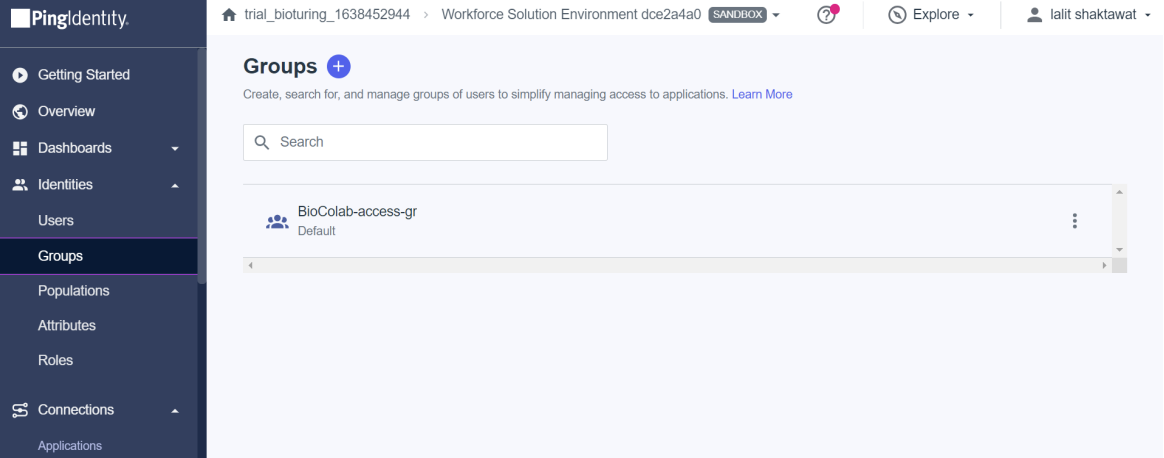
🔶 Now I created one Group and assigned those user’s to that Group
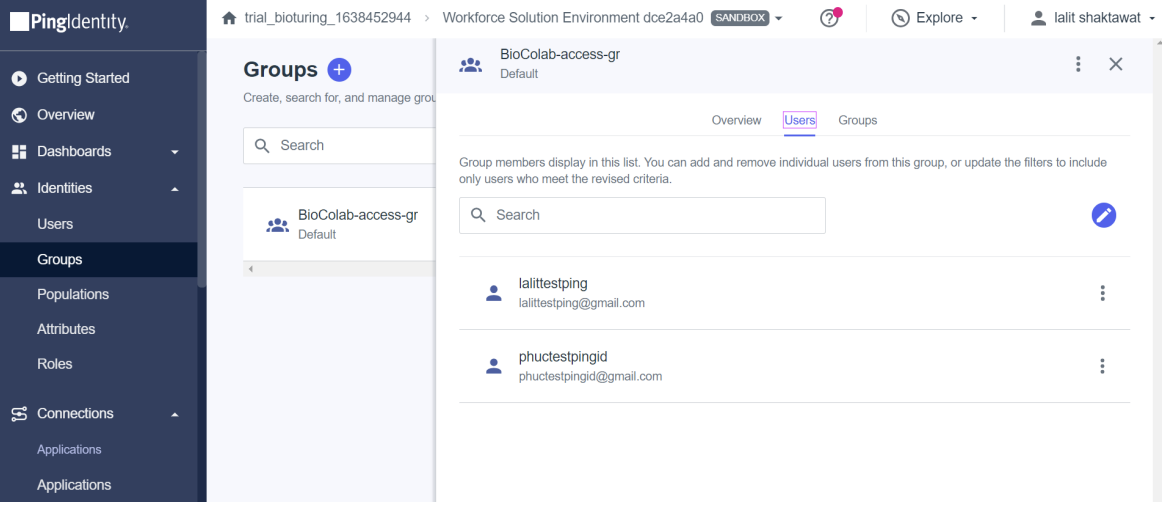
🔶 There are many ways to assign users to the group. Like User → Group → Edit – assign. Assign a group to the application.
🔶 Now all set and time to test SSO login with those users.
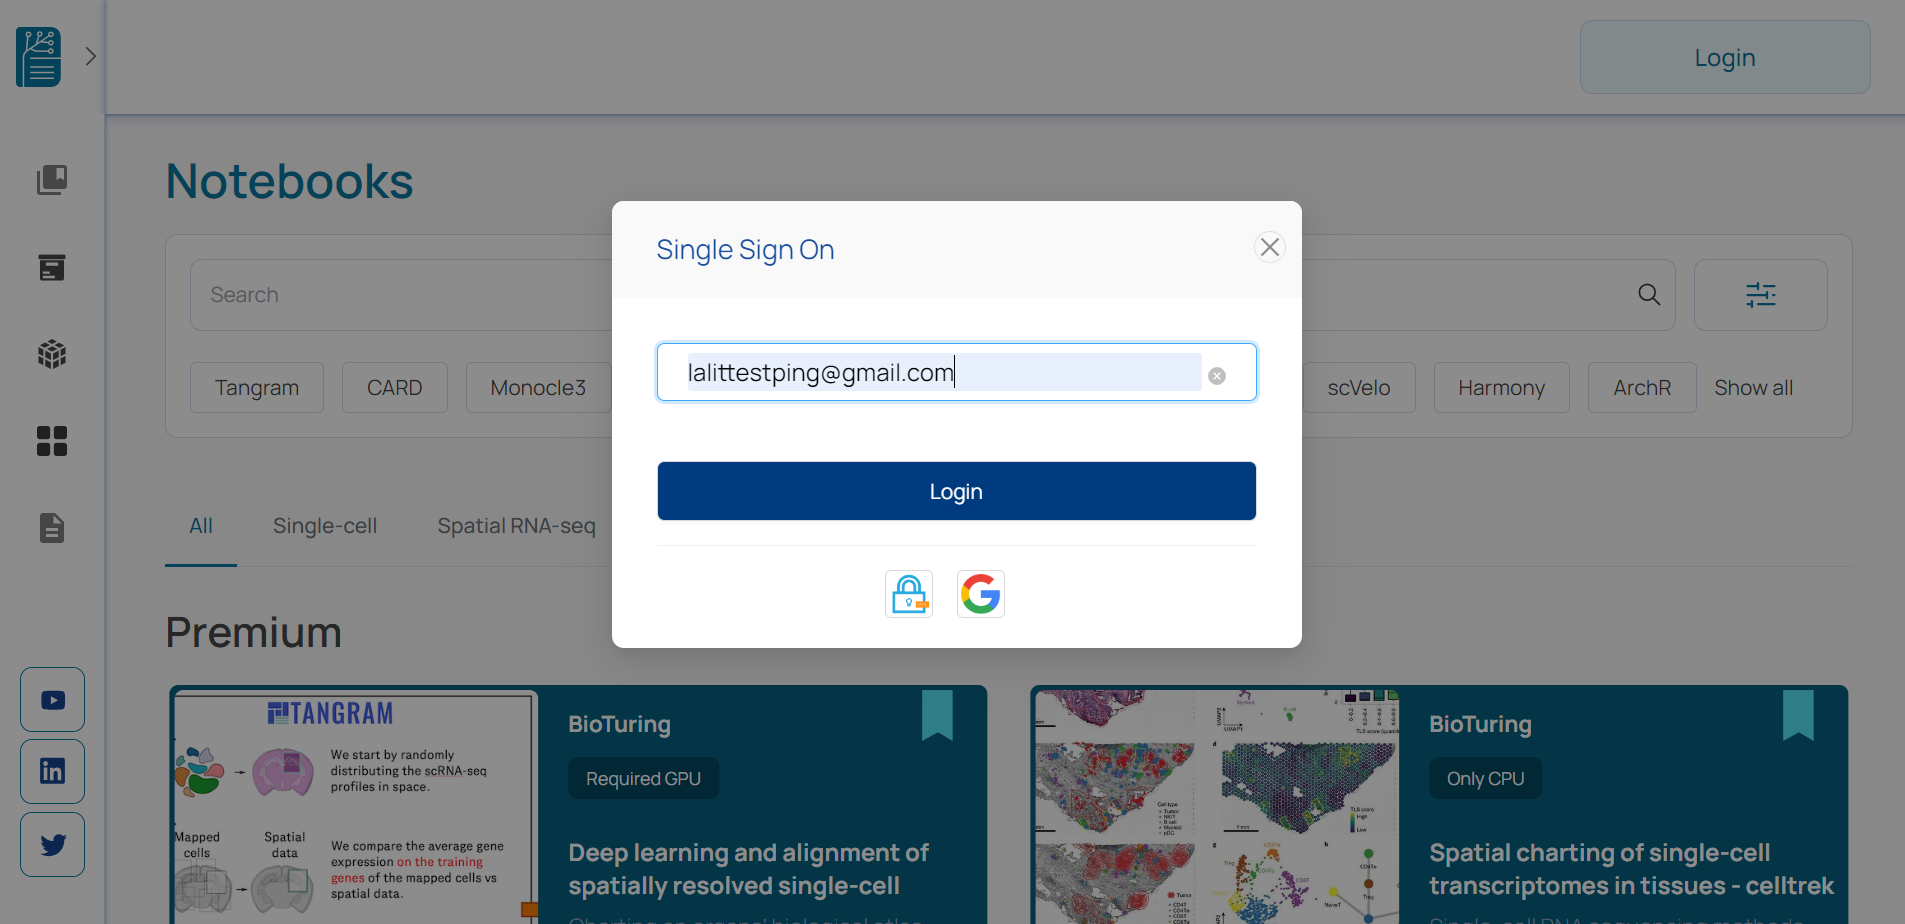
🔶 Provide PingID username and password, which we configured with Ping ID.
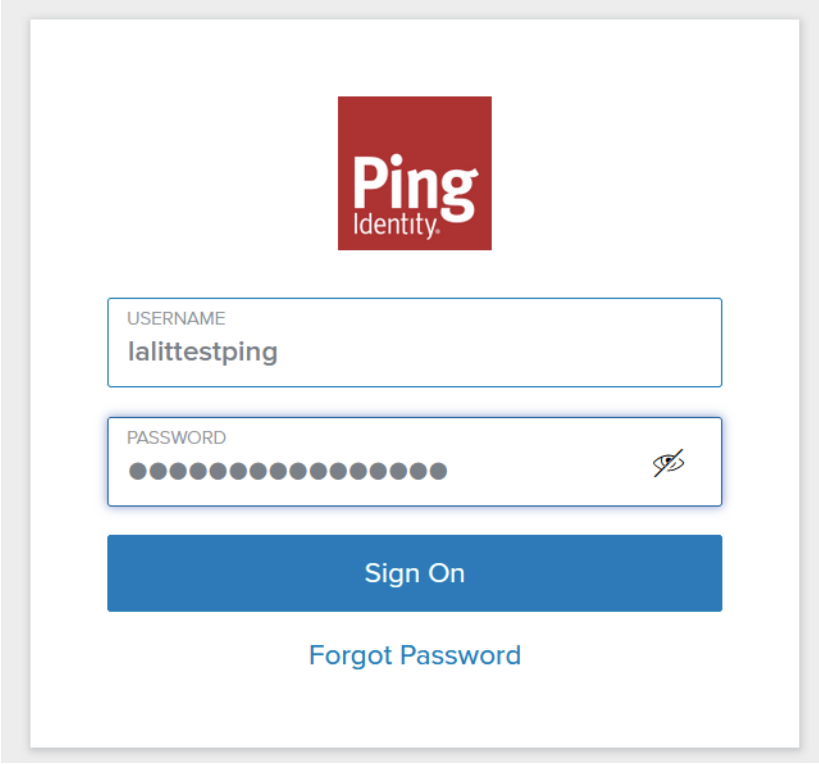
🔶 User is able to login successfully.

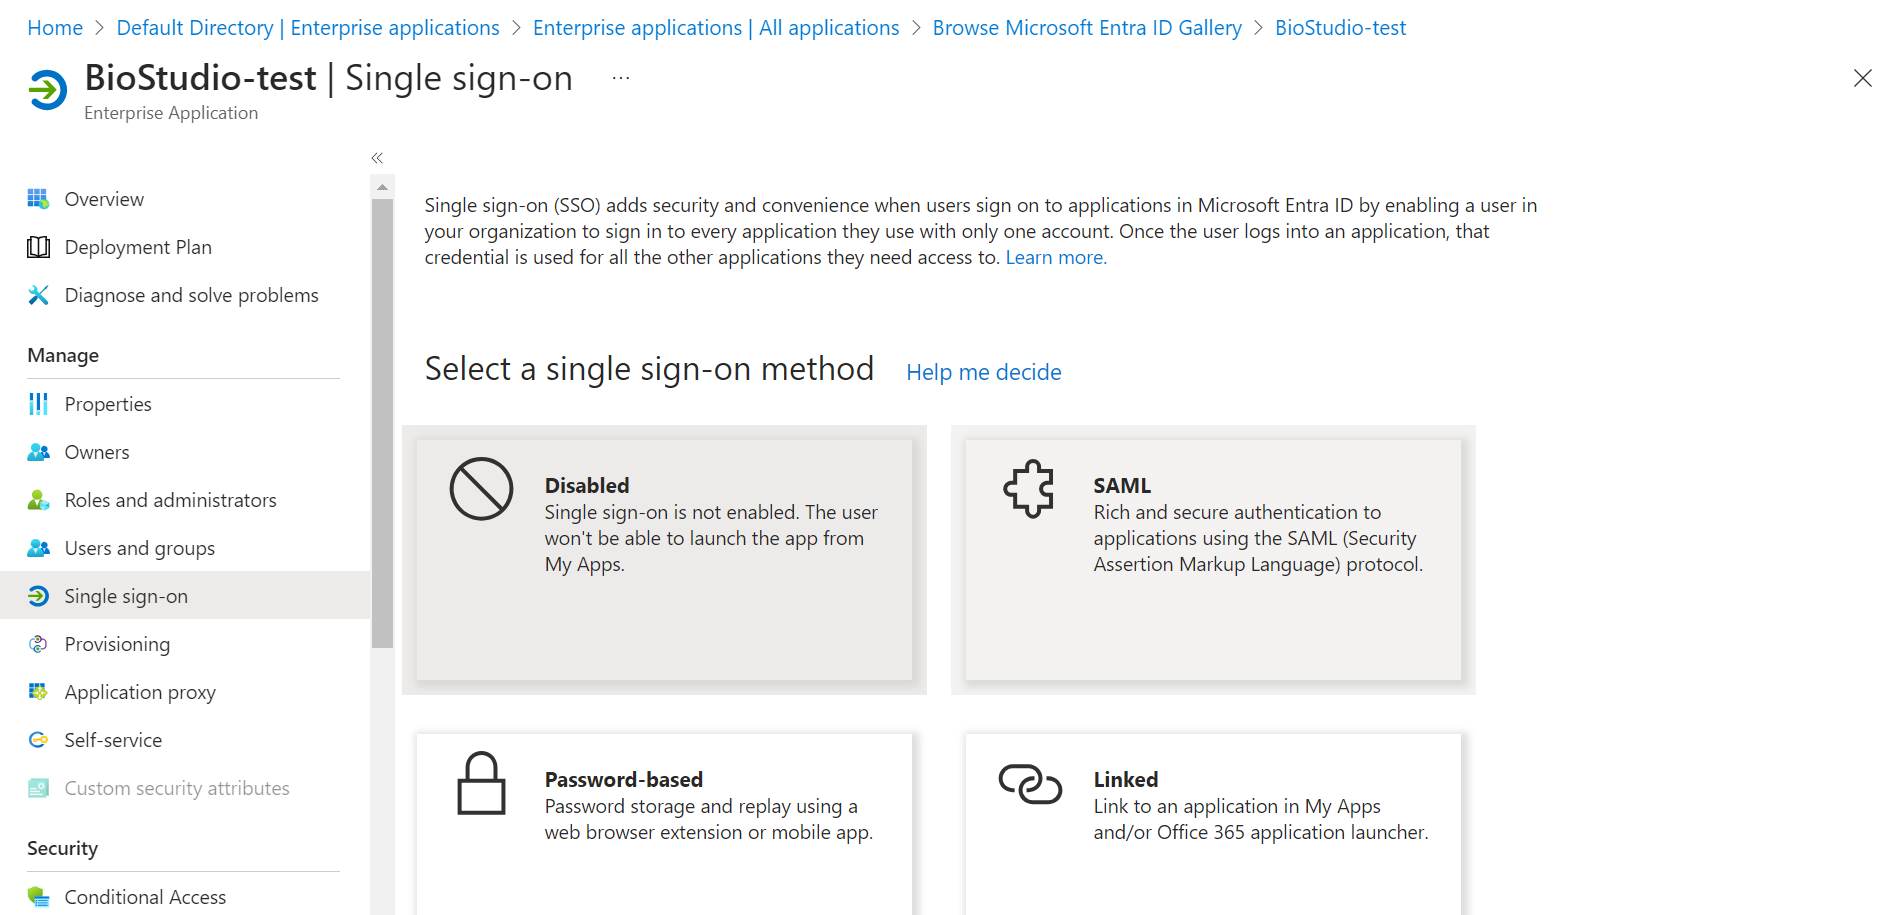
SSO set up with Azure AD ( SAML ) 
# Login to the dashboard admin
# https://<domain name>/dashboard
# provide admin credential, if already registered.
# If admin not yet registered, Kindly follow the instruction and registered first.
# NOTE: Make sure root password handy that you passed during BioStudio installation.
-
Dashboard login.
-
It will prompt for Admin credentials. Please provide Admin credentials to login.
🔶 Select SSO setting from left side menu and click on + Add New SSO. If you are going to
set up SSO at the same time.
🔔 Note: If we are going to provide a callback URL to another team to configure with IDP, Then we must provide dummy values to the mandatory field and click on the submit button to save. Later, we can update.
🔶 Copy Callback HTTPS URL that needs to be configured with IDP.
🔔 I am following to save the existing callback URL. Later, we will configure this.

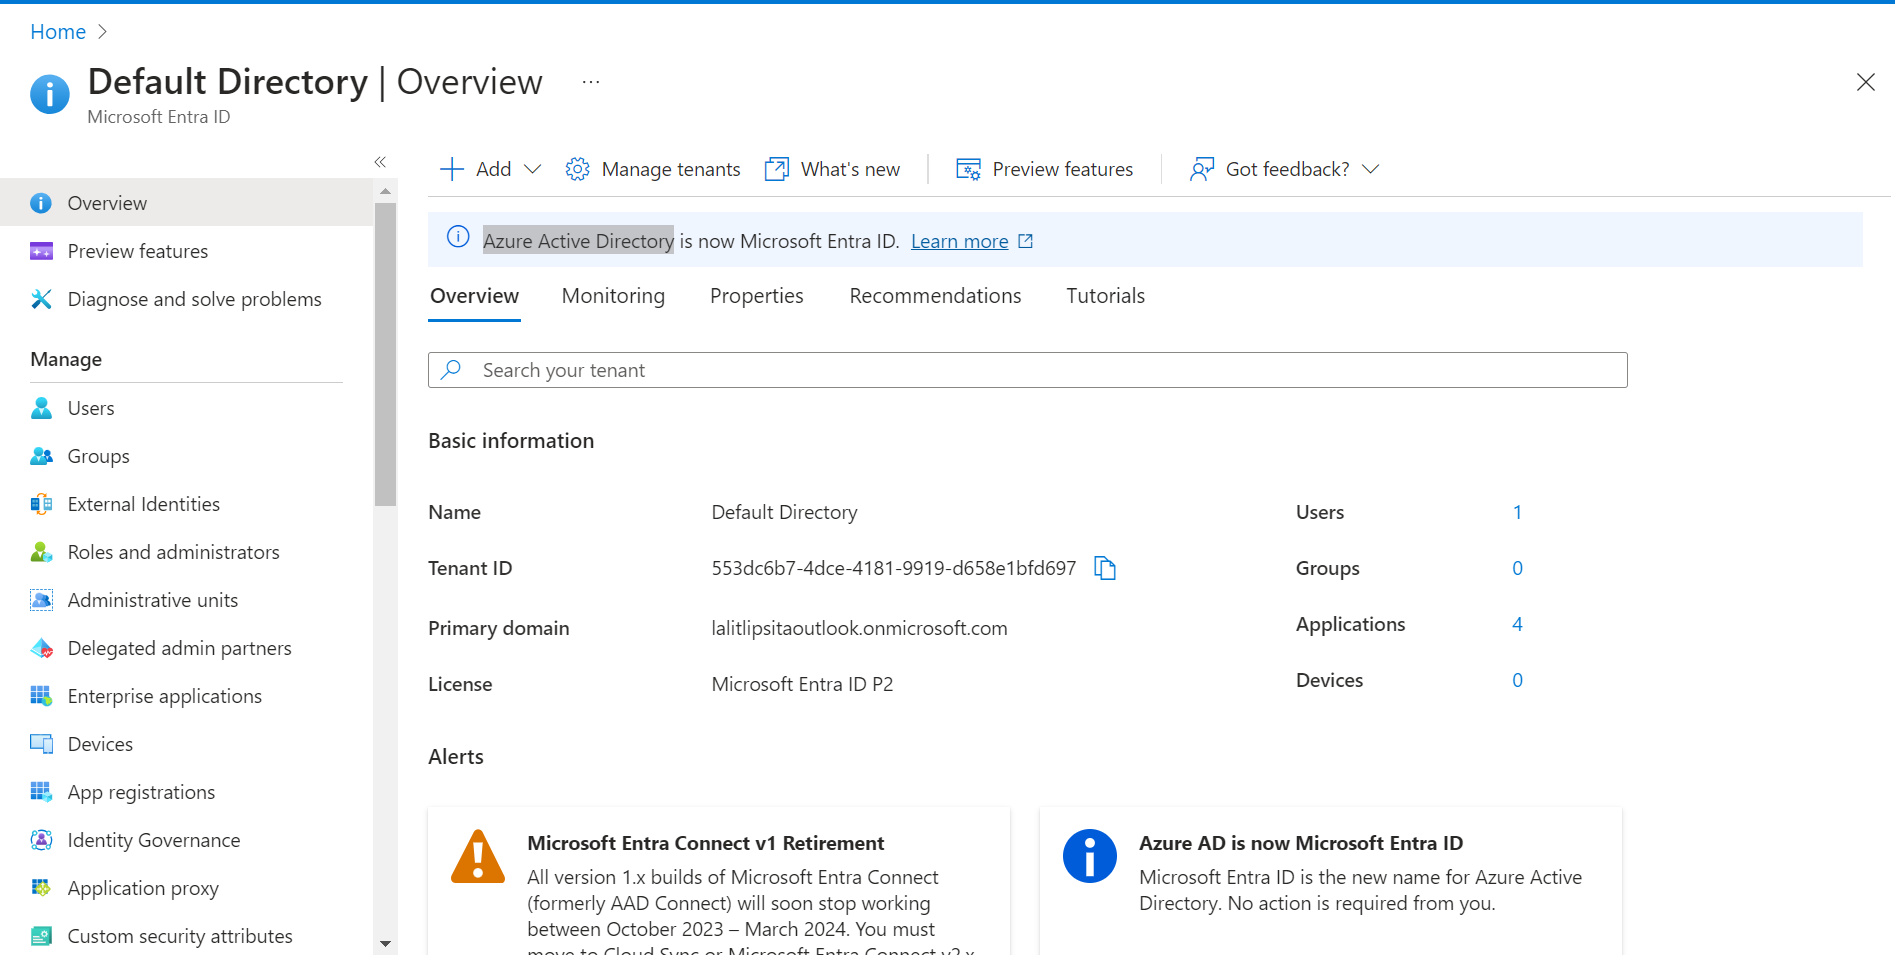
🔶 Login to Azure Cloud.
🔶 Open Microsoft Entra ID ( Azure Active Directory )
🔶 Click on Enterprise applications.

🔶 Click + New application.
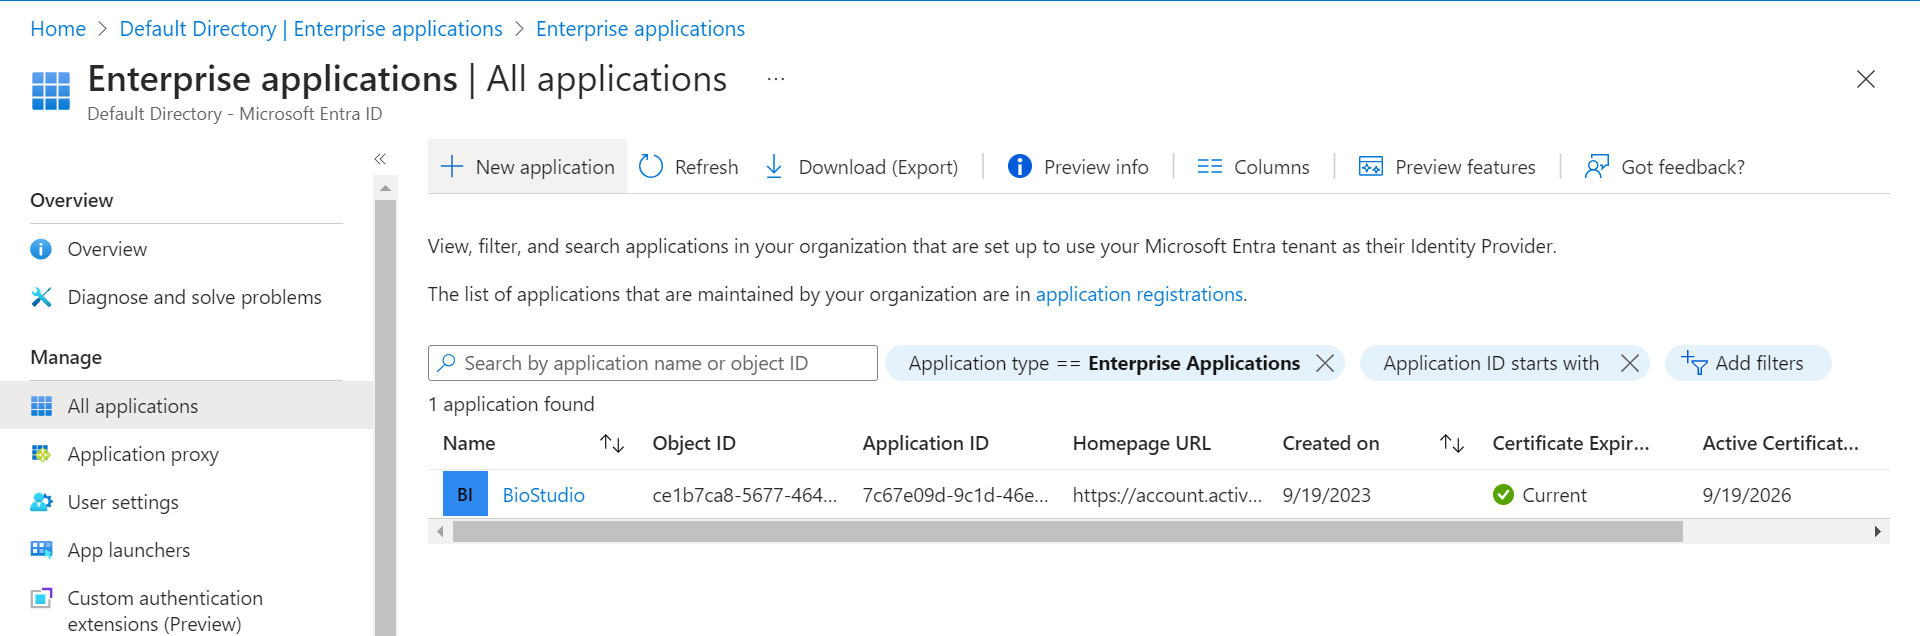
🔶 Click + Create your own application.
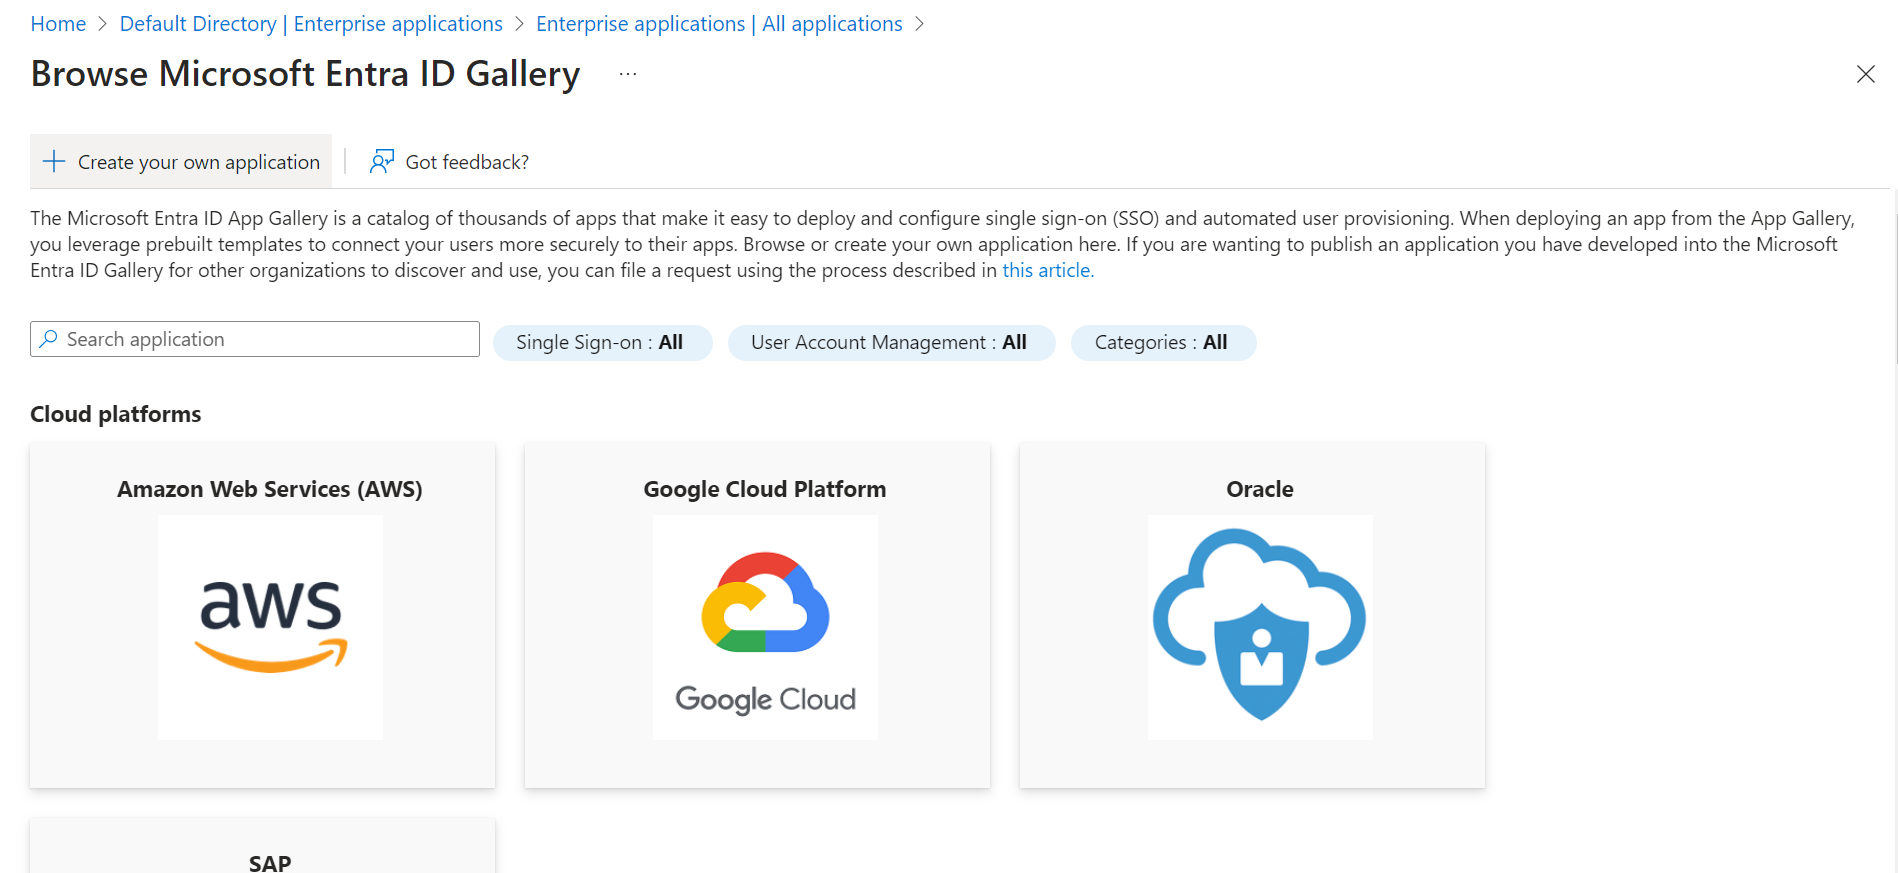
🔶 Input your application name. Click on Create
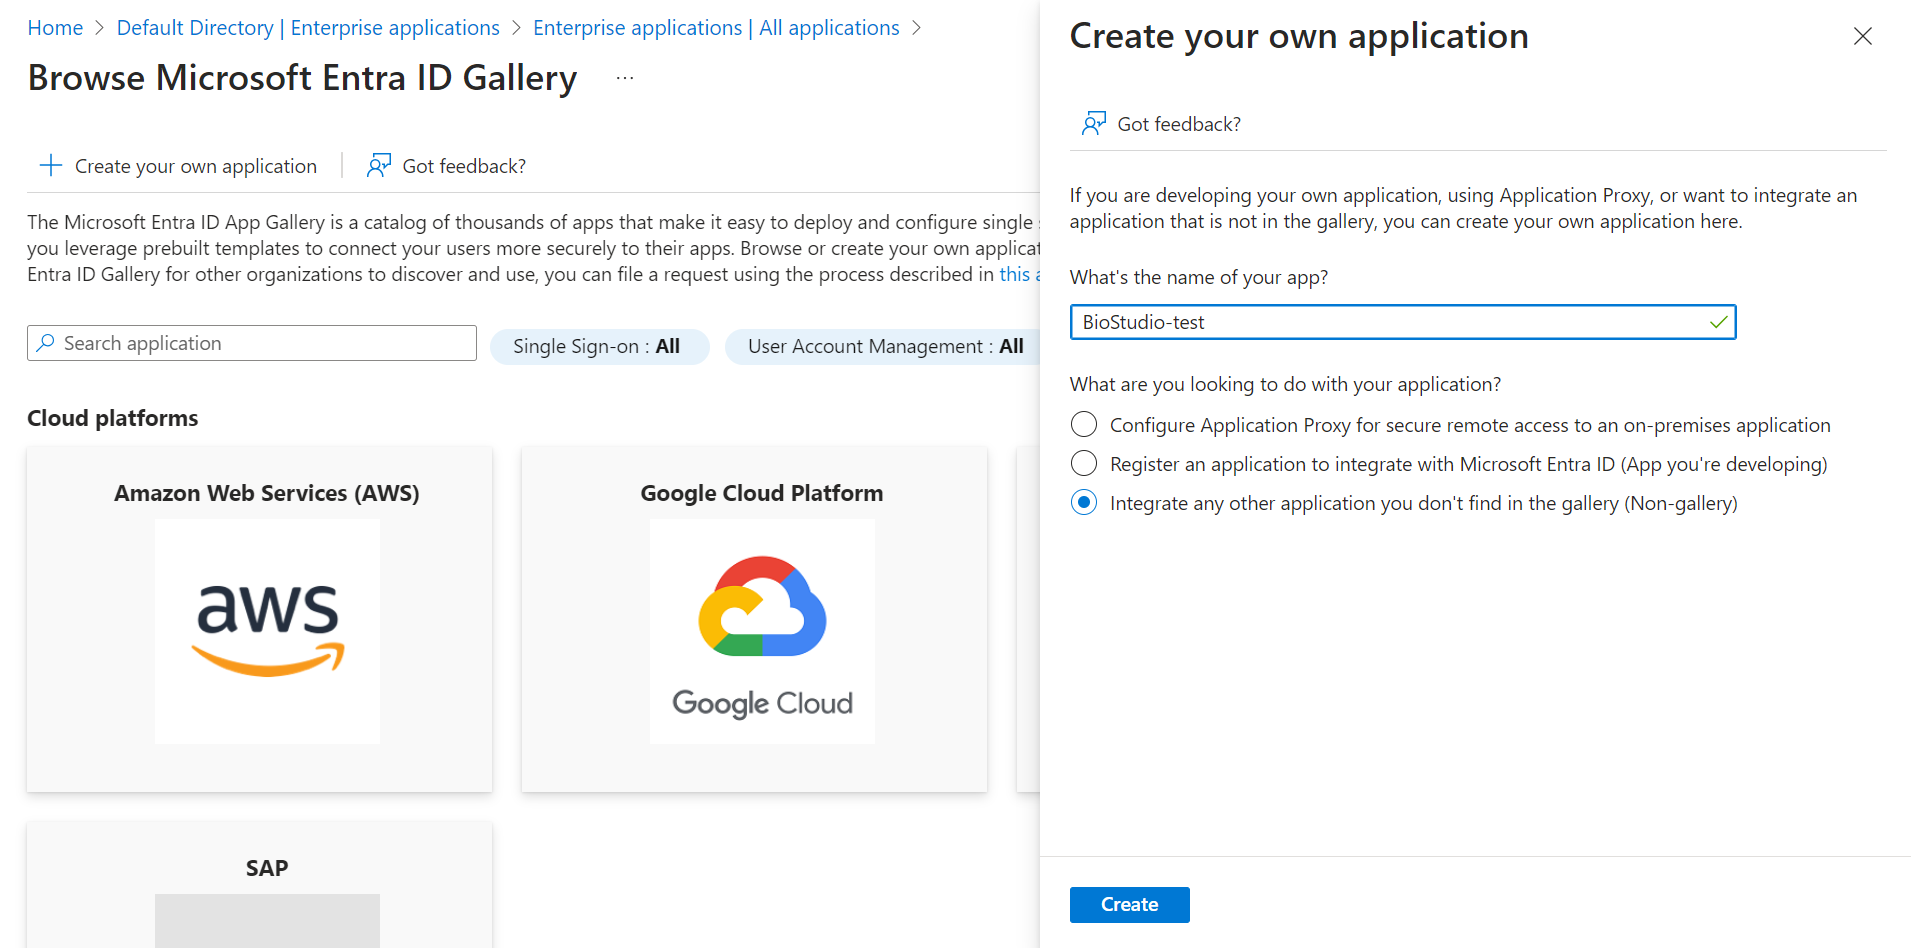
🔶 Application has been added.
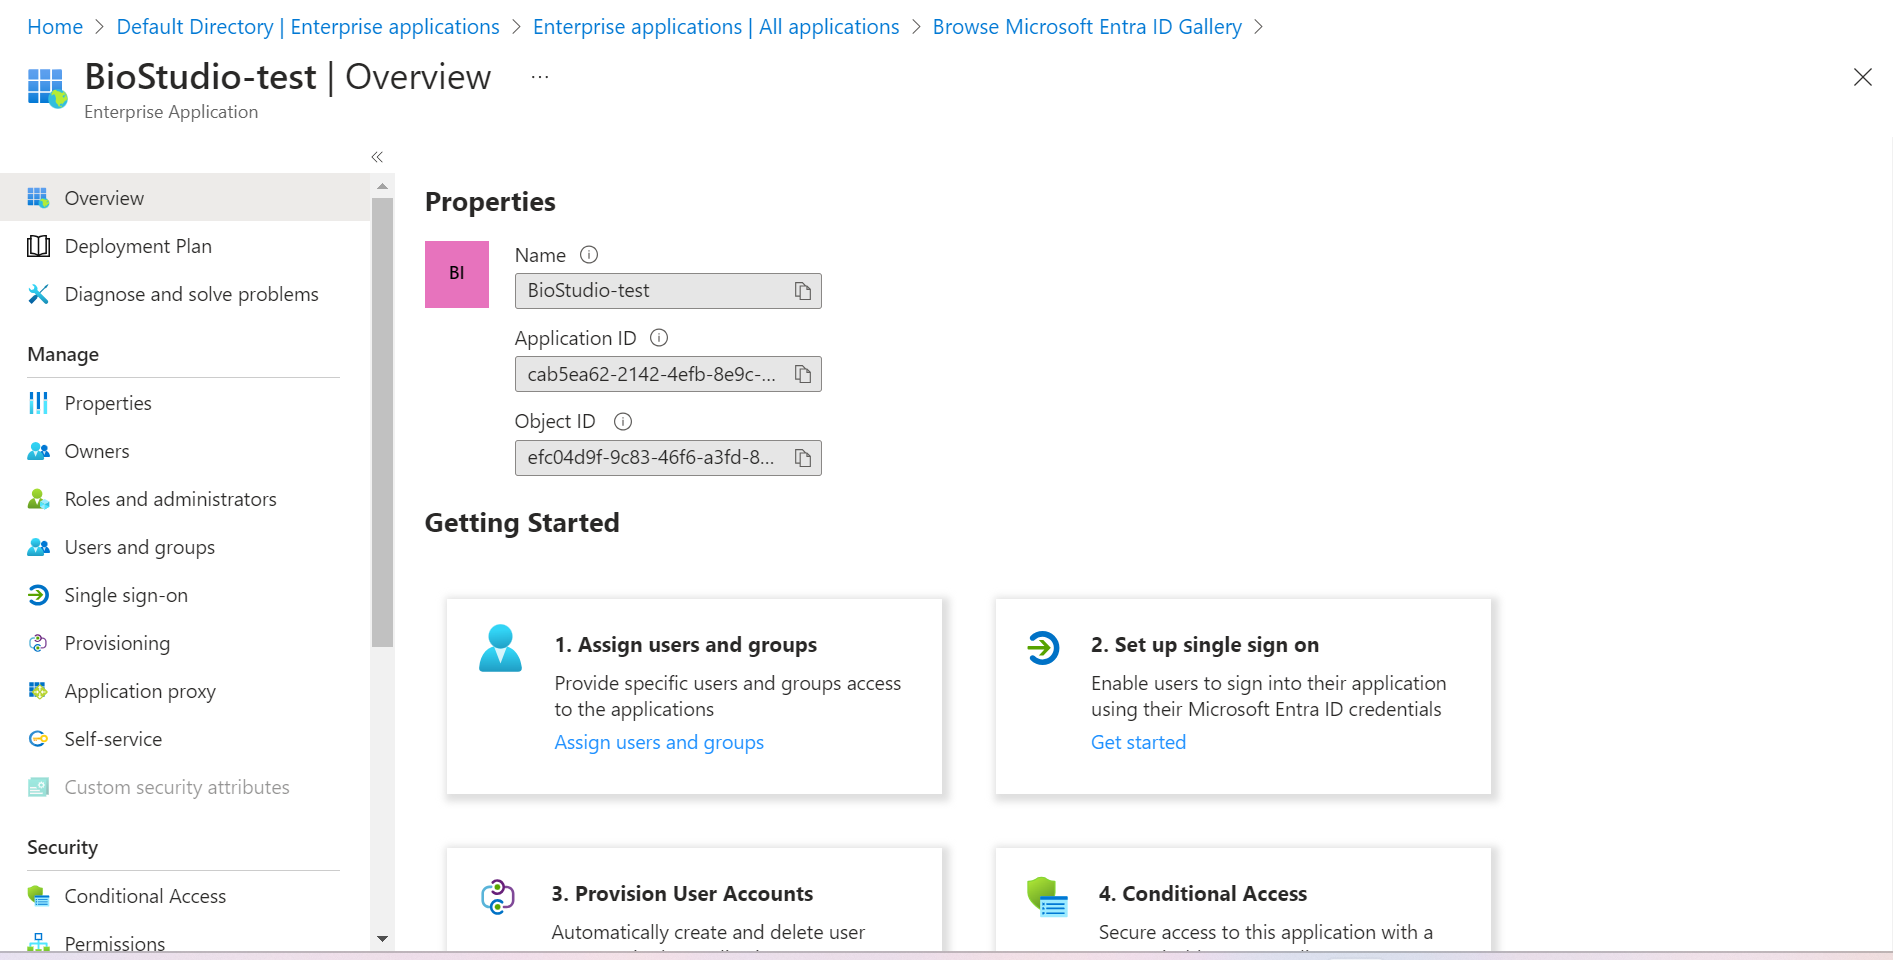
🔶 Click on Single sign-on.
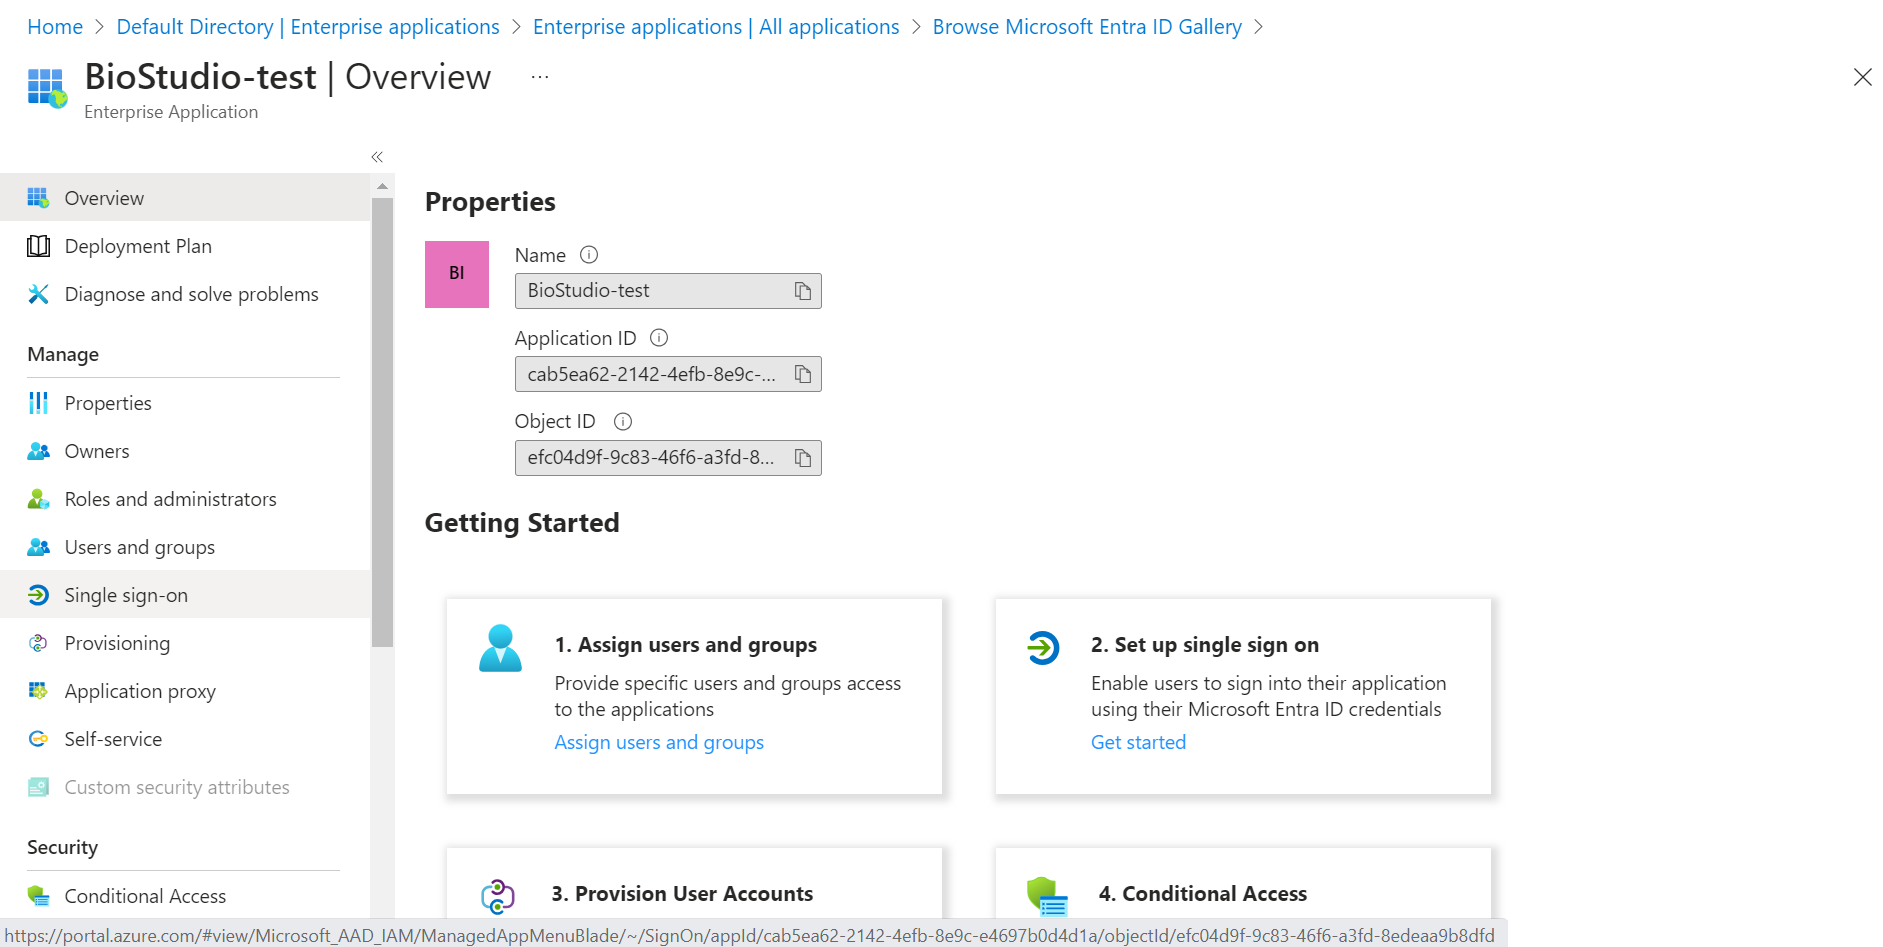
🔶 Click on SAML.
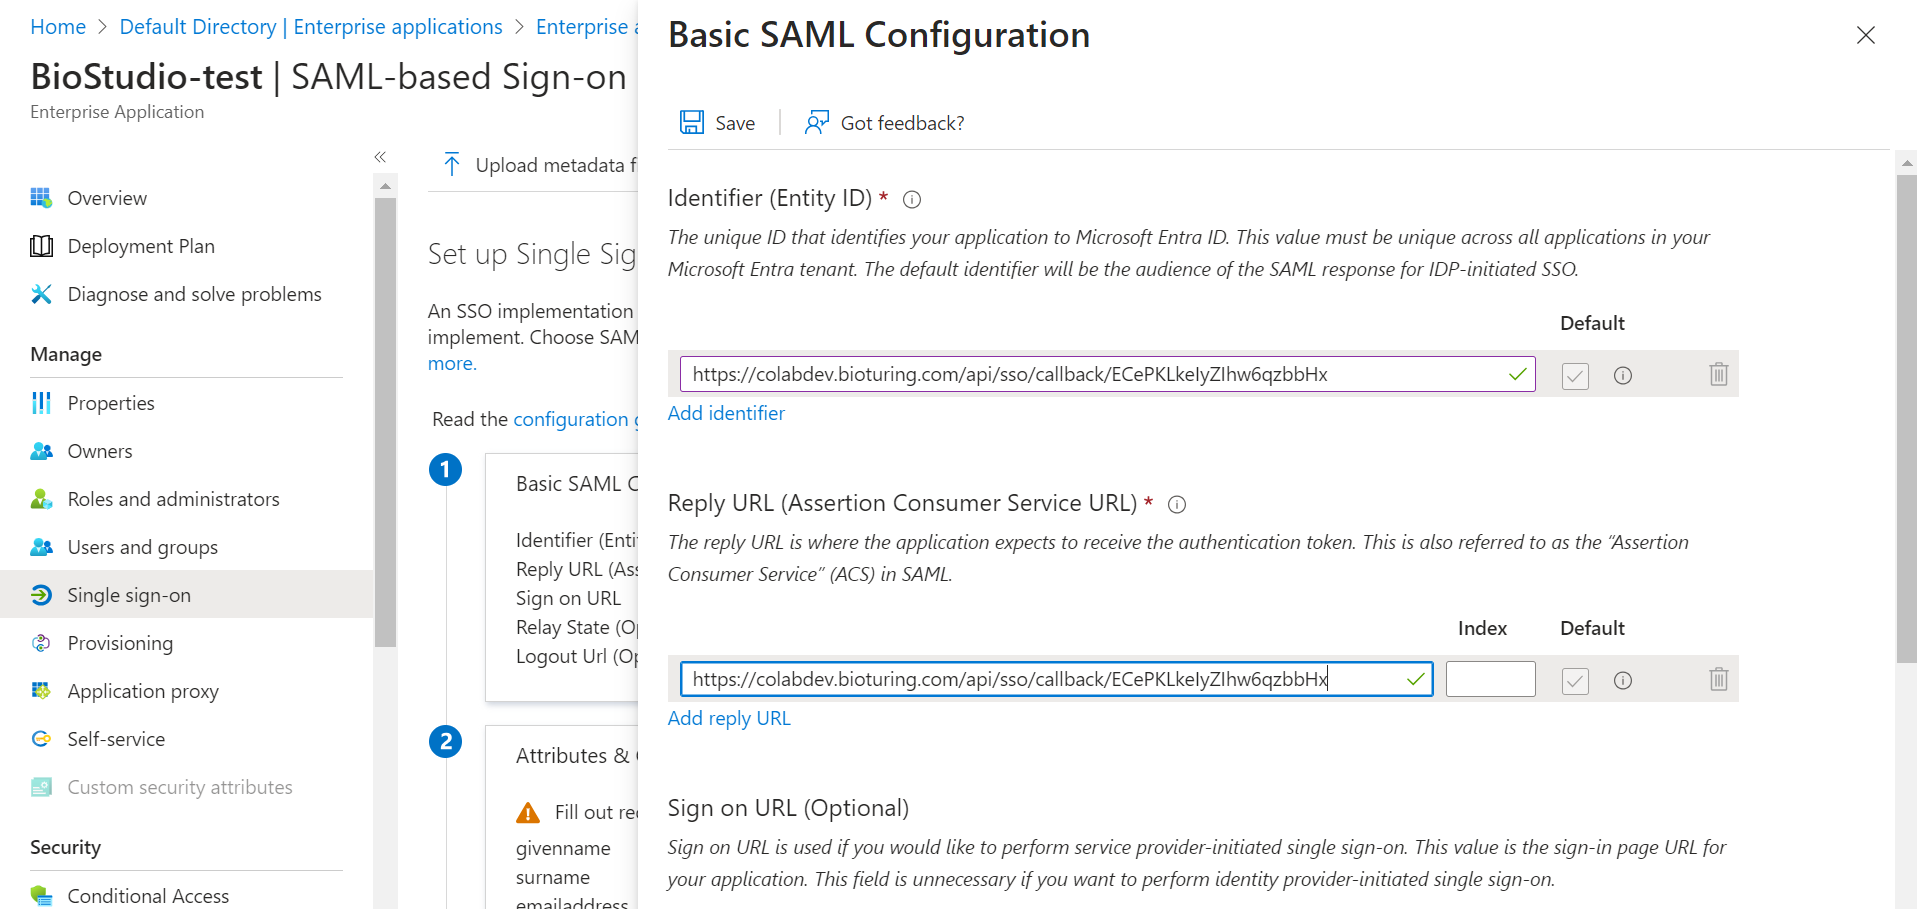
🔶 Click on Edit – Basic SAML Configuration

- Fill required field.
1️⃣ Identifier (Entity ID) : Callback URL
2️⃣ Reply URL (Assertion Consumer Service URL) : Callback URL
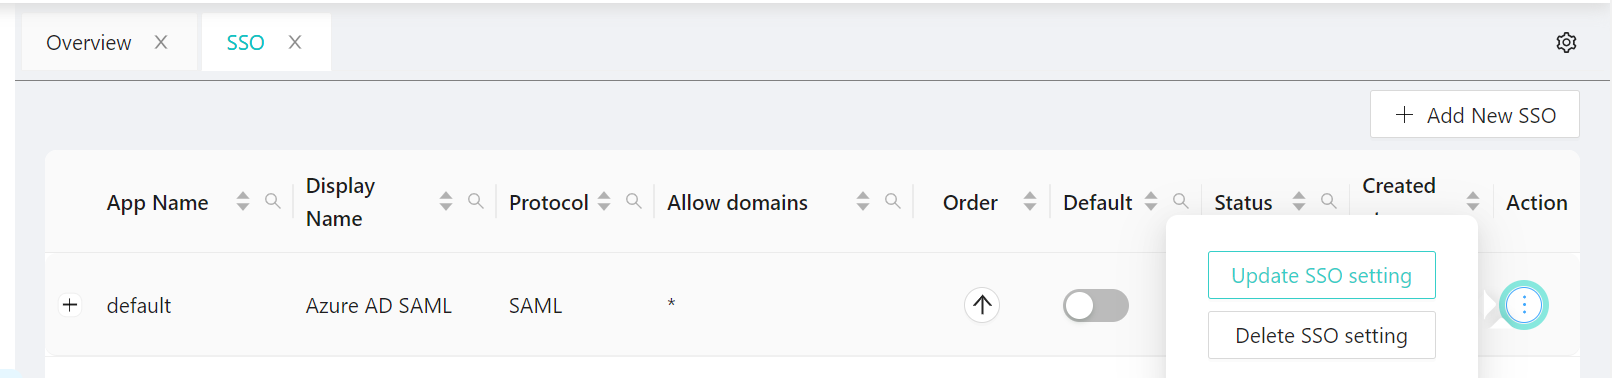
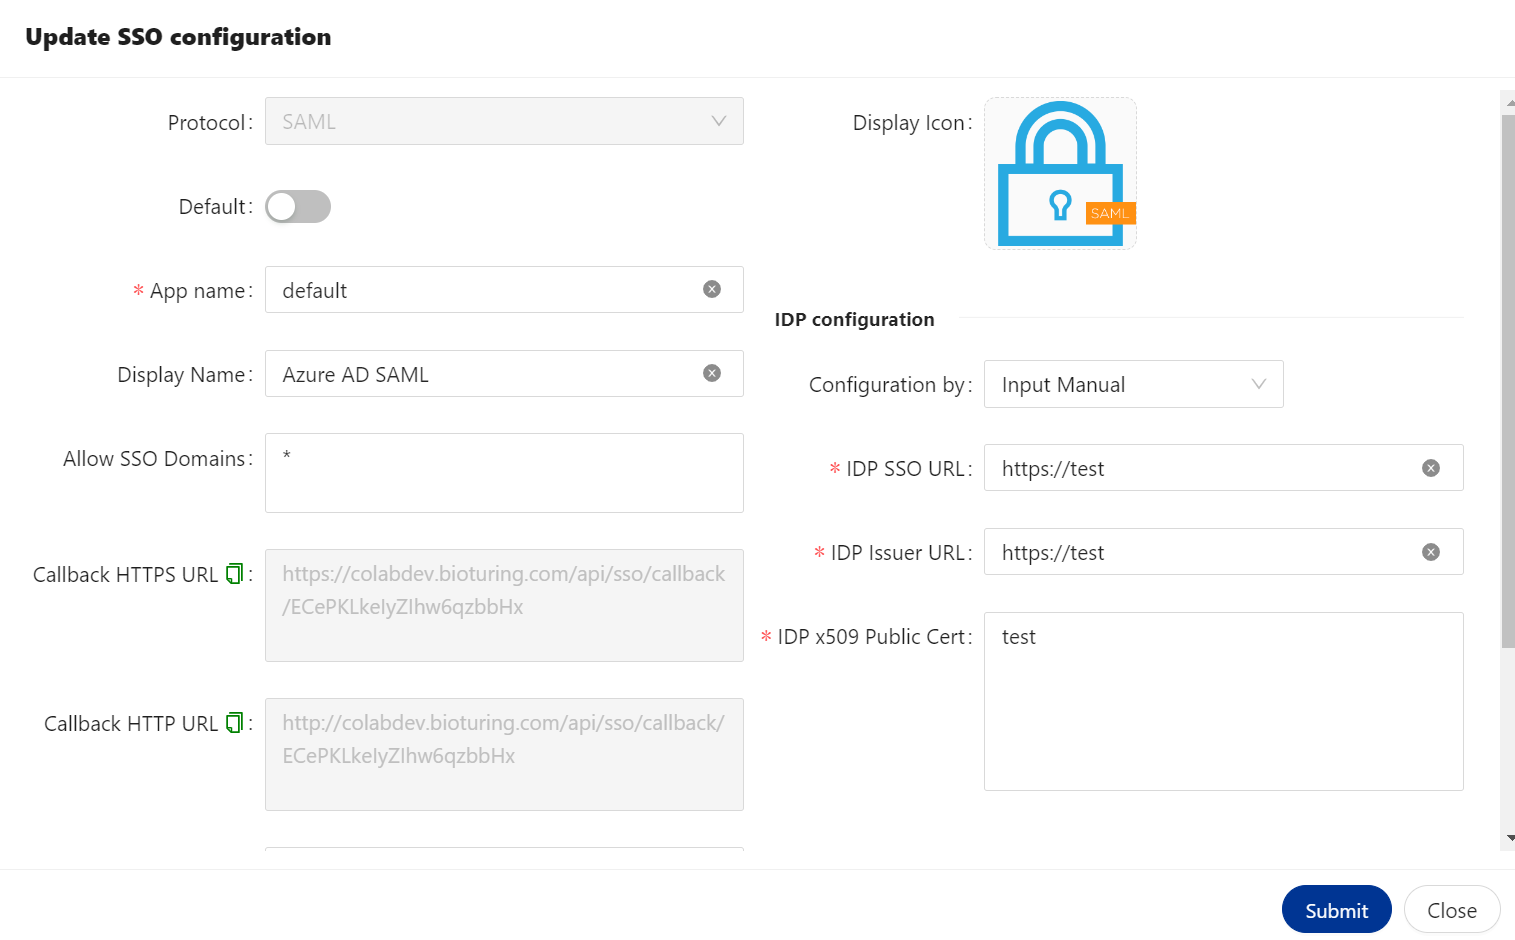
🔶 Login to BioStudio dashboard and click on three dot to select Update SSO setting
- Copy callback URL and fill on required fields.
🔶 Click on Save button.
- Download Certificate (Base64)
- Copy Login URL
- Copy Microsoft Entra ID Identifier
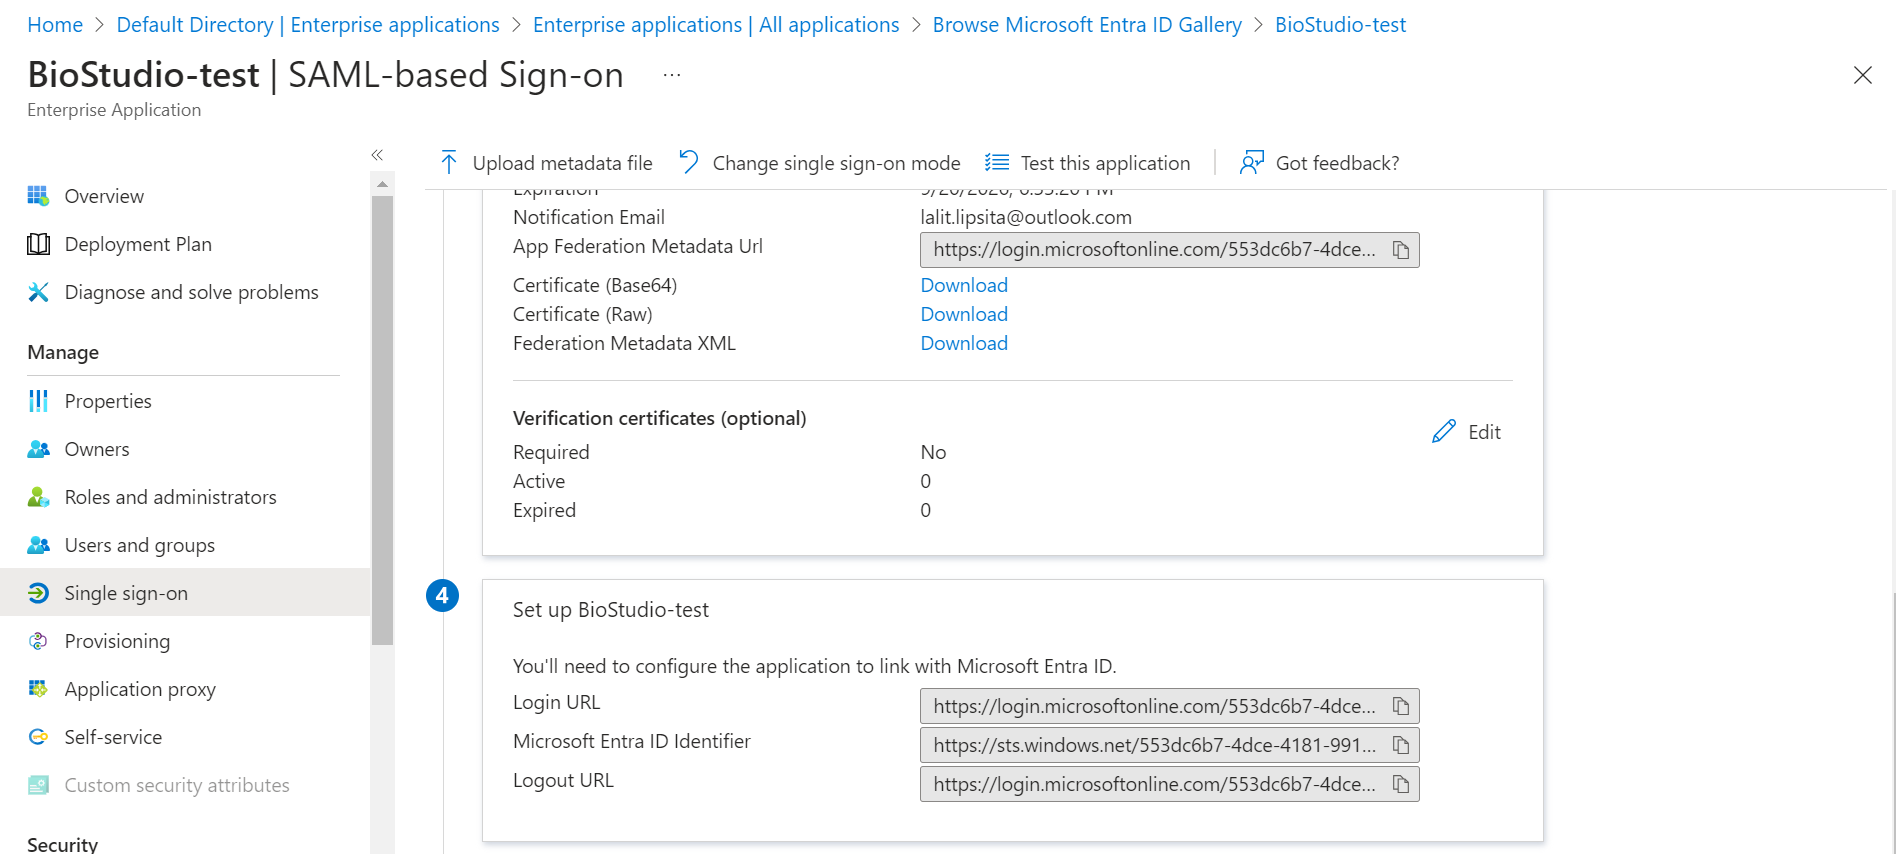
✏️ Certificate (Base64) = IDP x509 Public Cert
✏️ Login URL = IDP SSO URL
✏️ Microsoft Entra ID Identifier = IDP Issuer URL
- Fill appropriate values to BioStudio SSO configuration.
🔶 Login to BioStudio dashboard and click on three dot to select Update SSO setting
🔶 Create user and assign application to the user
🔶 Click on Users and groups
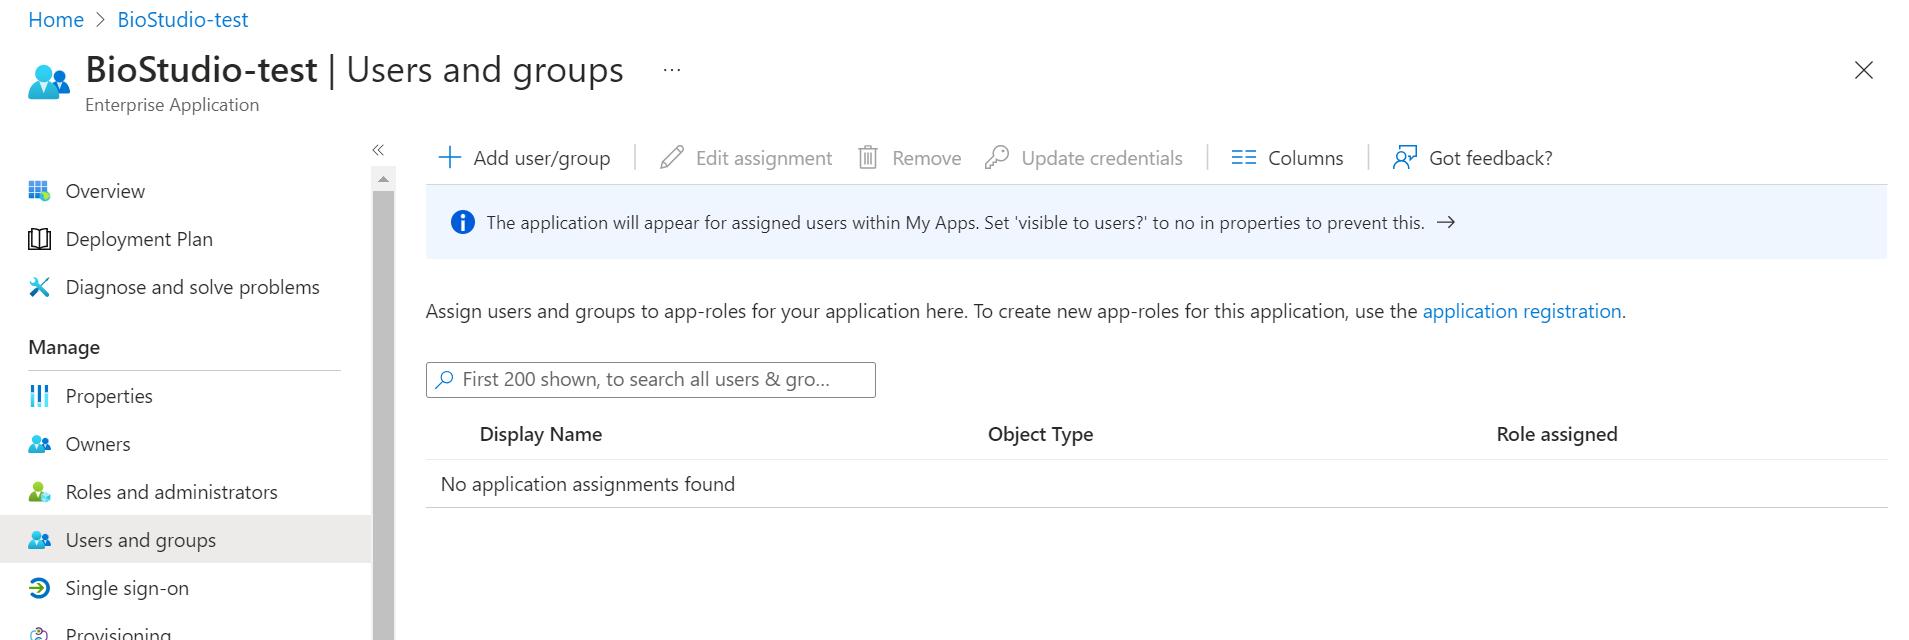
🔶 Click on + Add user/group
🔶 Click on Add user and click on Select
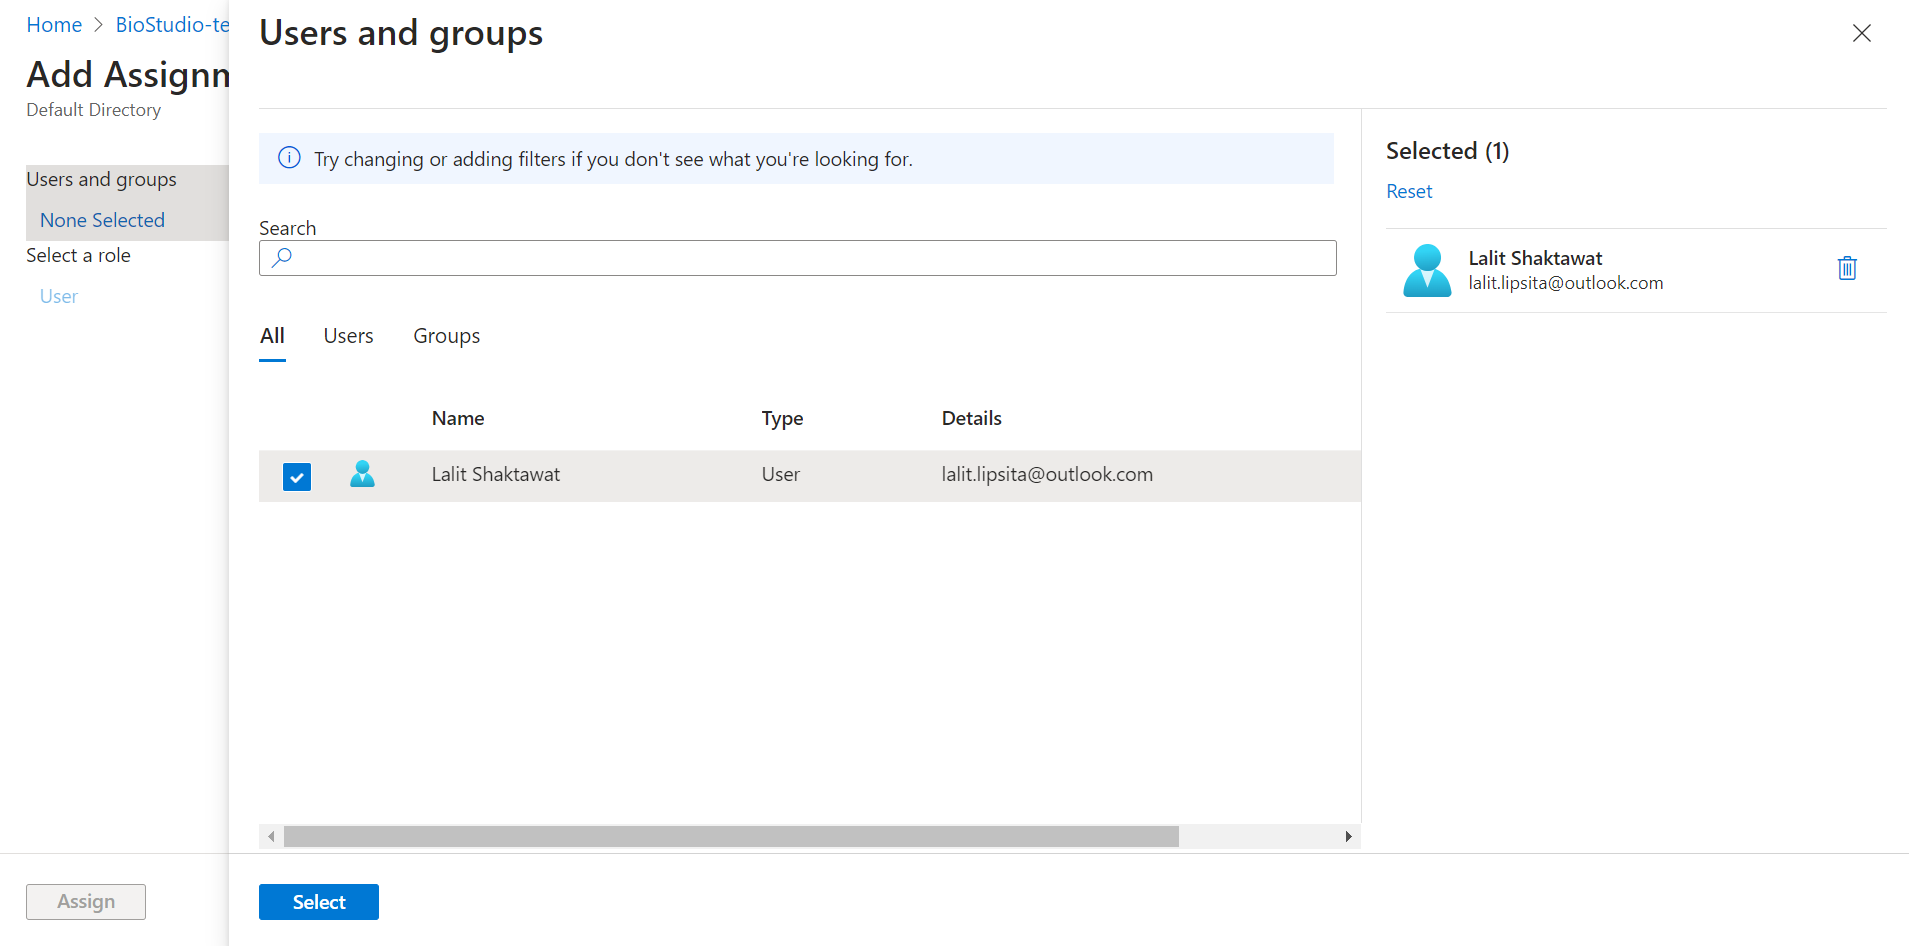
🔶 Click on Assign

🔶 User has been Assign to this application.

🔶 Login succeed.
SSL setup. 
SSL Setup : Kindly get X.509 Provate and Public key.
I] Upload SSL file using web-ui.
# Just need tu put right value on write box and update.
# Or upload files as required.
# System will auto detect those updates.

II] Login to server and follow below steps.
# Copy tls.crt and tls.key file to /biocolab/configs.
# It was auto detected by our software and update the certificates.
🔶 SSL using WebUI
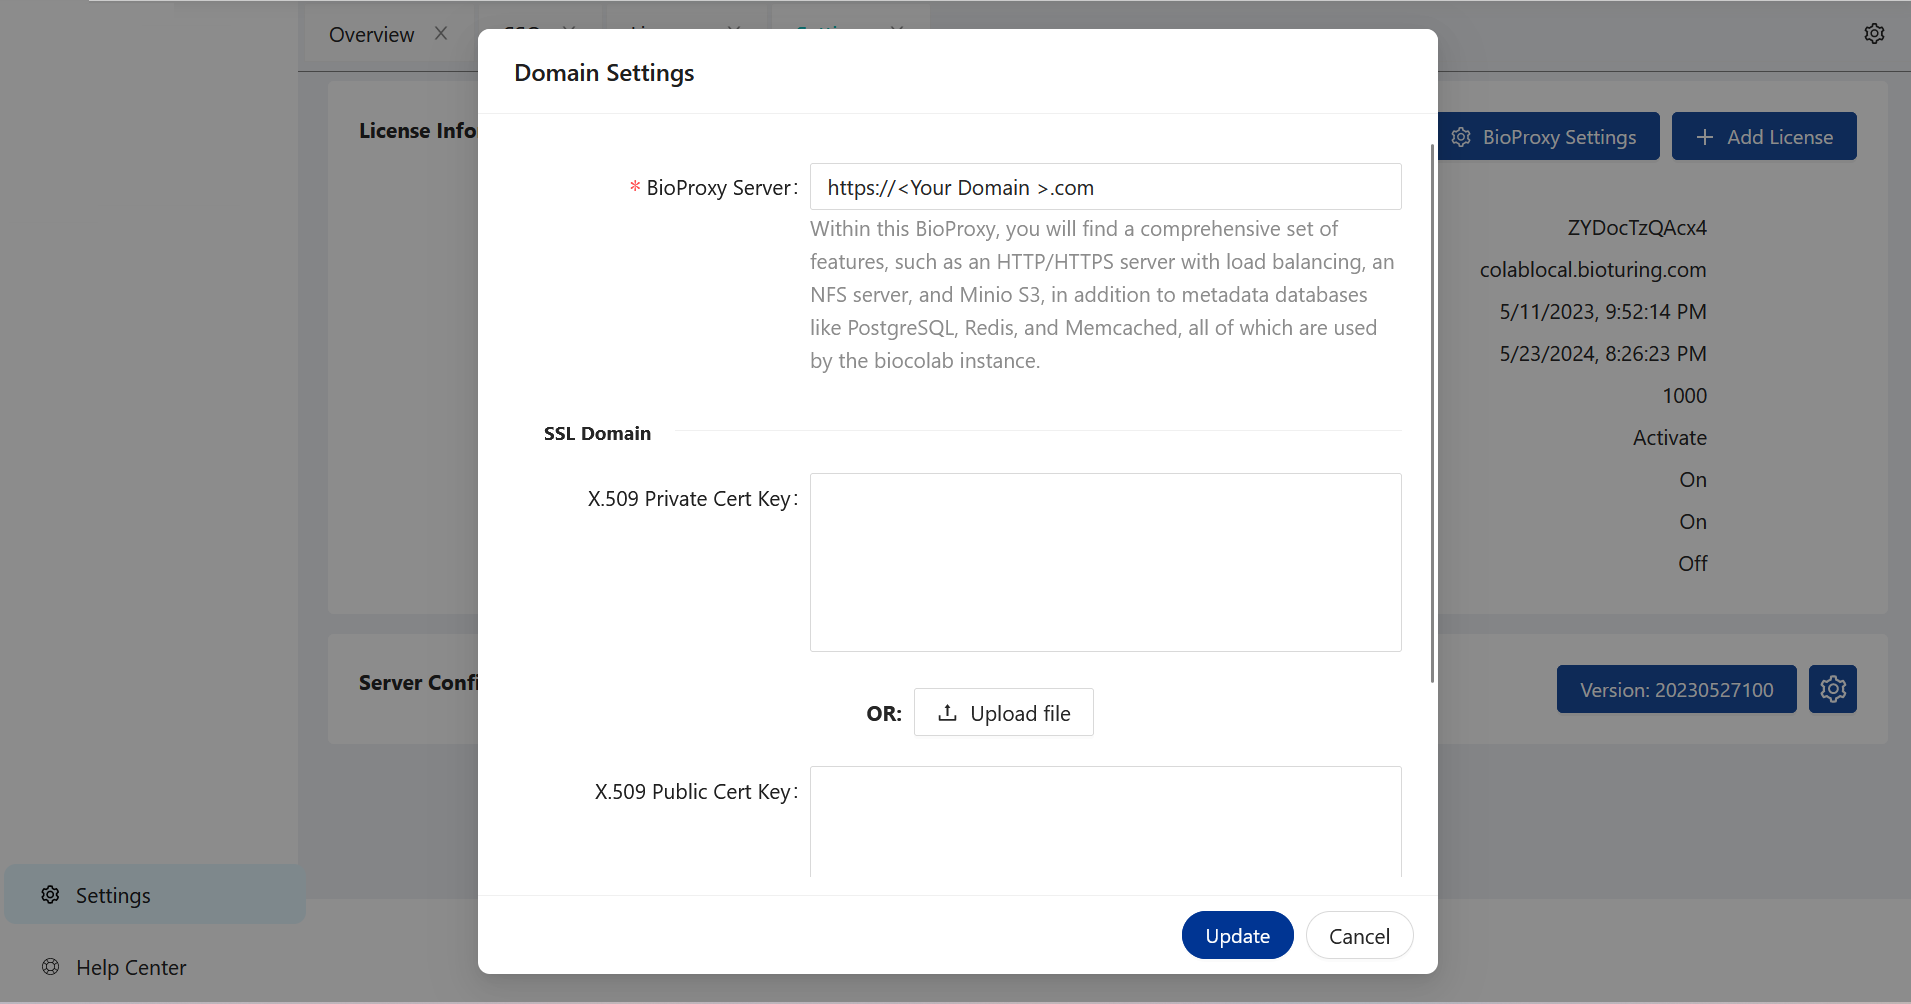
🔶 SSL direct upload on server location.

Kubernetes Setup for BioStudio 
helm search repo bioturing
NAME                    CHART VERSION   APP VERSION     DESCRIPTION
bioturing/biocolab      2.0.52          2.0.52          BioColab offers curated, ready-to-run notebooks...
bioturing/ecosystem     1.0.34          1.0.34          BioTuring System is a GPU-accelerated single-ce...
Helm chart version : 1.0.70
# Before installing the BioTuring System on Linux/K8S, some pre-installation steps are required:
# System: K8s
# A token obtained from BioTuring for BioStudio.
# BioStudio supporting GPU and CPU type of instance / Machine.
# Kindly select GPU, If you wish to use Prebuilt GPU based notebook or wish to generate GPU based note book.
Prepare GPU toolkit for K8S 
Patch container engines (Docker, Containerd)
Install NVidia container toolkit on each node following the guide:
🔗 nvidia toolkit install guide
🔶 Check container engines (Docker, Containerd)
# For microk8s :
microk8s kubectl describe no | grep Runtime

# For vanilla :
kubectl describe no | grep Runtime
▶️ If container engine is Containerd, add these lines to : /etc/containerd/config.toml
privileged_without_host_devices = false
base_runtime_spec = ""
[plugins."io.containerd.grpc.v1.cri".containerd.runtimes.runc.options]
    SystemdCgroup = true
[plugins."io.containerd.grpc.v1.cri".containerd.runtimes.nvidia]
    privileged_without_host_devices = false
    runtime_engine = ""
    runtime_root = ""
    runtime_type = "io.containerd.runc.v1"
    [plugins."io.containerd.grpc.v1.cri".containerd.runtimes.nvidia.options]
    BinaryName = "/usr/bin/nvidia-container-runtime"
    SystemdCgroup = true
[plugins."io.containerd.grpc.v1.cri".cni]
bin_dir = "/opt/cni/bin"
conf_dir = "/etc/cni/net.d"
▶️ After that, restart containerd
sudo systemctl restart containerd
sudo nvidia-container-cli --load-kmods info
If container engine is Docker, add these lines to: /etc/docker/daemon.json
{
    "default-runtime": "nvidia",
    "runtimes": {
        "nvidia": {
            "path": "nvidia-container-runtime",
            "runtimeArgs": []
        }
    }
}
▶️ After that, restart docker
sudo systemctl restart docker
sudo nvidia-container-cli --load-kmods info
Install BioTuring ecosystem on K8S 
We support all k8s engines: GKE (Google Kubernetes Engine), EKS (Amazon Elastic Kubernetes Service), AKS (Azure Kubernetes Service), MicroK8s, and vanilla K8S …etc.
Ensure that helm (version 3) is installed.
▶️ First, check the Helm version.
# Example :

microk8s enable helm3

microk8s helm3 version
Helm command tips:
# Add repo charts
helm repo add bioturing https://bioturing.github.io/charts/apps/
helm repo update
helm search repo bioturing

# Login BioTuring registry
helm registry login -u admin registry.bioturing.com

# Show information of helm chart name
helm show all bioturing/<helm chart name> --version <helm chart version>

# Action into helm chart name
helm template bioturing bioturing/<helm chart name> --version <helm chart version>
helm install bioturing bioturing/<helm chart name> --version <helm chart version>
helm upgrade bioturing bioturing/<helm chart name> --version <helm chart version>
⭕ Add BioTuring Helm charts
# Example:

For Vanilla K8s:

helm repo add bioturing https://bioturing.github.io/charts/apps/

For Microk8s:

microk8s helm3 repo add bioturing https://bioturing.github.io/charts/apps/
Helm Chart 
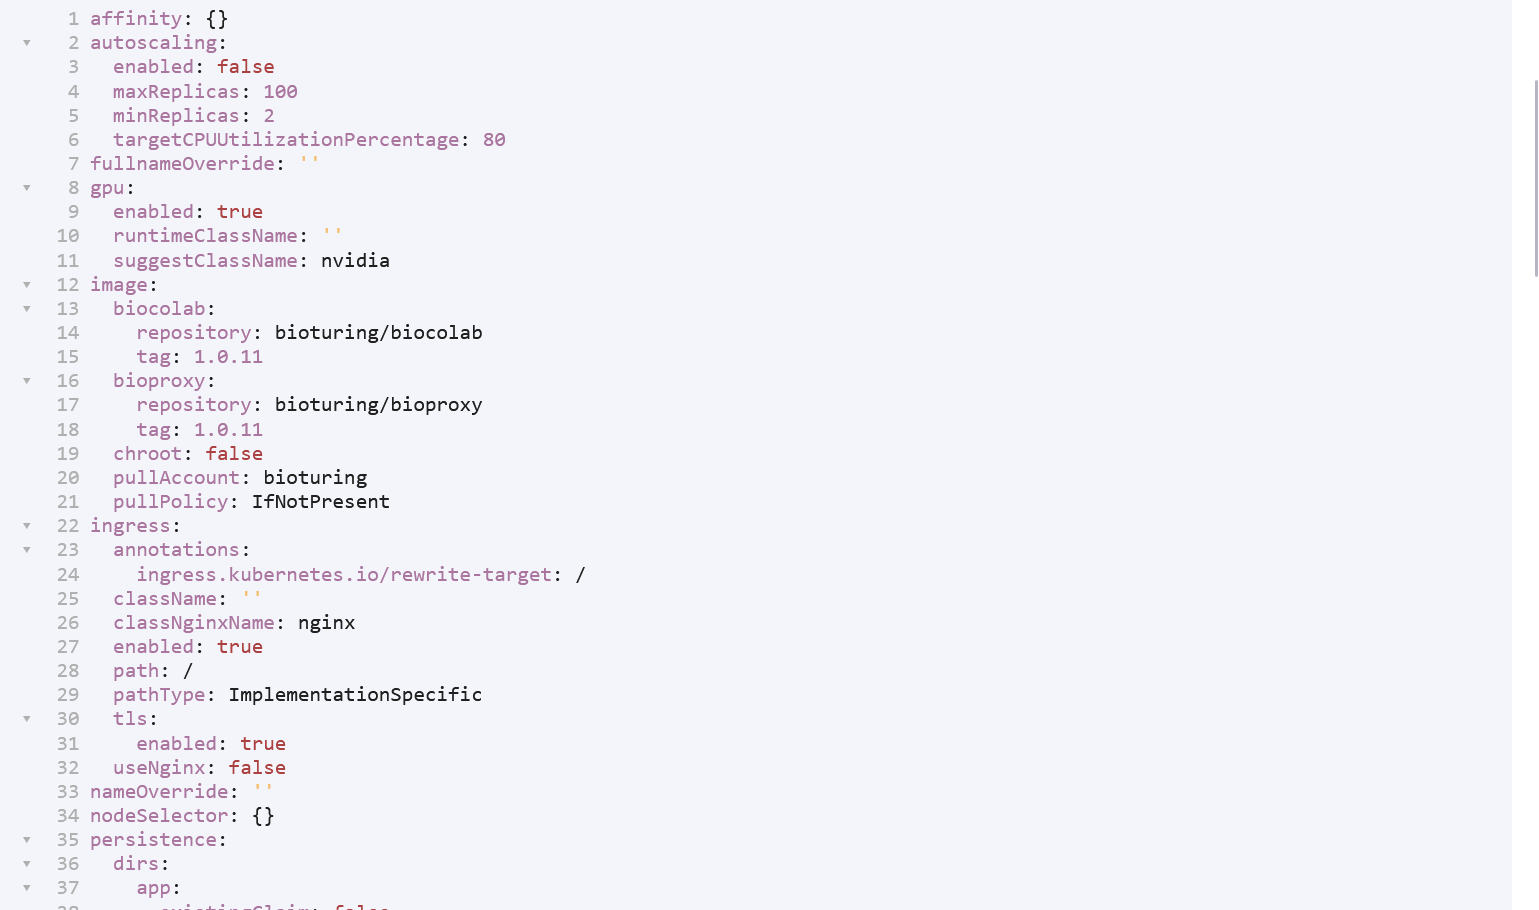
| Key | Type | Default | Description |
|---|---|---|---|
| image.biocolab.repository | string | bioturing/biocolab | biocolab repository |
| image.biocolab.tag | int | 2.0.50 | biocolab image tag |
| image.bioproxy.repository | string | bioturing/biocolab | bioproxy repository |
| image.bioproxy.tag | int | 1.0.26 | bioproxy image tag |
| imagePullSecrets | object | {} | secrets |
| secret.data.allowips | string | "" | allow ip |
| secret.data.cbtoken | string | "" | Colab token |
| secret.data.domain | string | "" | domain name |
| secret.admin.username | string | admin | admin user name |
| secret.admin.password | string | passwdadmin12 | admin password |
| secret.postgresql.dbcolab | string | "" | postgres DB name |
| secret.postgresql.dbhub | string | "" | postgres hub DB name |
| secret.postgresql.username | string | "" | postgres user name |
| secret.postgresql.password | string | "" | postgres password |
| secret.server.aria2c_list_ips | object | {} | |
| secret.server.certificate | string | "" | Server certificate |
| secret.server.key | string | "" | Server Key |
| secret.server.collaborative_mode | bool | false | |
| secret.server.debug_mode | bool | false | |
| secret.server.enable_https | bool | false | |
| secret.server.memcached_list | string | "" | |
| secret.server.mqtt_list_ips | string | "" | |
| secret.server.redis_list | string | "" | |
| secret.server.redis_password | string | "" | |
| secret.server.tracing_mode | bool | false | |
| secret.server.trakfik_proxy_mode | bool | false | |
| secret.server.use_letsencrypt | bool | false | |
| secret.server.use_redis_cache | bool | false | |
| service.ports.biocolab.aria2c.port | int | 6800 | |
| service.ports.biocolab.http.port | int | 11123 | application port |
| service.ports.biocolab.jobqueue.port | int | 11300 | |
| service.ports.biocolab.mqtttcp.port | int | 1883 | |
| service.ports.biocolab.mqttweb.port | int | 9001 | |
| service.ports.biocolab.notebook.port | int | 18000 | |
| service.ports.bioproxy.http.port | int | 80 | http port |
| service.ports.bioproxy.https.port | int | 443 | https port |
| service.ports.bioproxy.memcached.port | int | 11211 | |
| service.ports.bioproxy.ntfsp1.port | int | 111 | |
| service.ports.bioproxy.ntfsp2.port | int | 2049 | |
| service.ports.bioproxy.ntfsp3.port | int | 32767 | |
| service.ports.bioproxy.ntfsp4.port | int | 32765 | |
| service.ports.bioproxy.postgresql.port | int | 5432 | |
| service.ports.bioproxy.redis.port | int | 6379 | redis port |
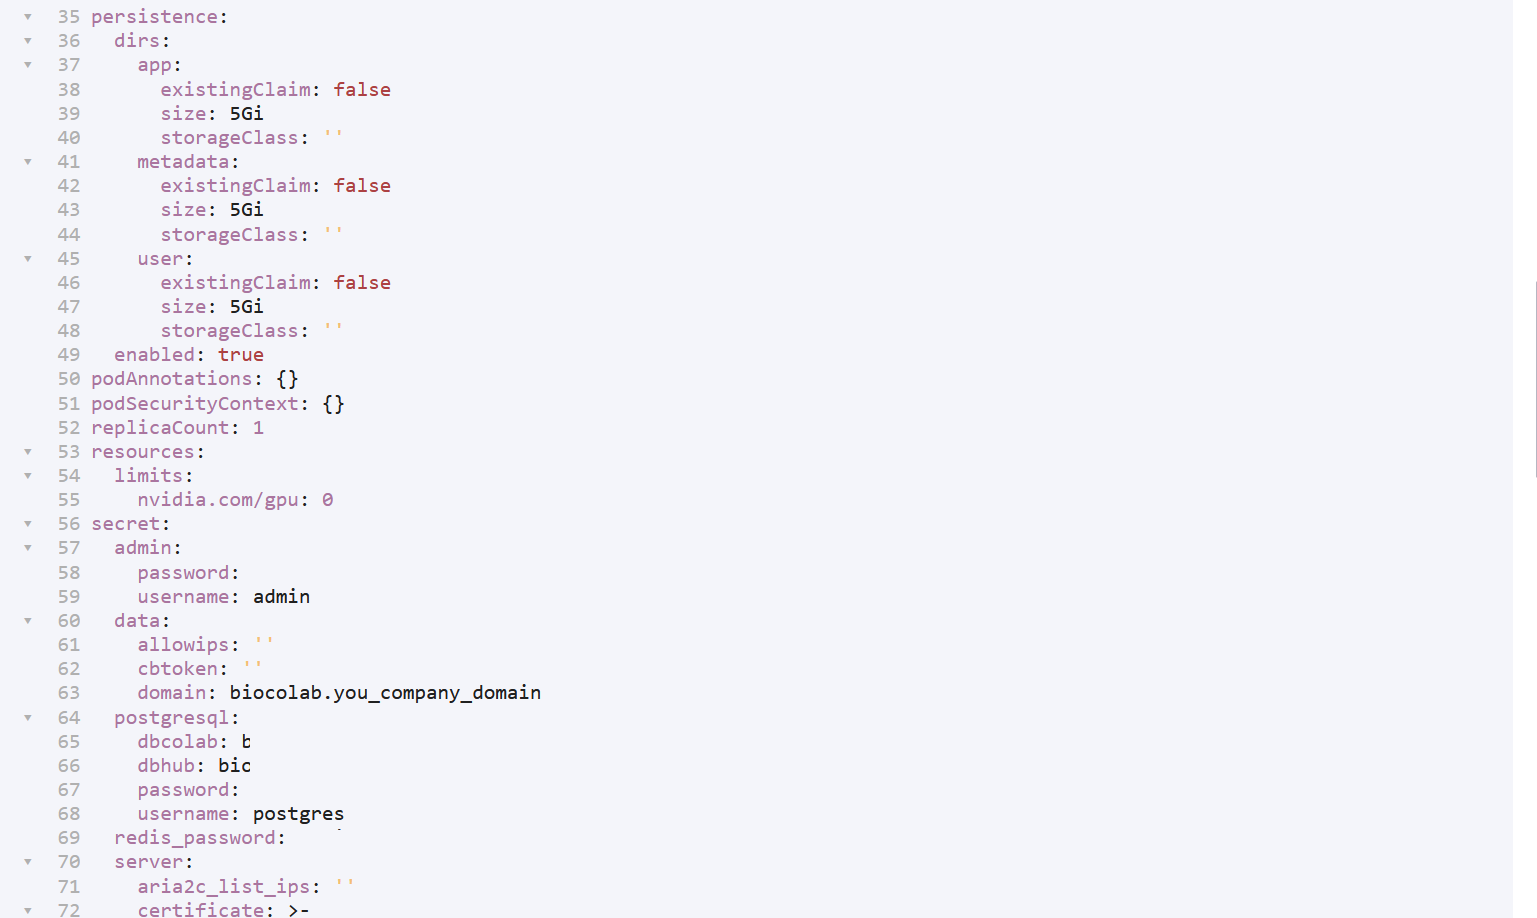
| persistence.dirs.app.size | String | 150Gi | application data |
| persistence.dirs.app.storageClass | string | "" | |
| persistence.dirs.metadata.size | String | 5Gi | metadata |
| persistence.dirs.metadata.storageClass | string | "" | |
| persistence.dirs.user.size | String | 500Gi | user data |
| persistence.dirs.user.storageClass | string | "" | |
| ingress.annotations | object | {} | |
| ingress.className | string | "" | |
| ingress.classNginxName | string | nginx | |
| ingress.enabled | bool | true | |
| ingress.tls | bool | true | |
| ingress.tls.enabled | bool | true | |
| ingress.useNginx | bool | false | |
| nodeSelector | object | {} | |
| podAnnotations | object | {} | |
| podSecurityContext | object | {} | |
| replicaCount | int | 1 | |
| resources | object | {} | |
| service.type | string | ClusterIP | |
| serviceAccount.annotations | object | {} | |
| serviceAccount.name | string | "" | |
| tolerations | object | {} | |
| host_ip | int | 0.0.0.0 | |
| affinity | object | {} | |
| autoscaling | object | {} | |
| autoscaling.enabled | bool | false | |
| autoscaling.maxReplicas | int | 100 | |
| autoscaling.minReplicas | int | 2 | |
| autoscaling.targetCPUUtilizationPercentage | int | 80 | |
| gpu.runtimeClassName | string | "" |
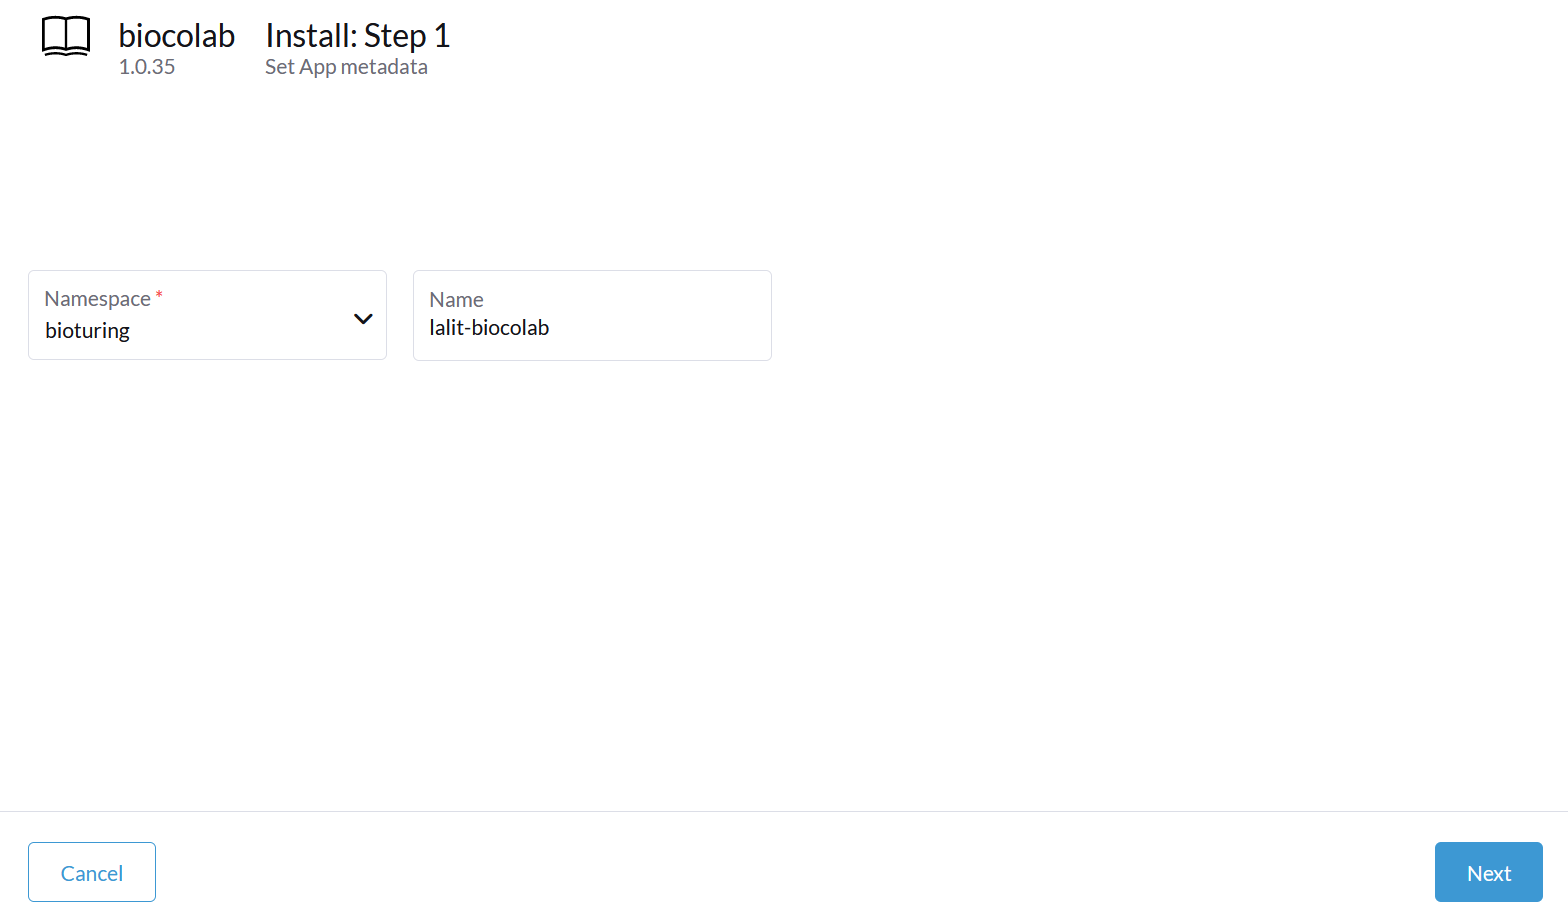
🔶 Select helm chart version.
⭕Kindly select latest version of Helm Chart. Support team will get in touch with you and share latest version tag.
# Click on install.

🔶 Select namespace and type name of Statefulset.
🔶 Click on Next
🔶 Verify Tag and repository
🔶 Update values:
# Change volume size according to your data.
# Update domain name and Colab token.
# Update credentials based on your choice.
# Click on install.
🔶 BioStudio will start installation based on helm chart.
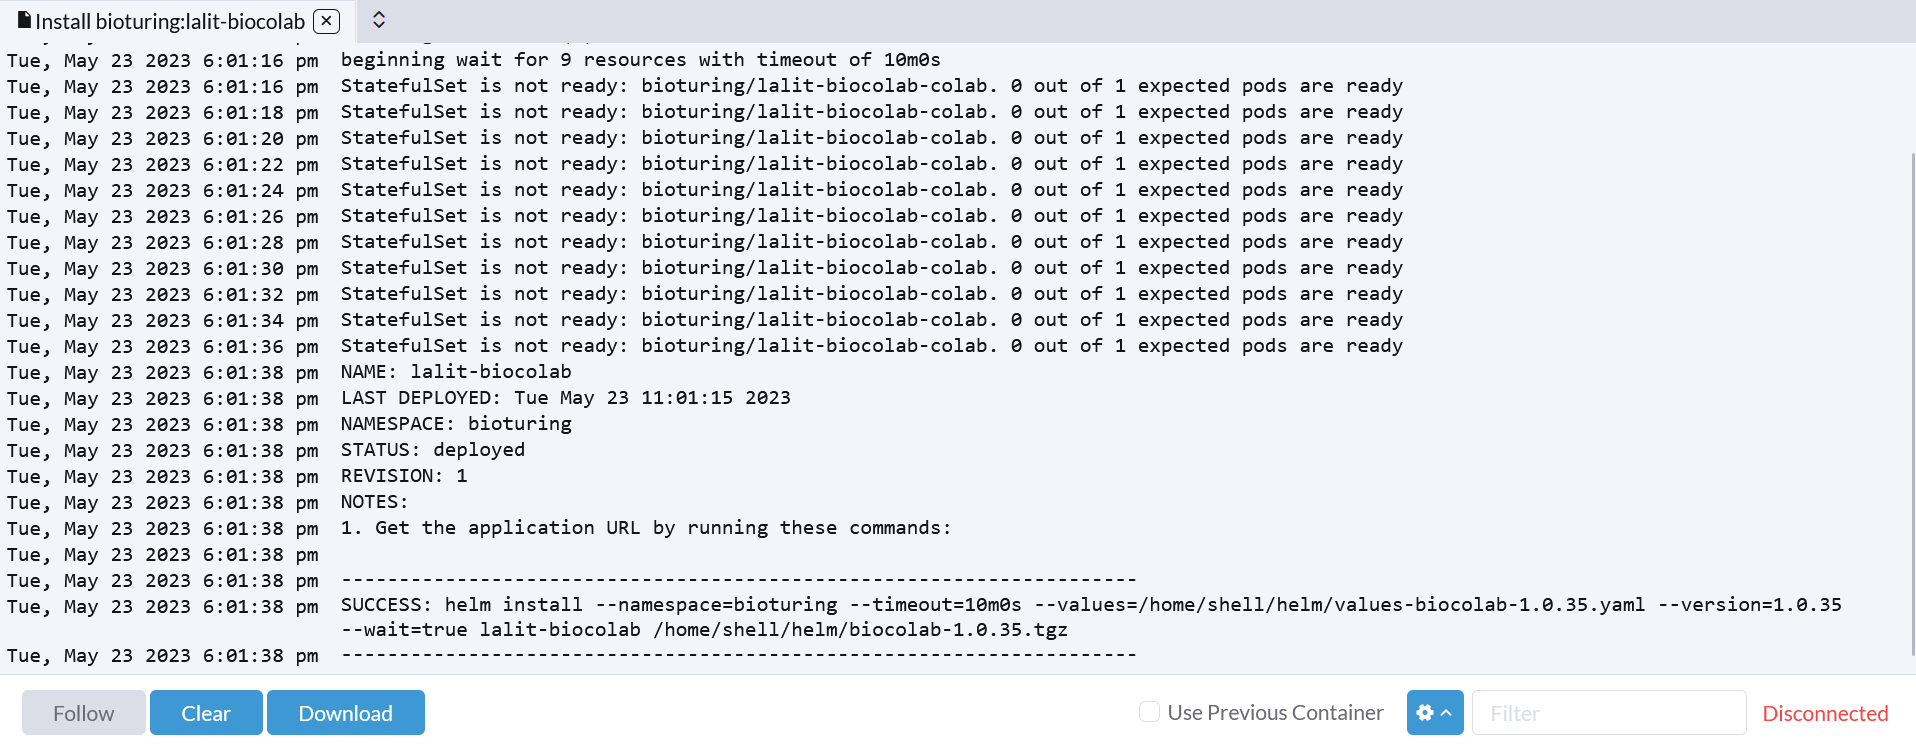
🔶 Verify statefulset.

🔶 Verify ingress.

🔶 Browse your domain.
🔸 Before access WORKSPACE. It is necessary to access dashboard and create machine and well as create volume to be mounted.
# Note: Kindly follow to create Machine and volume creation process in order to utilize our product.
# It is a necessary step.
# For any support and enquiry. Drop a mail to us support@bioturing.com
![]()
BioStudio Deployments on Kubernetes
¶Introduction
BioStudio on K8s BioStudio software is compatible and easy to install on all kind of Operating System as well as on Docker, Kubernetes, Standalone machine, Cloud, On-premises, VM and all type of infrastructure platform. We are happy to inform that we are a leading brands company to provide all of our Softwares as a Service (SaaS). It is directly ready to use for end users.
🔔 Please contact 📧 [support@bioturing.com] in case you need any support or have any inquiry for us.
We are supporting all kind of service provider including on-premise.
BioStudio on K8s. Install Software on Kubernetes Clusters with the Helm.
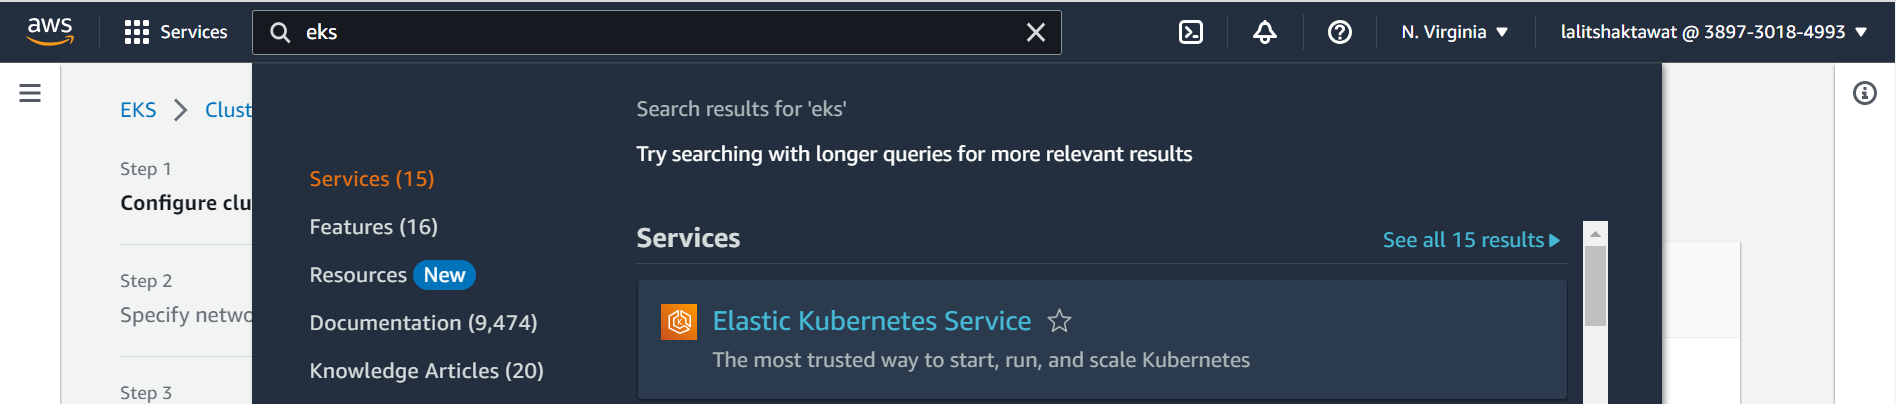
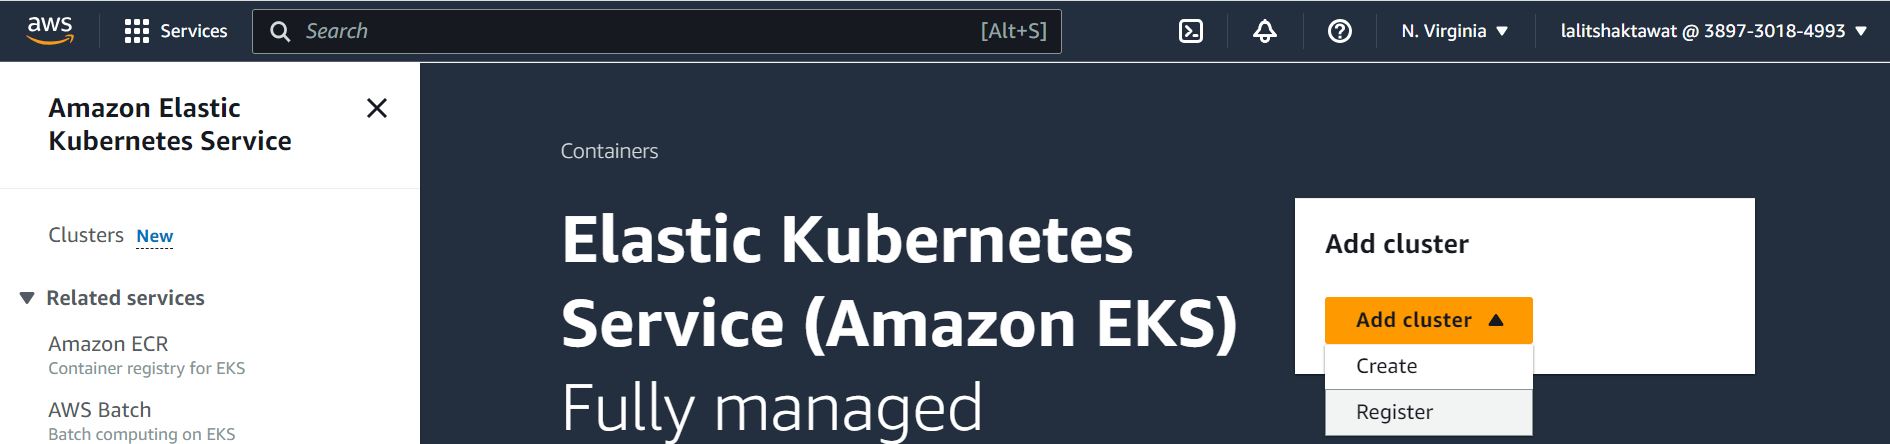
AWS EKS Cluster 
🛂 Login to AWS console.
⭕ Serach for EKS in serach bar.
⭕ select create on Add Cluster.
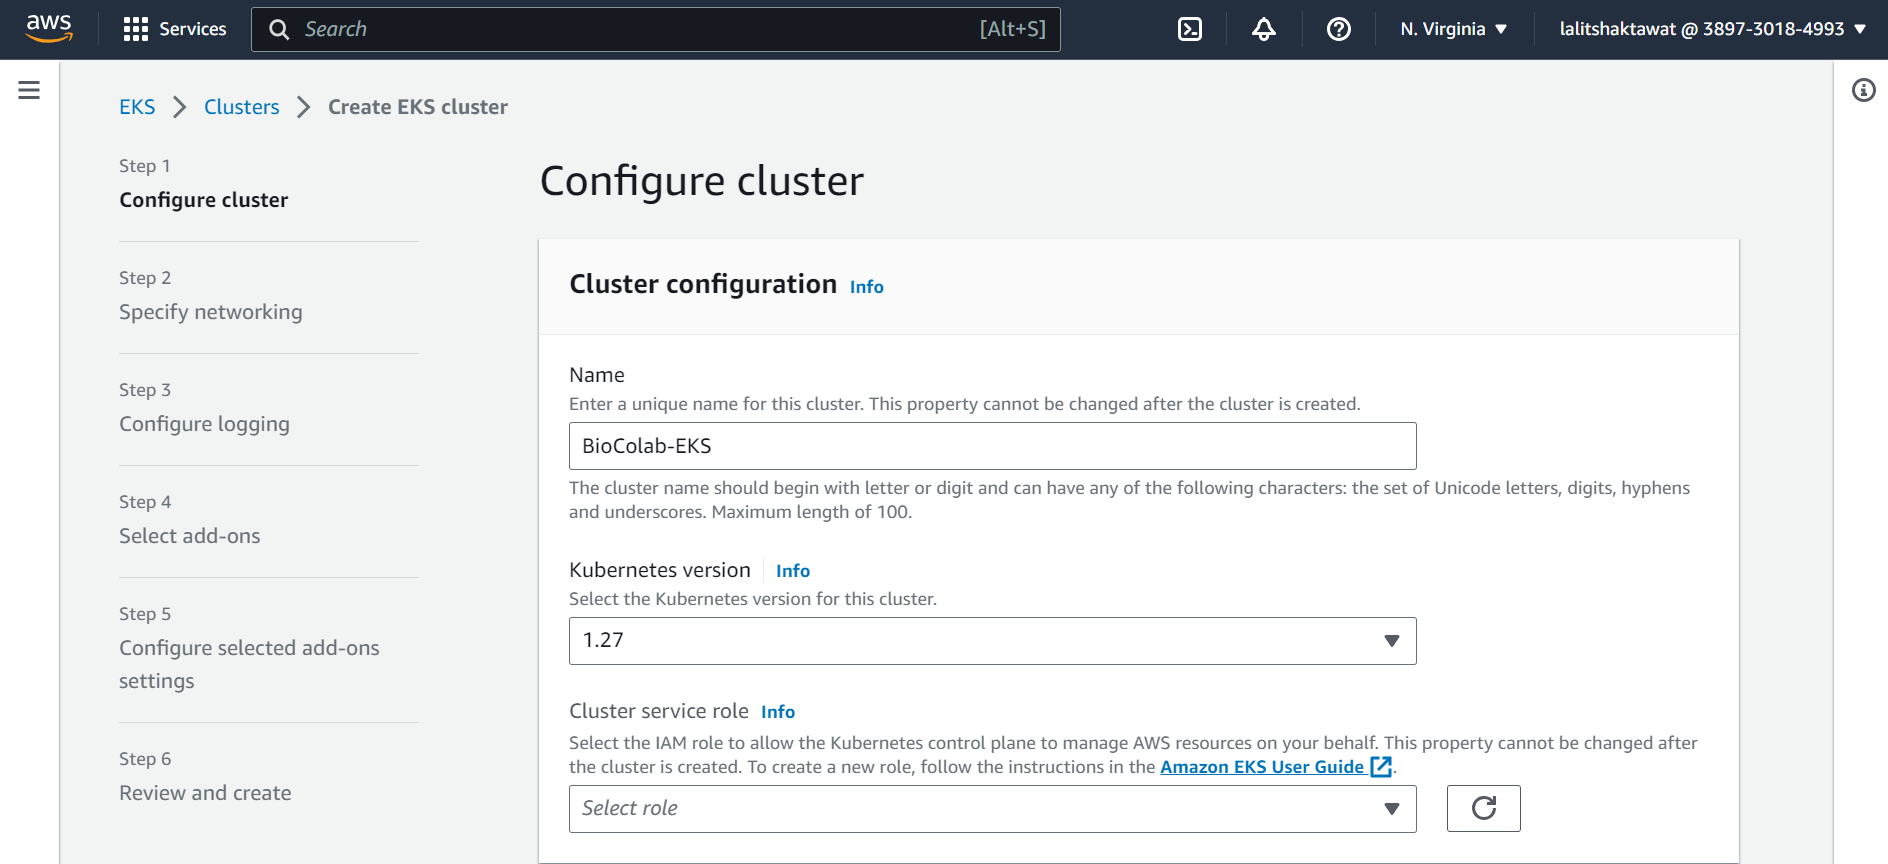
⭕ Configure Cluster.
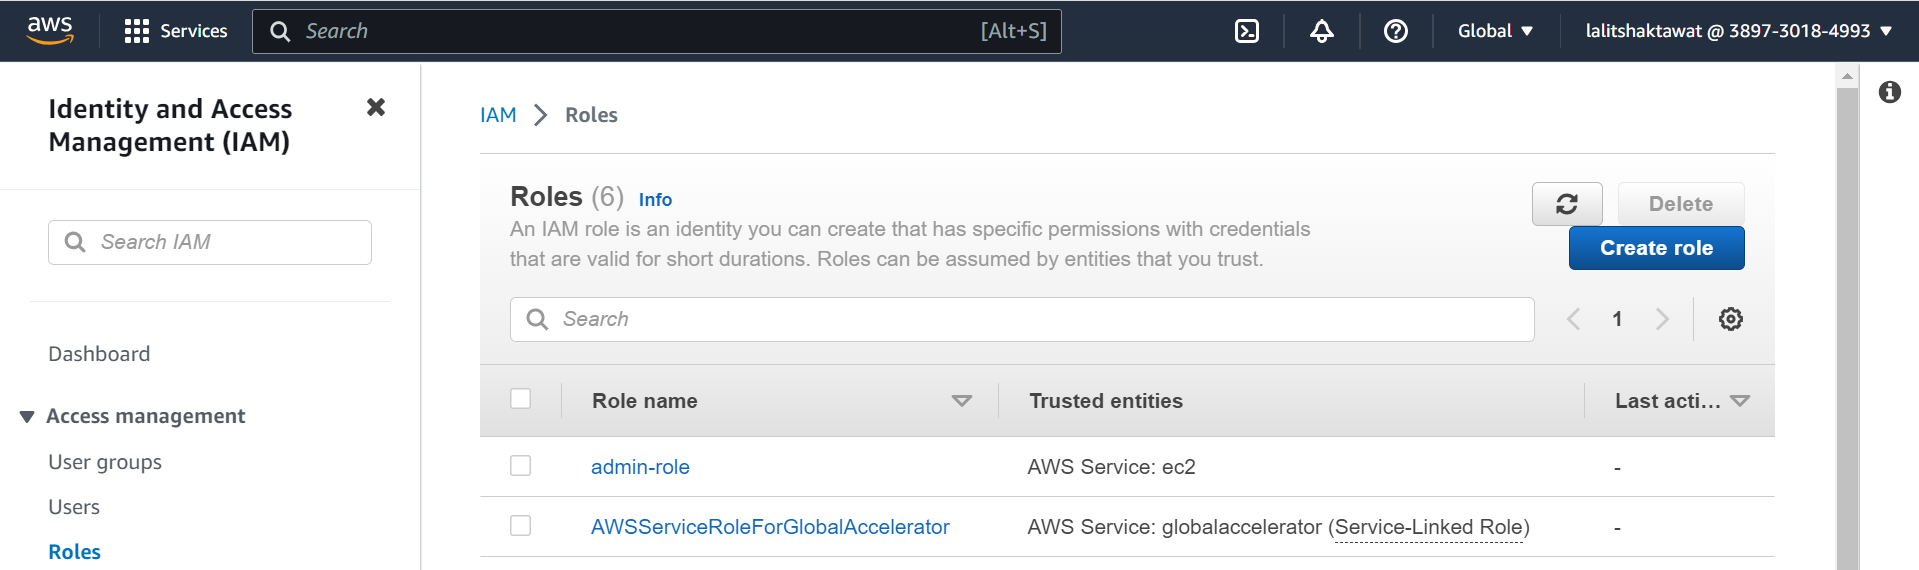
⭕ Create Cluster Service role.
role --> Create role
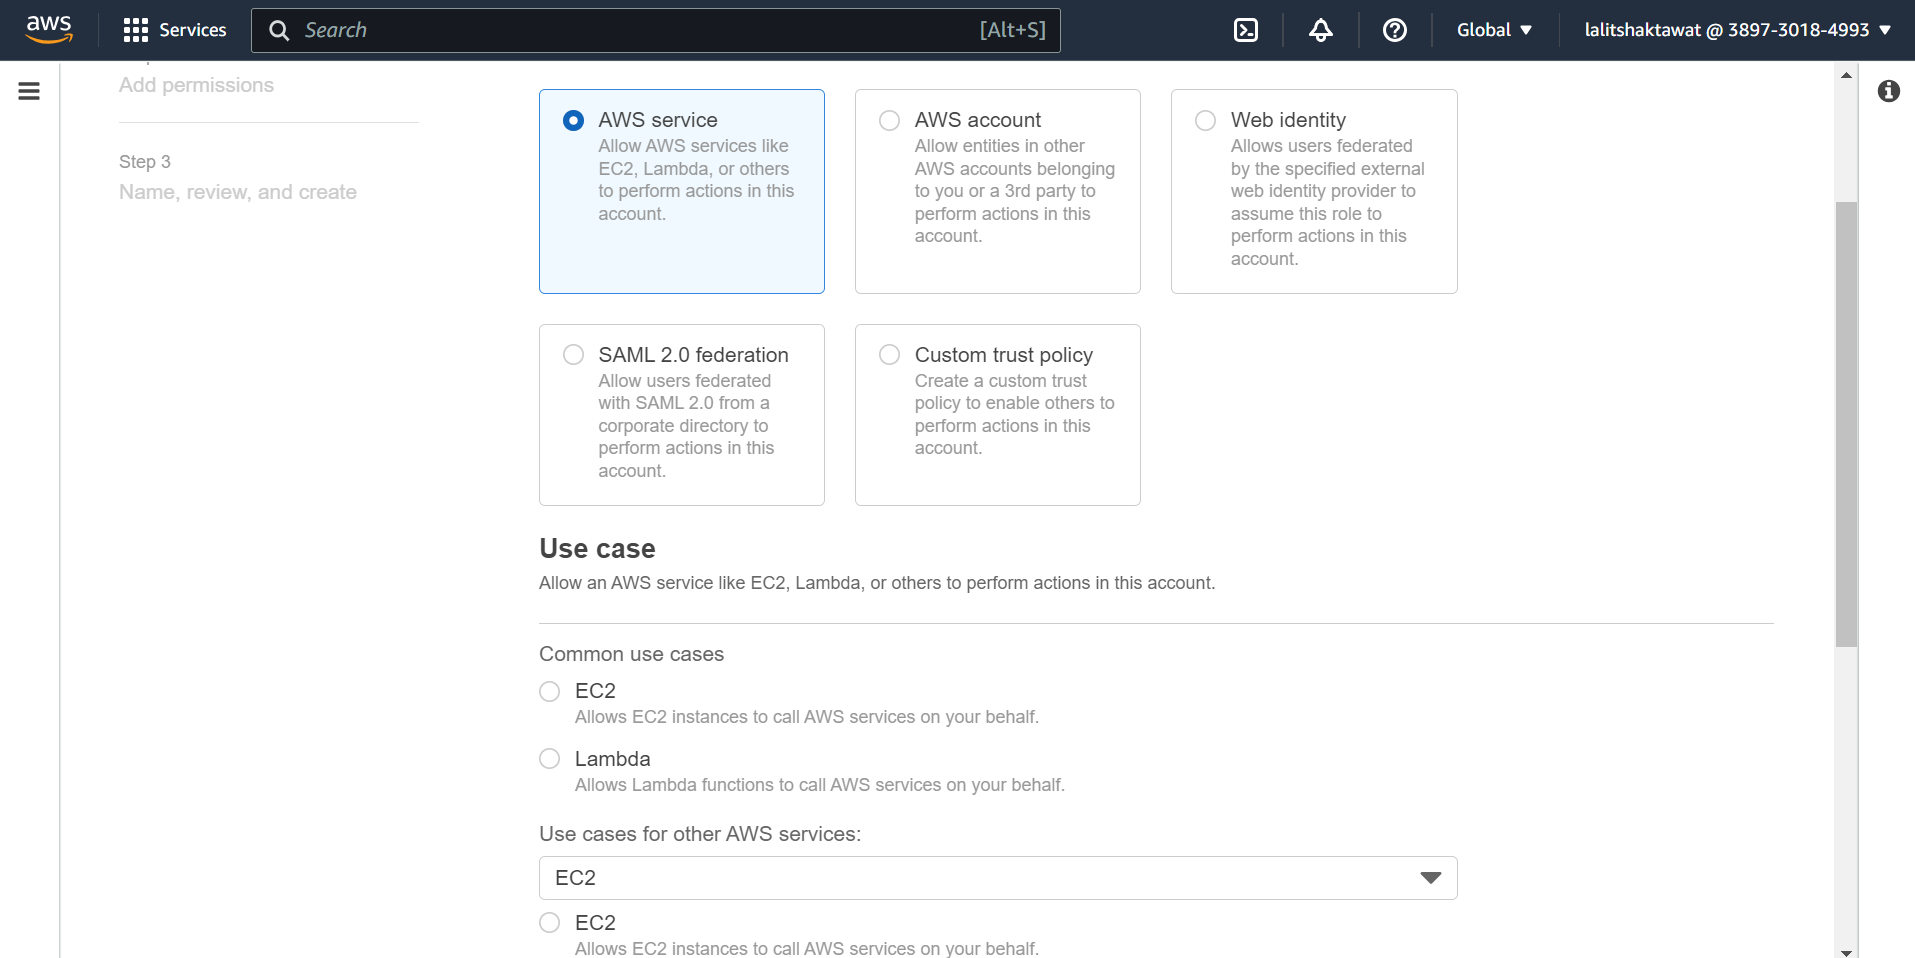
⭕ Select AWS service and EKS on use case.
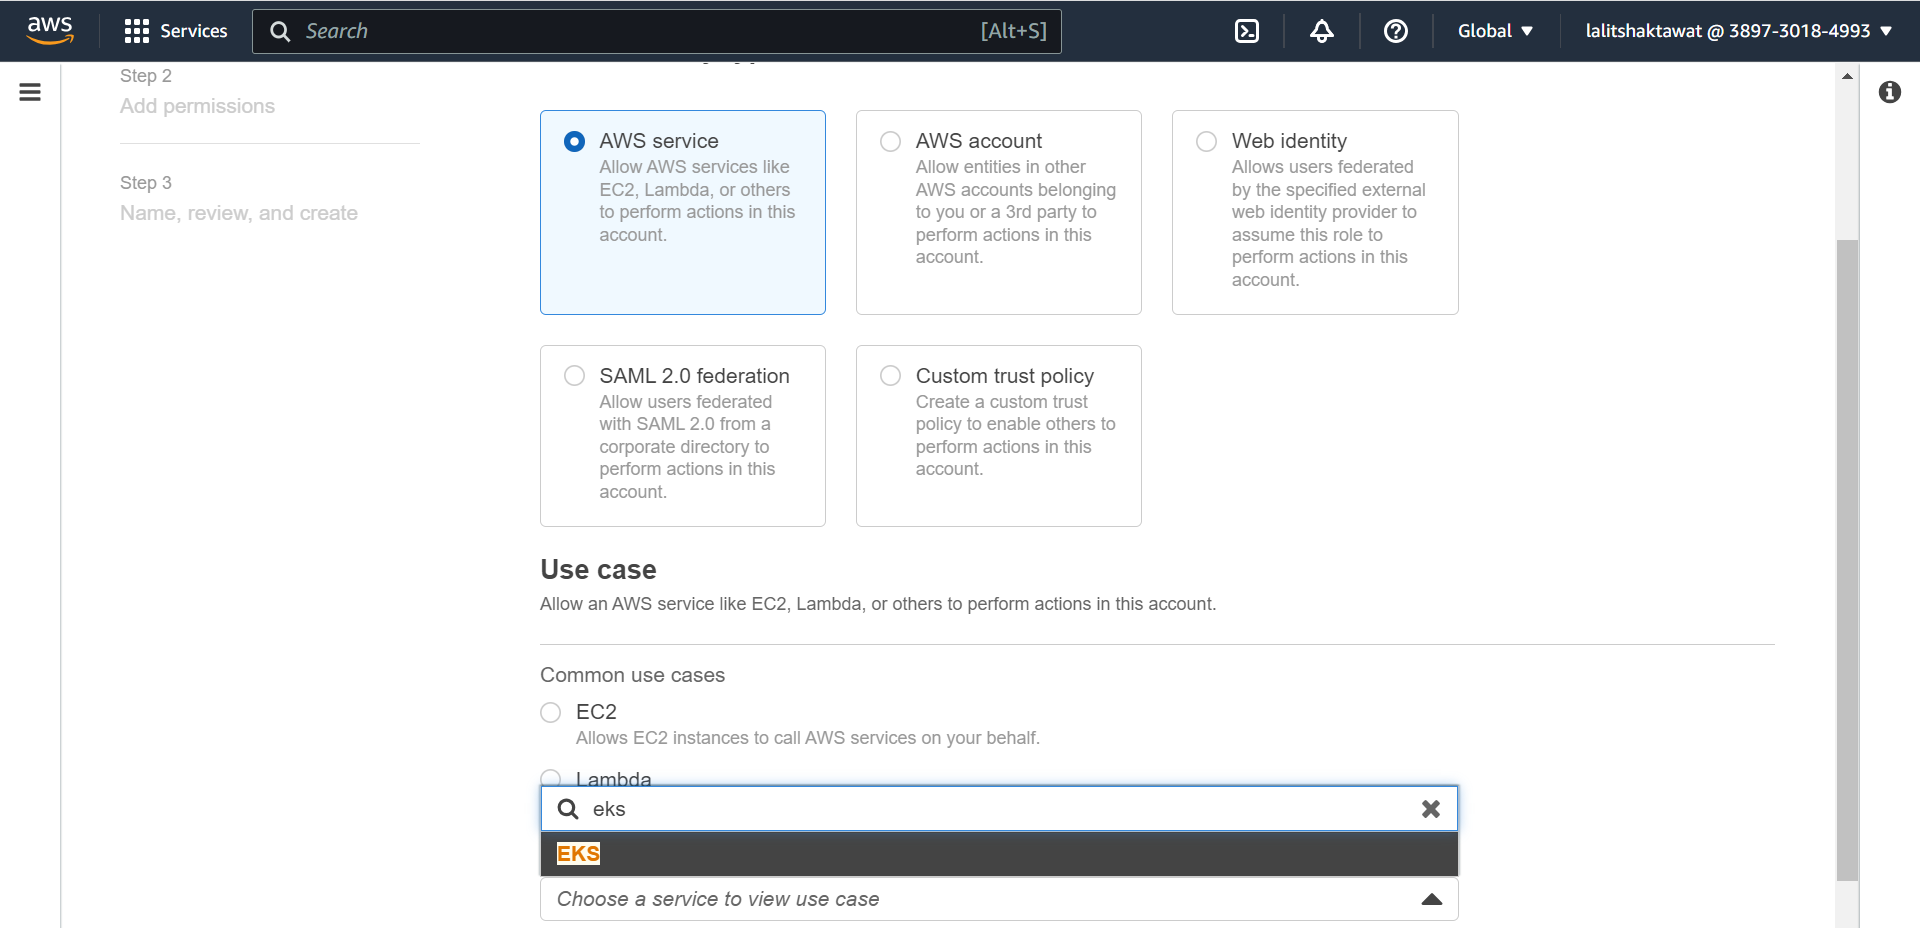
⭕ Select EKS -Cluster.
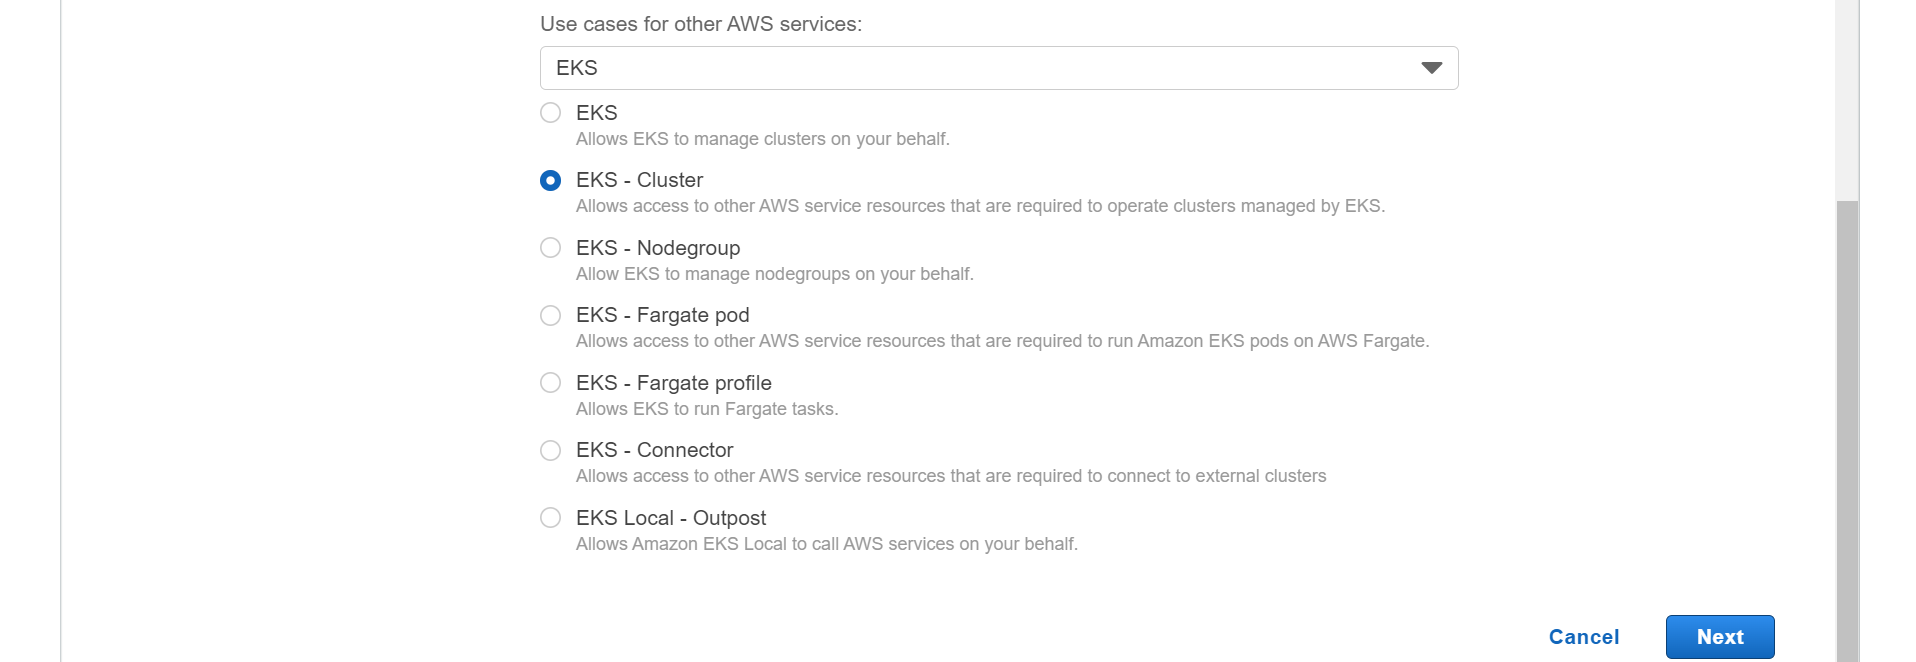
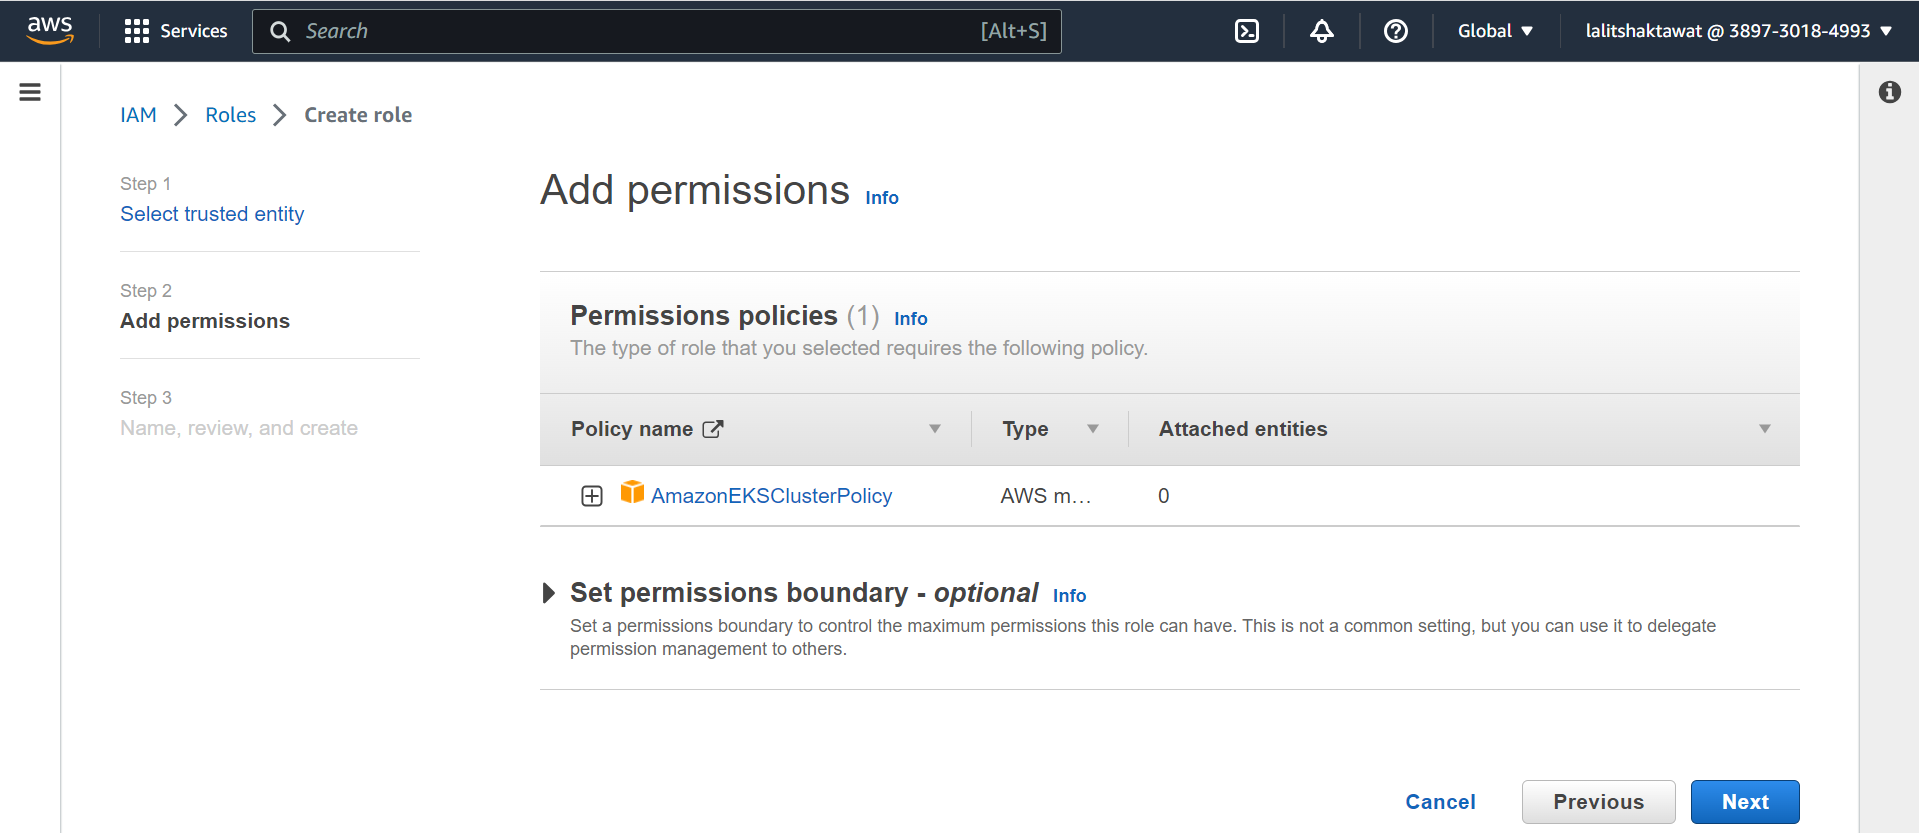
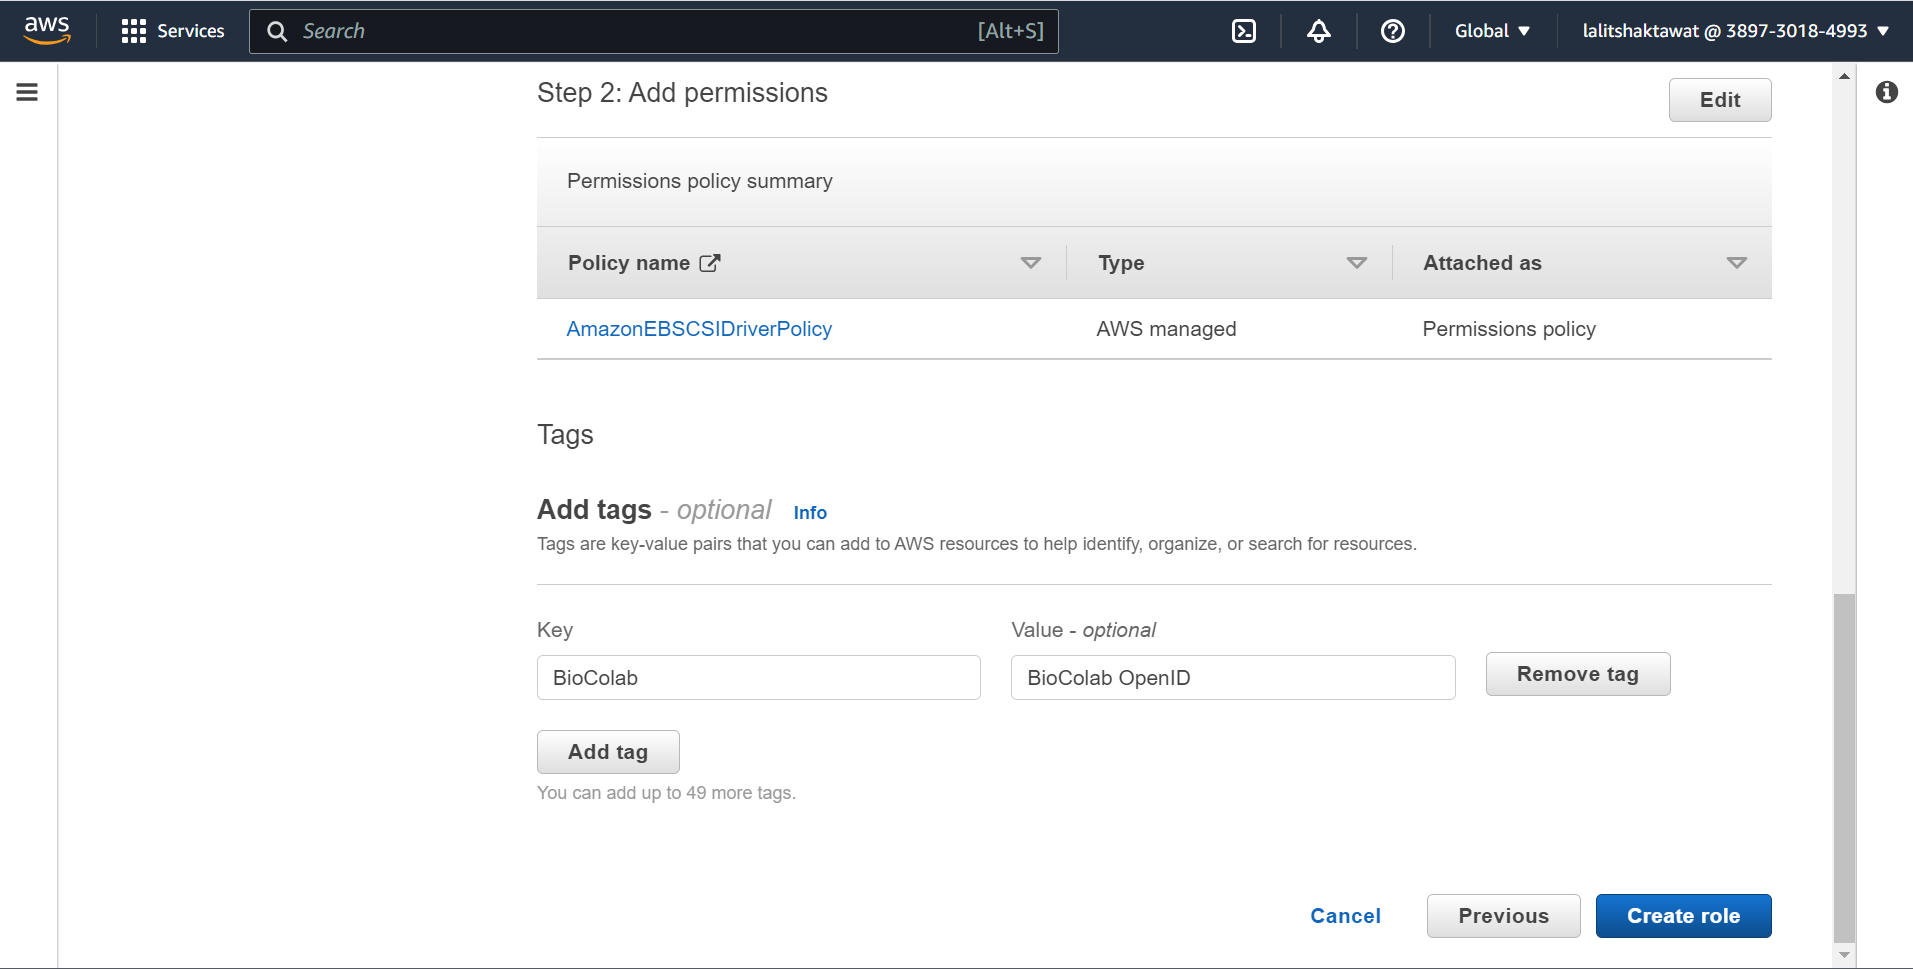
⭕ Add permission.
AmzonEKSClusterPolicy
➡️ click on next.
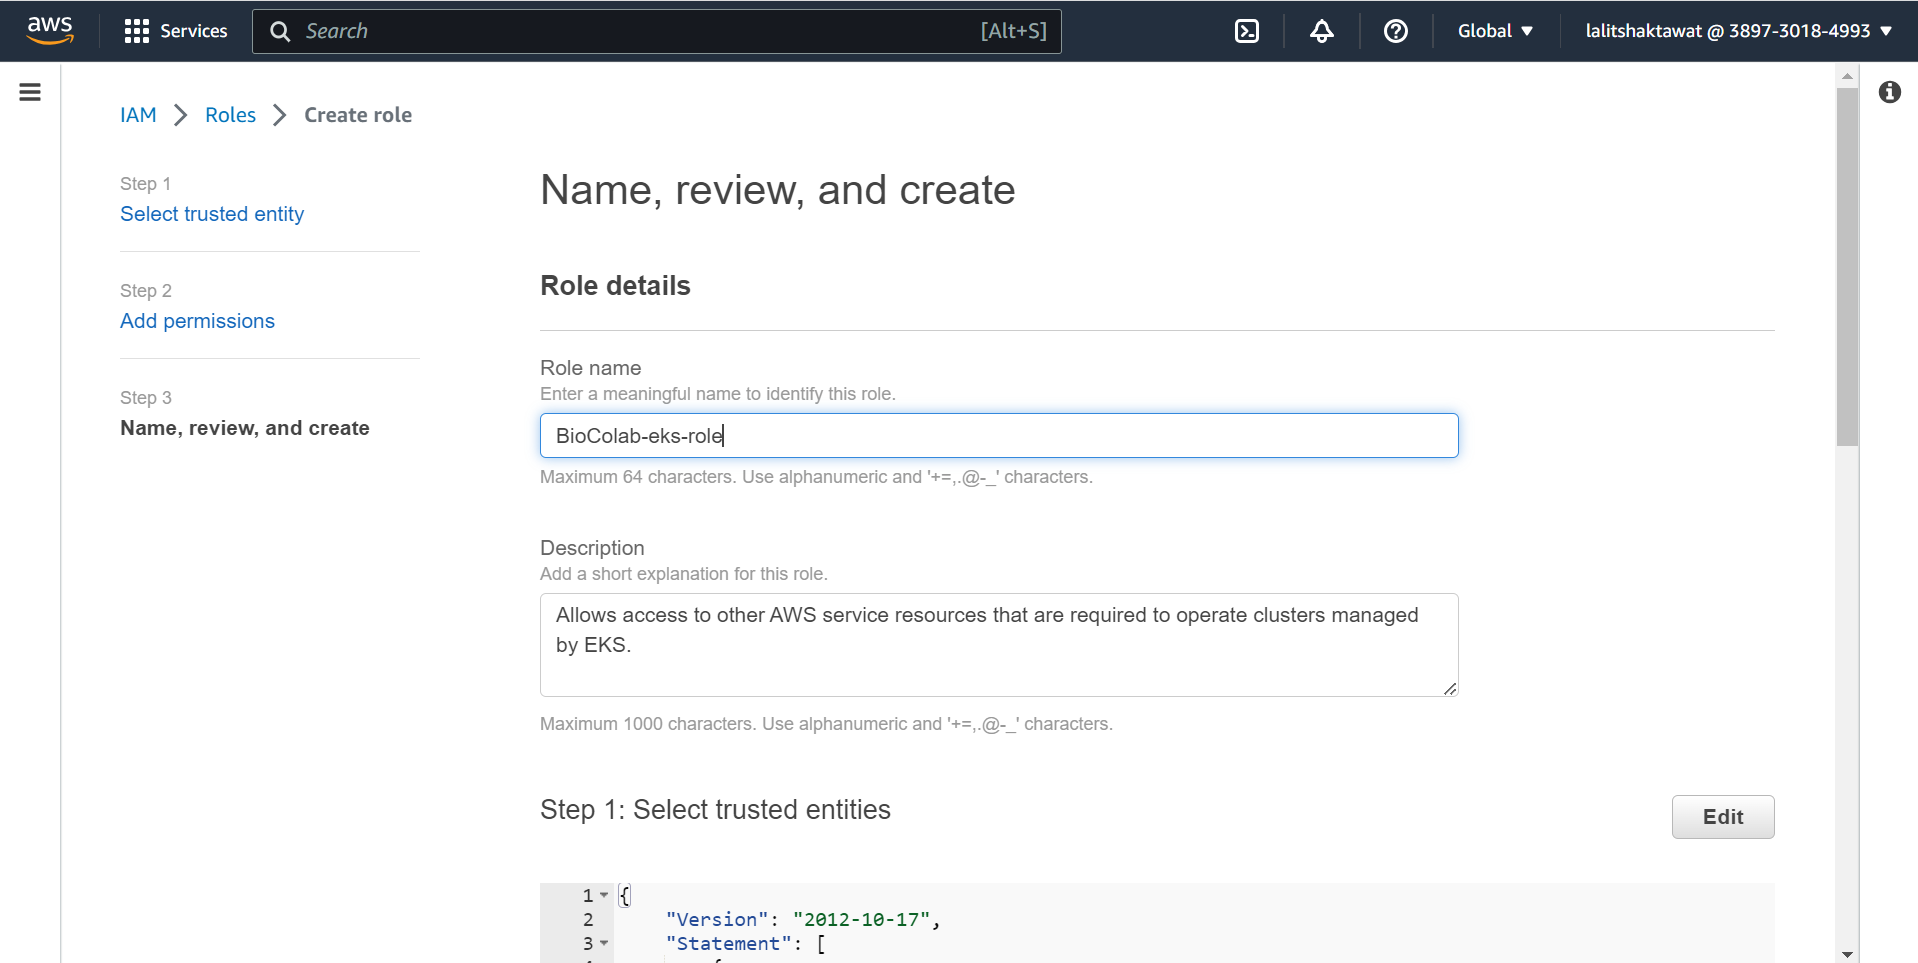
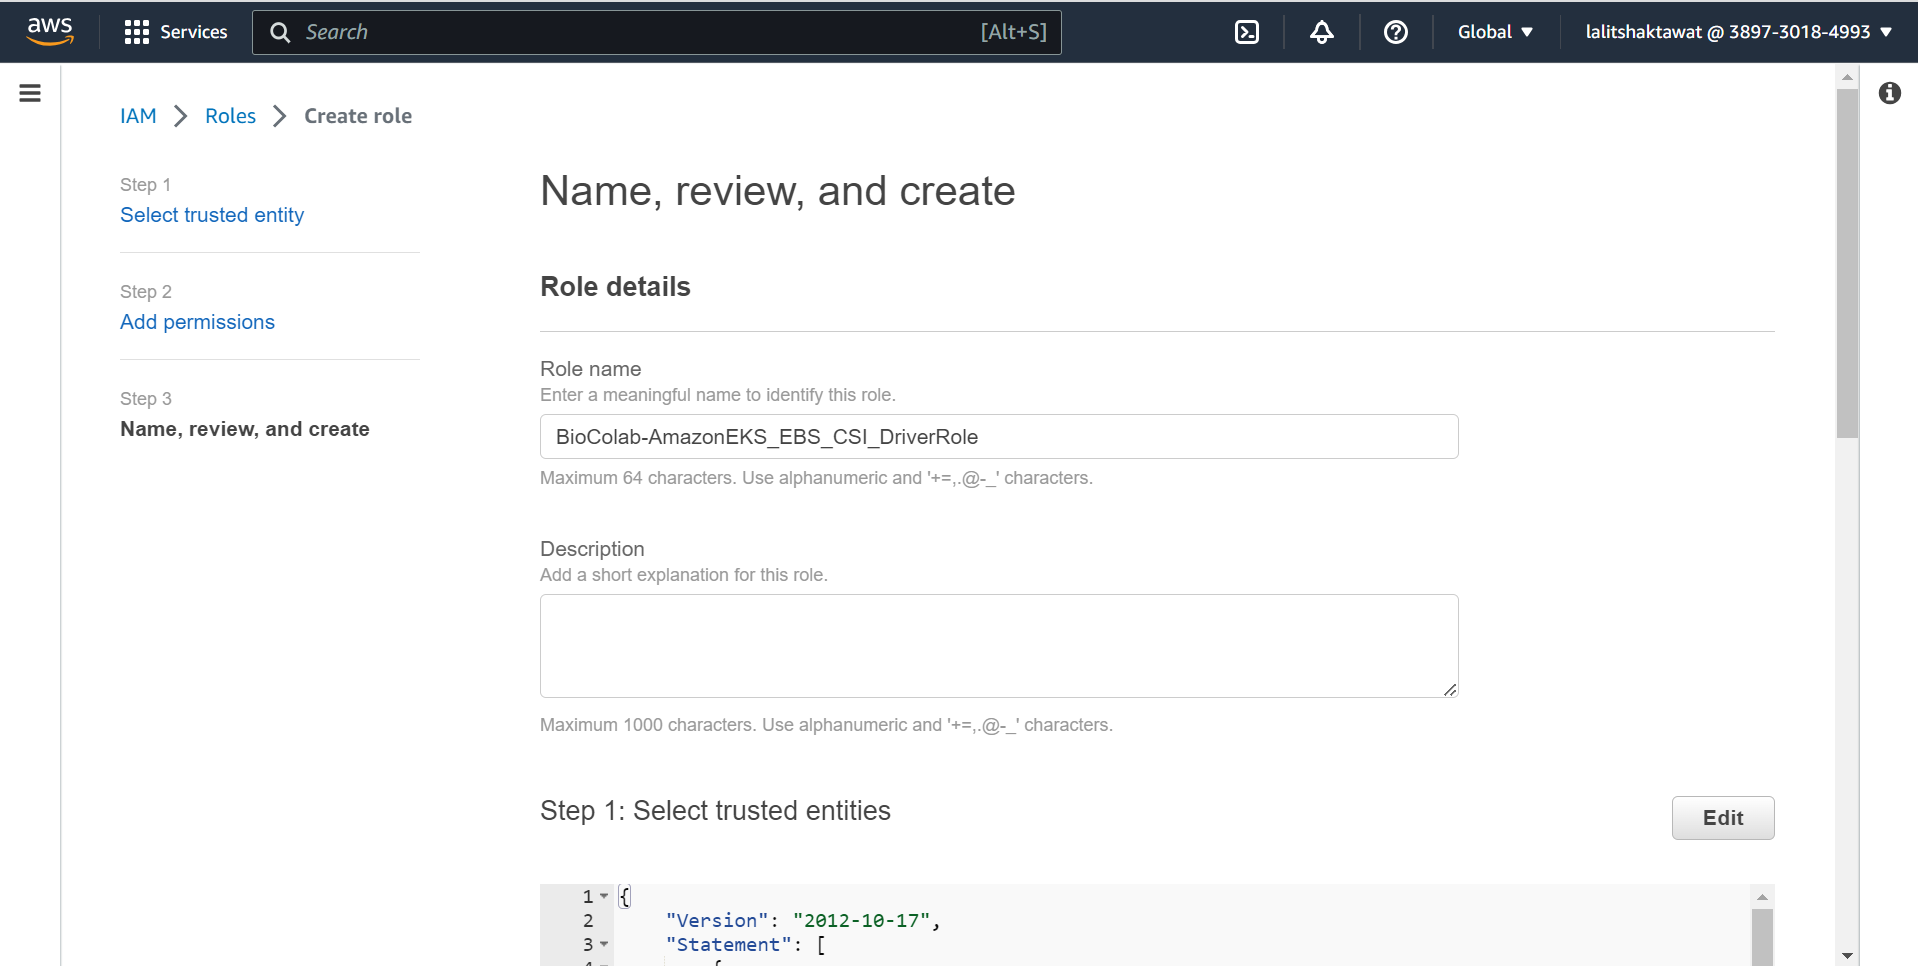
⭕ Fill Role detail.
➡️ Create role.

⭕ Role created .
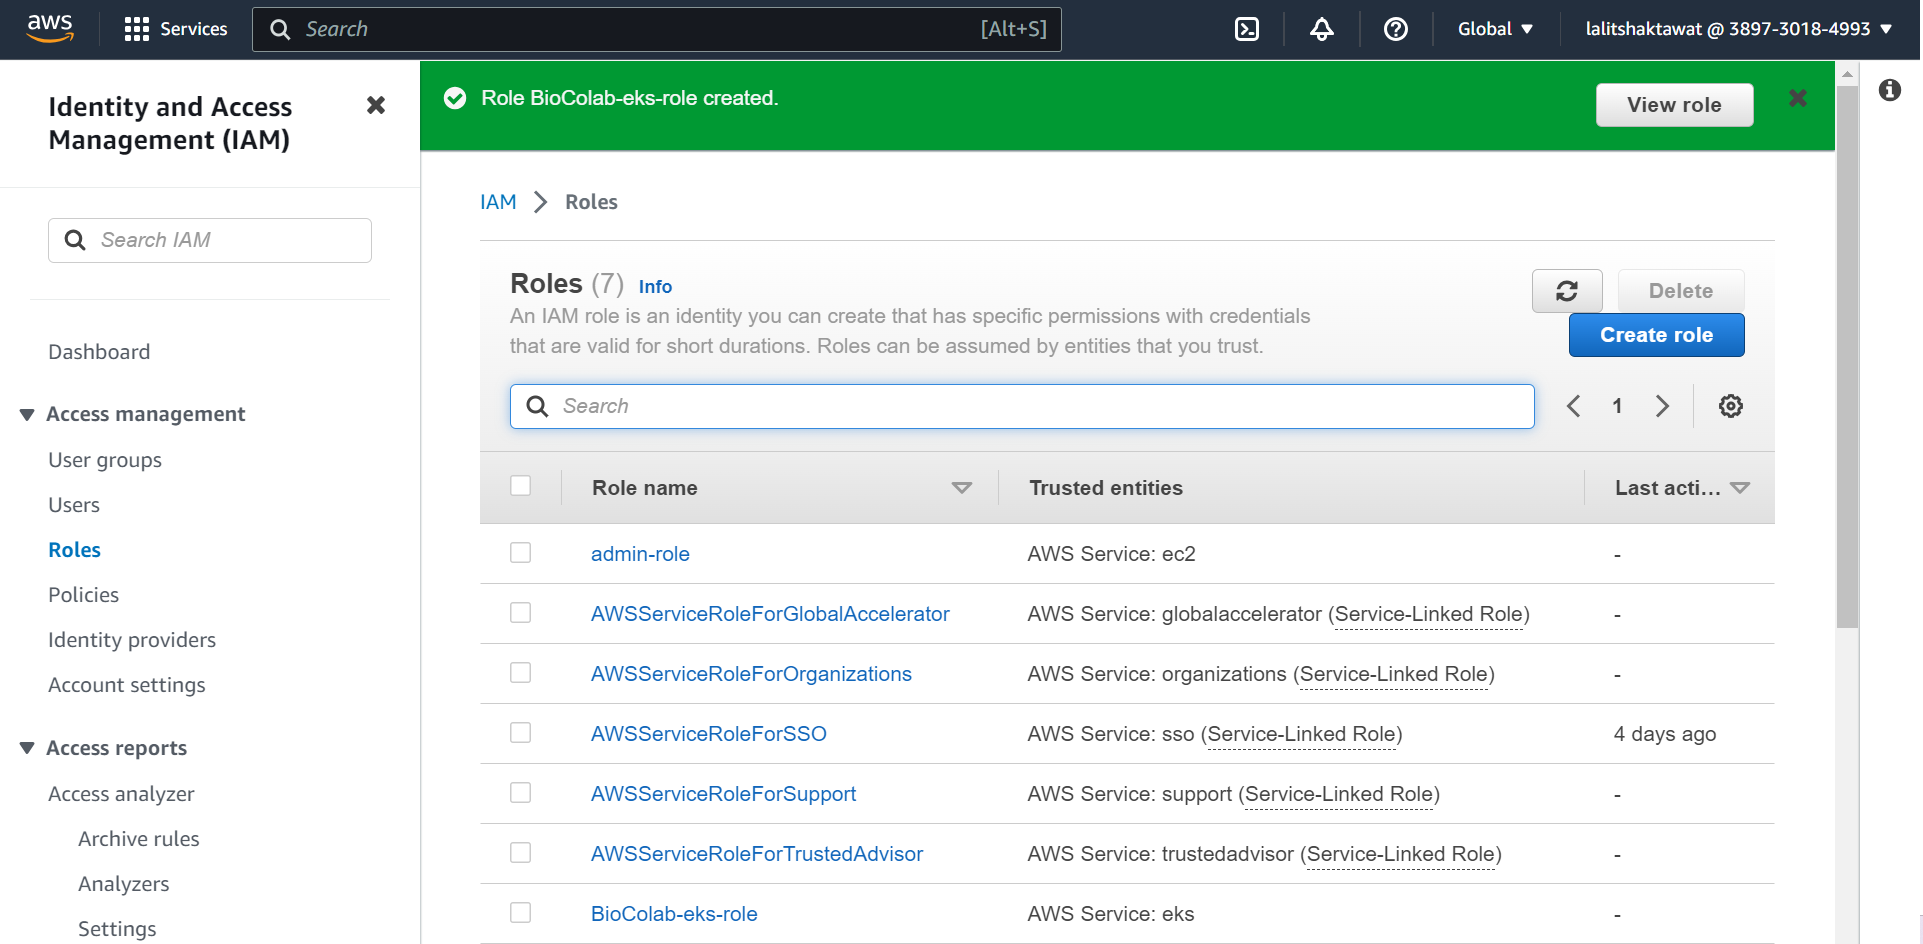
⭕ Select appropriate role that we created earlier..
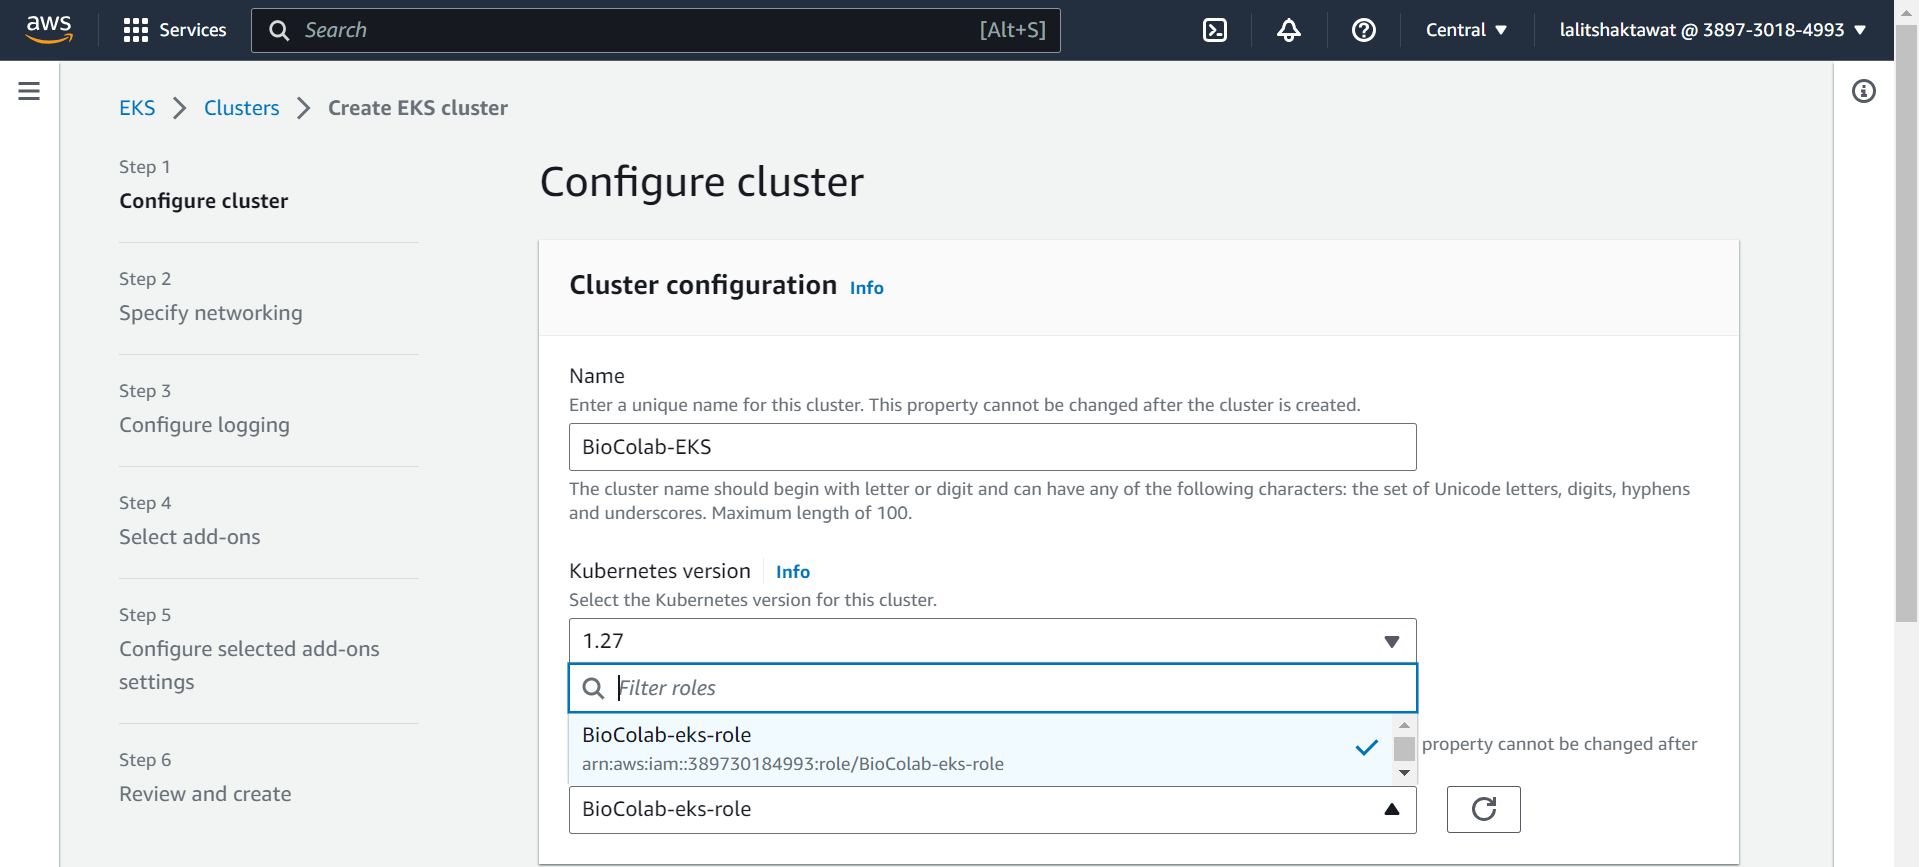
⭕ provide appropriate tag.
➡️ click on next.

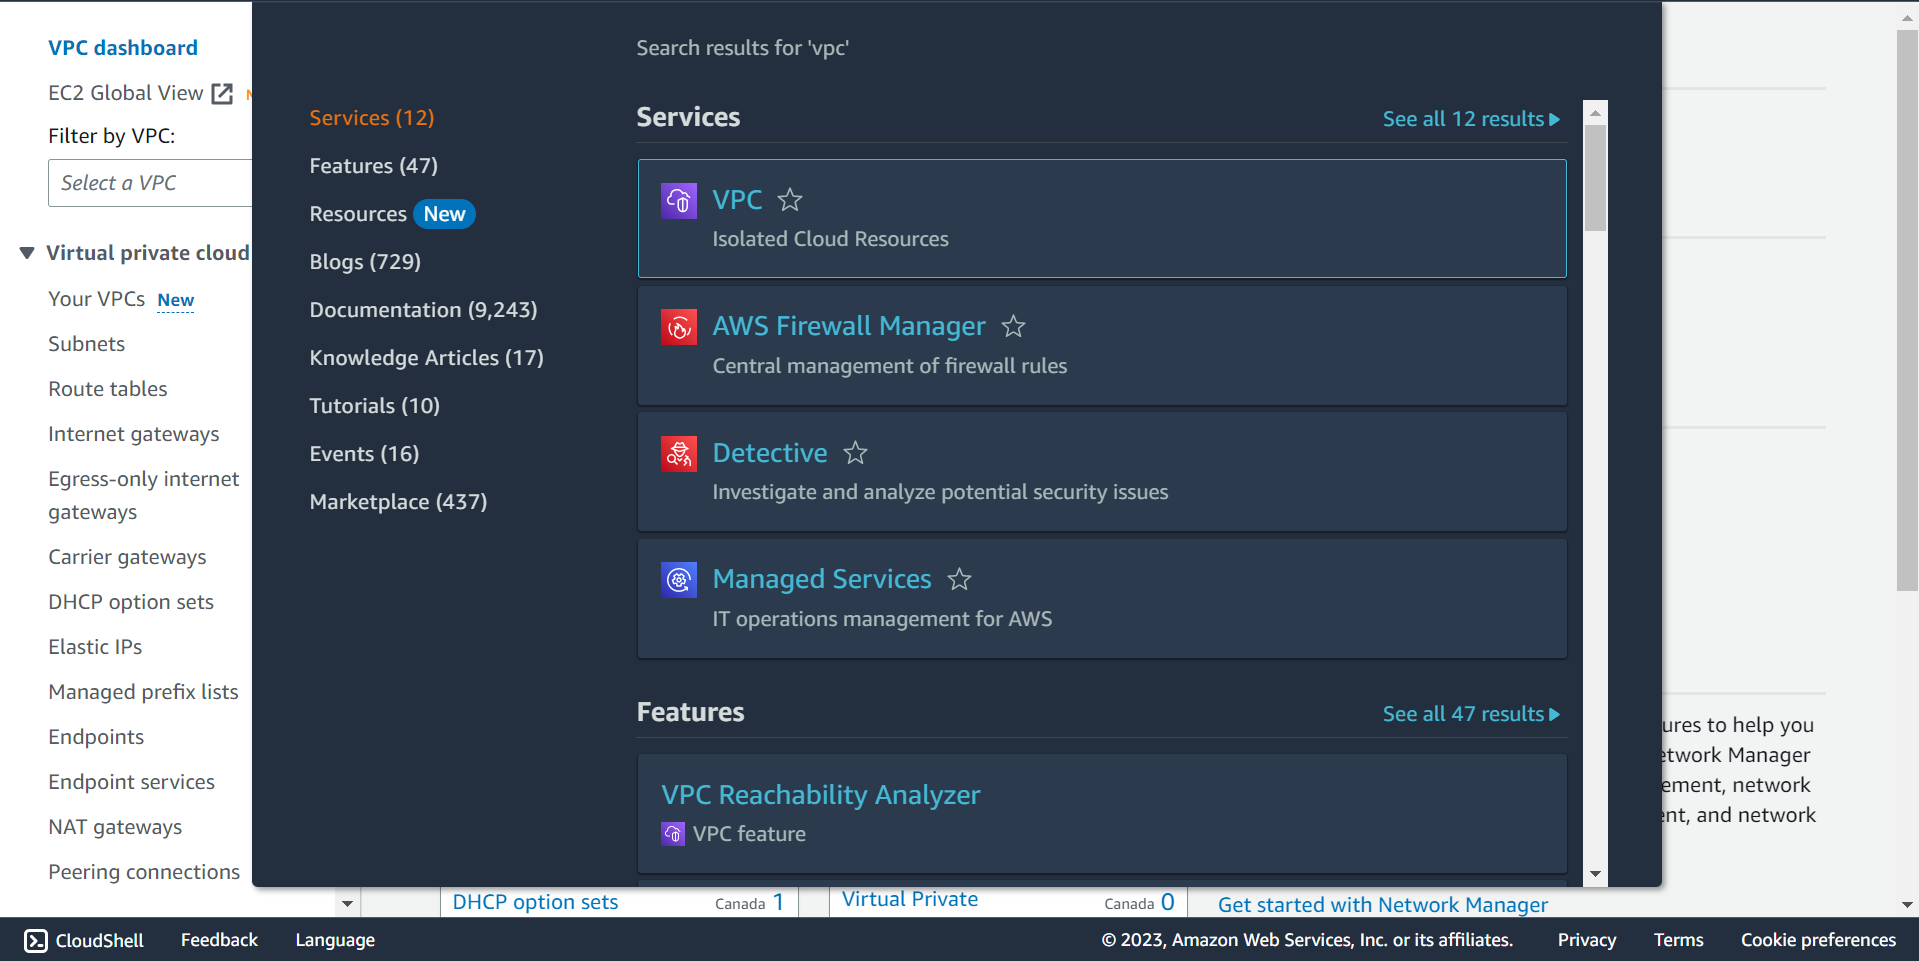
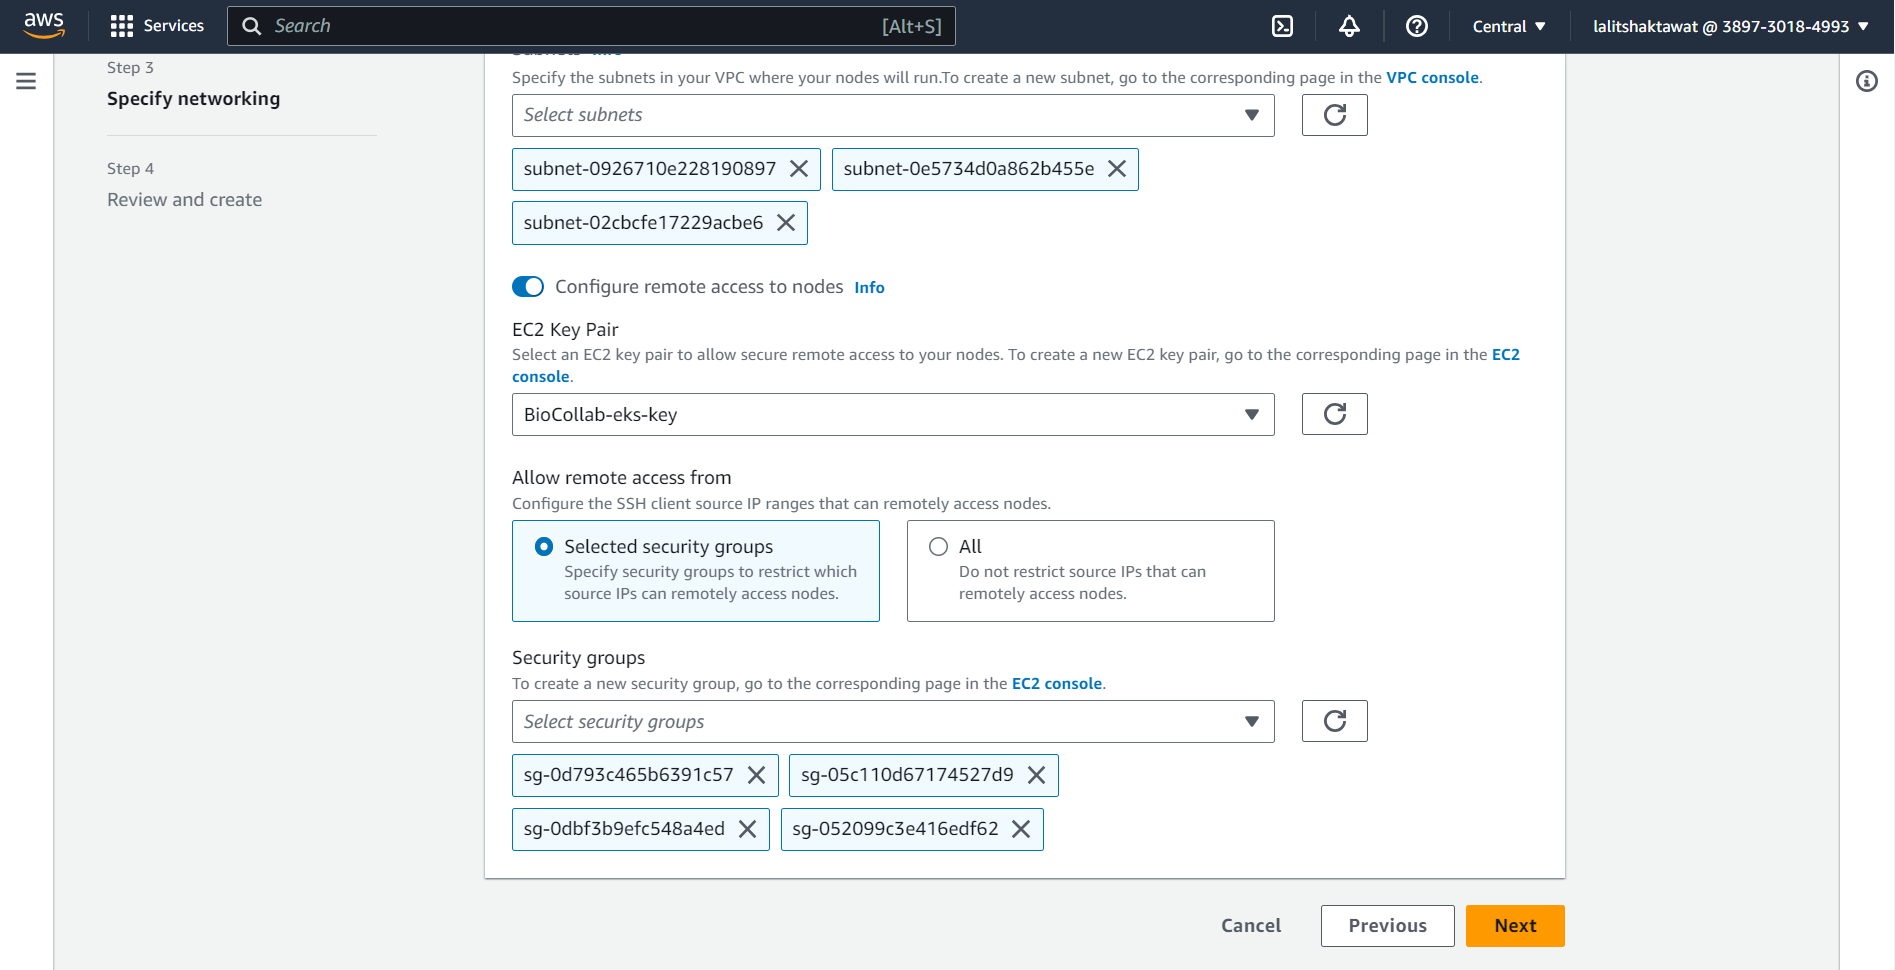
⭕ Specify networking. VPC and Networking.
🔗 Amazon EKS VPC and subnet requirements and considerations
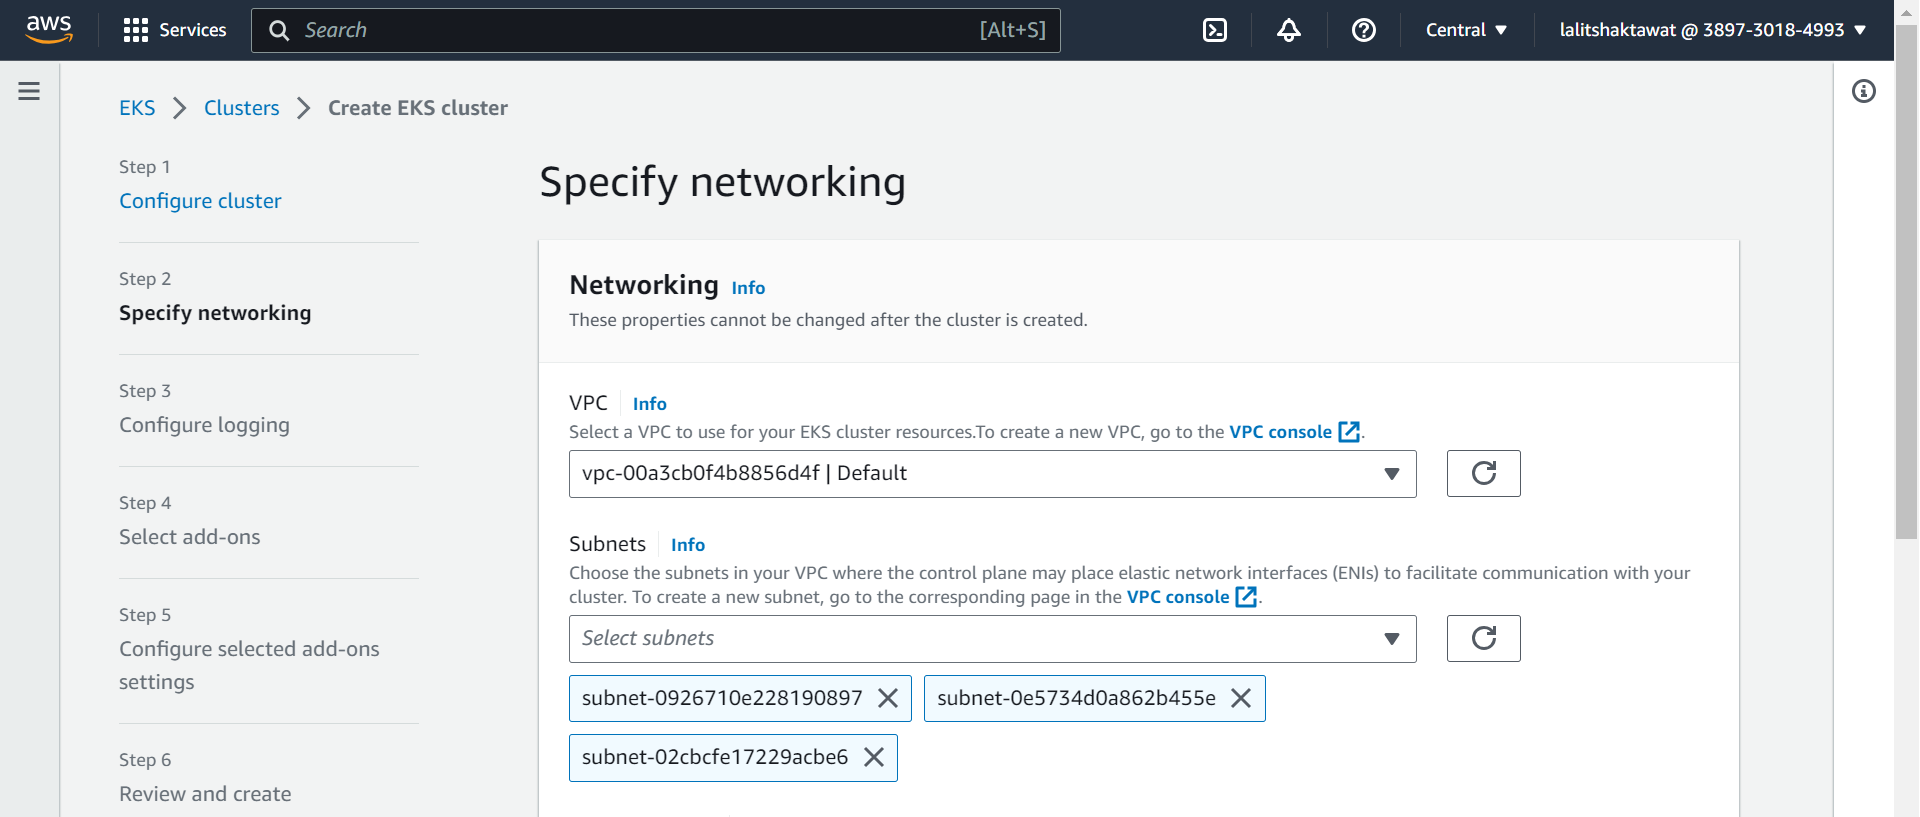
⭕ Select Security Group.
➡️ click on next.
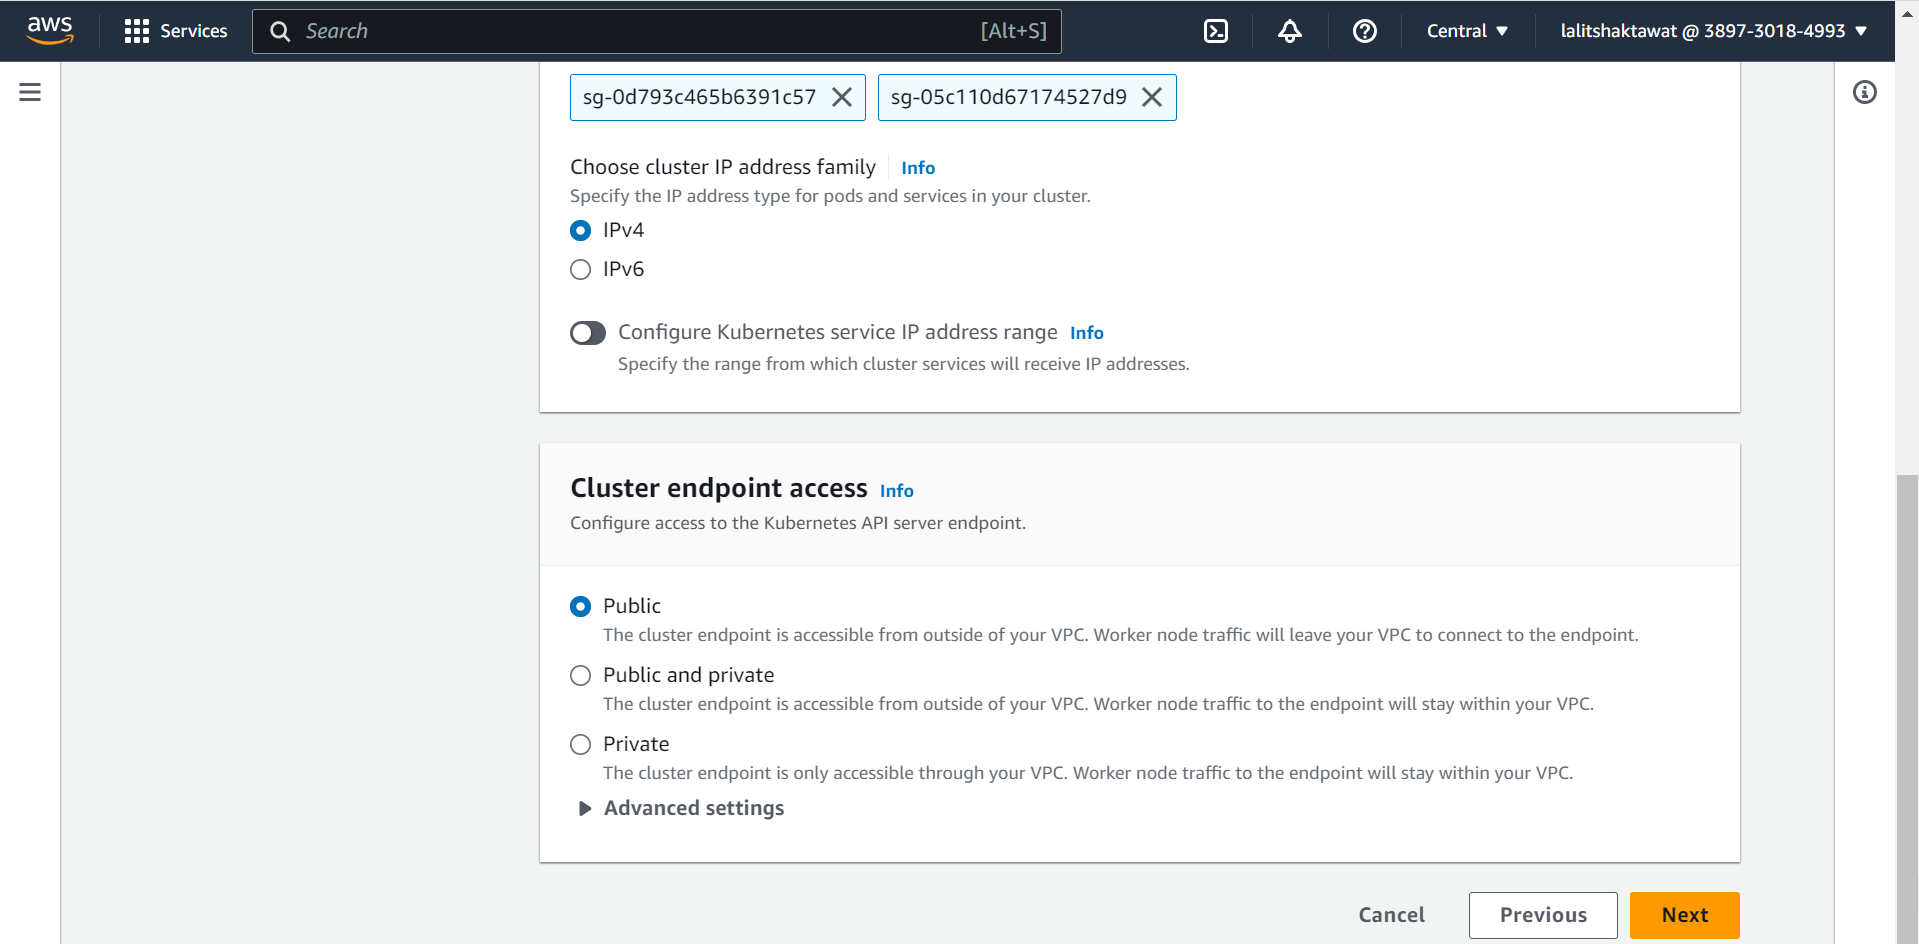
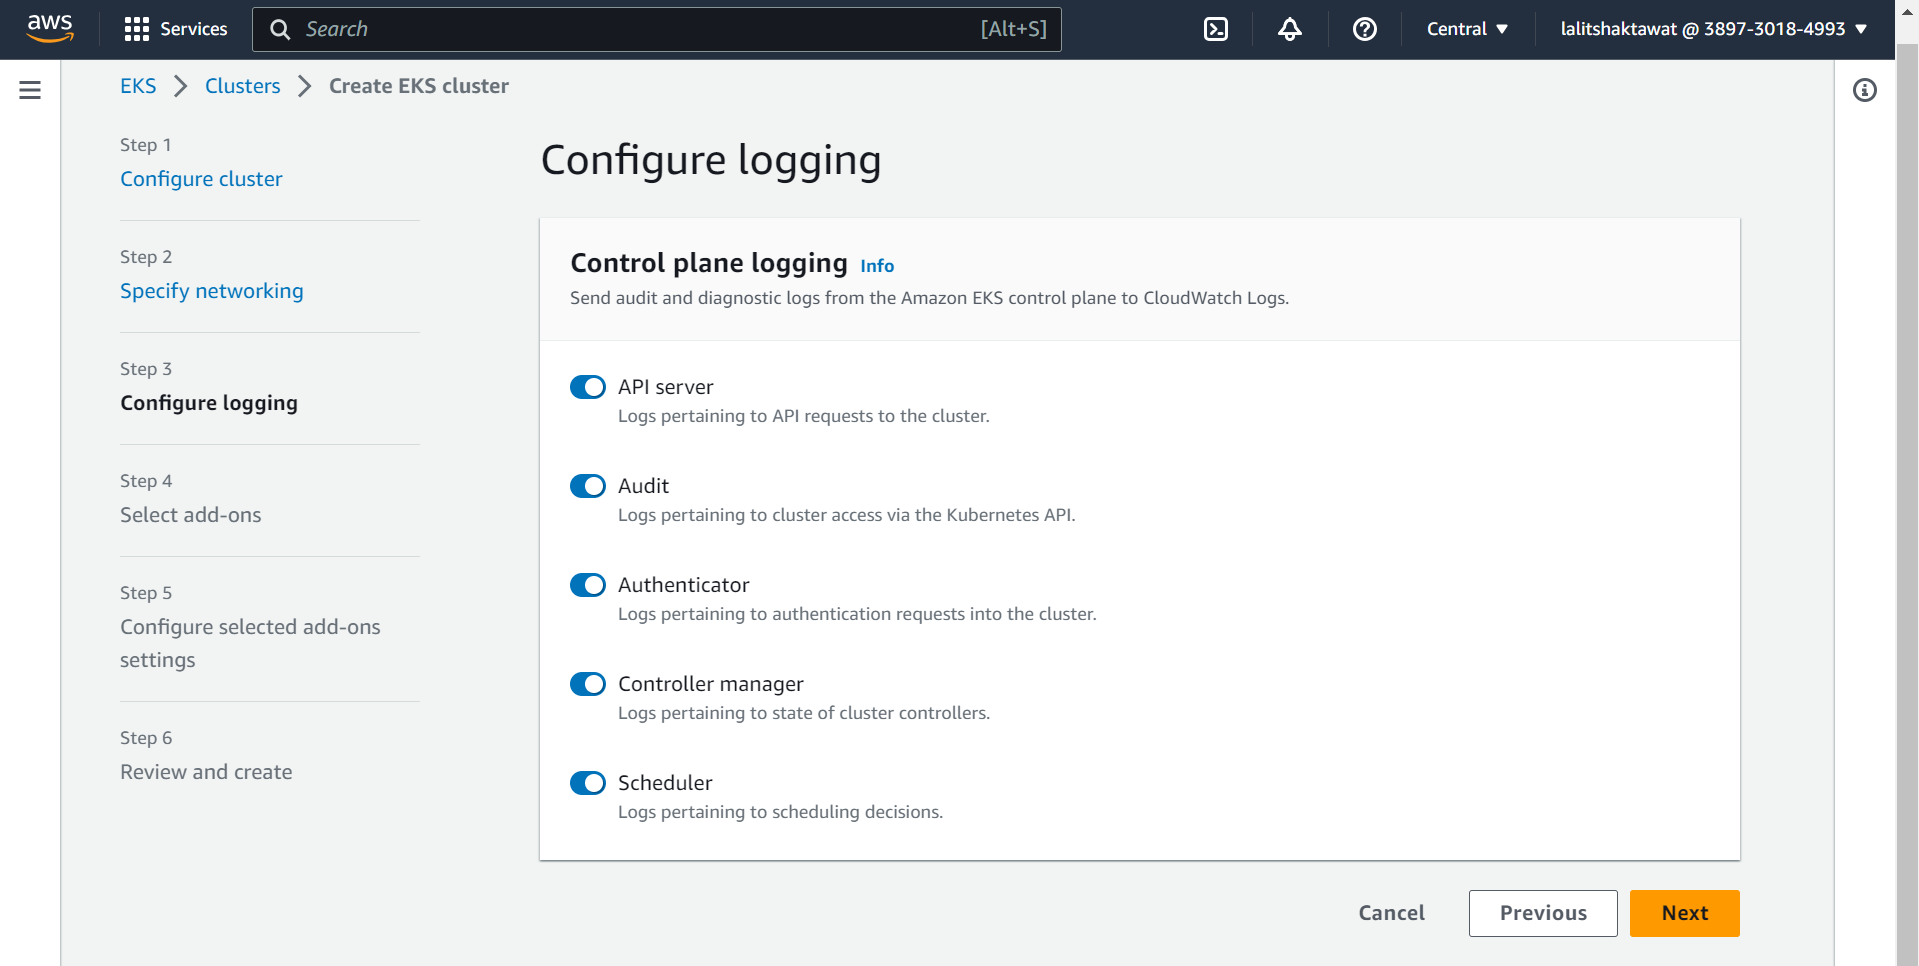
⭕ Select Configuring logging.
⭕ Select Add-ons.
➡️ click on next.
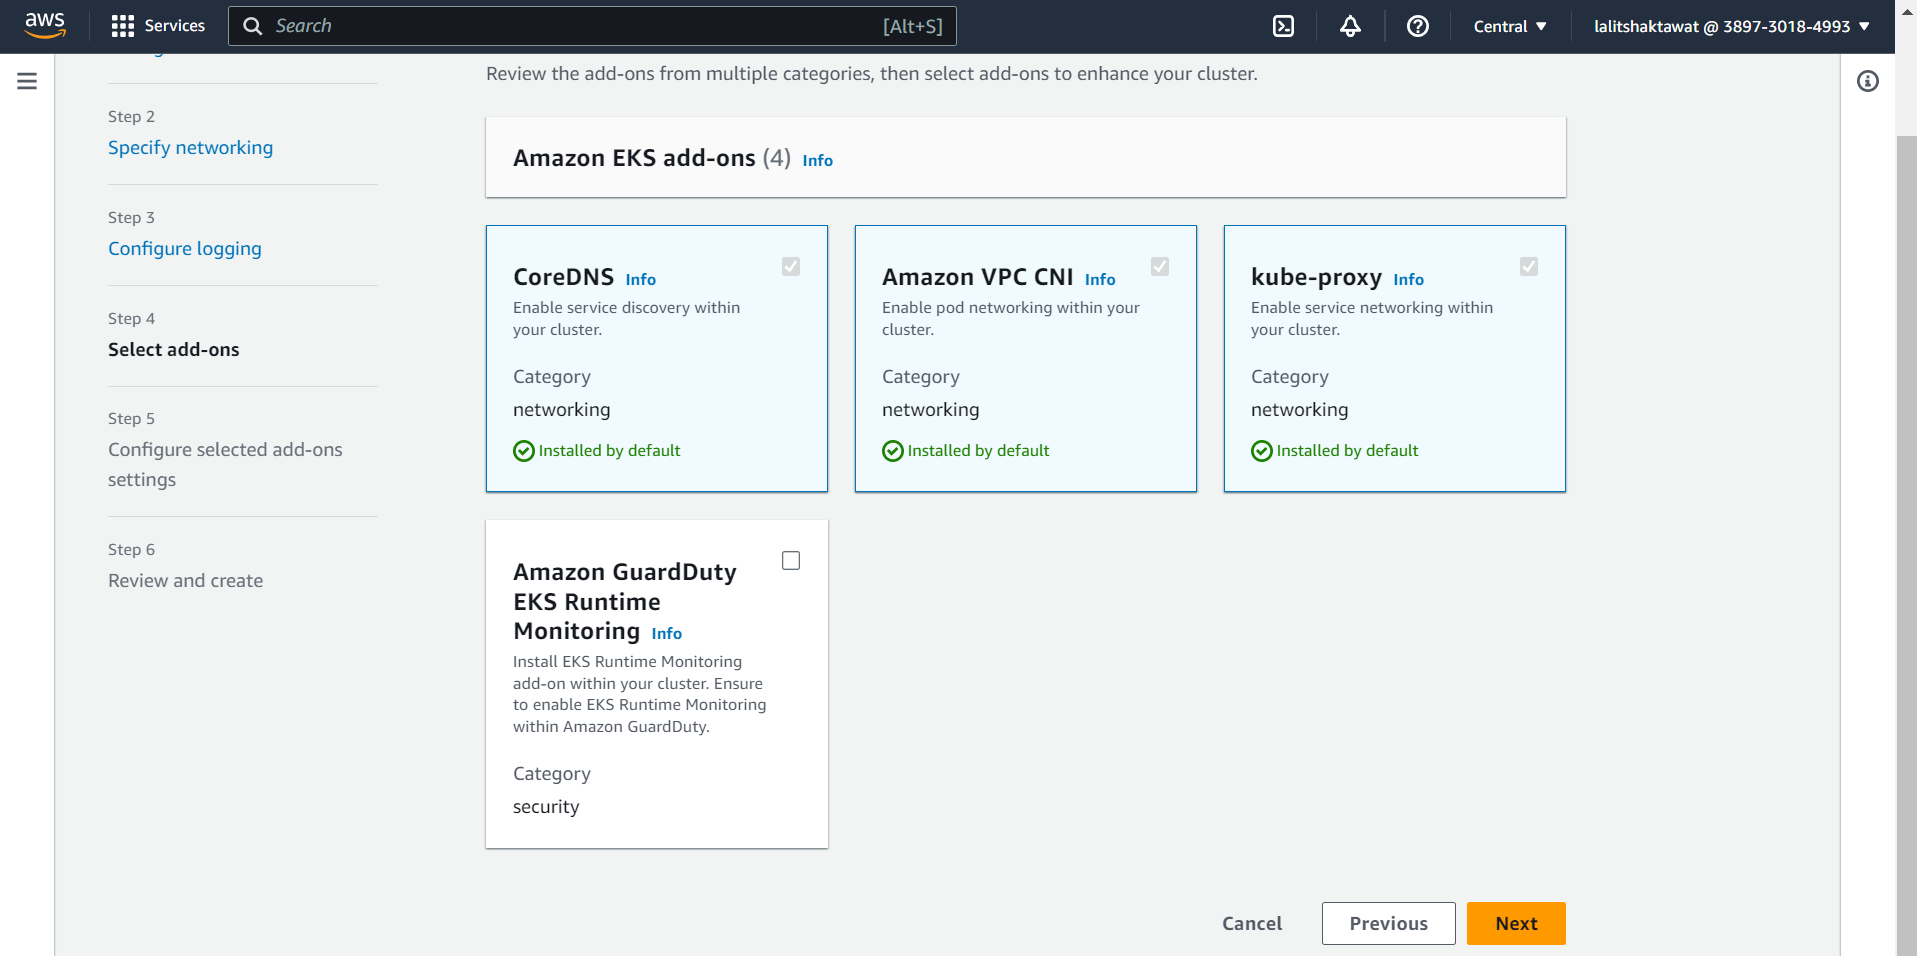
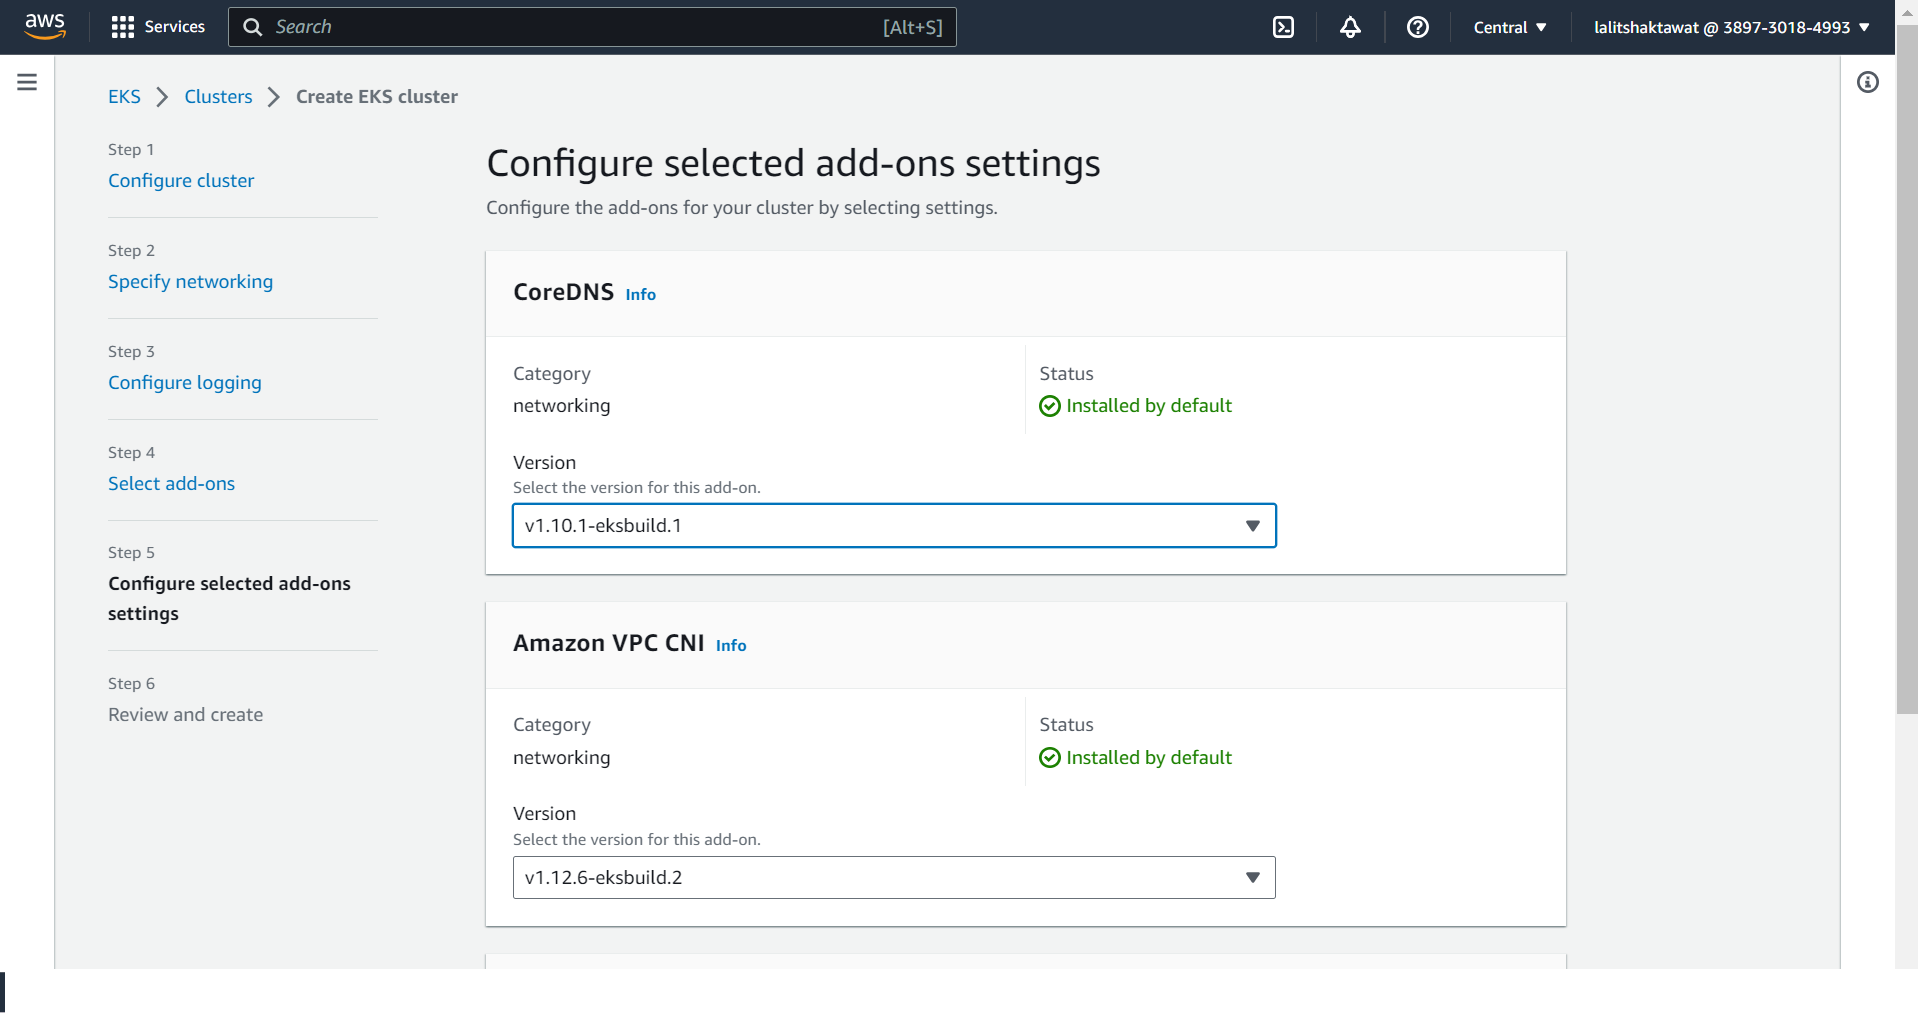
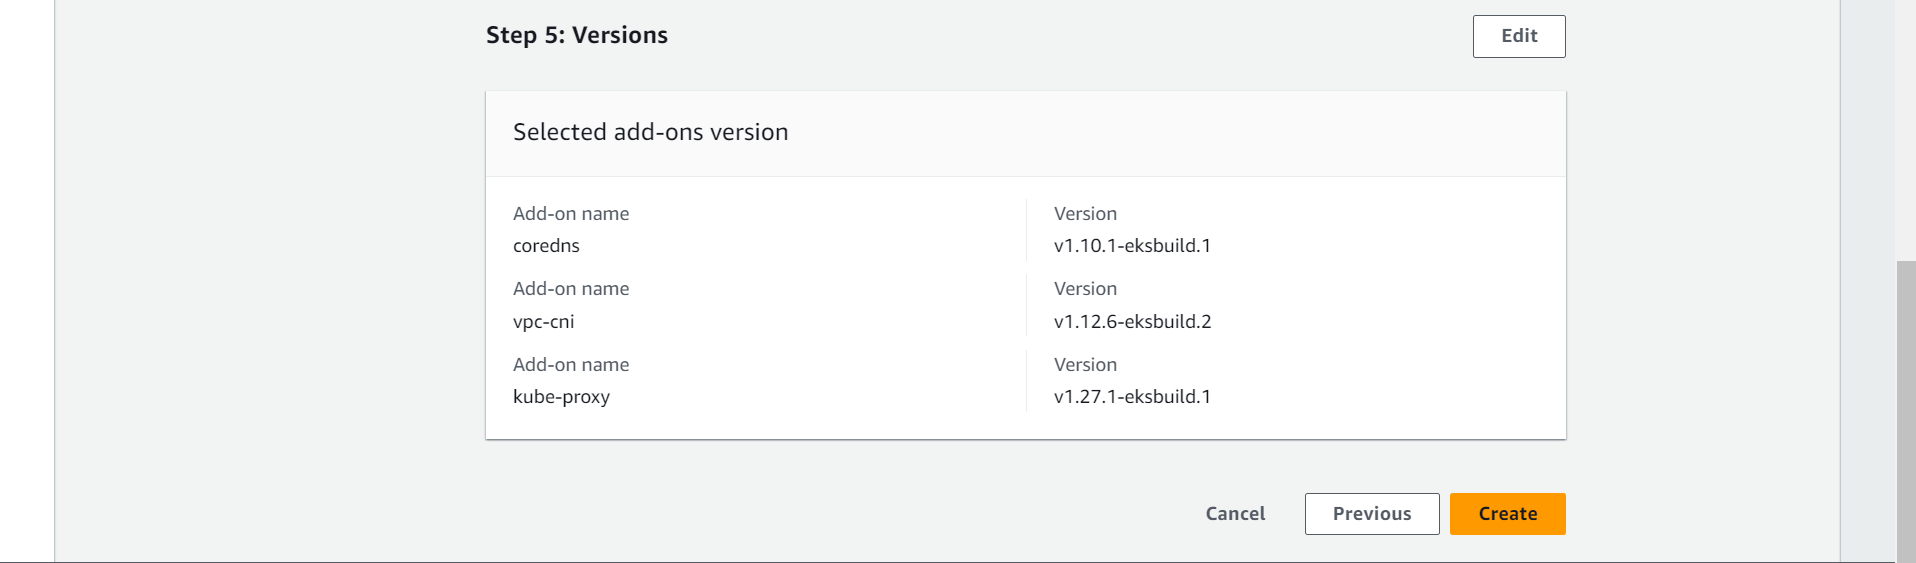
➡️ Select Version of Add-ons and click on next.

⭕ Click on Create.
😊 You are done to create cluster. Wait for a while to setup this.
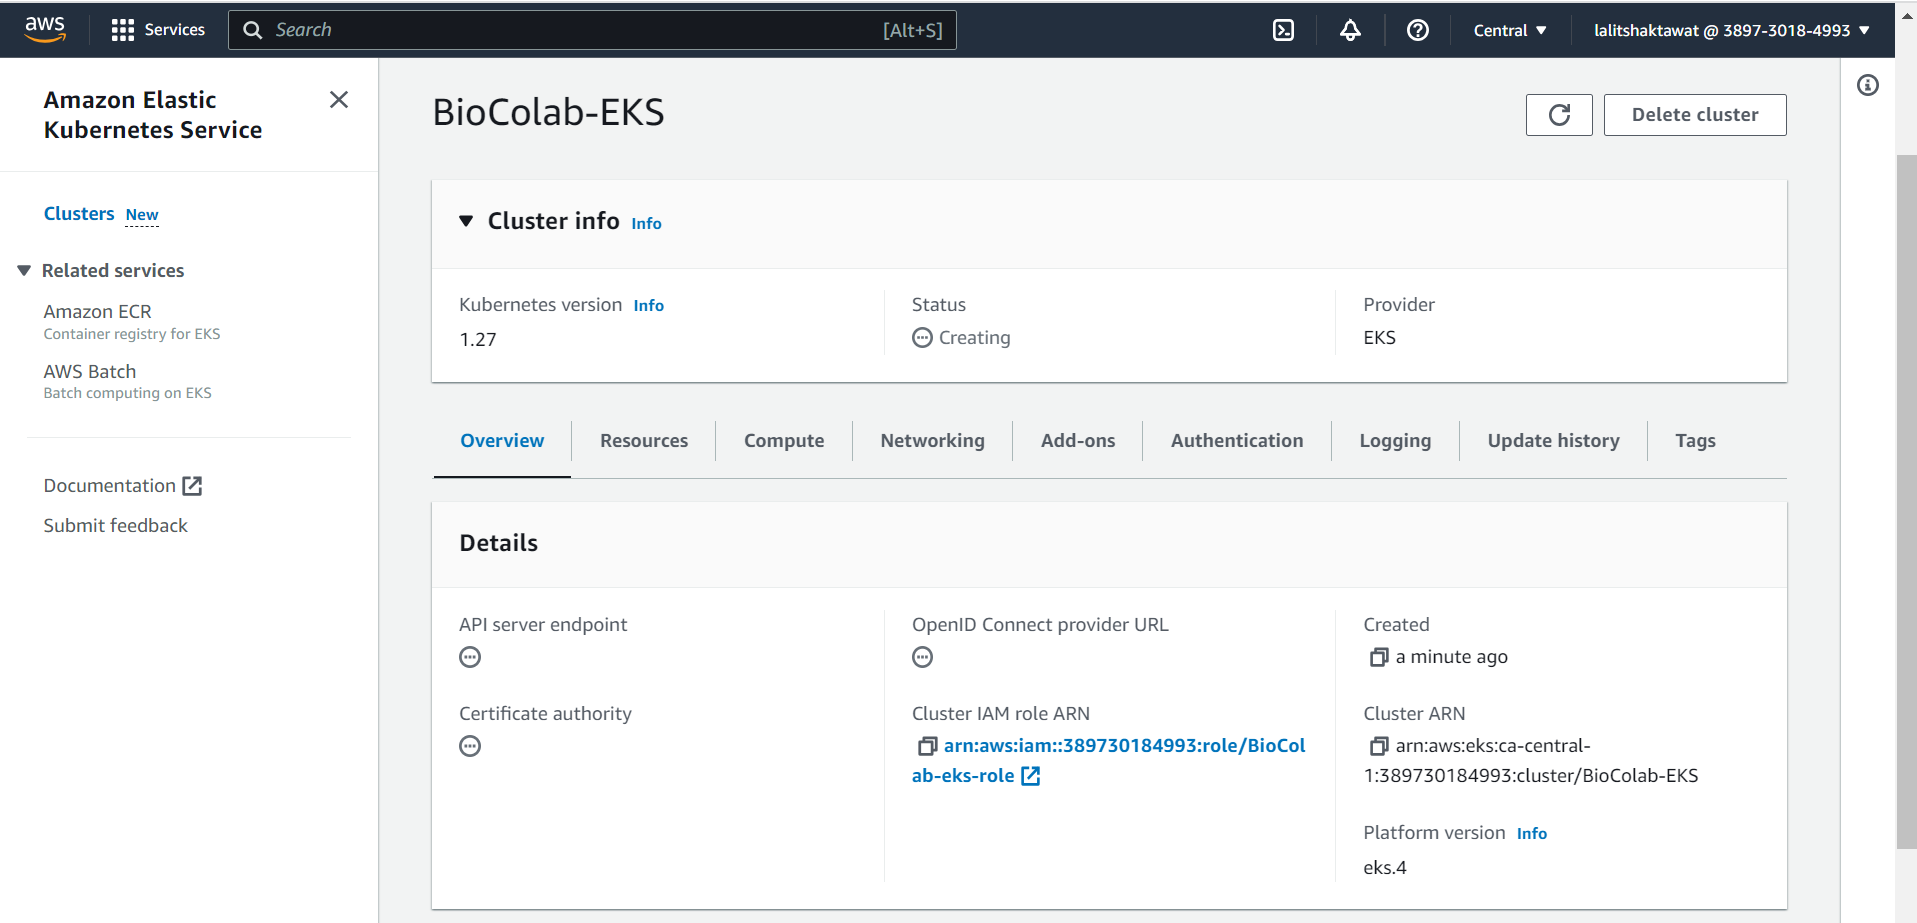
🎁 Kubernetes Cluster is Active now.
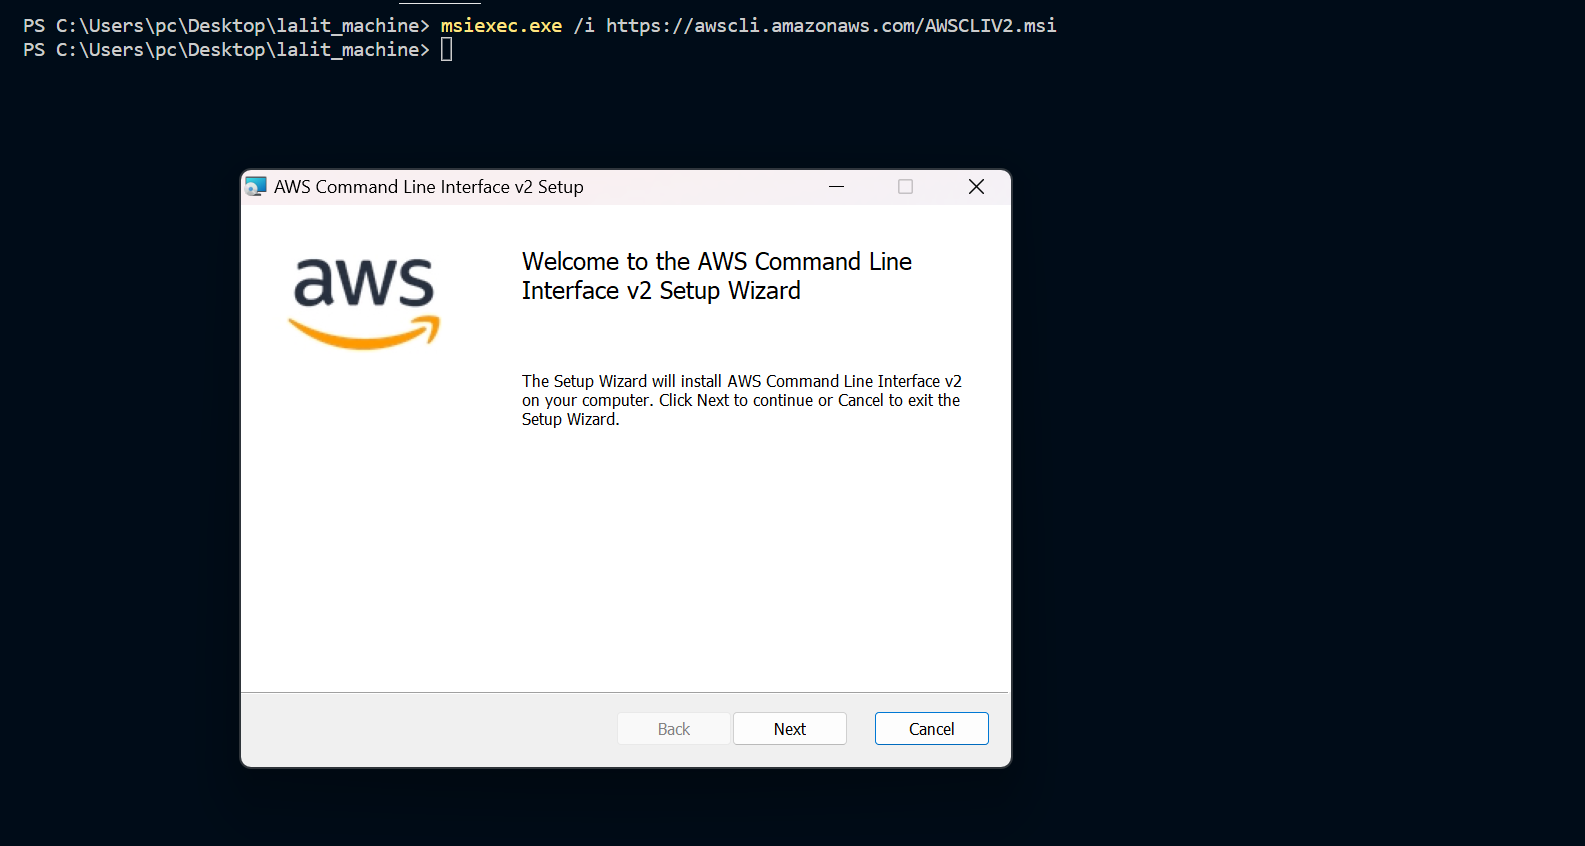
🔗 AWS CLI
Kindly select the OS version installation according to your Operating System.
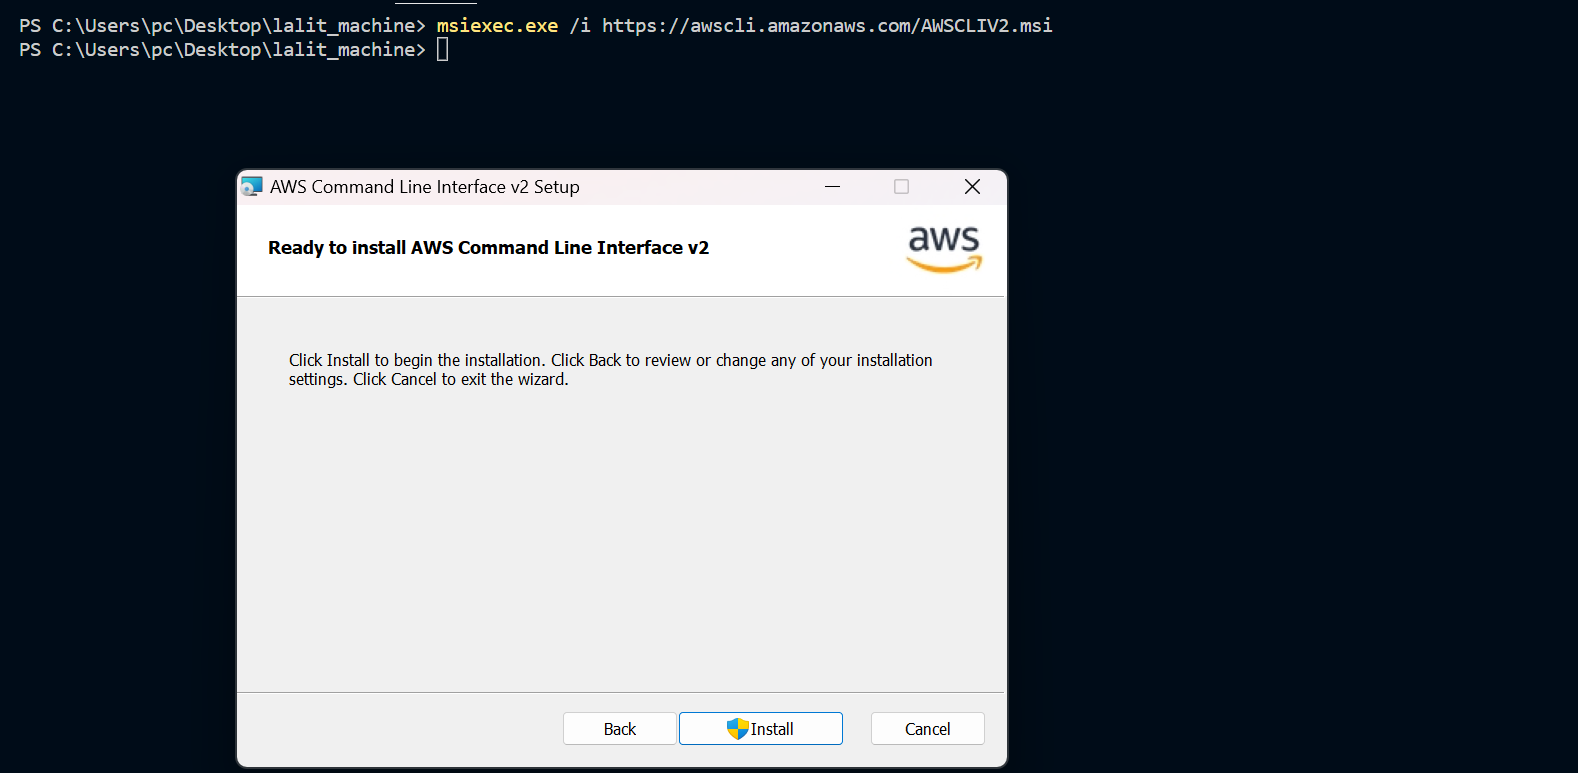
⭕ Test AWS cli


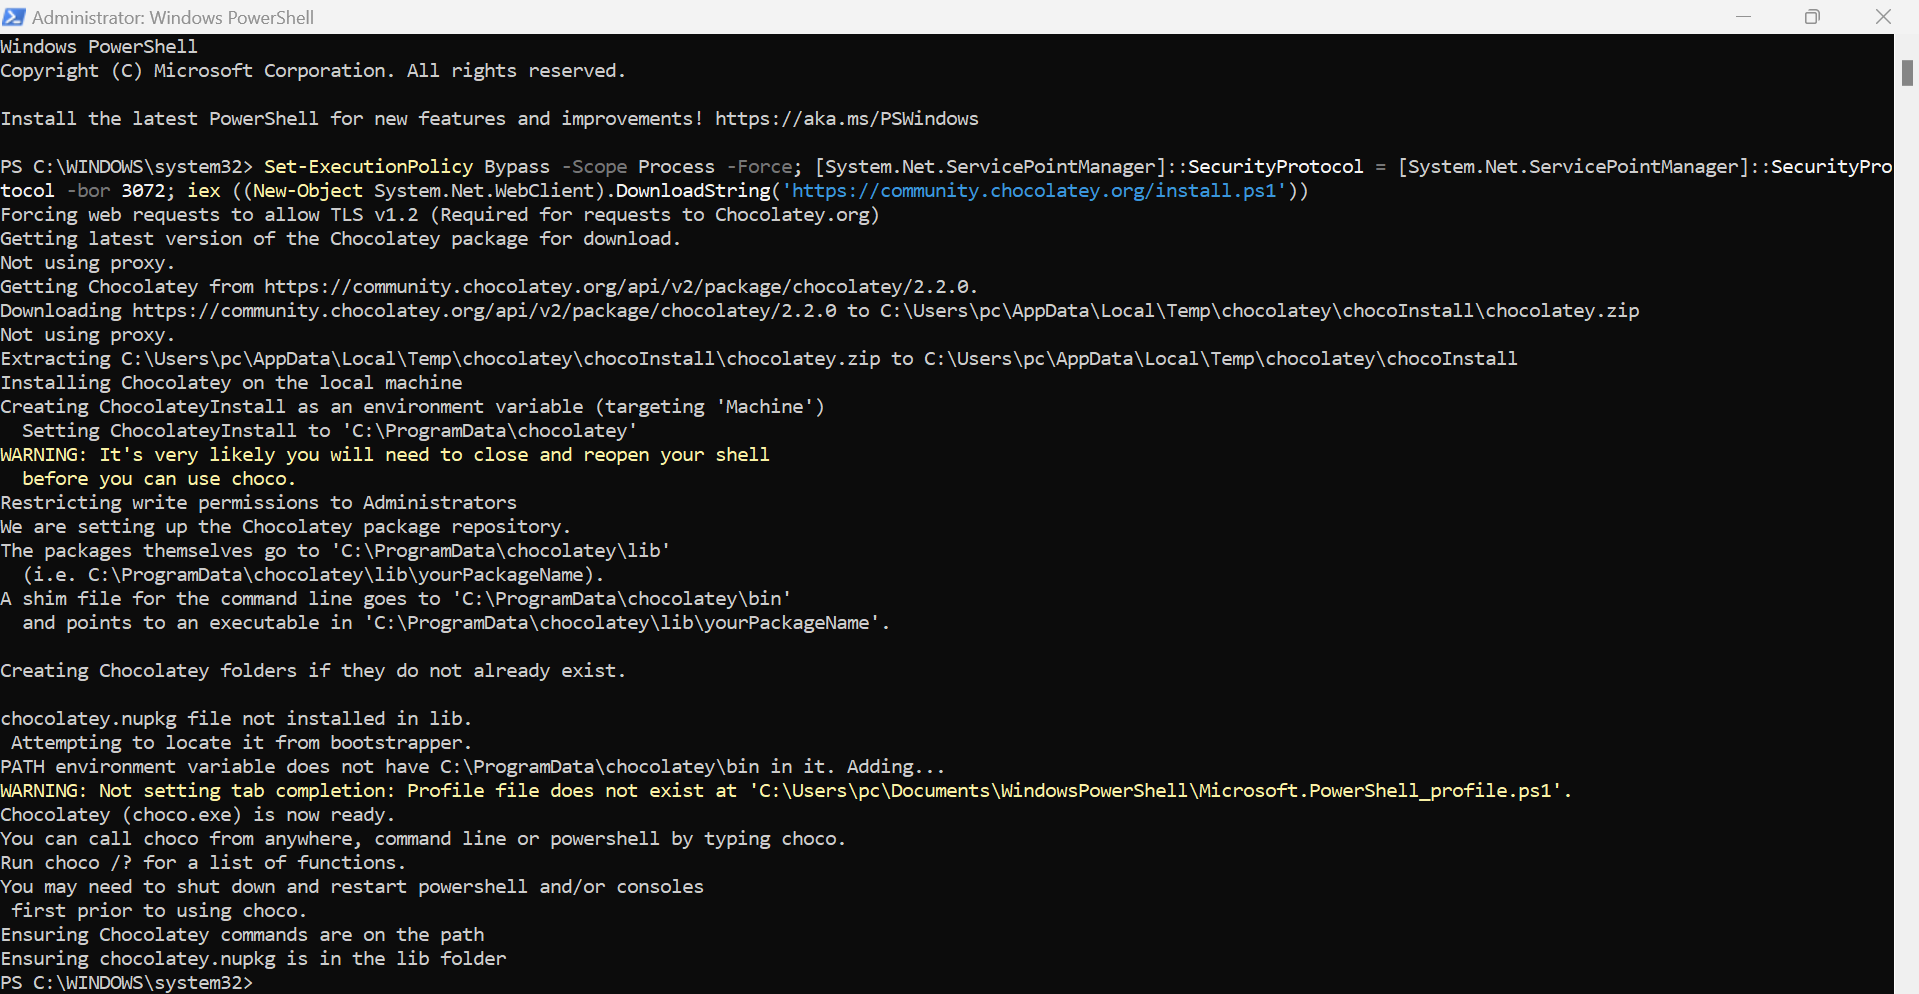
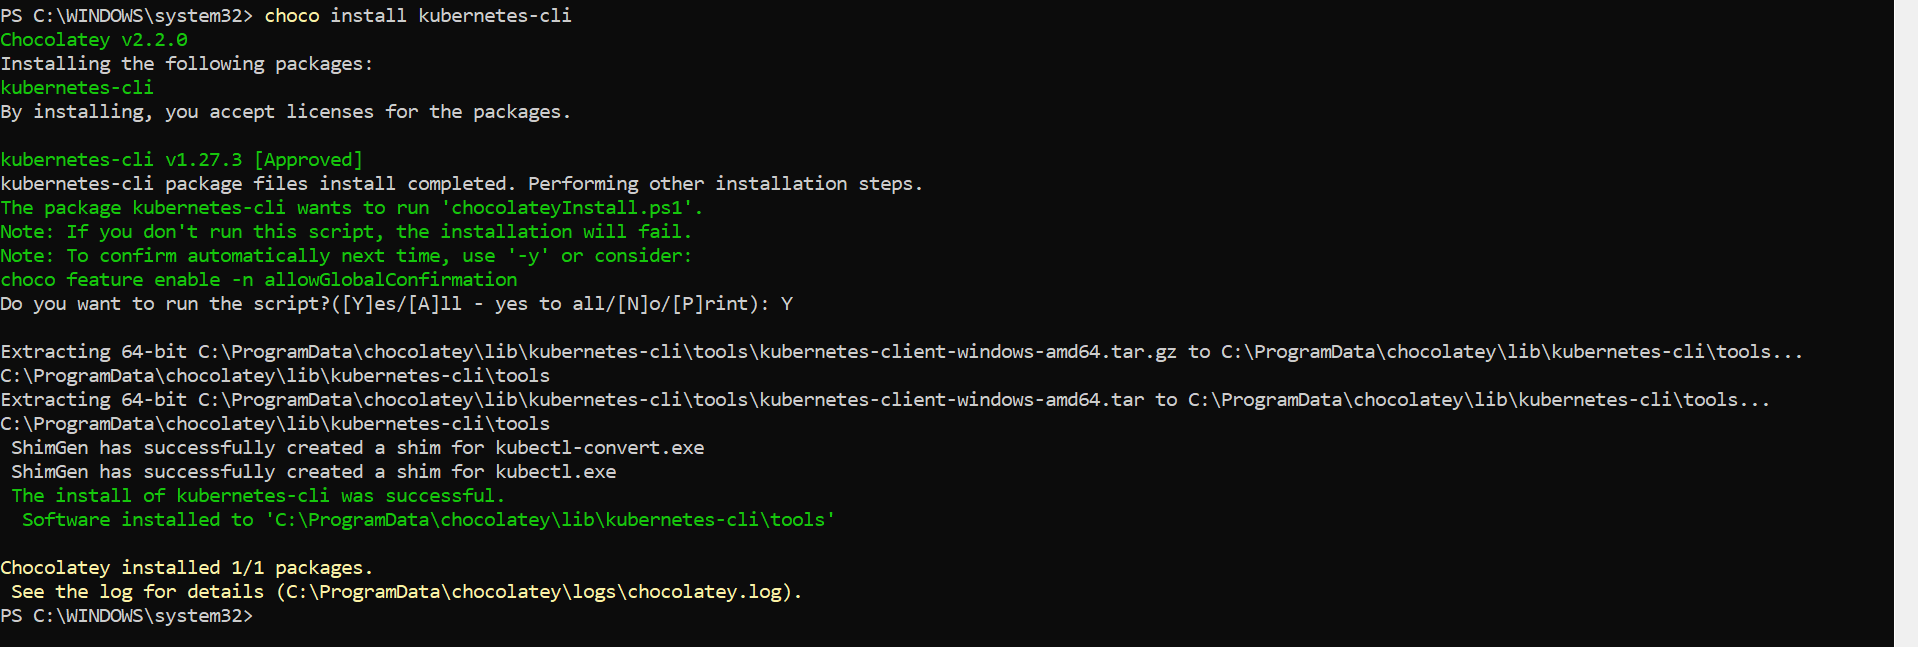
⭕ Installing Kubectl command utility.
There are many ways to install Kubectl command utility too. Here we are using window machine, So just to prefer Choco.
⭕ Adding worker node to Kubernete cluster.
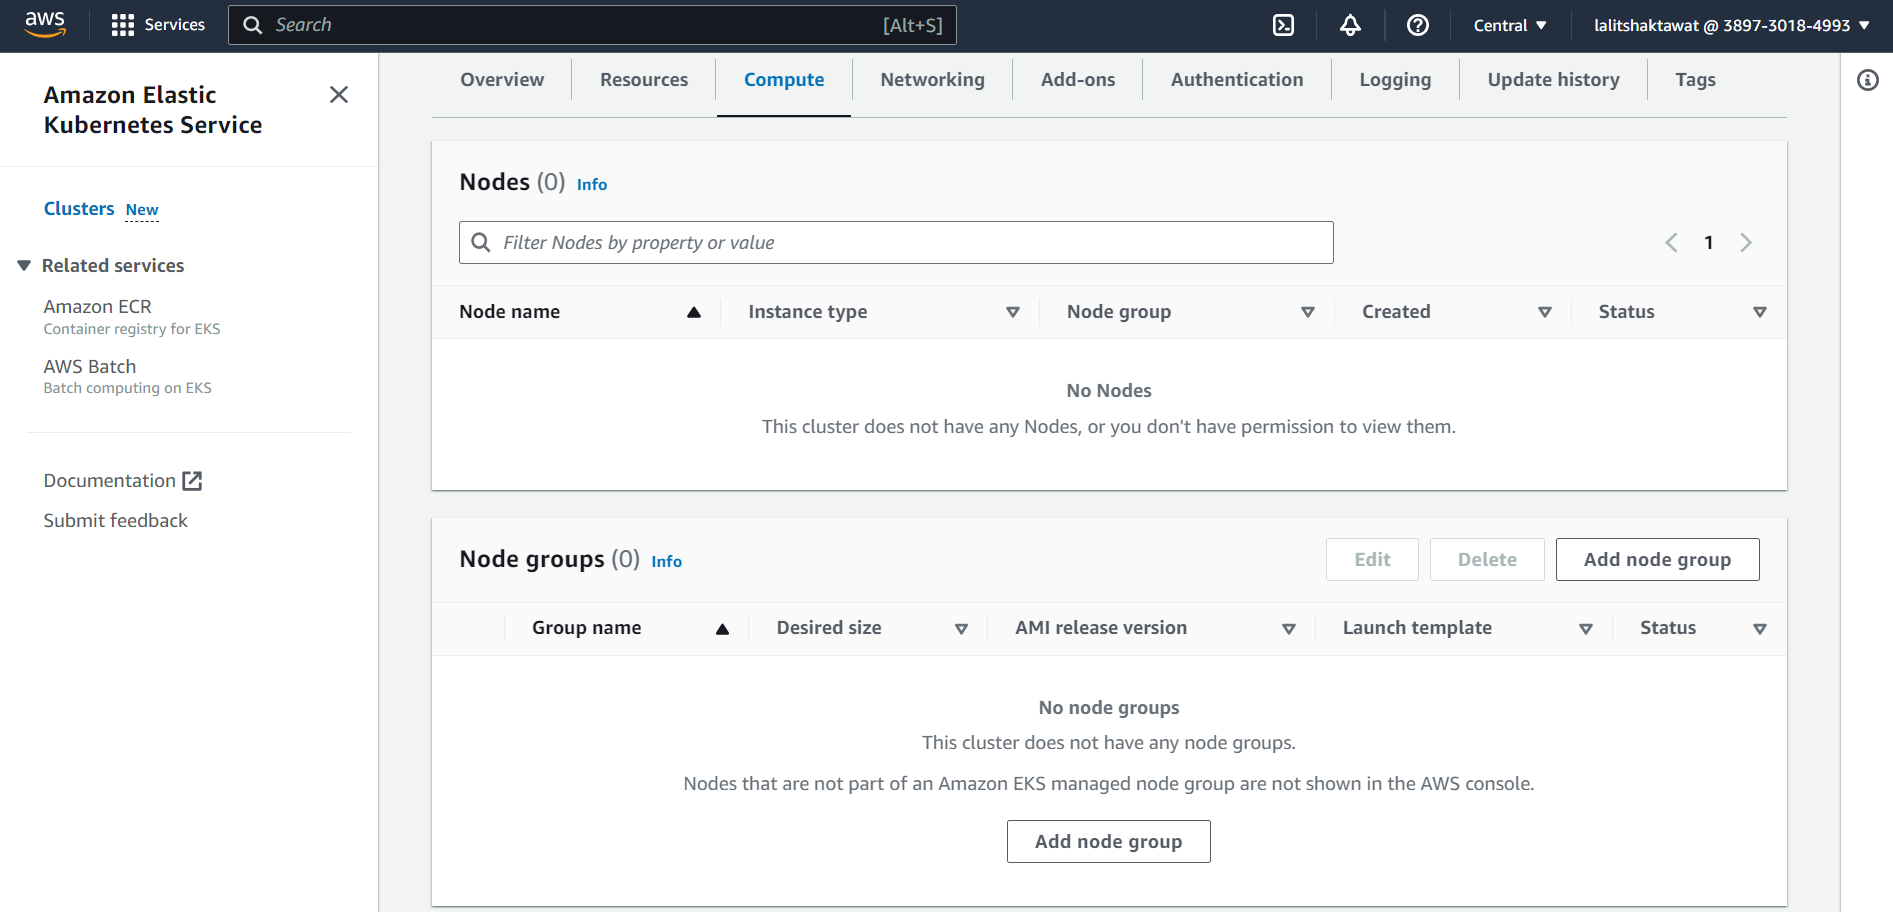
EKS --> Compute --> Add node group.
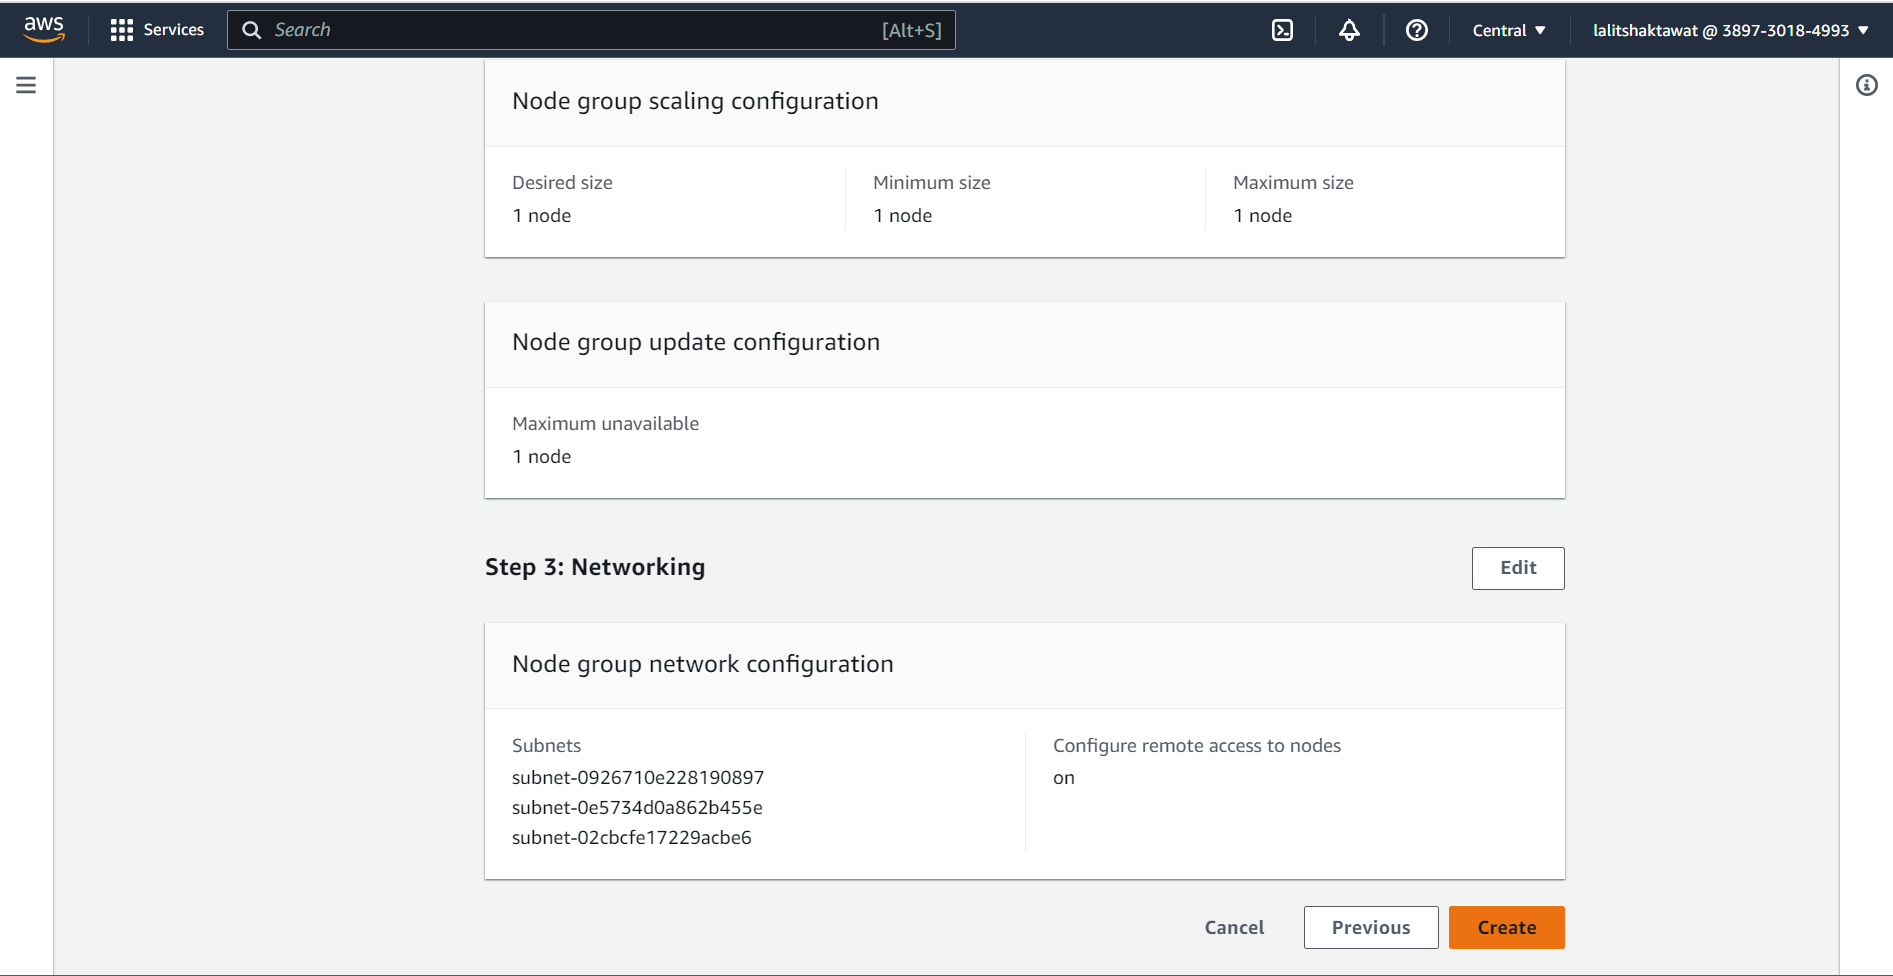
In order to add node to the cluster. We need to add node group. Each node group can content different kind of node ( compute resources ). We can add many node group based on requirements.
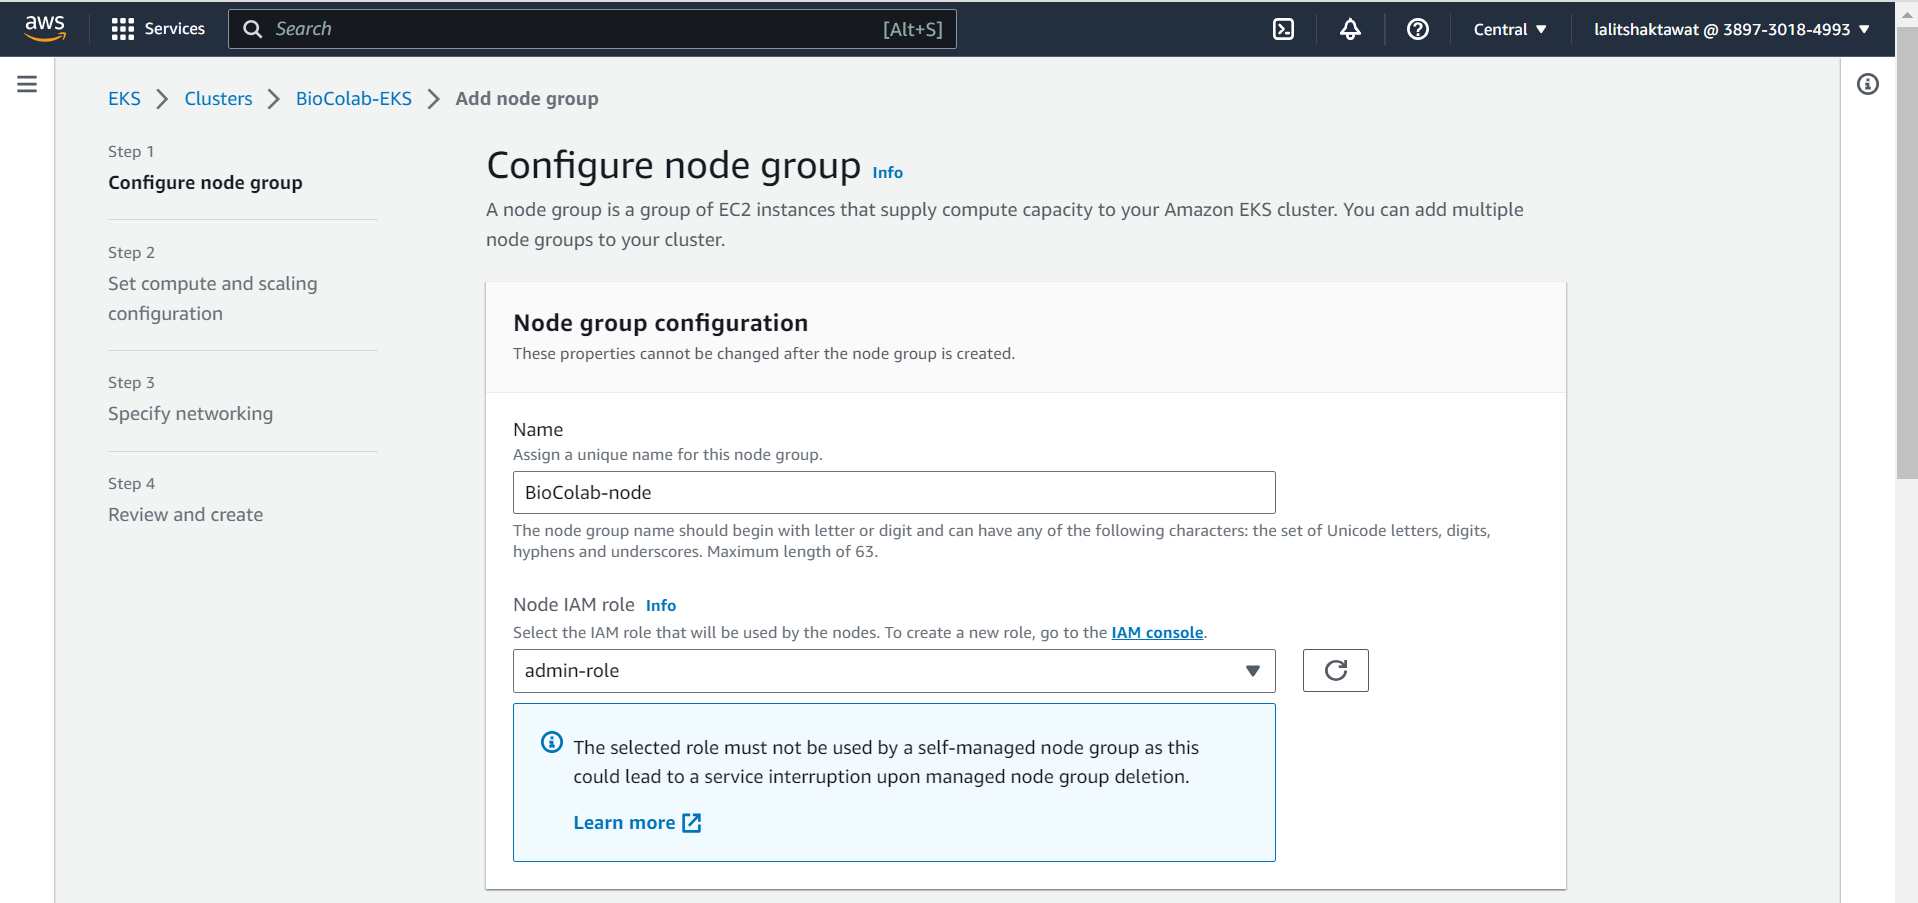
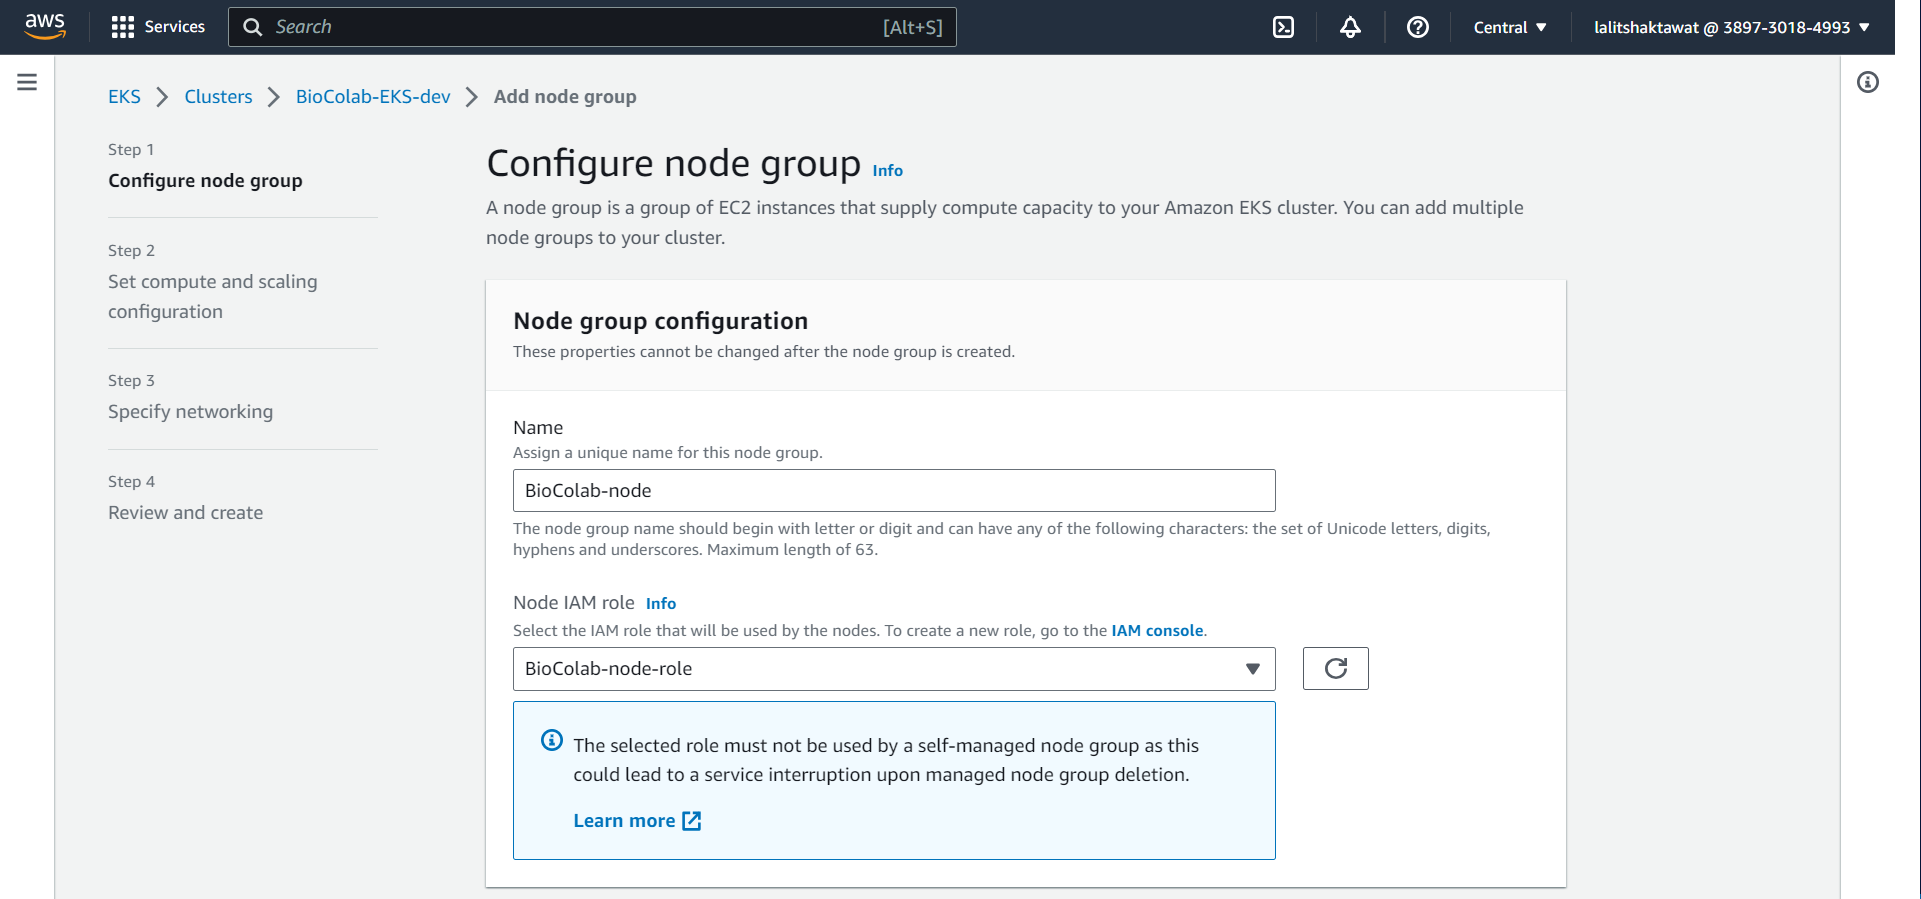
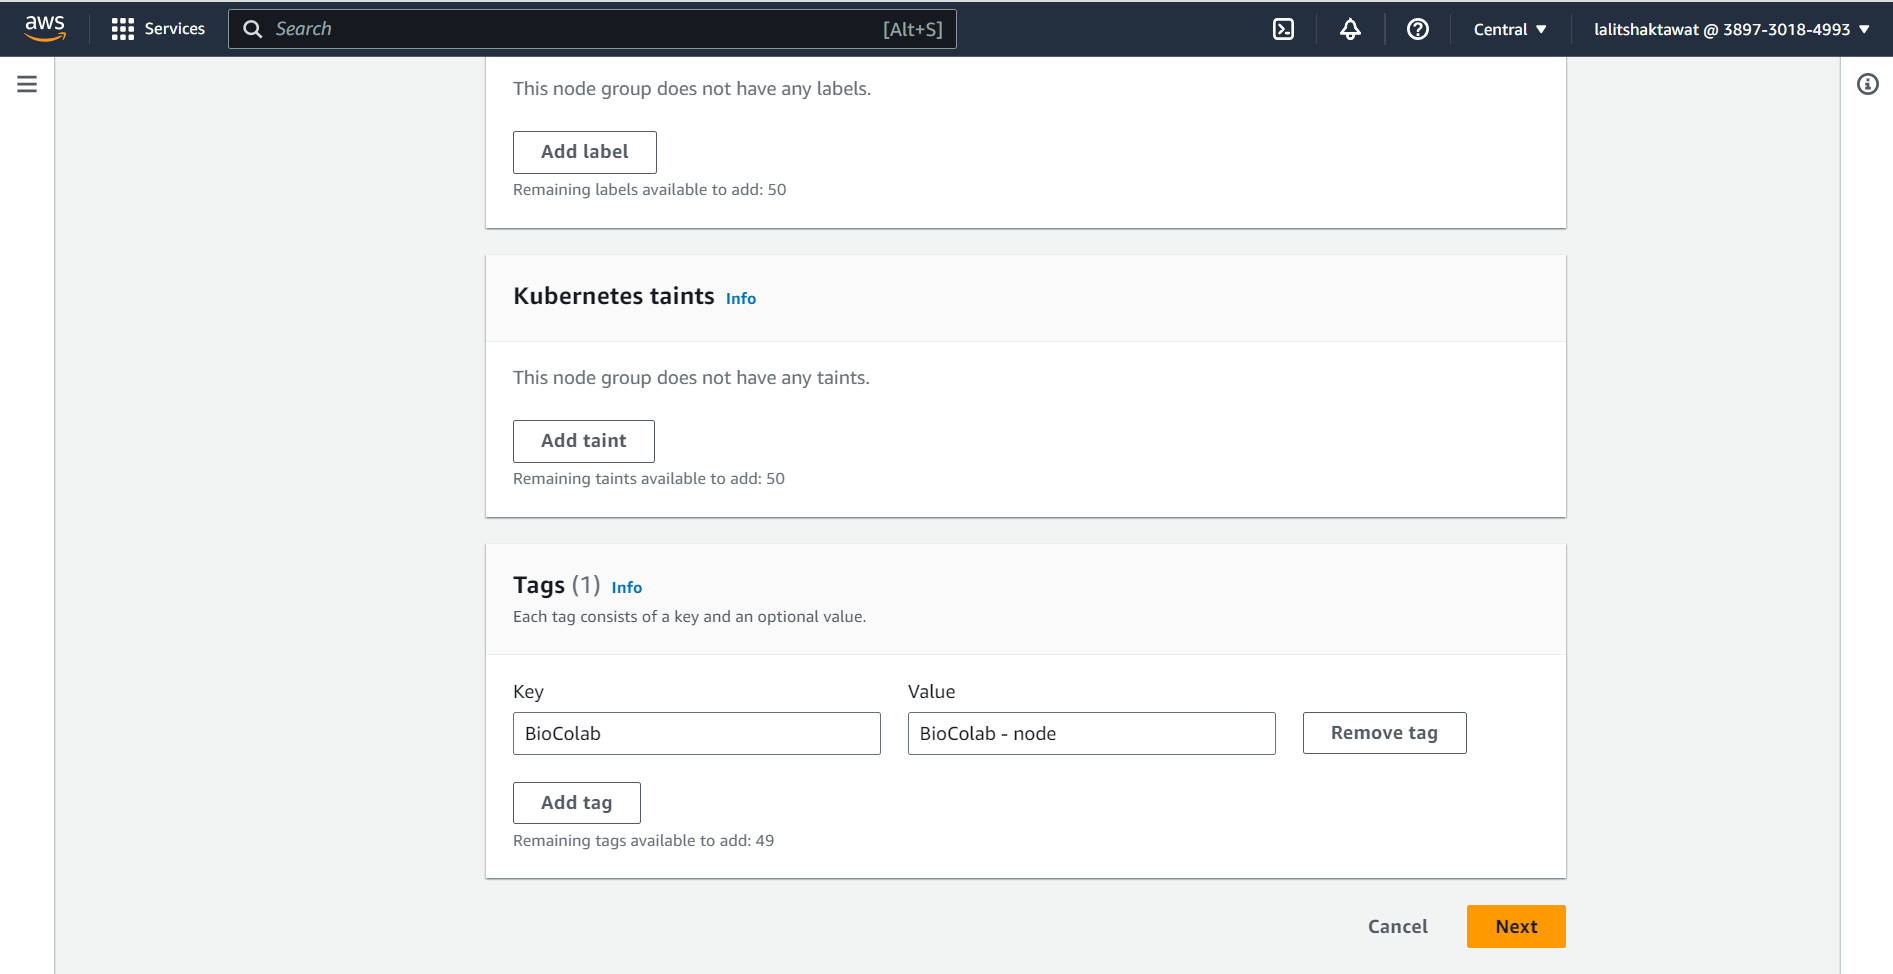
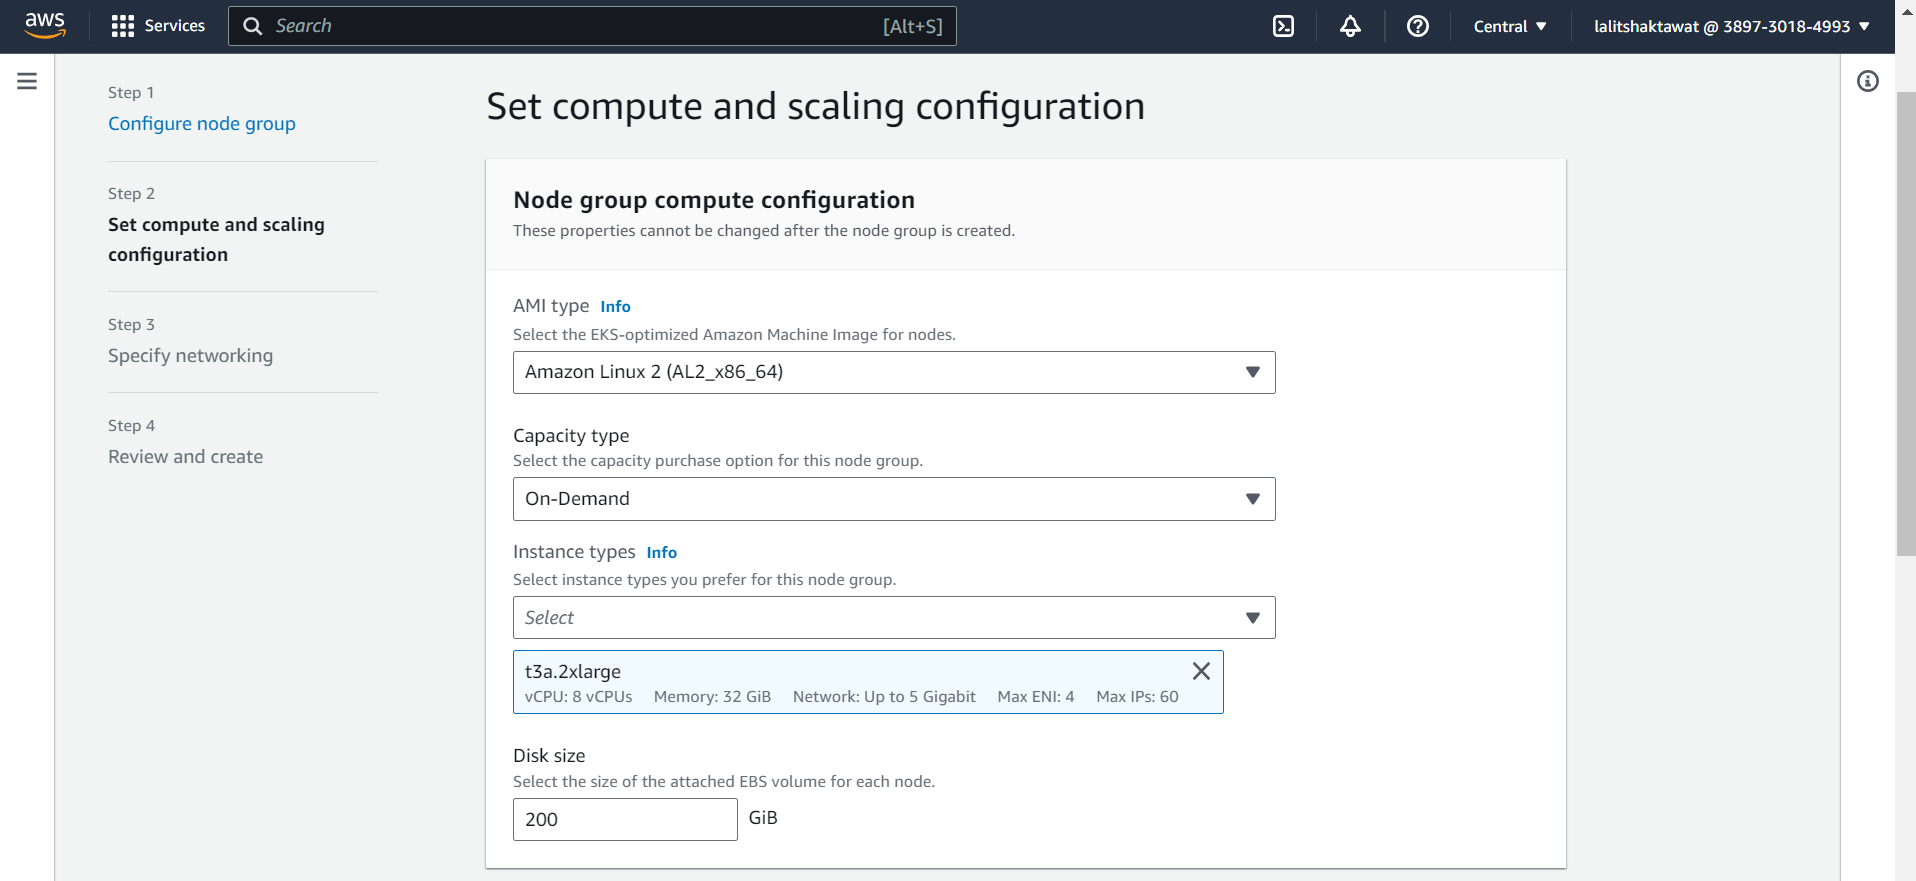
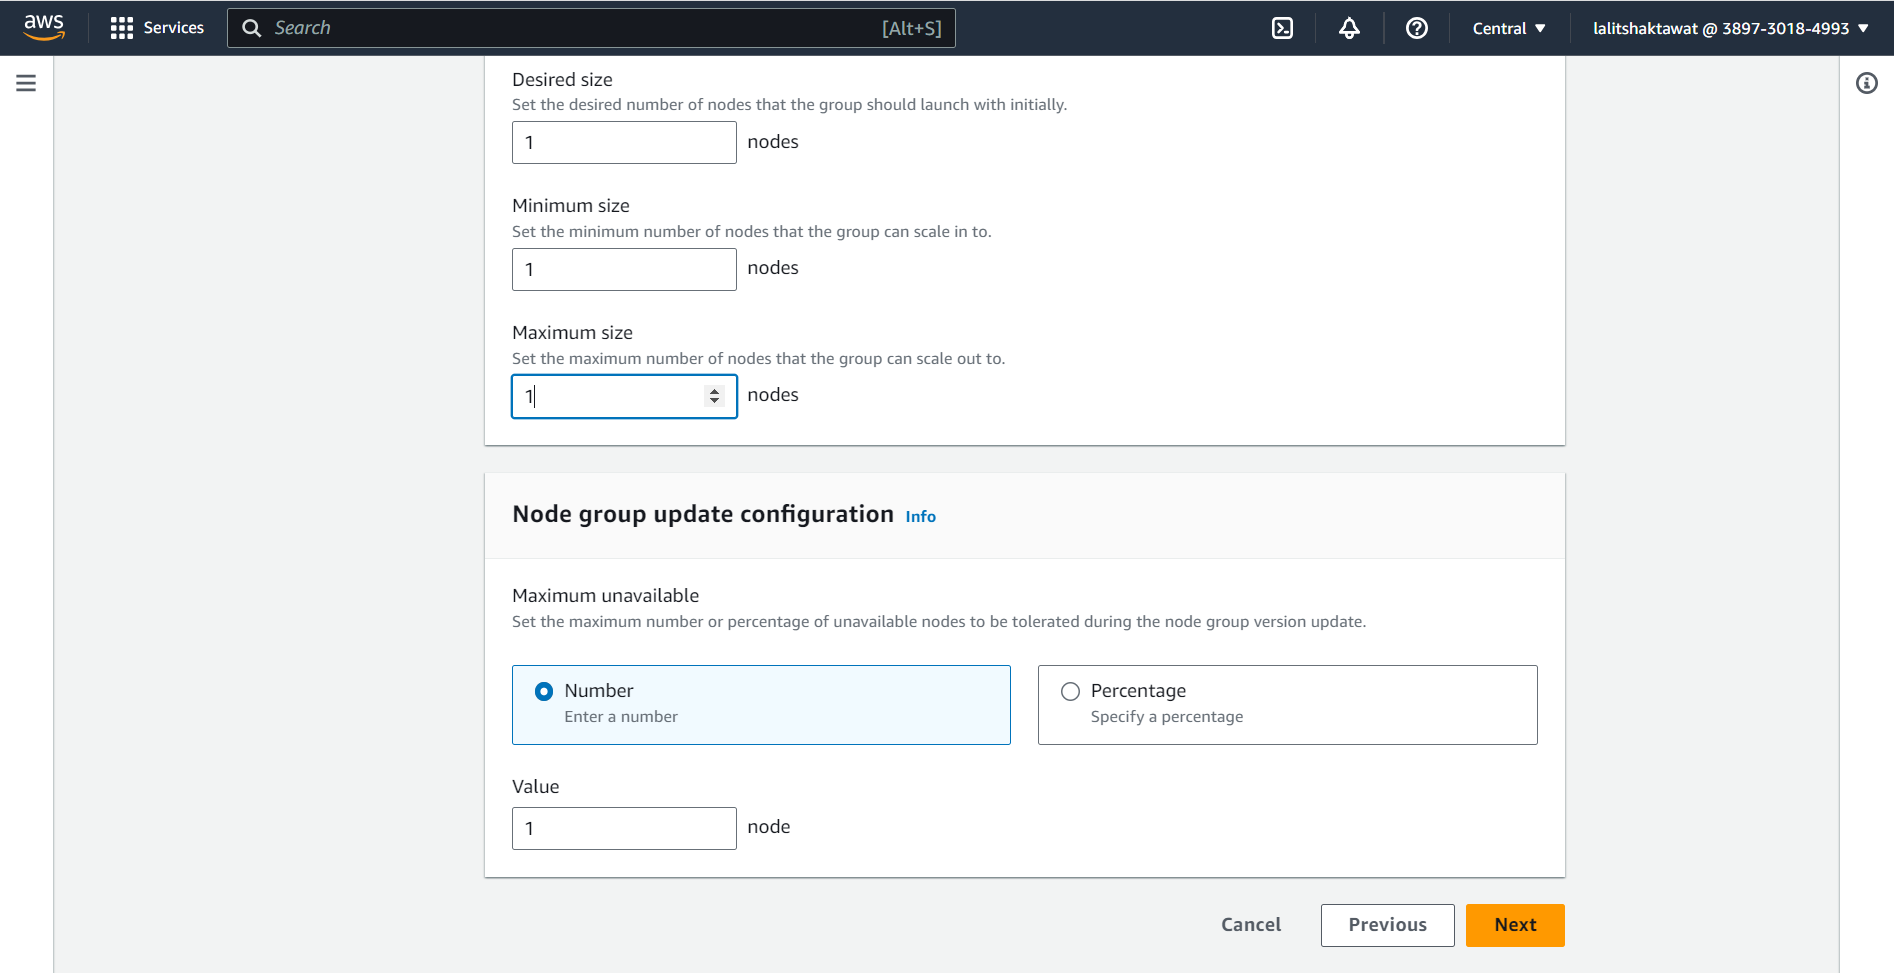
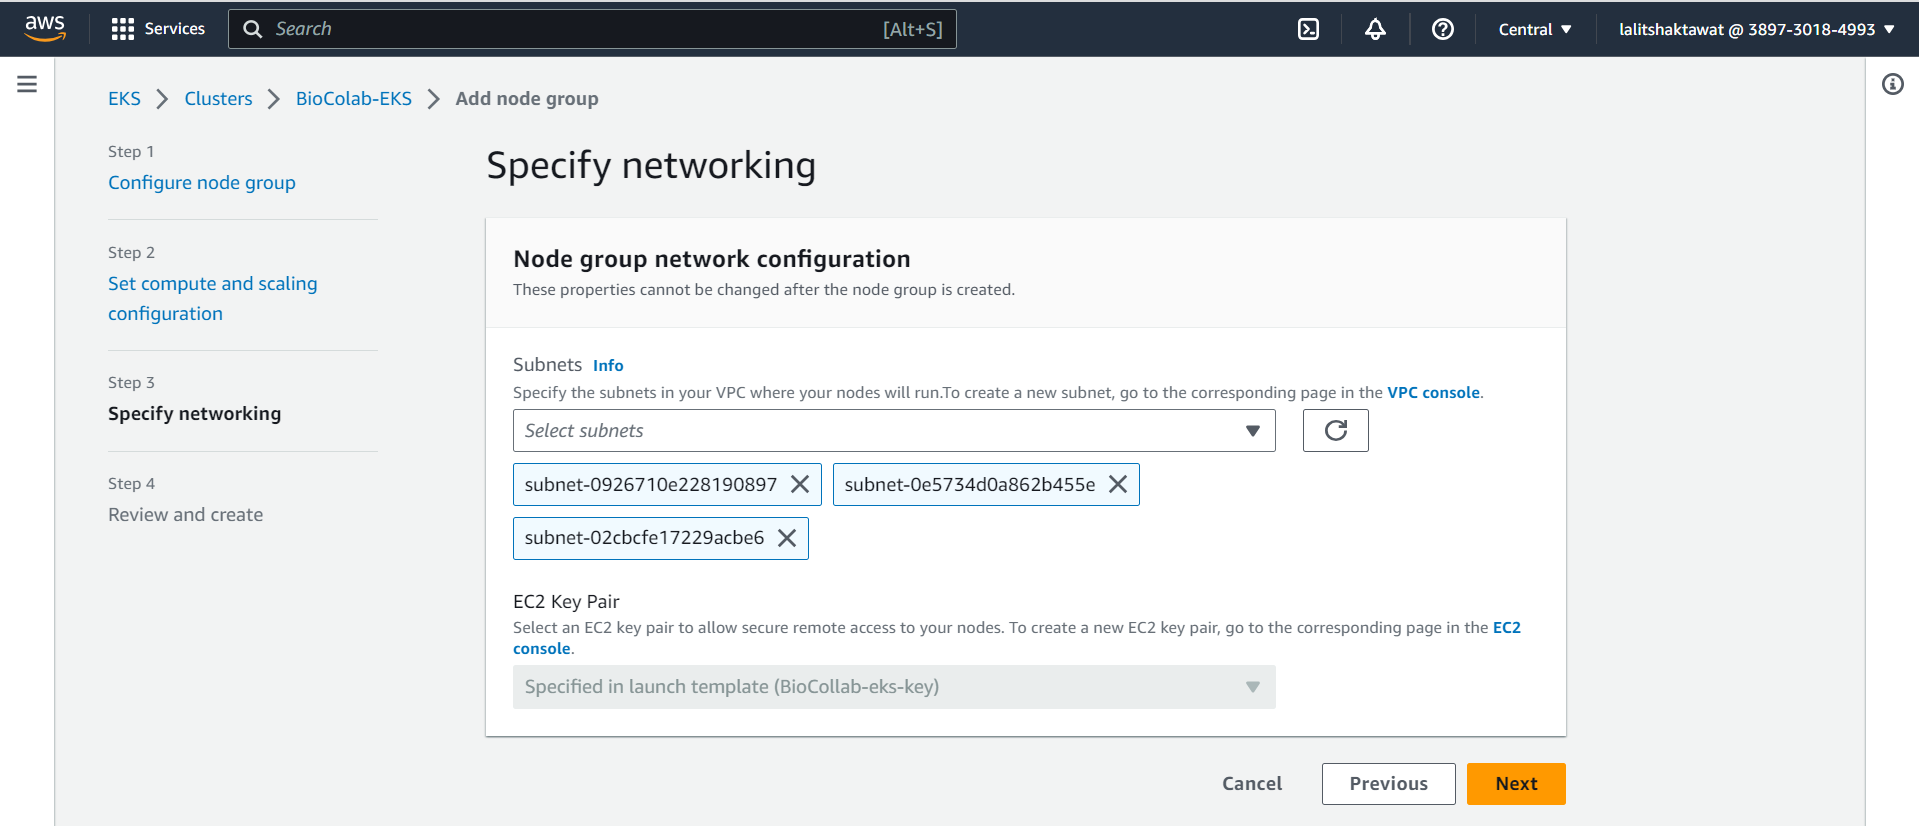
⭕ Configure node group.
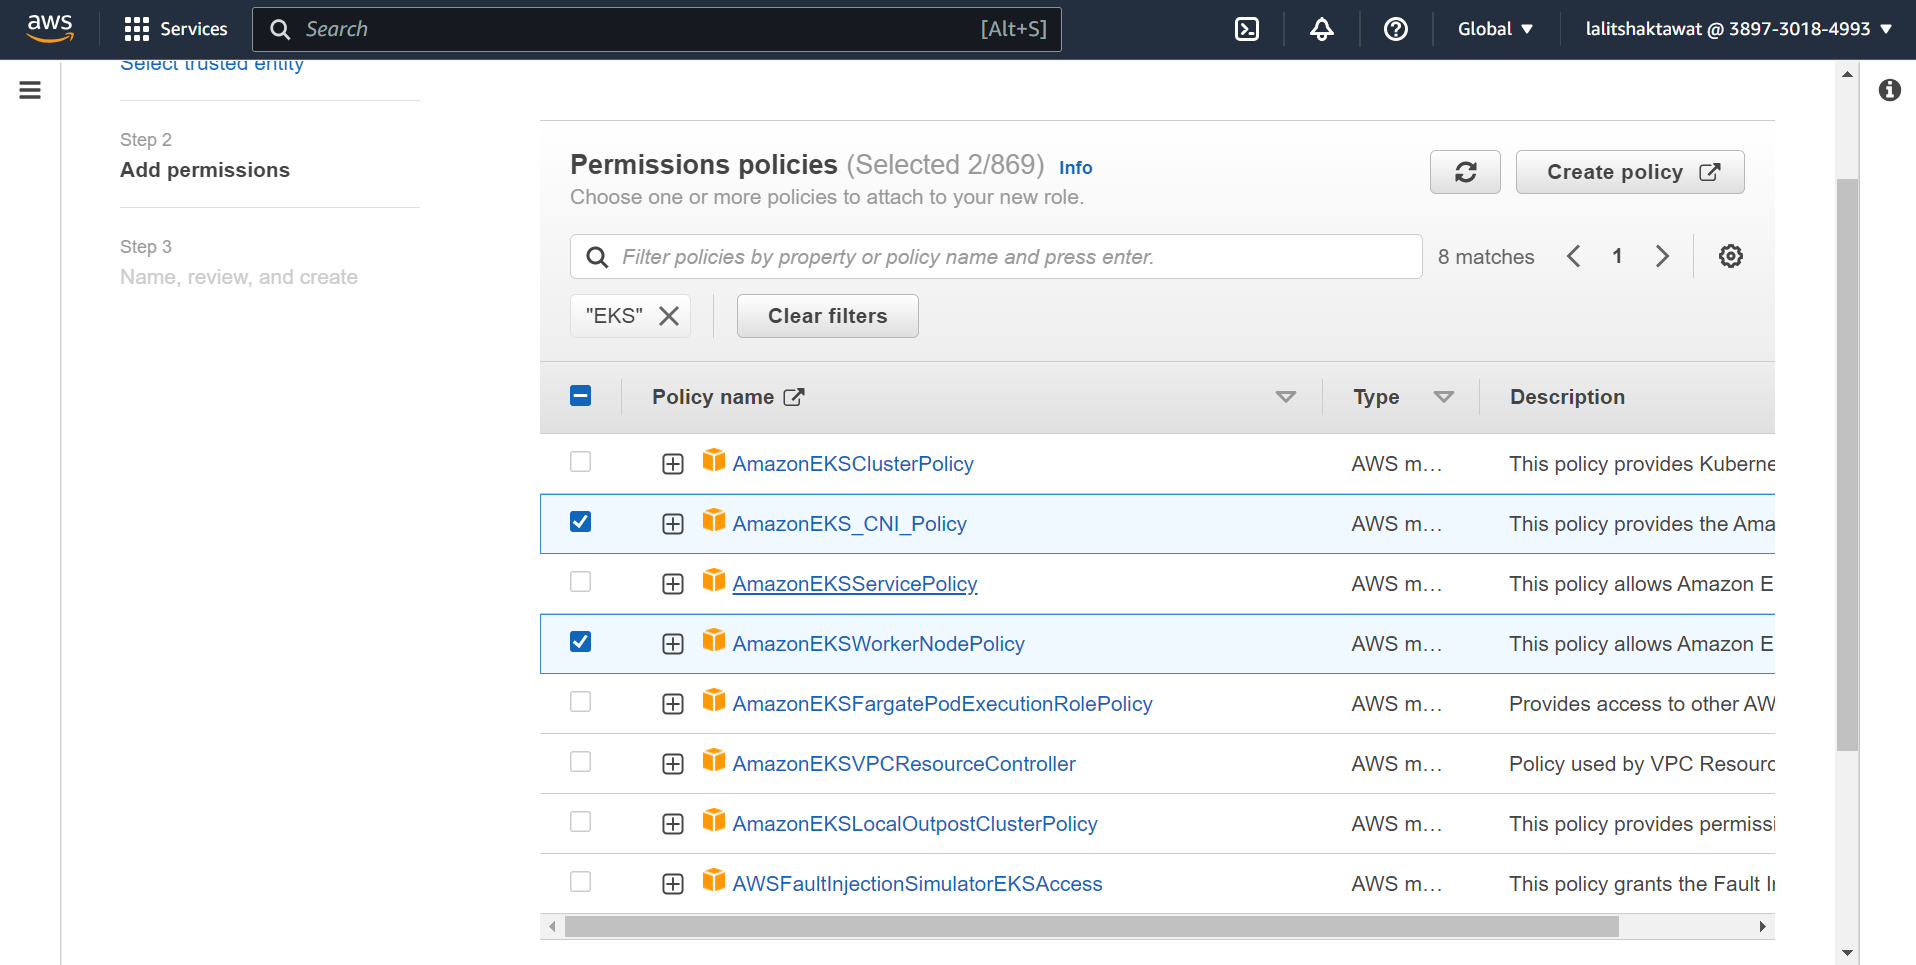
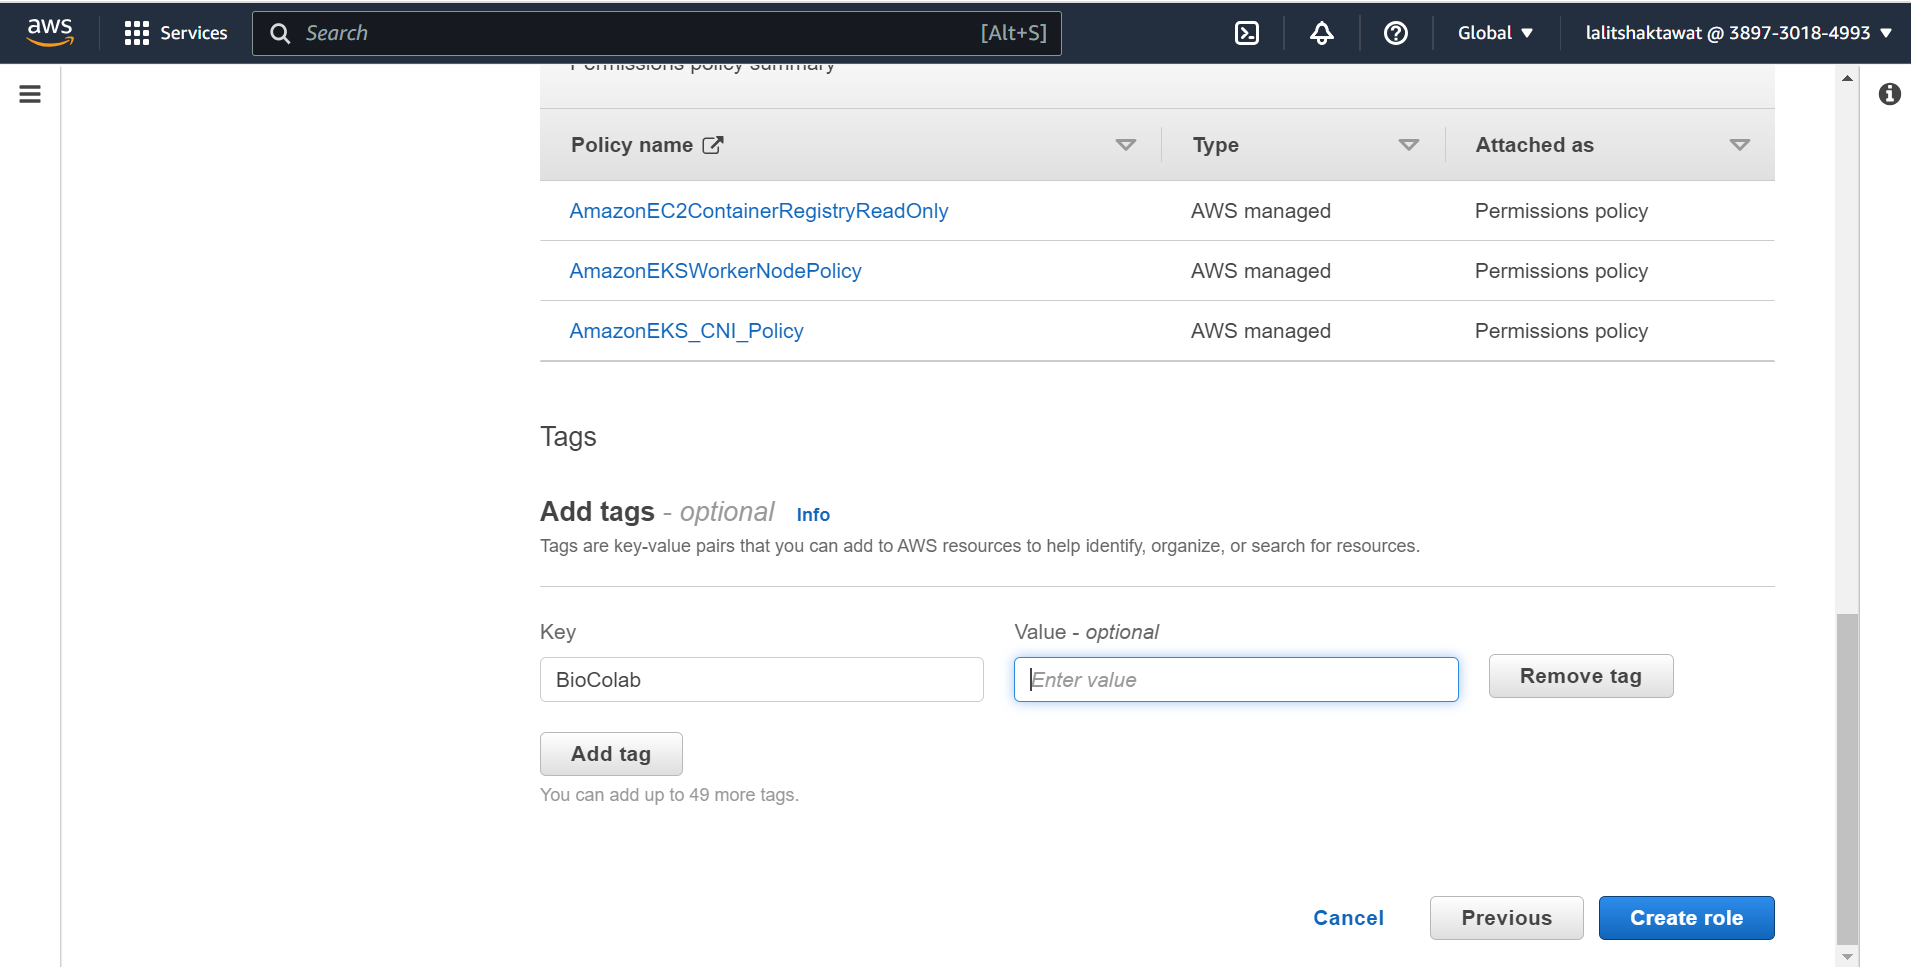
In node group configuration, We need to provide node name as well as must create Node IAM role. to handle worker node. Once click on IAM console. A new window will open to create new IAM role.
⭕ Click on Create role.
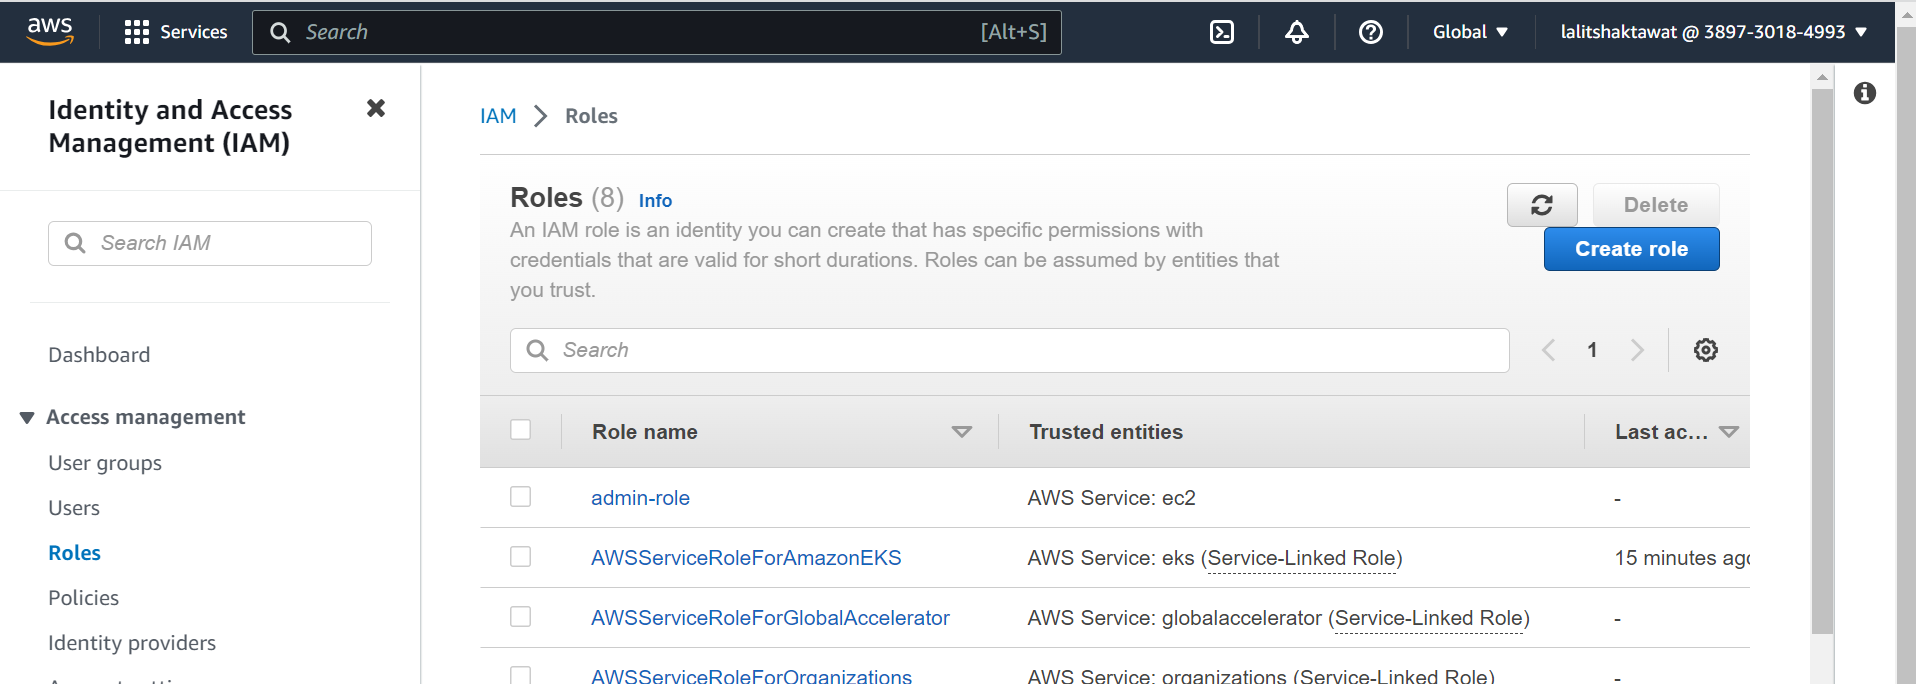
⭕ Select AWS service.
Use cases for other AWS services. EC2
Add three tick mark policy that role.

⭕ Click on Create role.
Once role is ready. Now time to assign this role to node group.

You have two option to create Ec2 instance.
1. Launch from EKS node configuration wizard.
2. Using Template
1️⃣ Launch from EKS node configuration wizard.
⭕ Click on Next.
⭕ Click on Next.
⭕ Click on Next.
⭕ Click on Create.
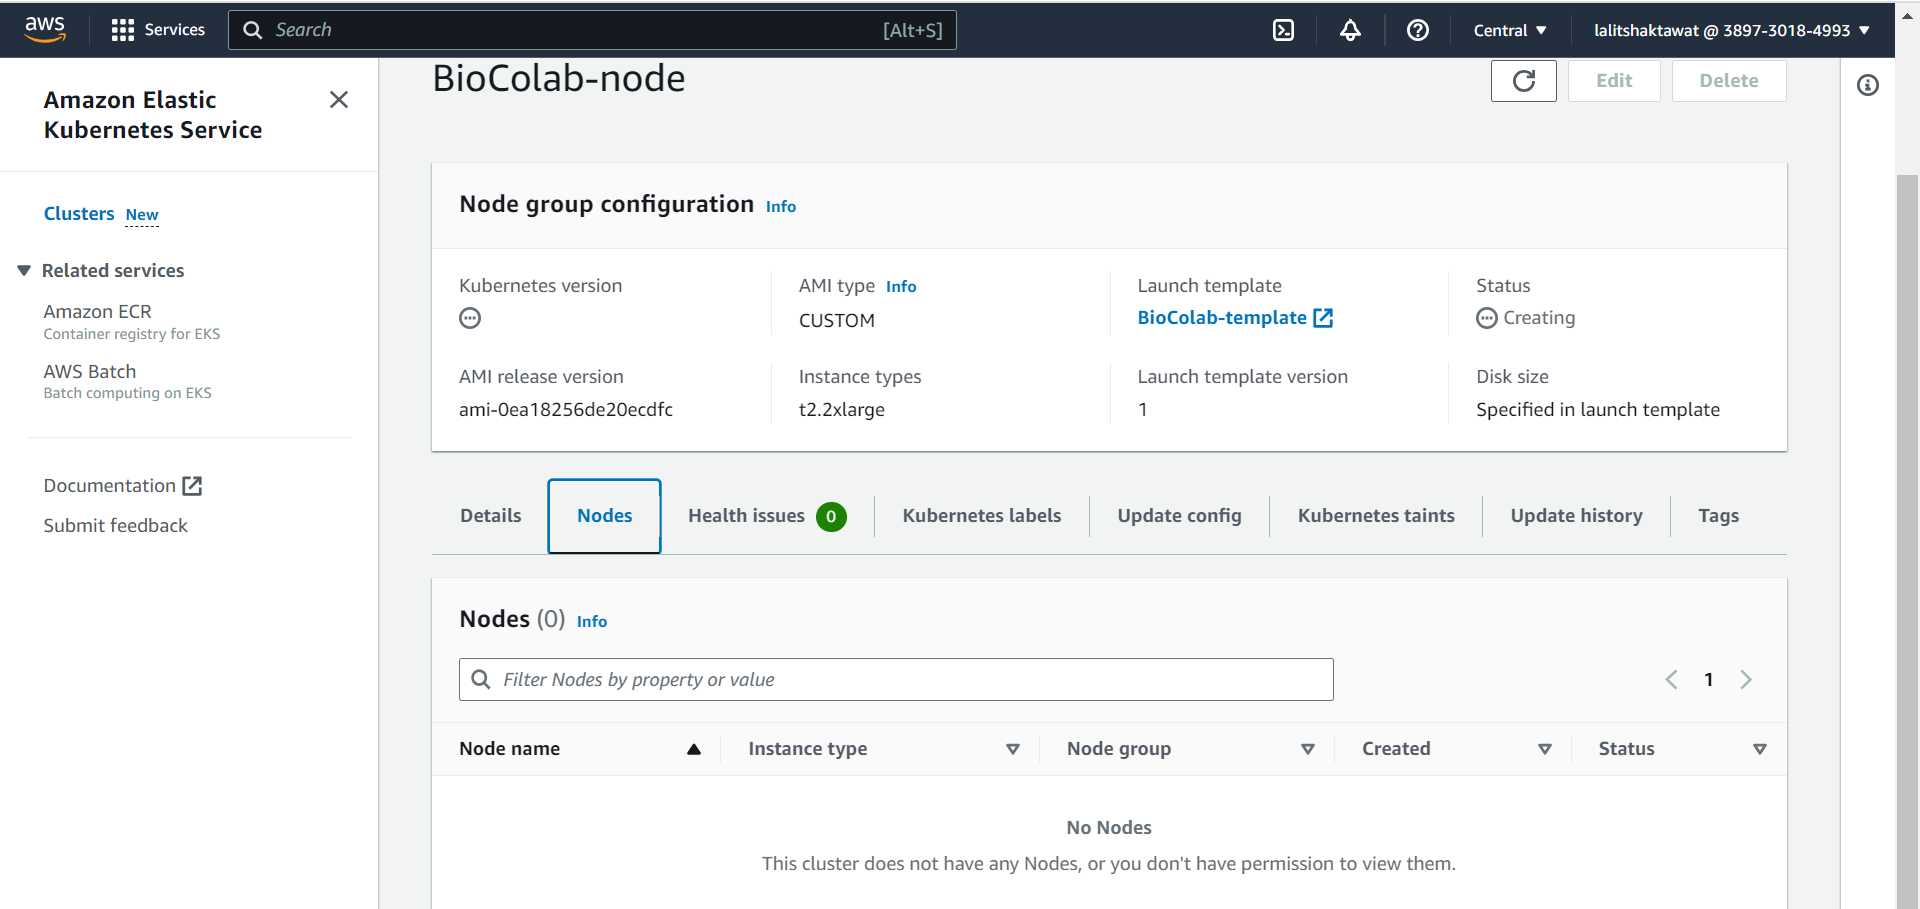
🔄 Wait for a while to add node to the Cluster.
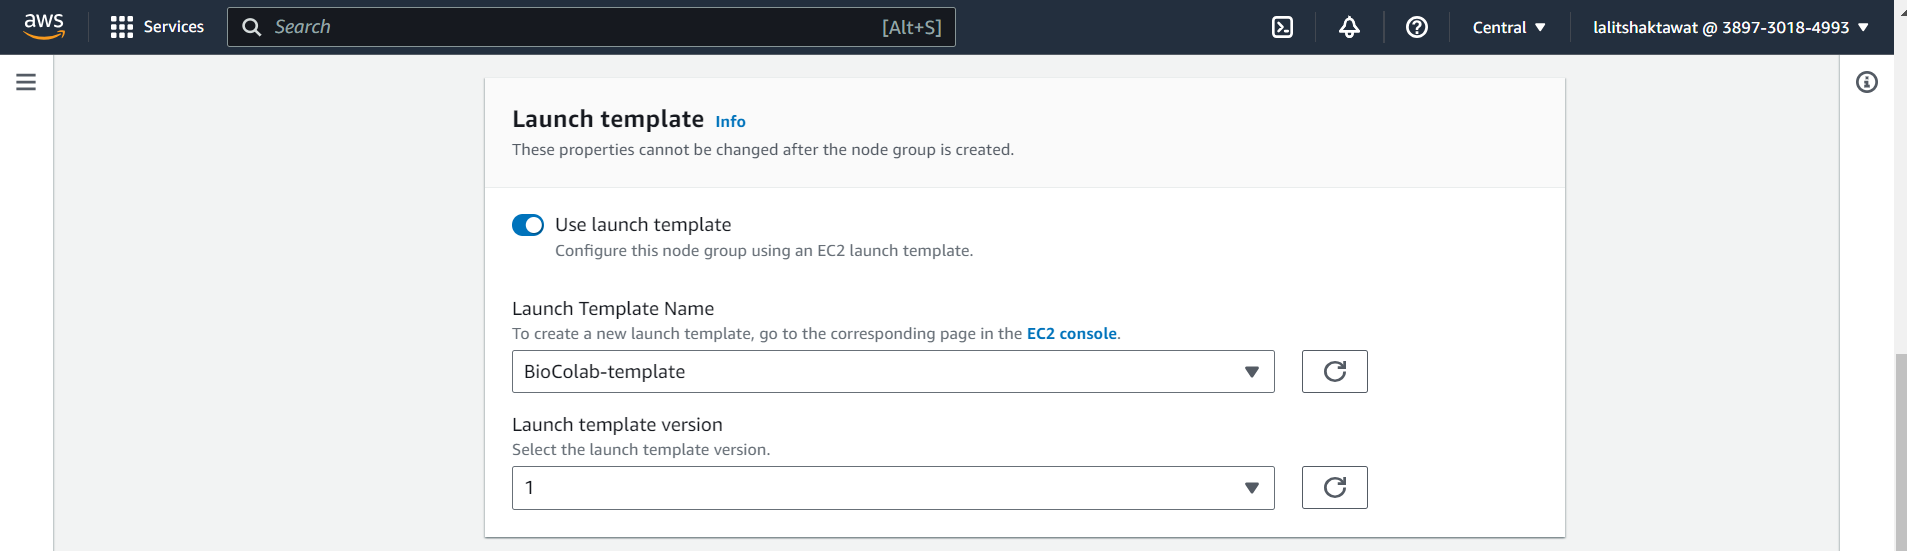
2️⃣ Add node group using template wizard.
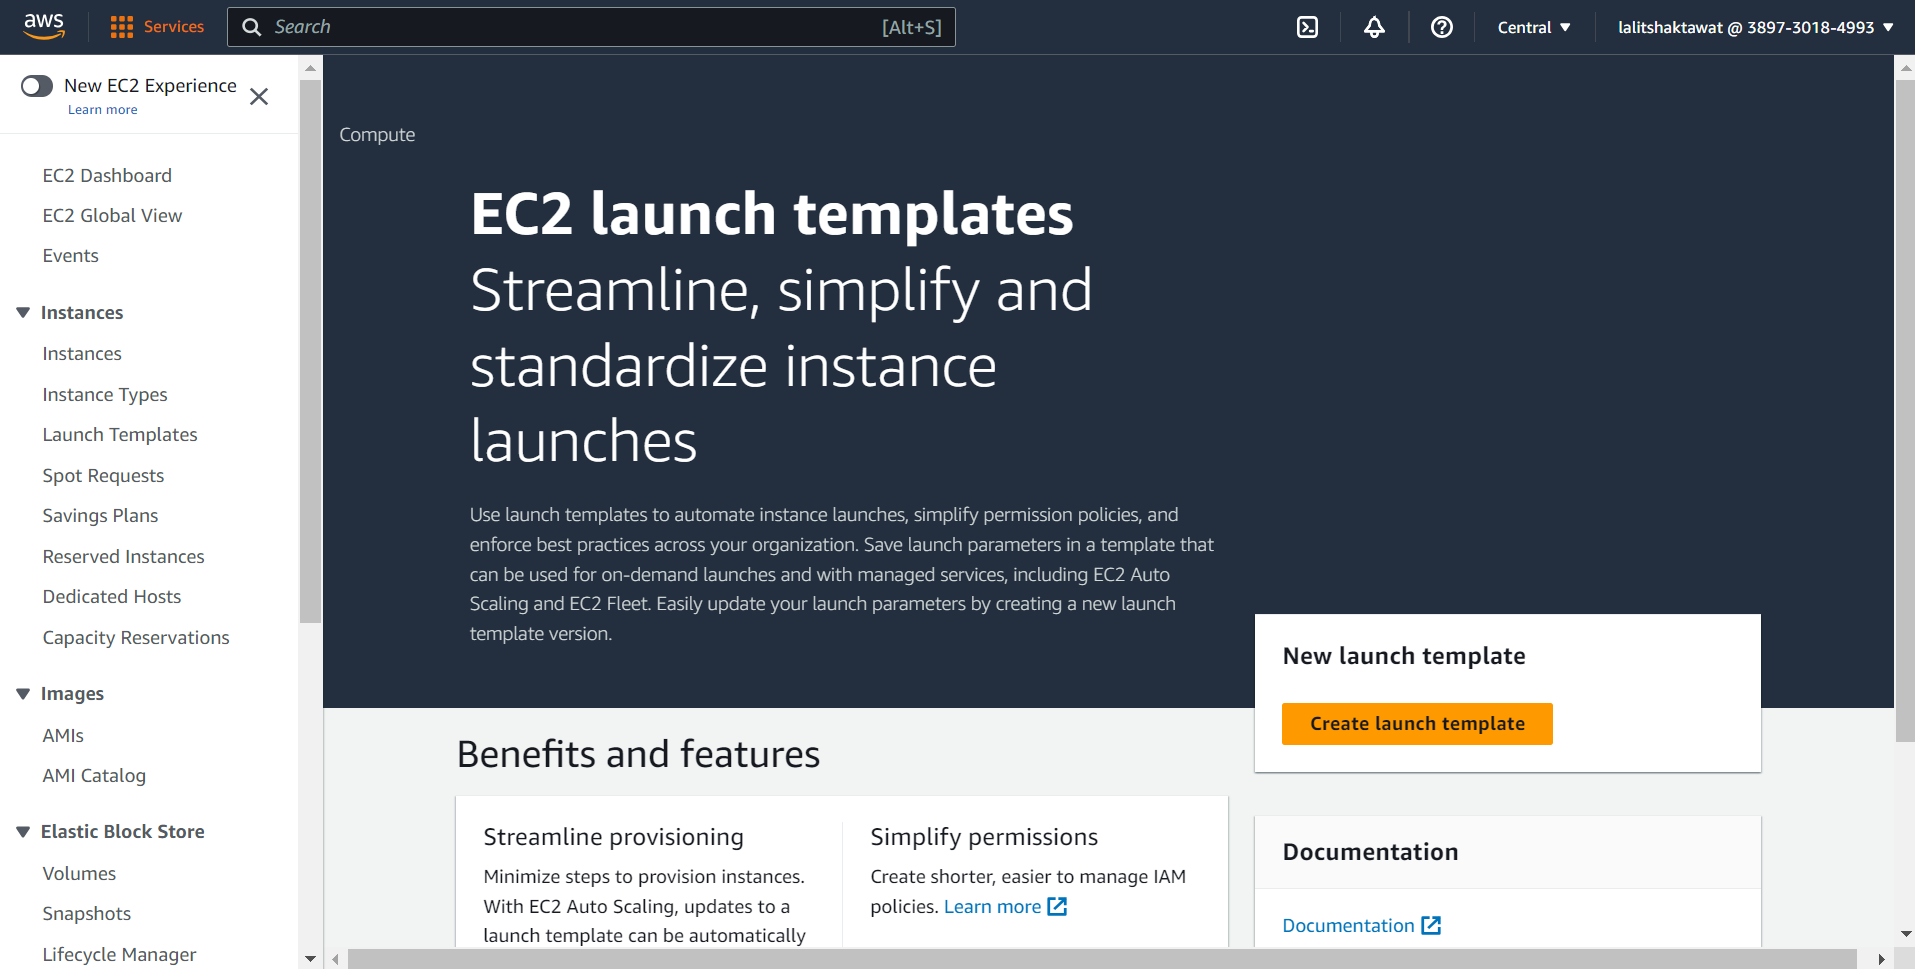
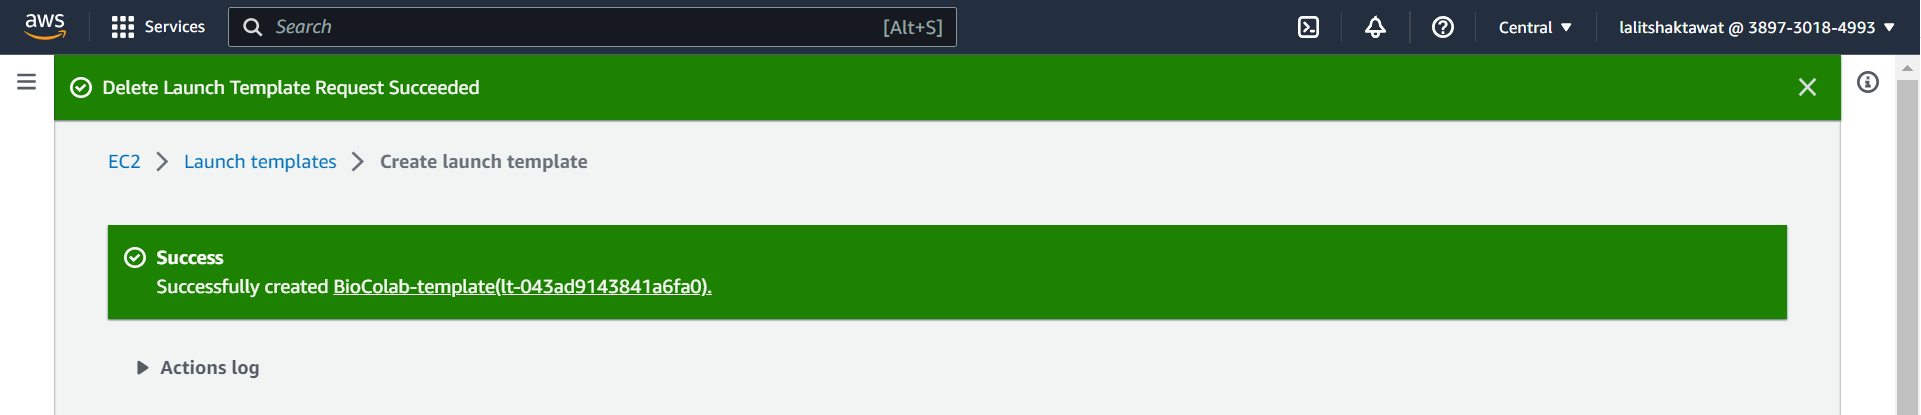
⭕ Click on Create Launch template.
▶️ Follow the instruction based on Template creation steps.
⭕ Once followed to provide all the value. Click on create launch template.
⭕ Once template ready. Add to the node group.
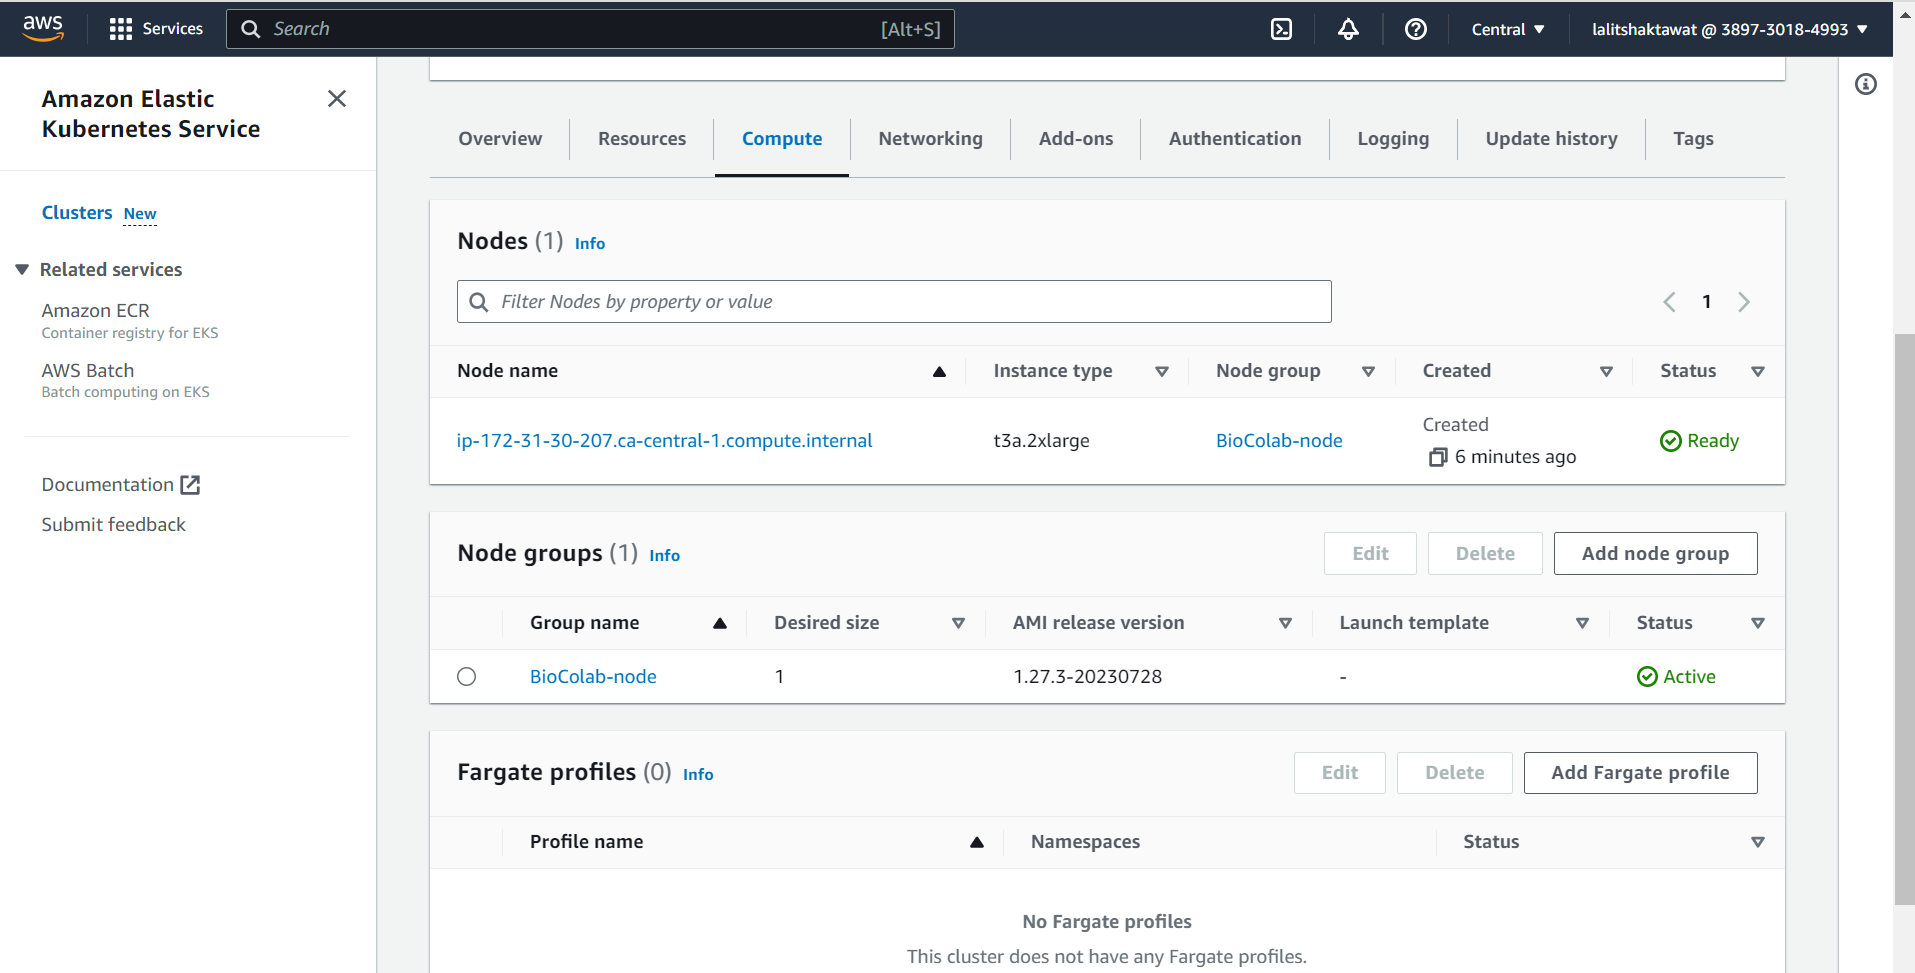
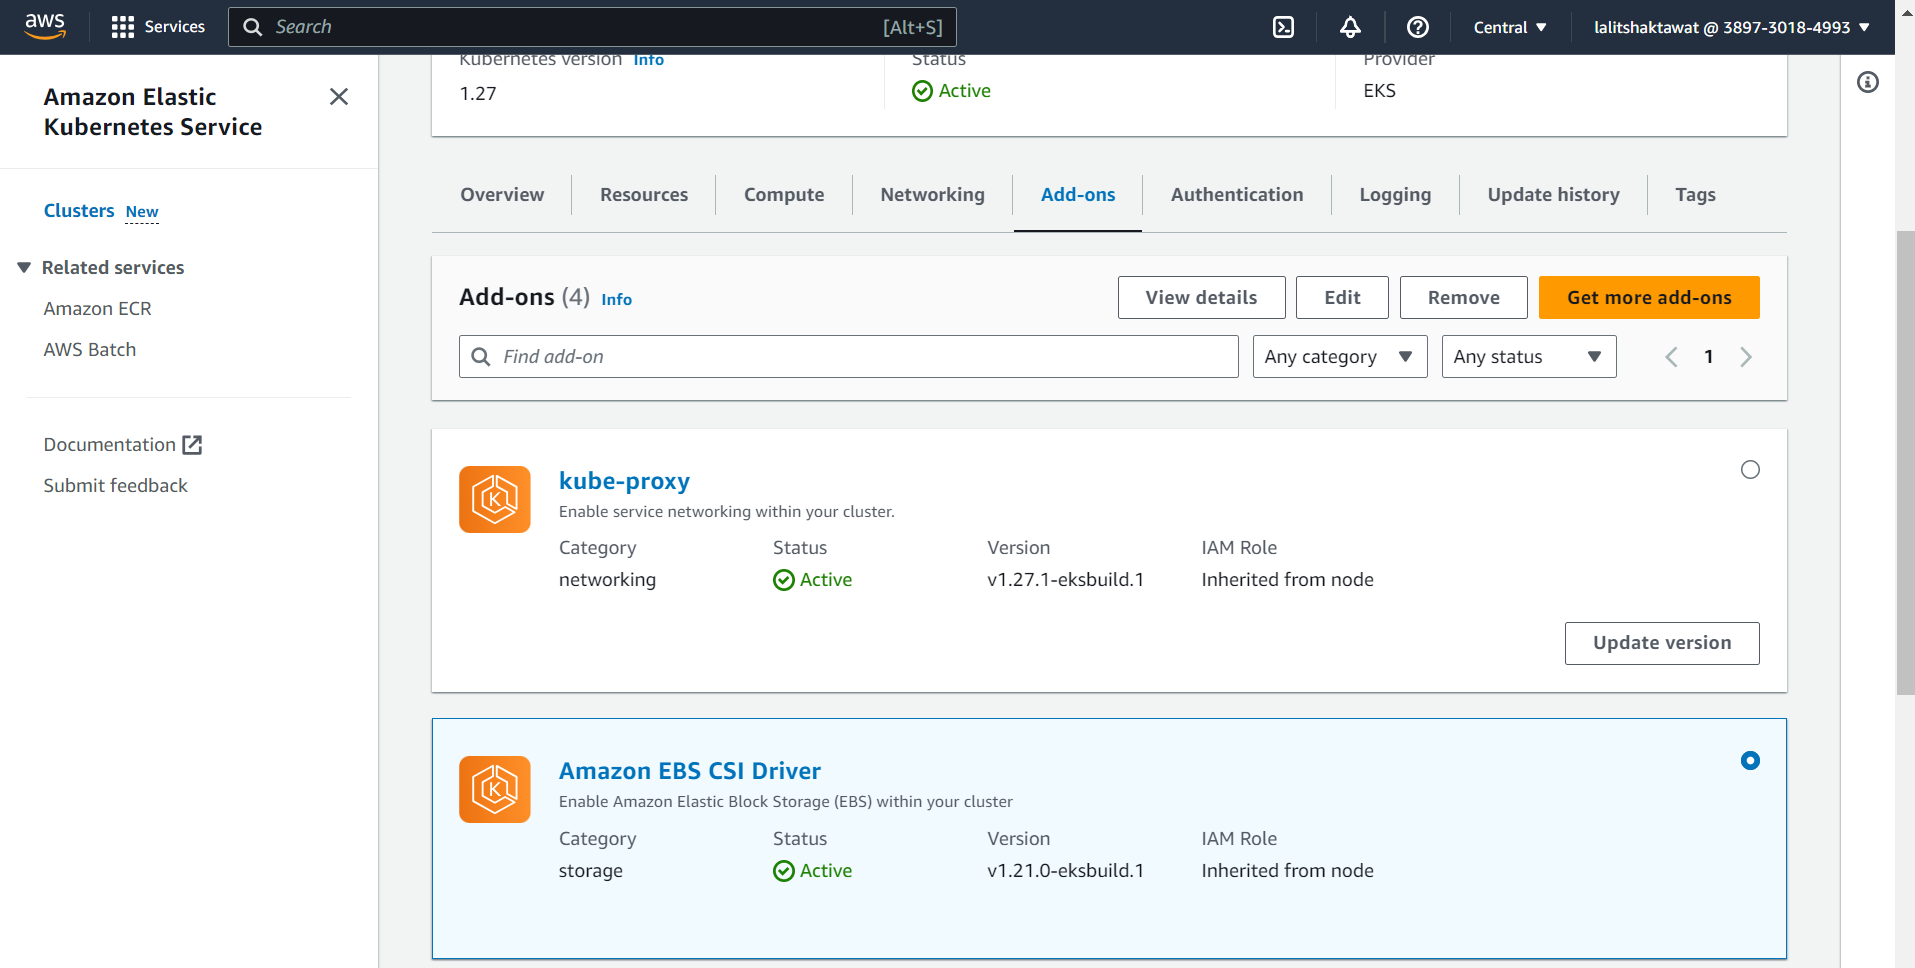
⭕ In order to use PVC creation. We must have driver installed with cluster.
⭕ Click on Add-ons tab.
⭕ Click on Get more Add-ons.
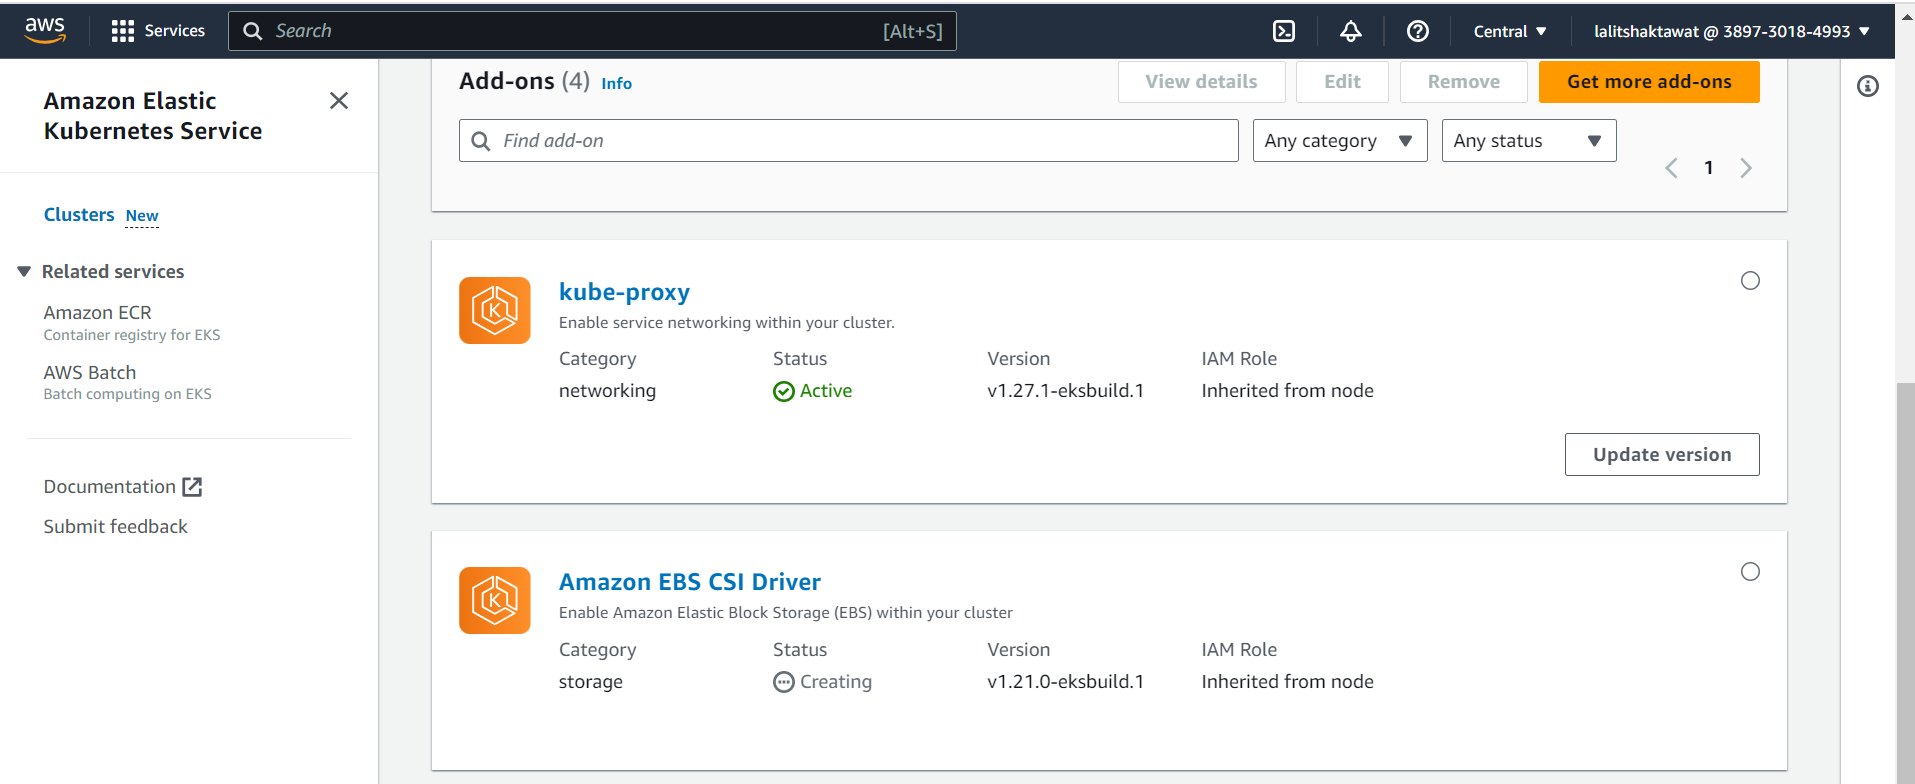
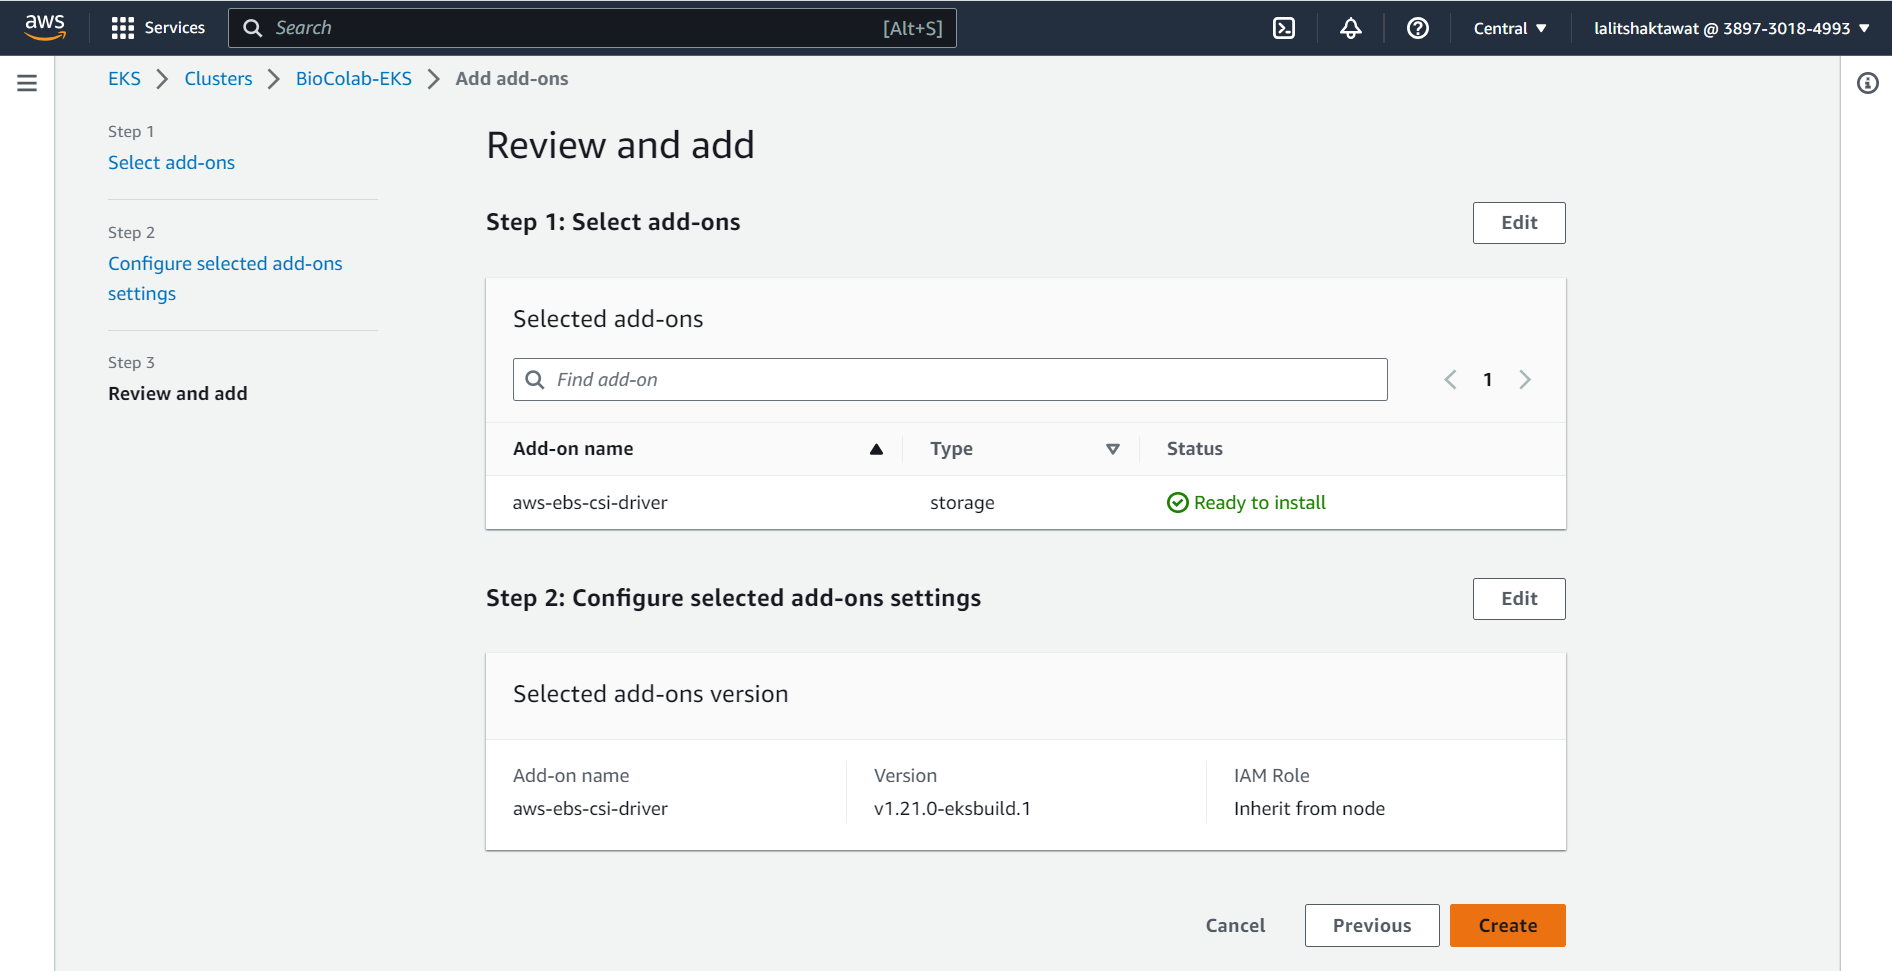
⭕ Select Amazon EBS CSI Driver.
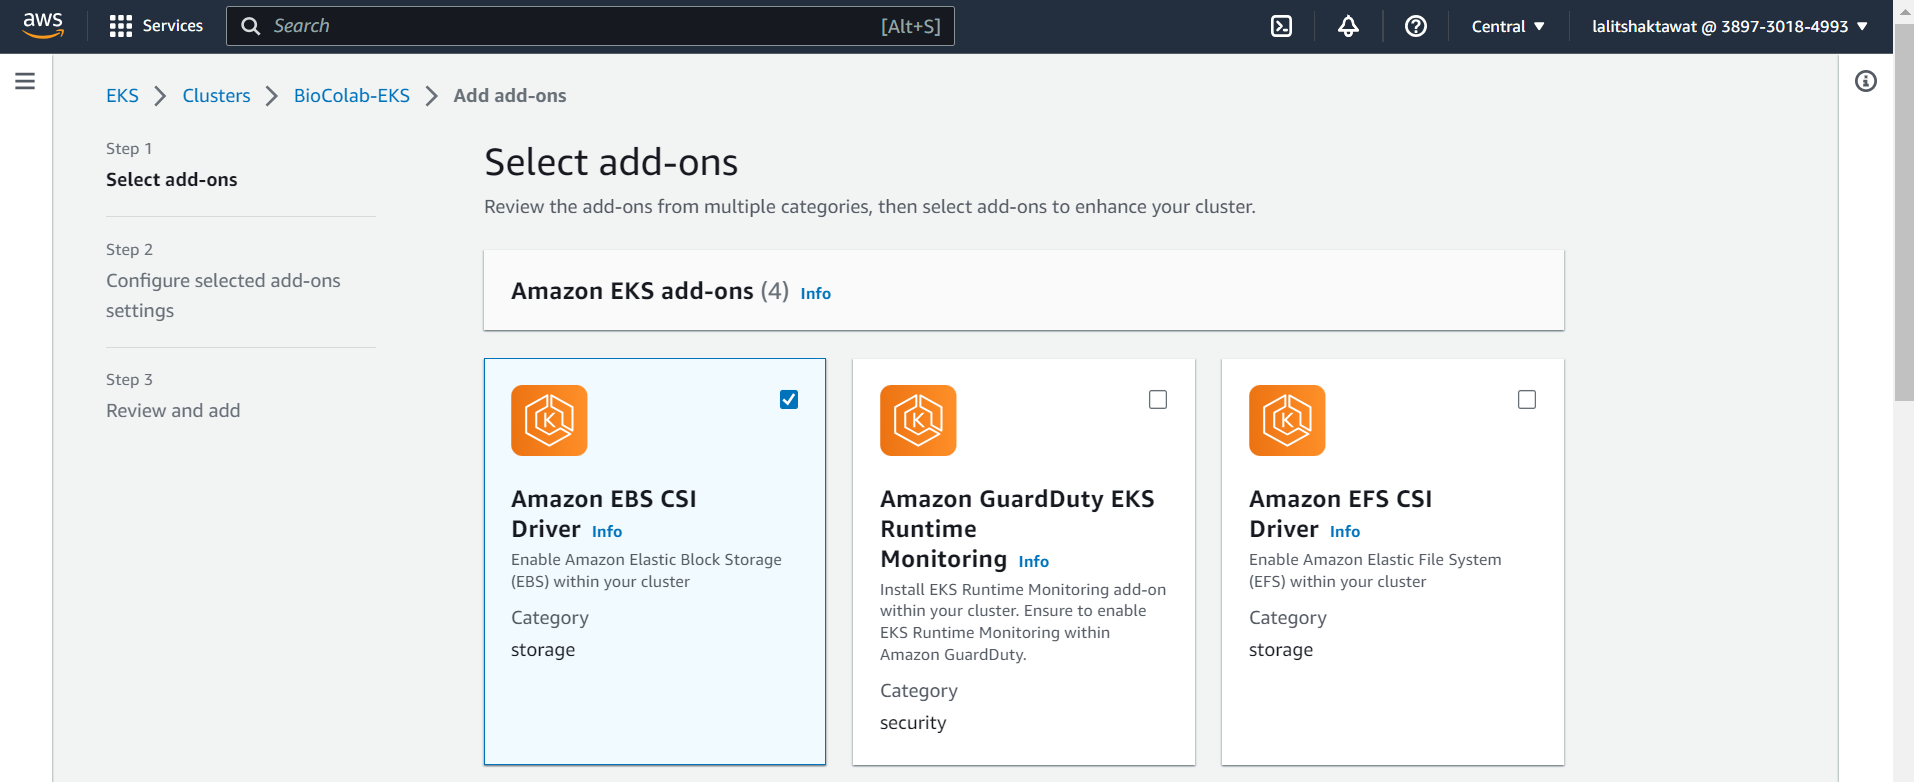
⭕ Click on next.
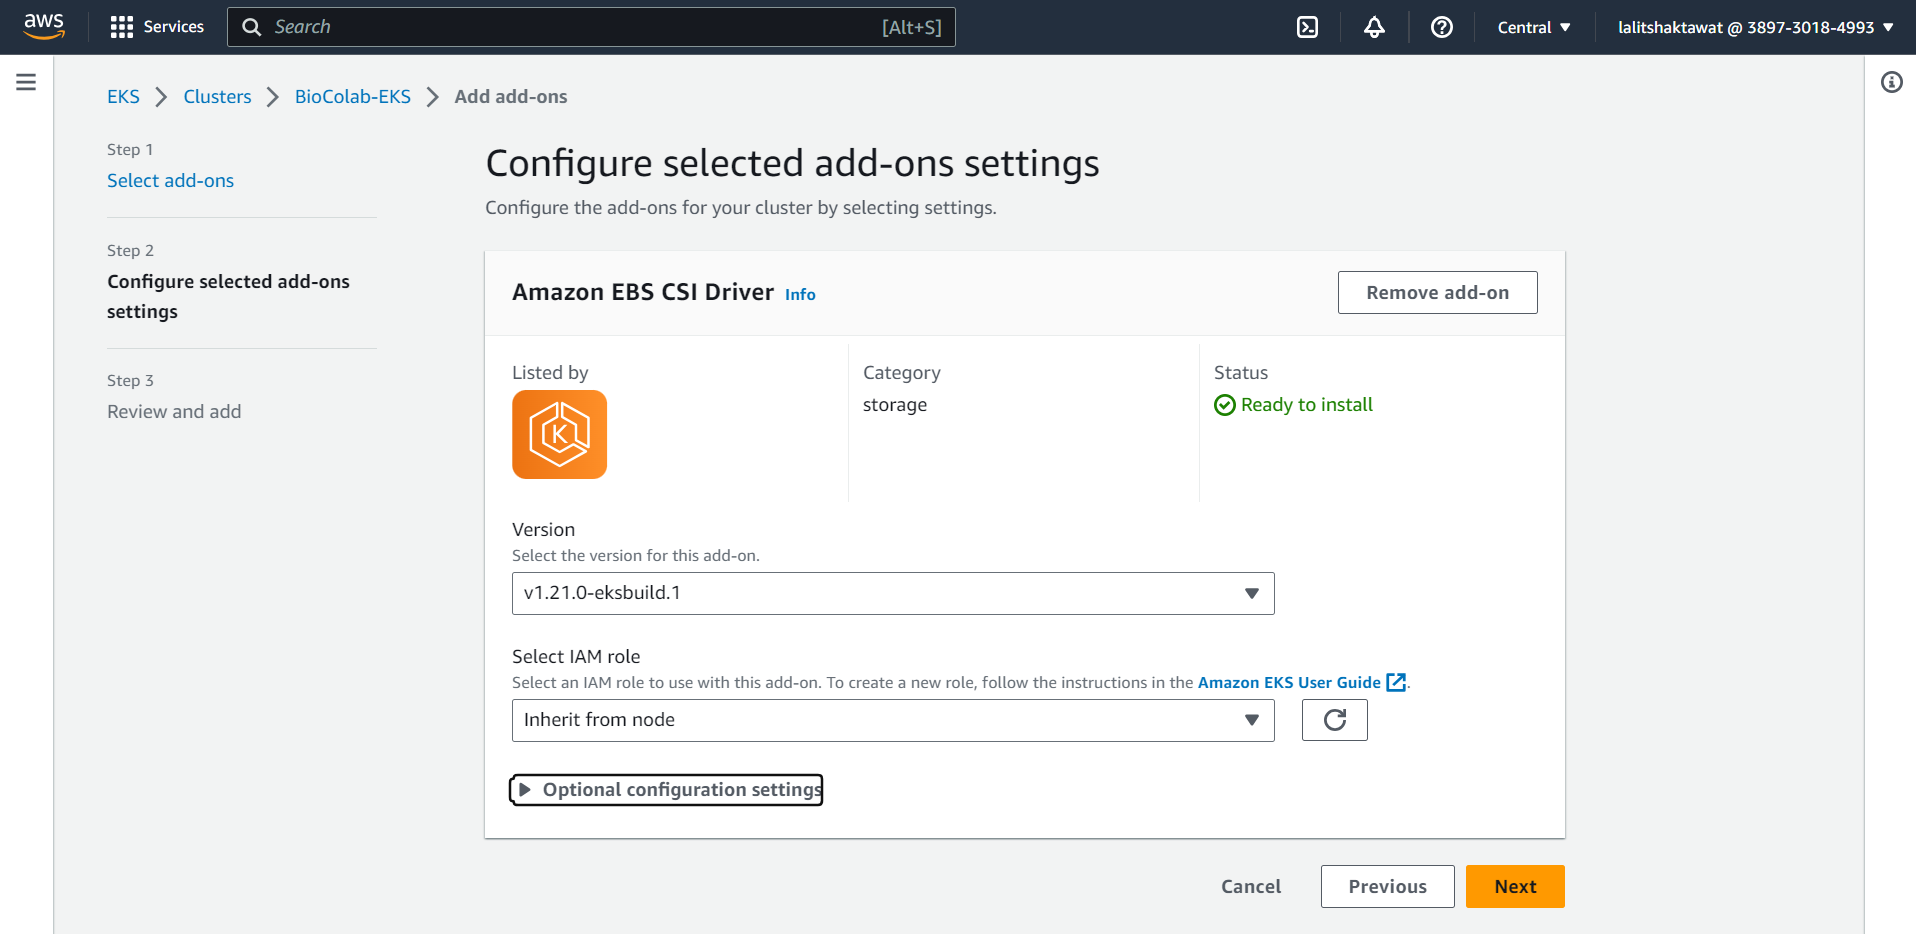
⭕ Click on Create.
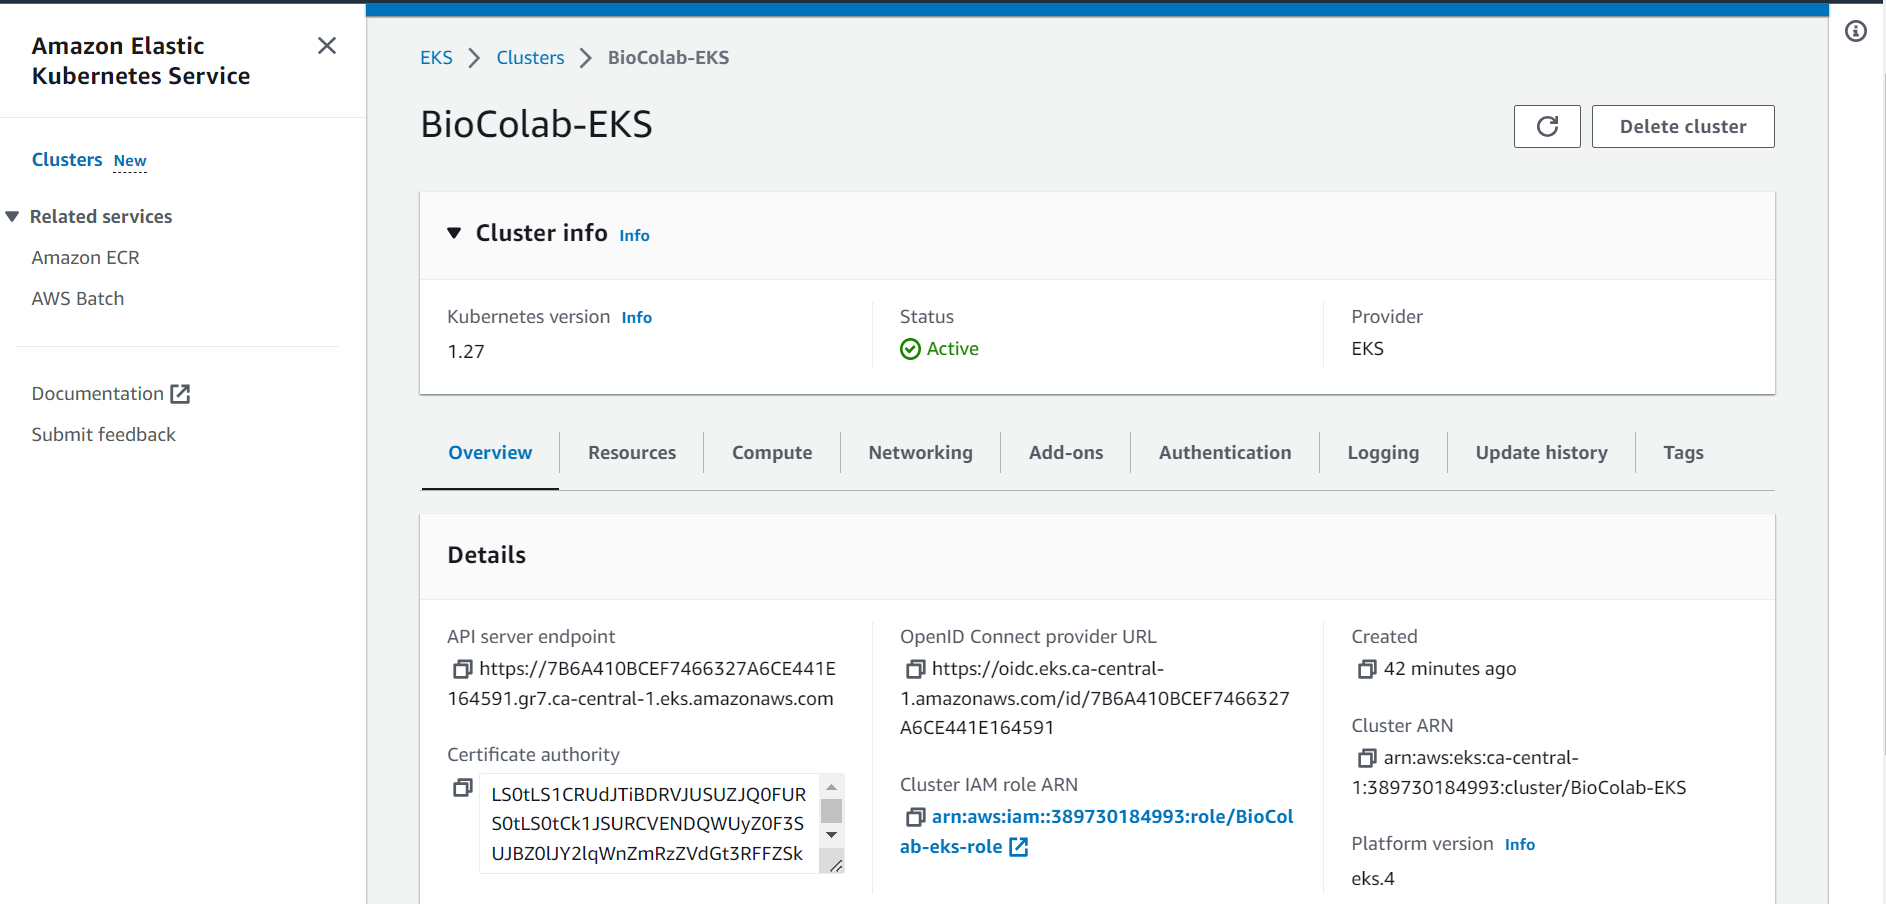
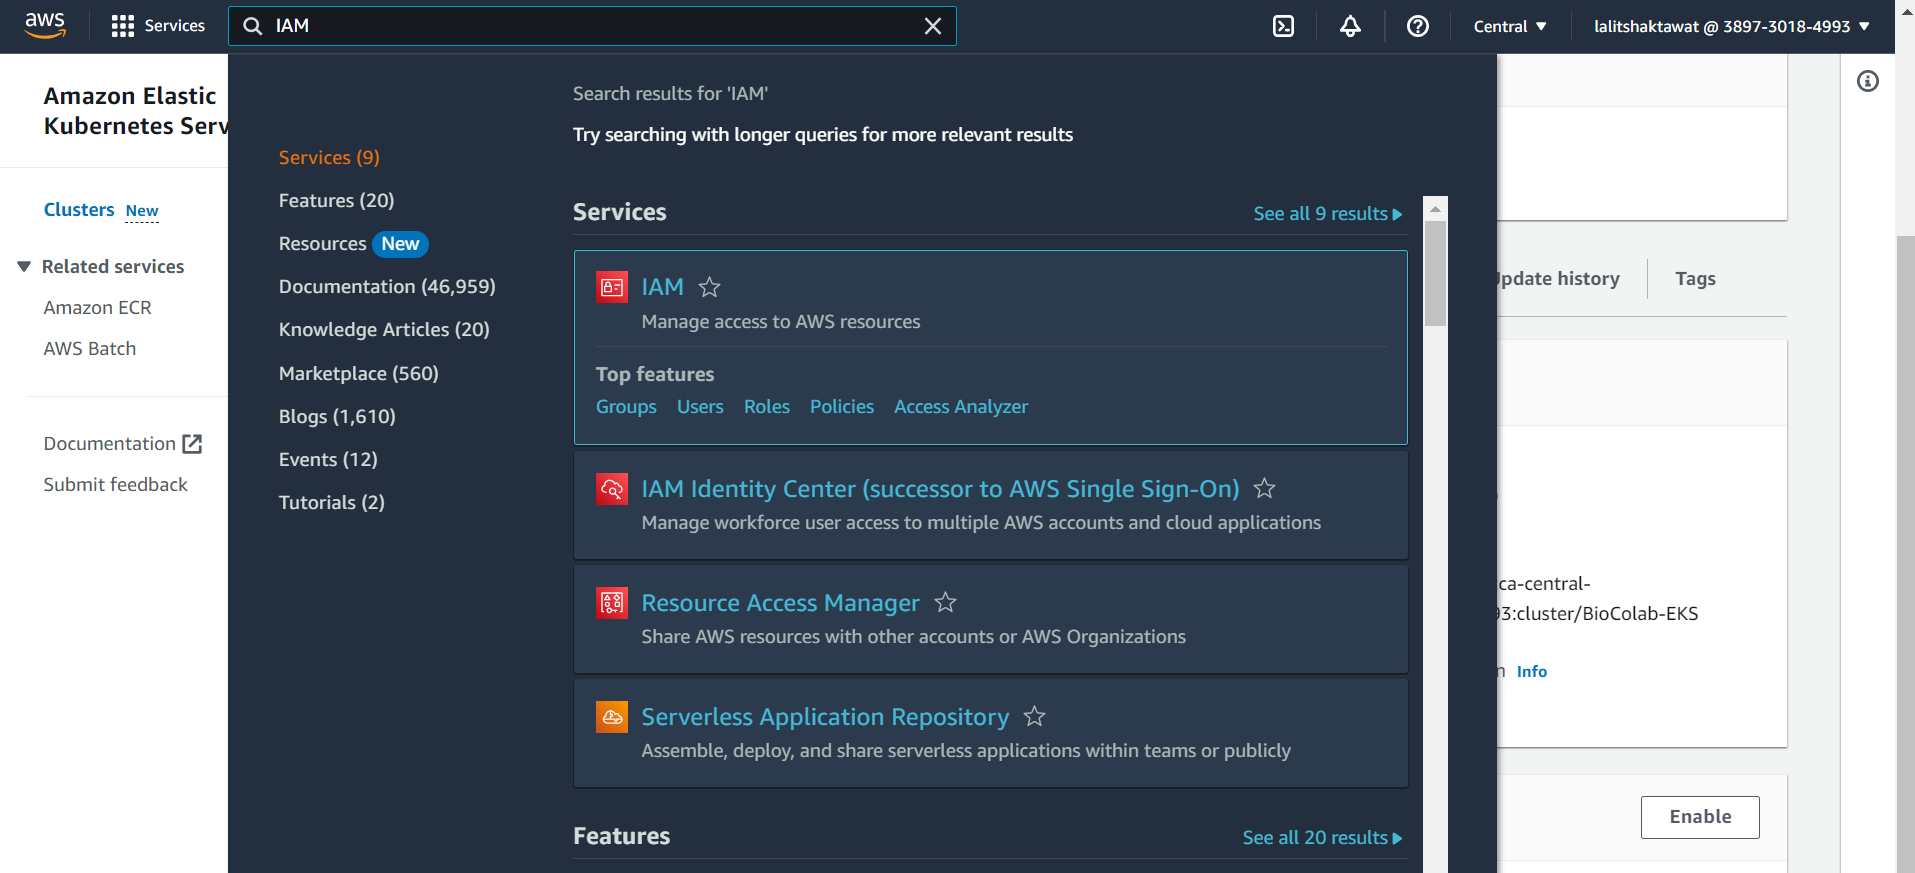
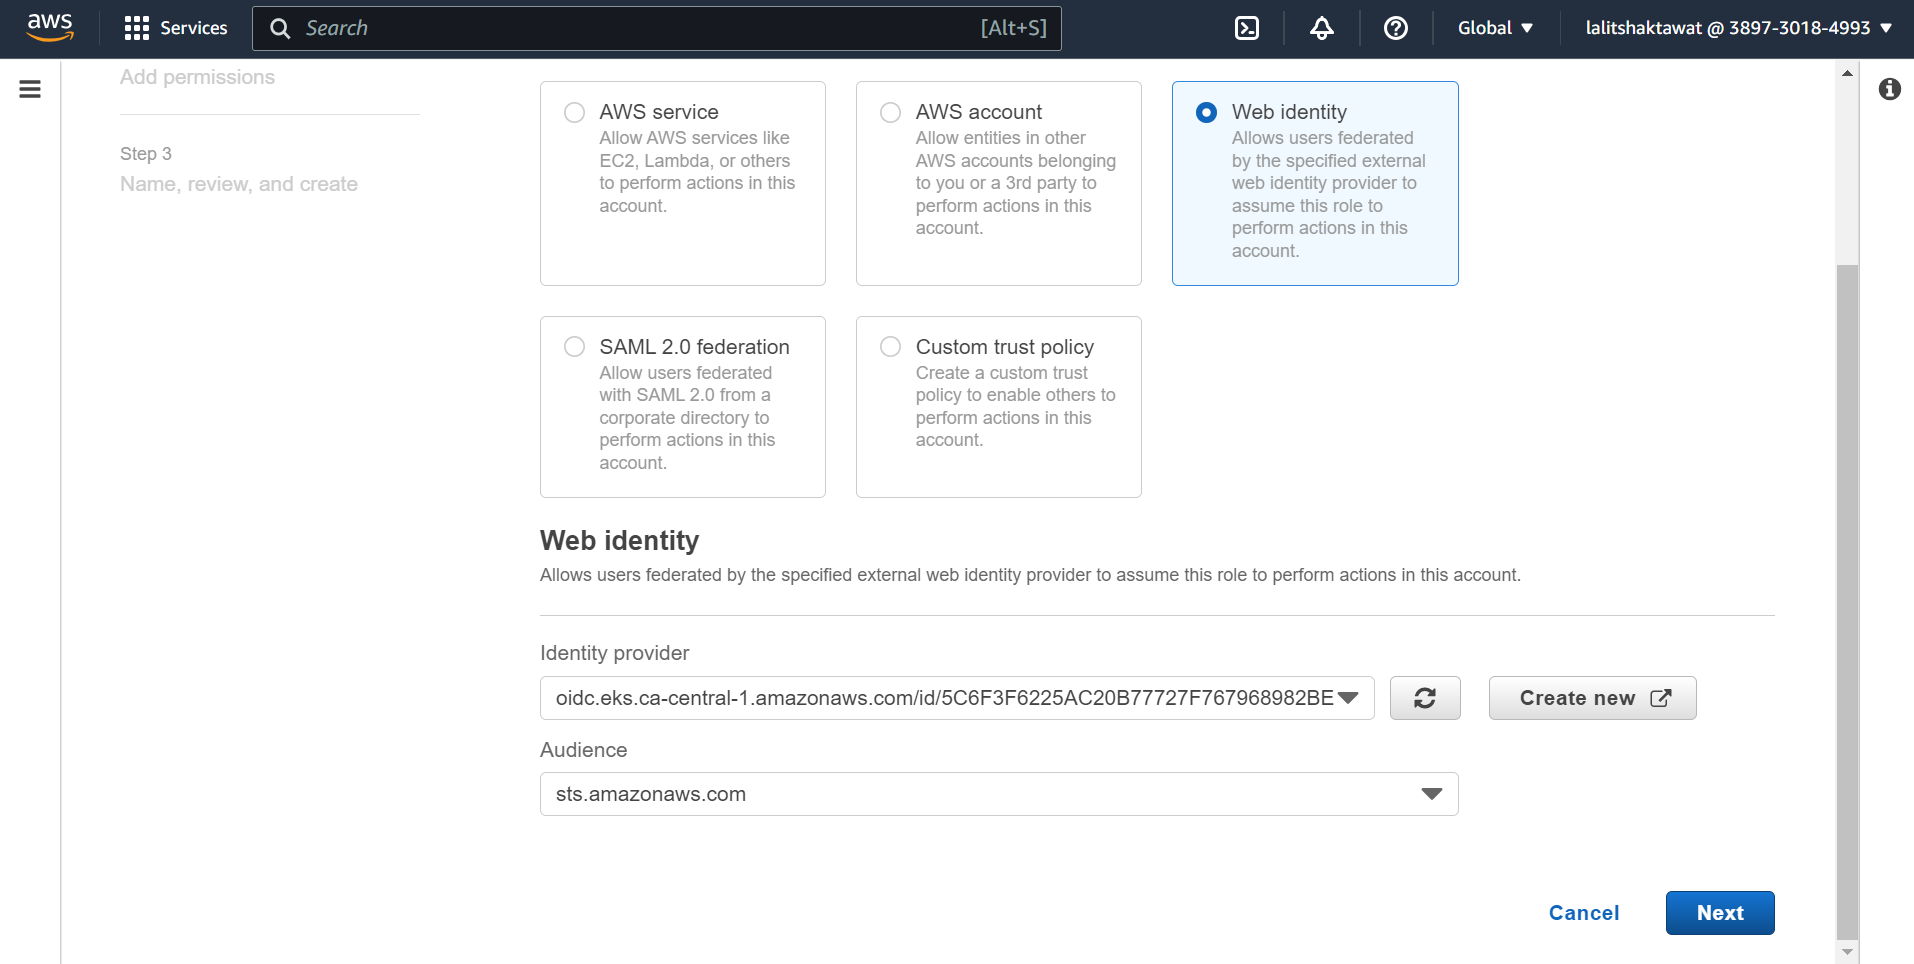
✴️ We need to create IAM OIDC provider for your cluster.
🔗 OIDC
⭕ Copy the OpenID Connect provider URL.
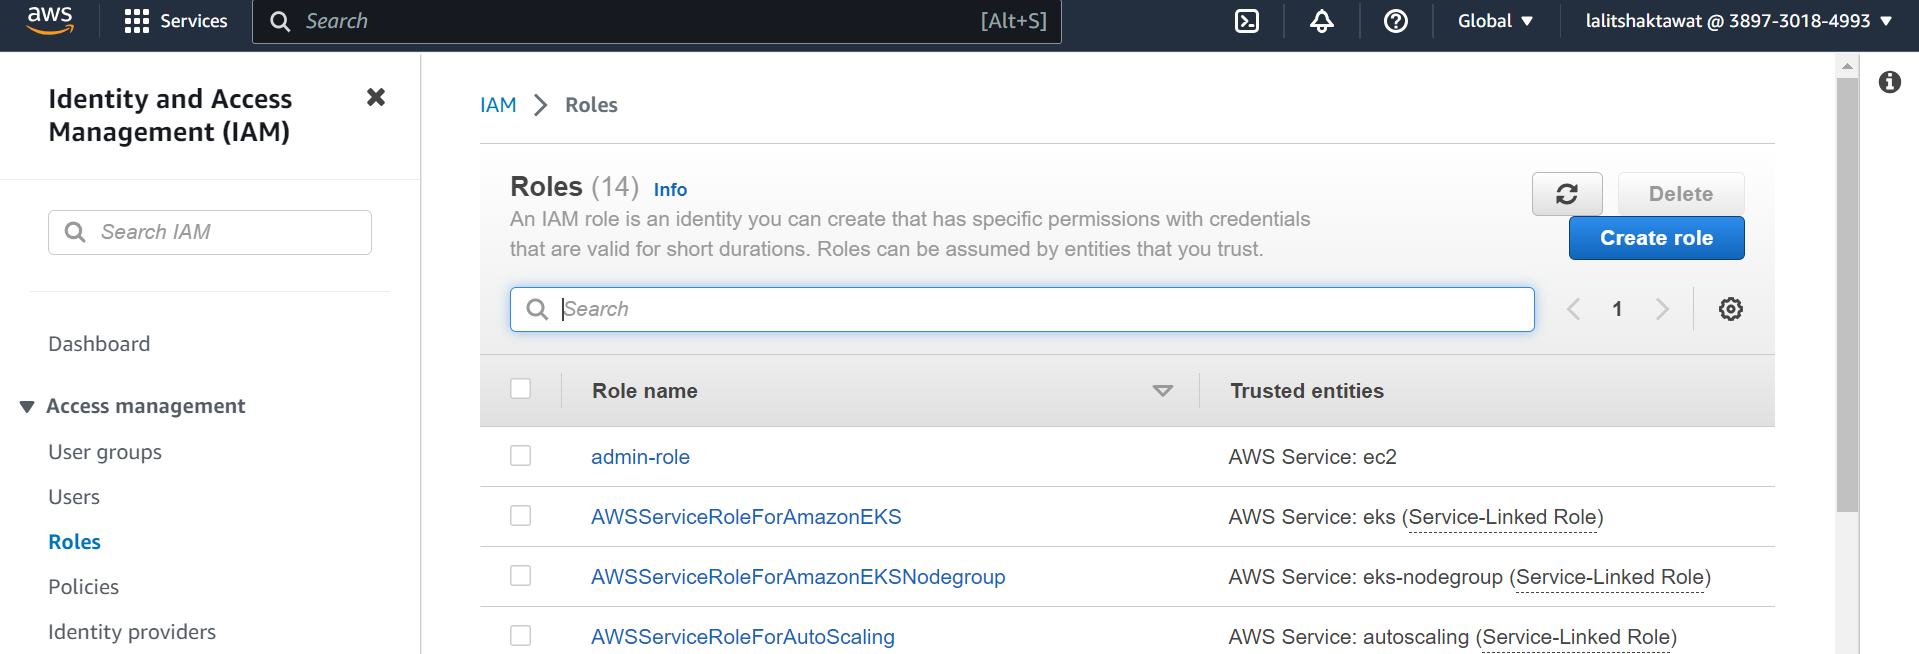
➡️ Search IAM and click on role
➡️ Select Identity provider on Access management.
➡️ Click on Add provider.
➡️ Click on OpenID Connect.
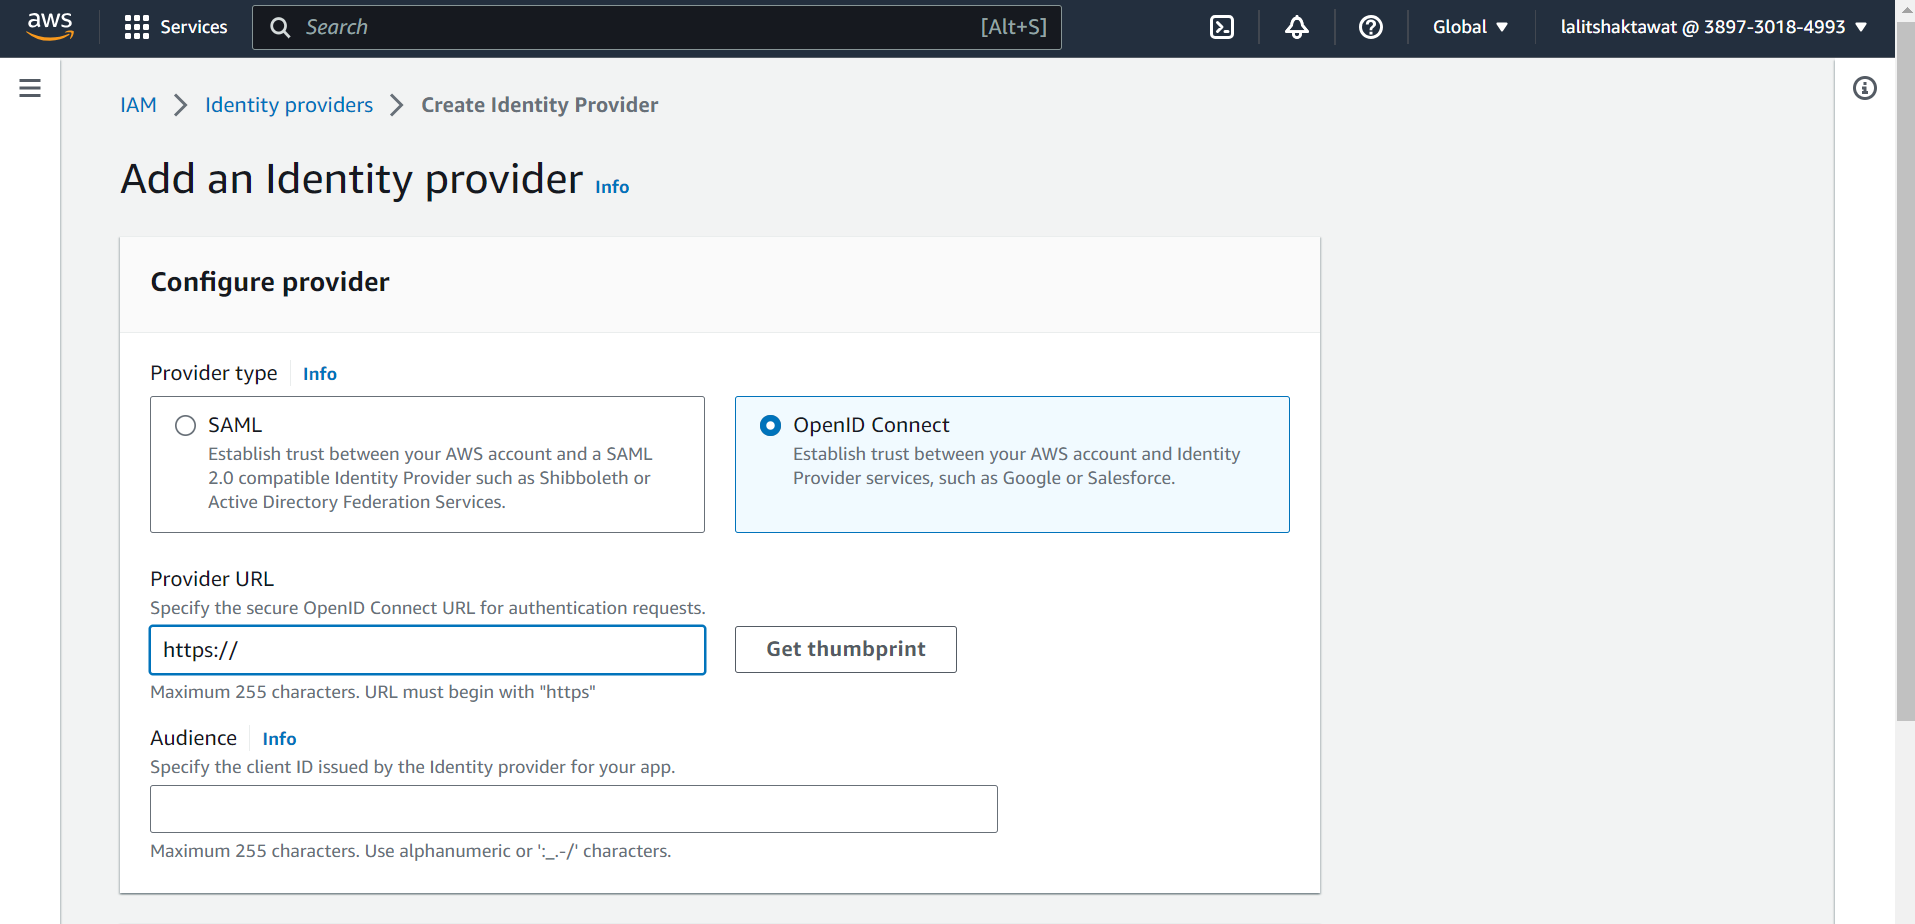
➡️ Paste Provider URL tht we copied earlier from Cluster.
➡️ Click on Get thumbprint.
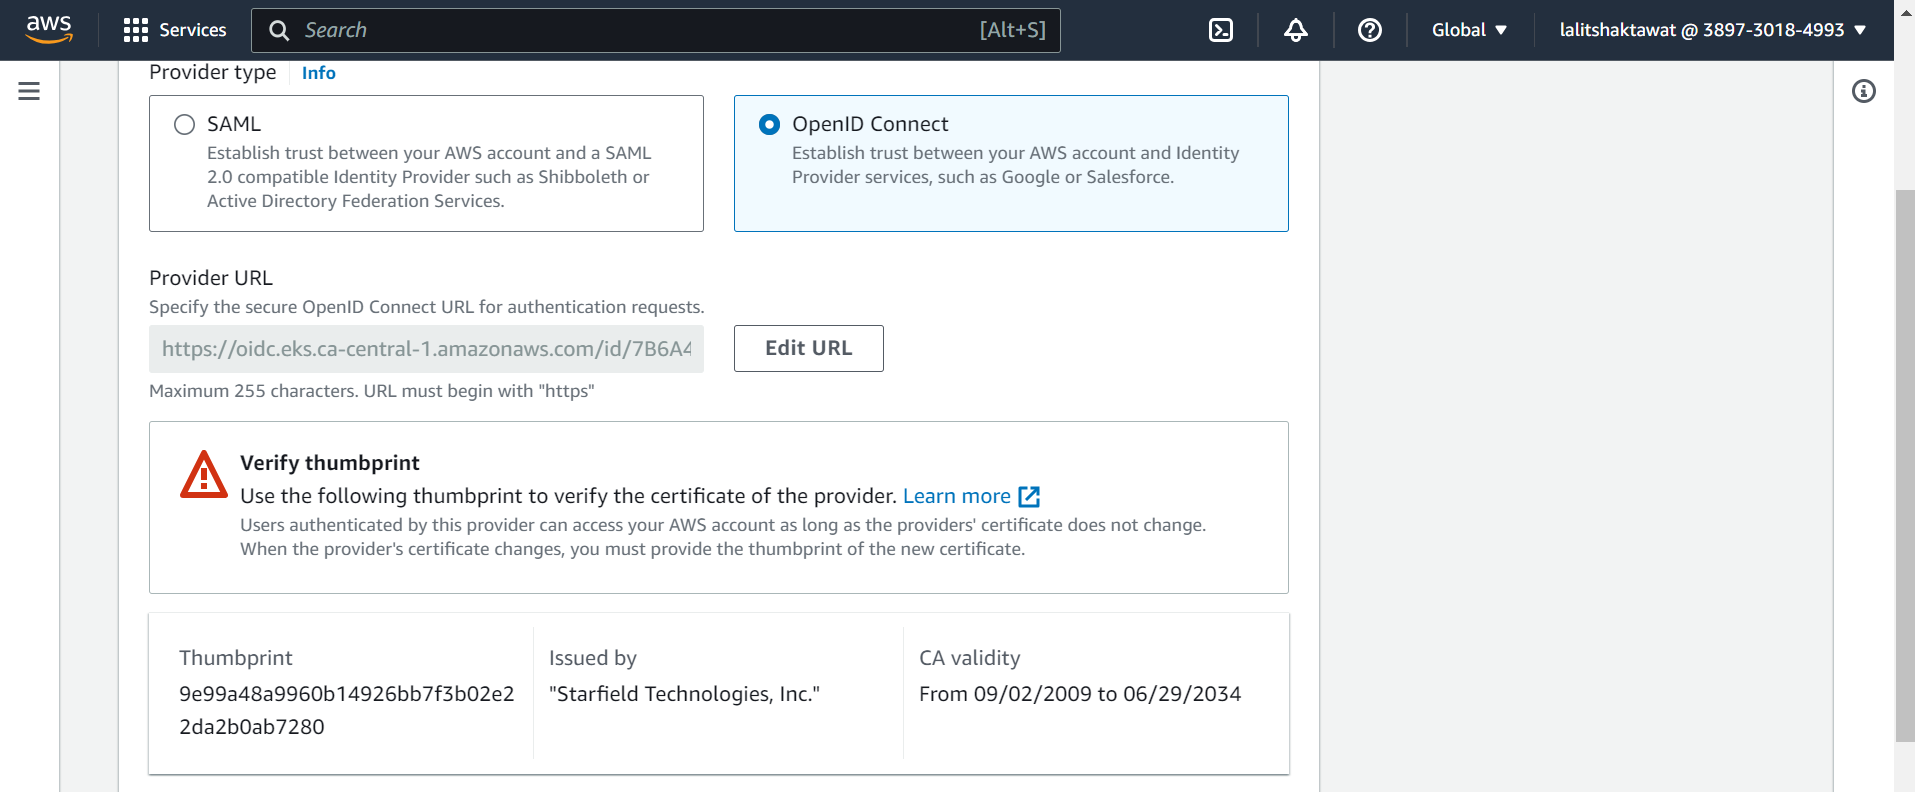
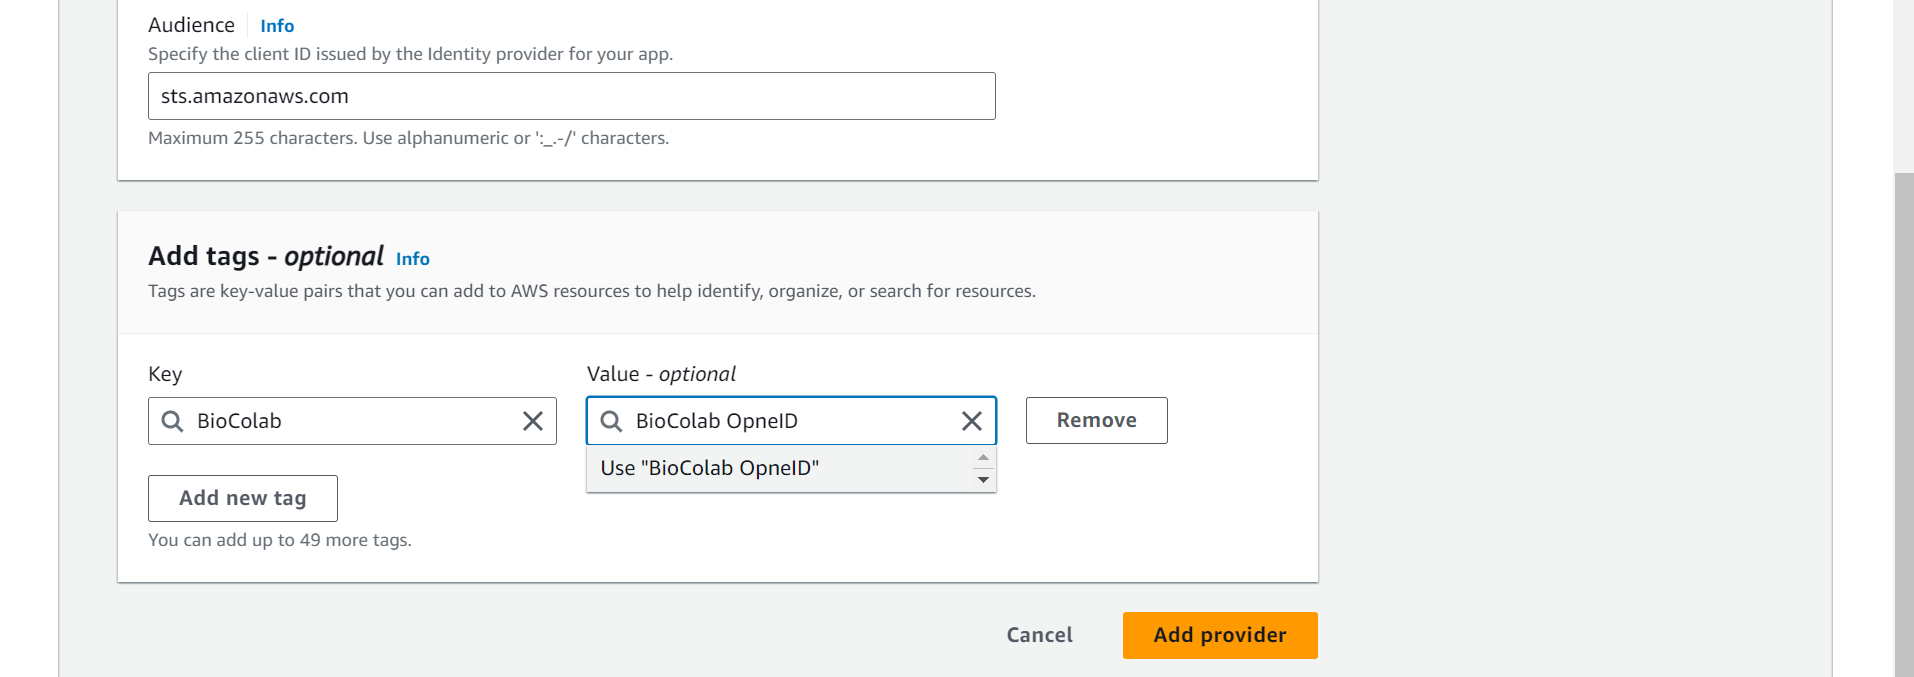
➡️ Audience, enter sts.amazonaws.com and choose Add provider.
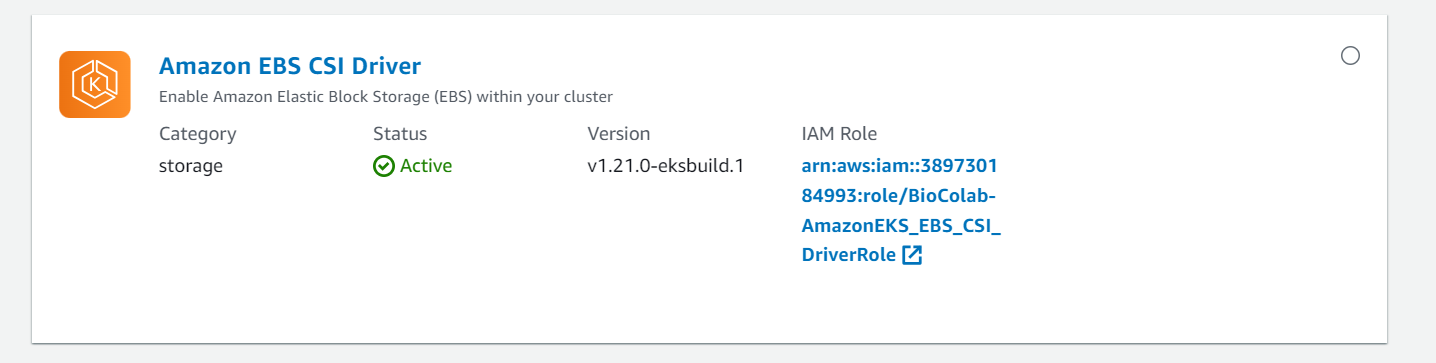
⭕ Create Amazon EBS CSI driver IAM role.
IAM --> Roles --> Create role

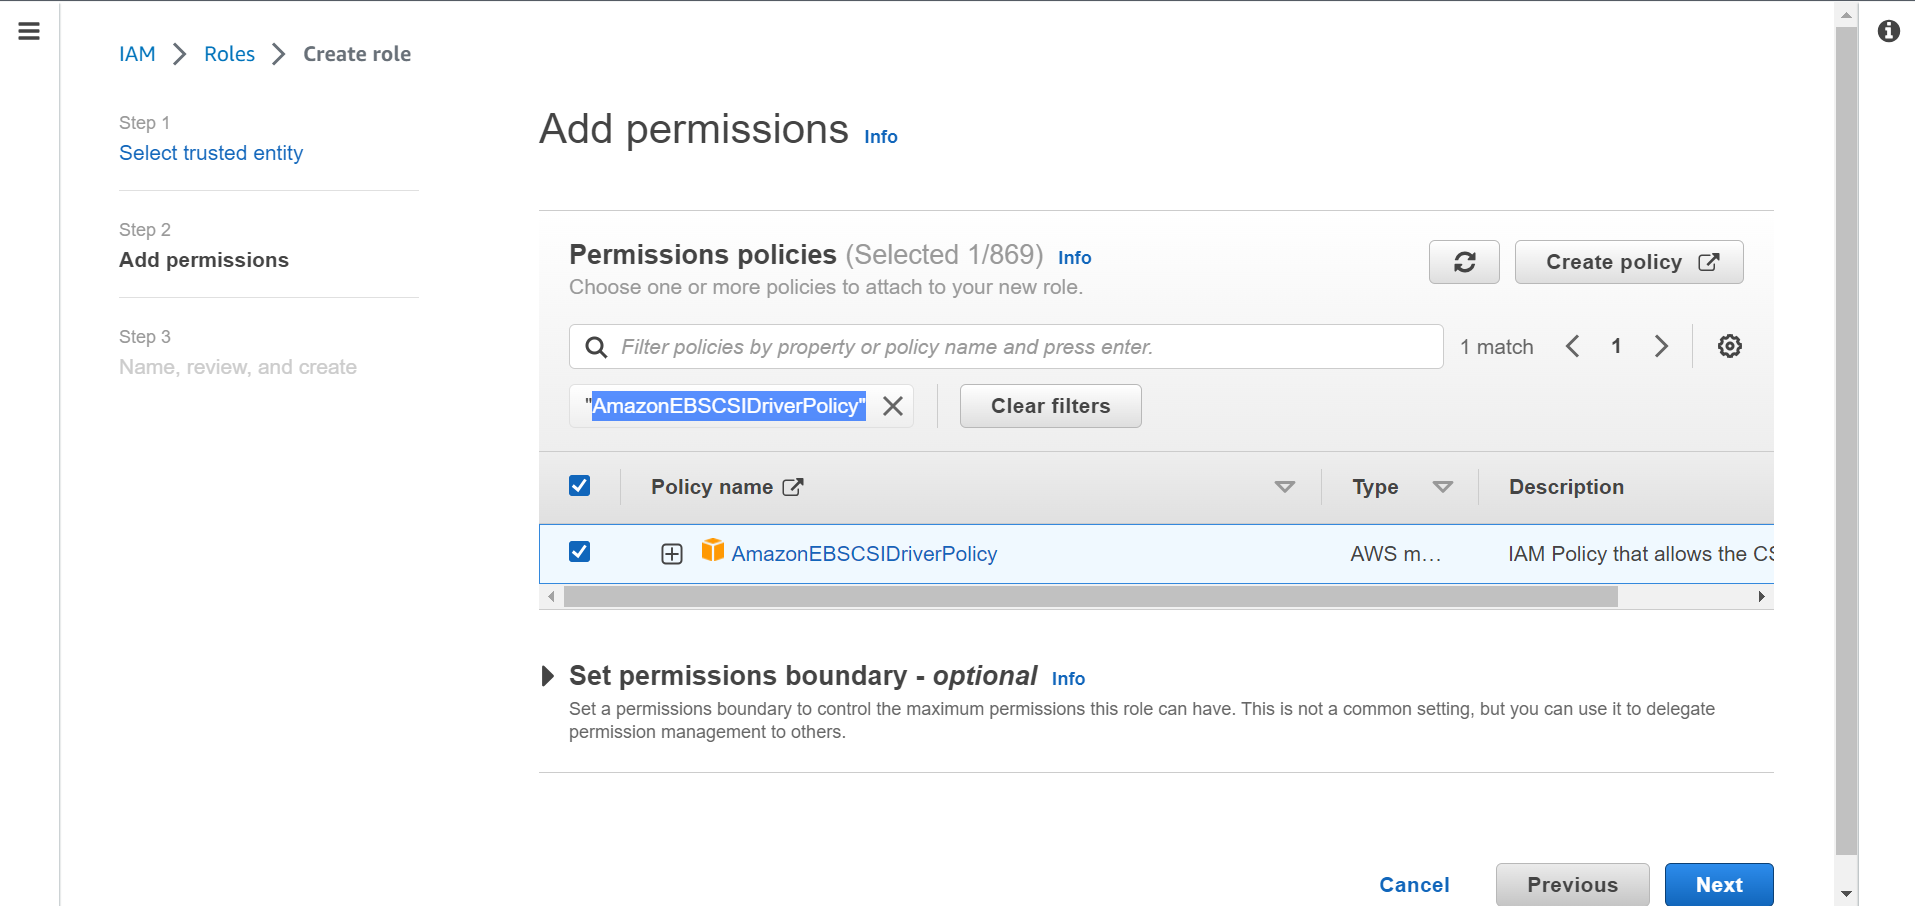
➡️ Edit trust relationship policy.
➡️ Click on Edit trust policy. Add the following line after comma
🔔 Change the value based on your OpenID
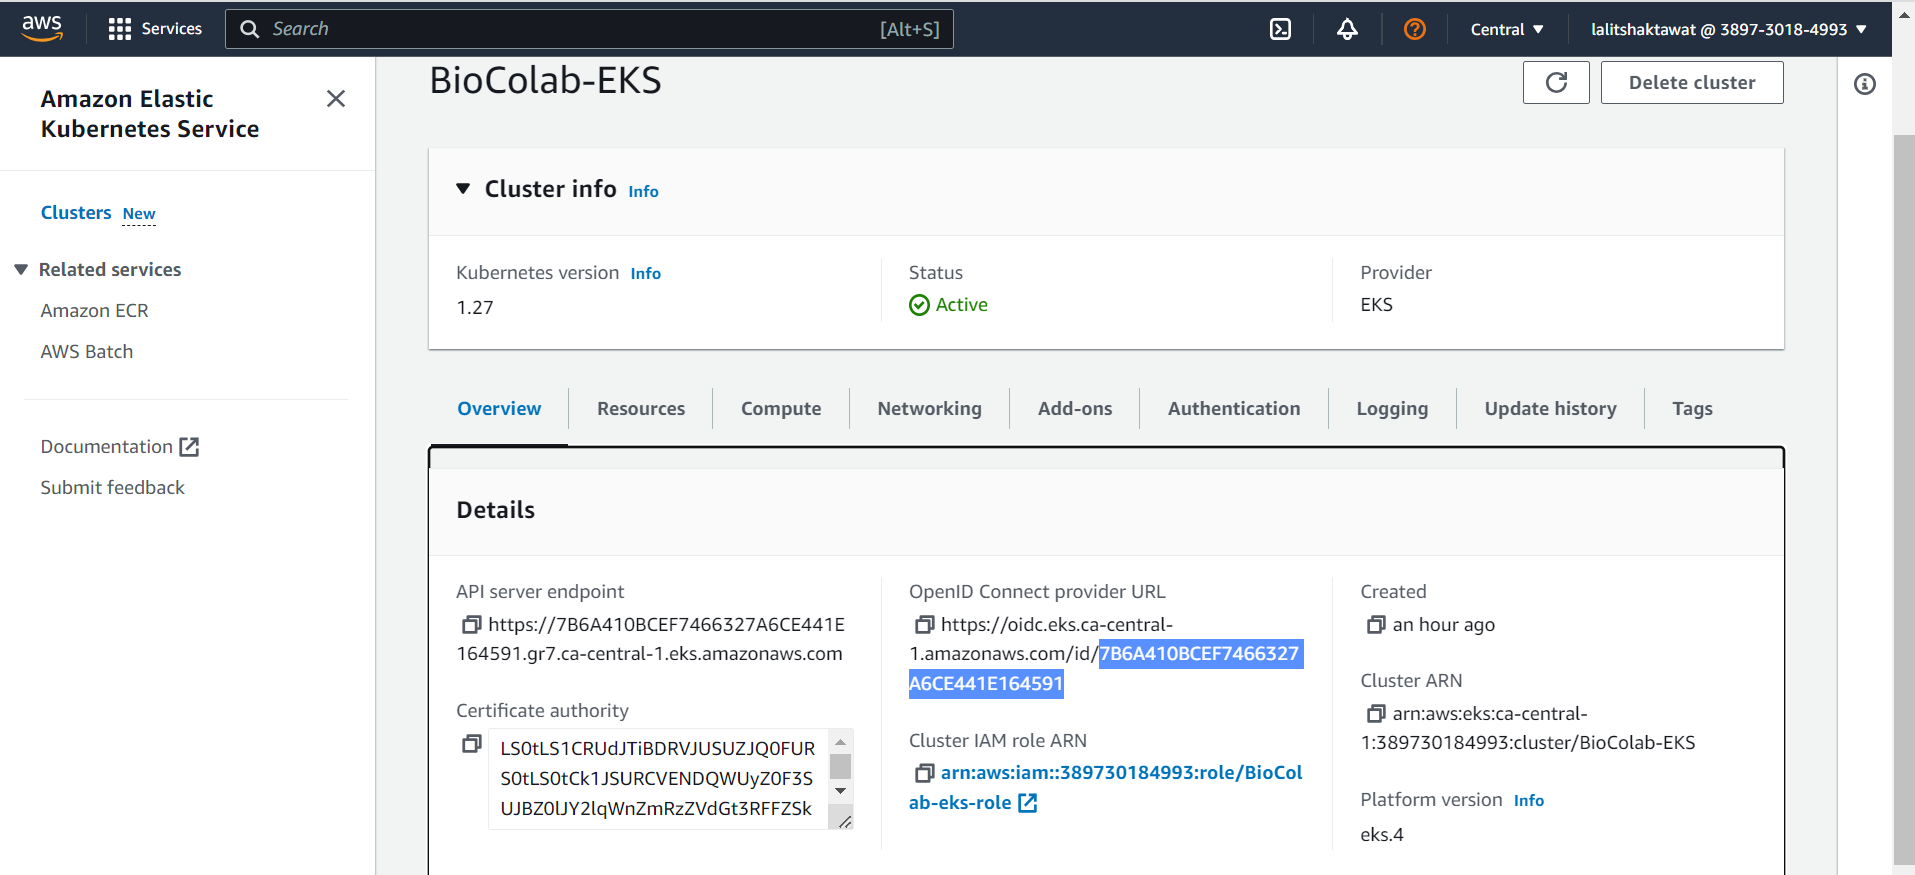
"oidc.eks.ca-central-1.amazonaws.com/id/7B6A410BCEF7466327A6CE441E164591:sub": "system:serviceaccount:kube-system:ebs-csi-controller-sa"

➡️ Click on Update policy.
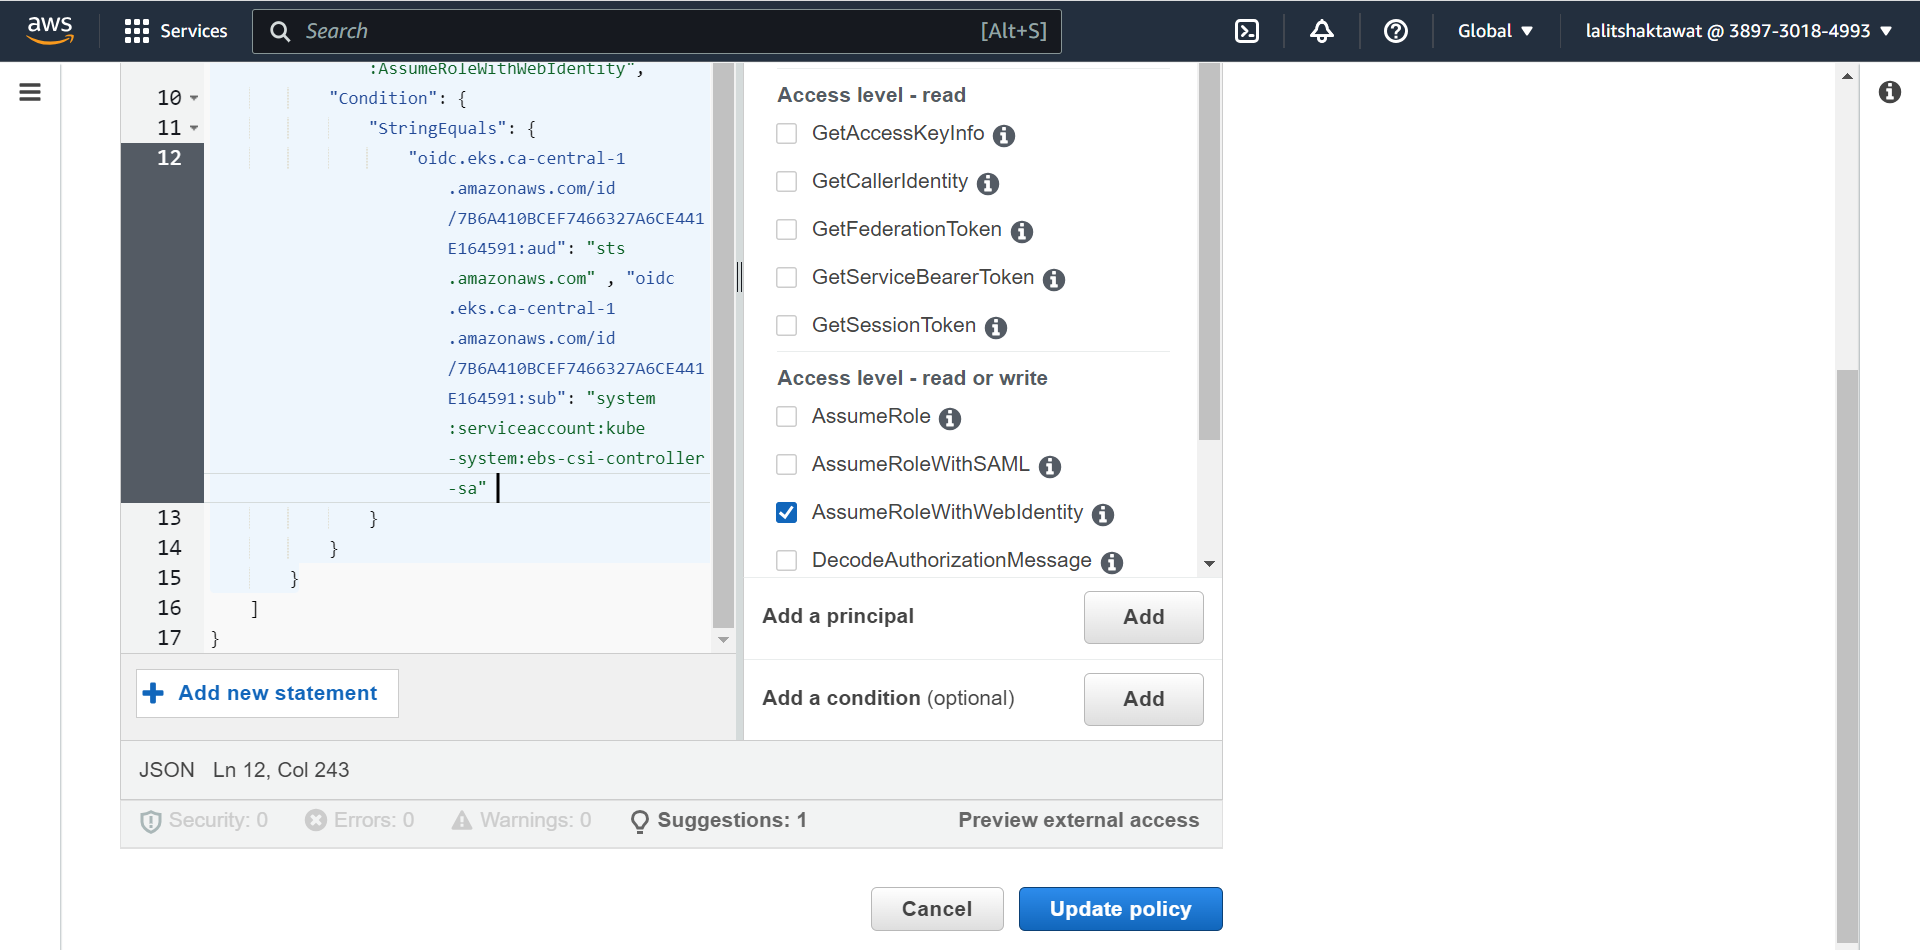
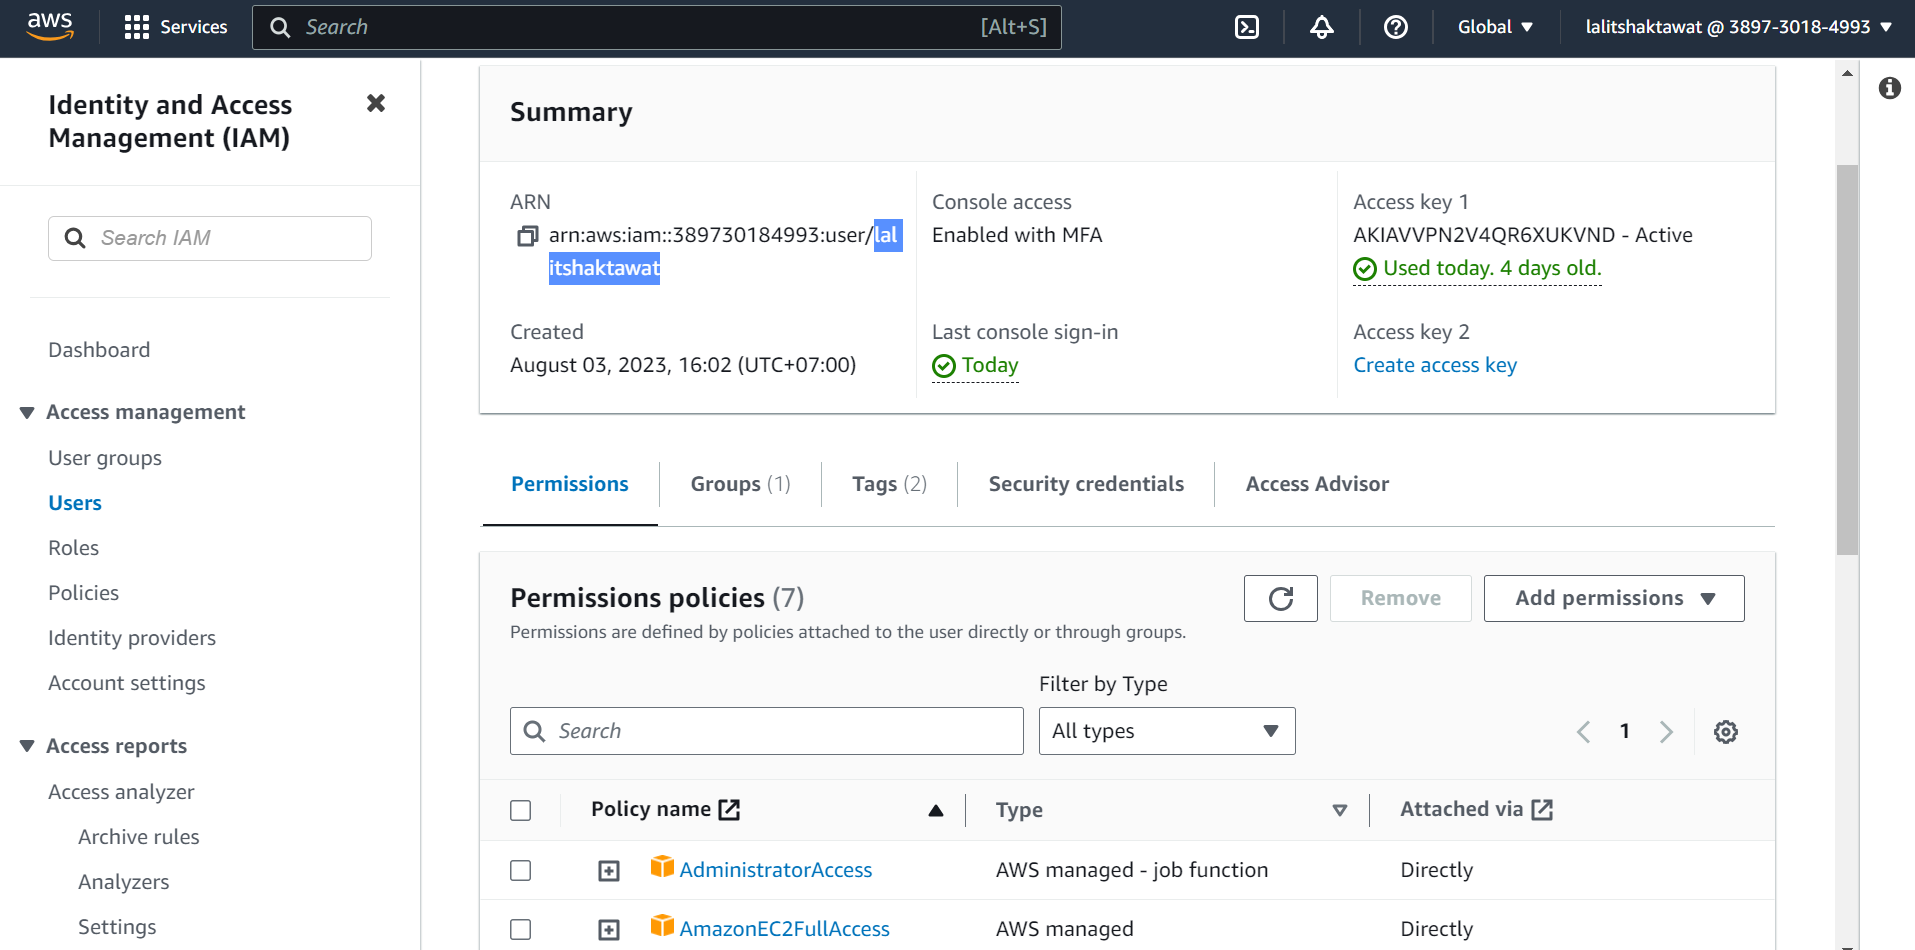
🔔 Make sure user should have permissions “AmazonEC2FullAccess”.
⭕ Update EBS CSI Driver fro IAM Role.

➡️ Test.
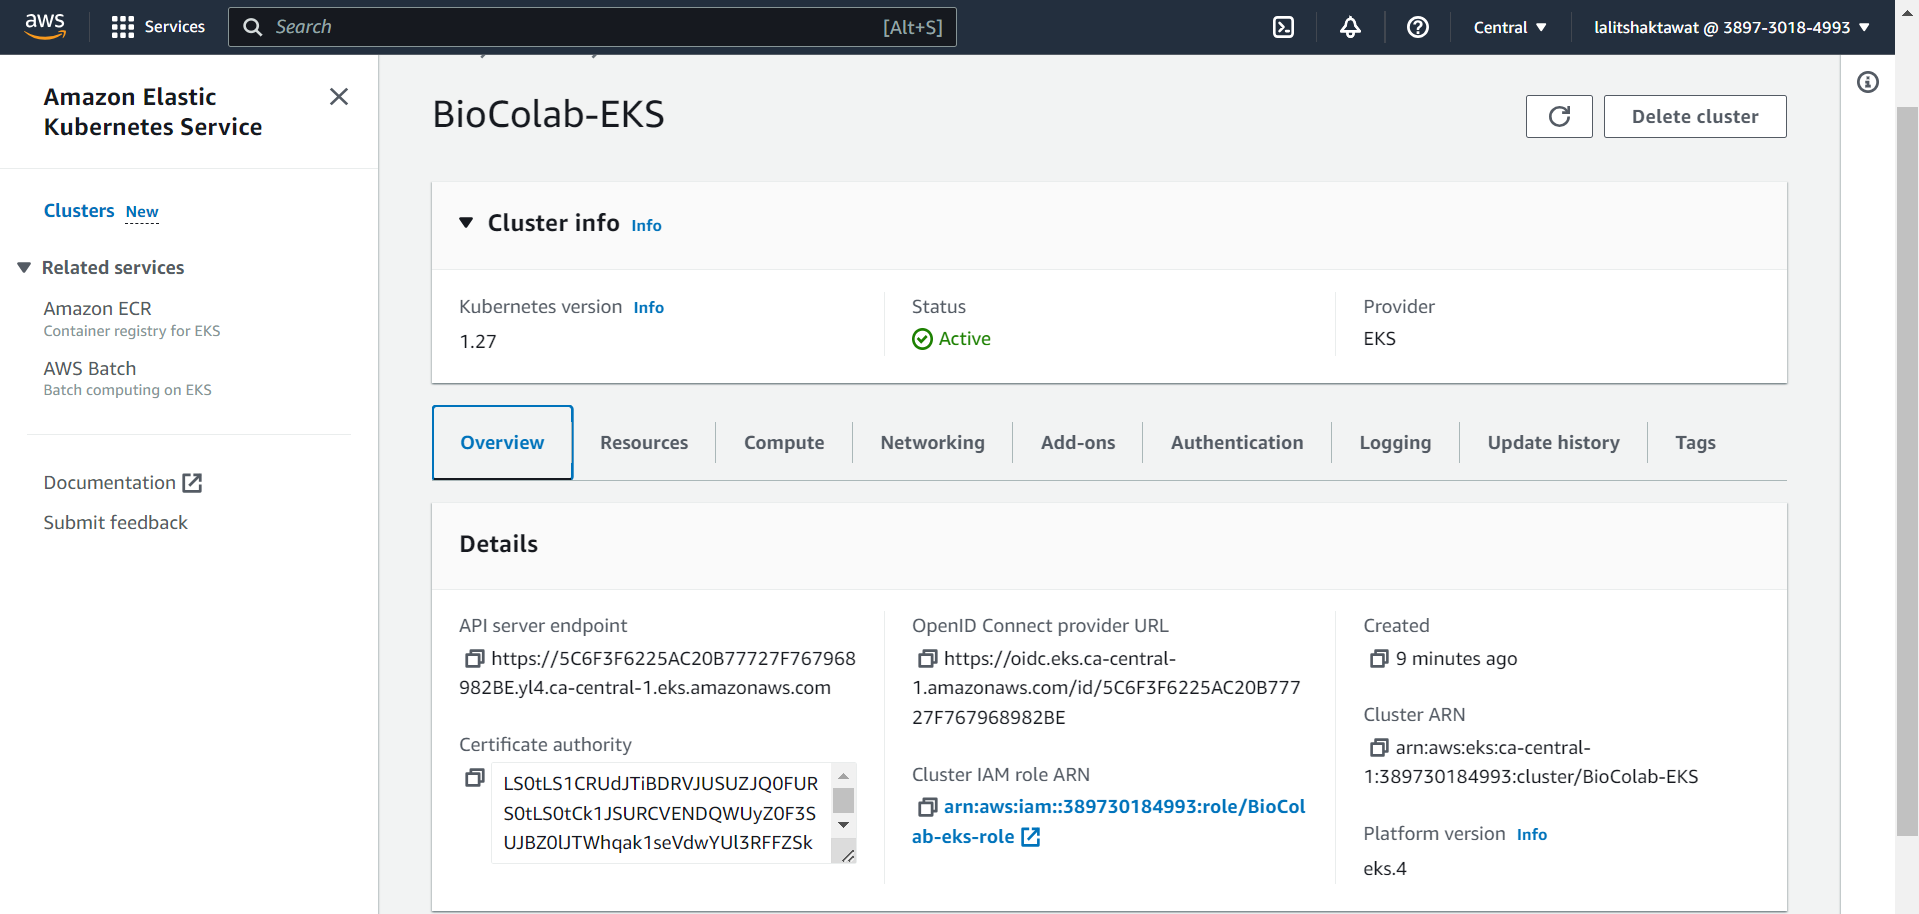
aws eks --region ca-central-1  describe-cluster --name BioColab-EKS  --query cluster.status --profile lalitshaktawat

aws eks update-kubeconfig --region ca-central-1 --name BioColab-EKS --profile lalitshaktawat

eksctl utils associate-iam-oidc-provider --region=ca-central-1 --cluster=BioColab-EKS --approve --region ca-central-1 --profile lalitshaktawat

kubectl config current-context

➡️ Troubleshoot.
We might face an issue related to PVC. Pod will not start and it will be on pending status. We just need to recreate ebs-csi-controller to resolve this issue.


kubectl delete pods -n kube-system -l=app=ebs-csi-controller

========
pvc.yaml
========
apiVersion: v1
kind: PersistentVolumeClaim
metadata:
  name: ebs-claim1
spec:
  accessModes:
    - ReadWriteOnce
  storageClassName: gp2
  resources:
    requests:
      storage: 1Gi

========
pod.yaml
========
apiVersion: v1
kind: Pod
metadata:
  name: app
spec:
  containers:
  - name: app
    image: centos
    command: ["/bin/sh"]
    args: ["-c", "while true; do echo $(date -u) >> /data/out.txt; sleep 5; done"]
    volumeMounts:
    - name: persistent-storage
      mountPath: /data
  volumes:
  - name: persistent-storage
    persistentVolumeClaim:
      claimName: ebs-claim1
Create resources for testing. It is just a test. You can skip this step.
========================================================================
kubectl apply -f .\pvc.yaml
kubectl apply -f .\pod.yaml
kubectl get pods
kubectl get pvc

Delete resources.
=================
kubectl delete po/<pod name> -n <namespace name>
⭕ Installing Helm.
➡️ Please follow link below to install Helm.
helm repo add bioturing https://bioturing.github.io/charts/apps/
helm repo update
helm search repo bioturing
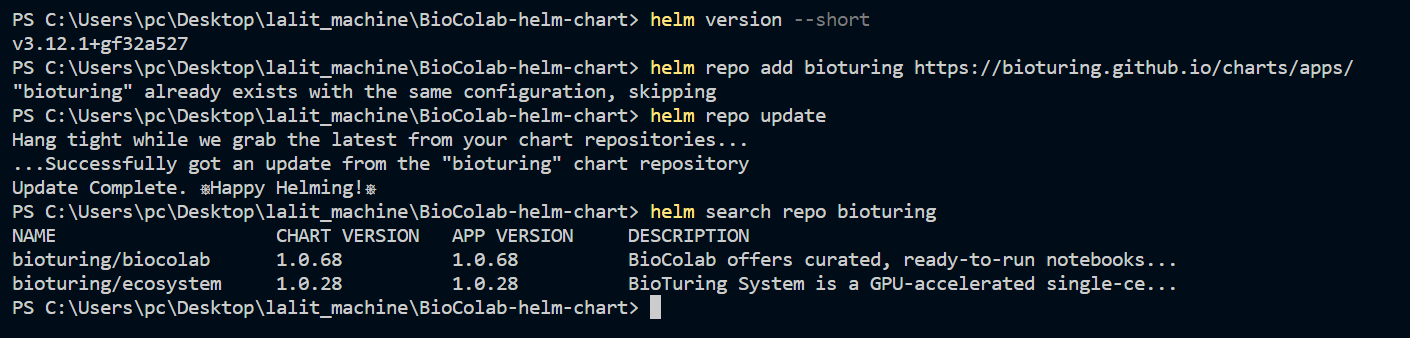
🔔 I downloaded latest version of BioStudio and adjusted values accordingly.

⭕ Kindly setup Load balancer (ALB) with your DNS.
⭕ Please contact 📧 [support@bioturing.com] for any inquiry.
Machine name on K8S
¶# We must use local DNS service name to add machine.
<Service Name>.<Namespace>.svc.cluster.local
# bioc-test-release-biocolab-colab.bioc-test.svc.cluster.local
# biocolab-preprod-biocolab-colab.bioturing-preprod.svc.cluster.local
BioStudio Checklist 
🔔 Note: Ensure that the BioProxy container doesn’t have HTTP_PROXY, HTTPS_PROXY, and NO_PROXY settings configured
1] Process running with host.
ps -ef
netstat -nltup
2] Process running with Bioproxy container
ps -ef
netstat -nltup
3] Process running with BioColab container
ps -ef
netstat -nltup
4] Check application up and running and connectivity.
curl command testing
curl <localhost>
curl <localhost>:<http port>
curl <localhost>:<application port>
curl <localhost>:<nginx port>
5] check whiltelist of domain with Host and both containers.
# curl https://colab.biotruing.com
Should show contents
# curl https://cdn.biotruing.com
# wget https://cdn.bioturing.com/documentation/adm.png
# curl https://cdn-eu-west-1.s3.eu-west-1.amazonaws.com
# wget https://cdn-eu-west-1.s3.eu-west-1.amazonaws.com/colab/apps/0w-byh0iNCWigGEjbZybU.92ae1dec-6bf9-4041-9d06-330e0fe7b564.zip
# curl https://s3.us-west-2.amazonaws.com/cdn.bioturing.com
# wget https://s3.us-west-2.amazonaws.com/cdn.bioturing.com/documentation/adm.png
# curl https://studio.bioturing.com
Should show contents
6] Check application varification processes
with Host machine
# ps -ef | grep 'docker'
# ps -ef | grep 'miniconda'
# ps -ef | grep nginx
# ps -ef | grep postgres
7] Check dashboard setting
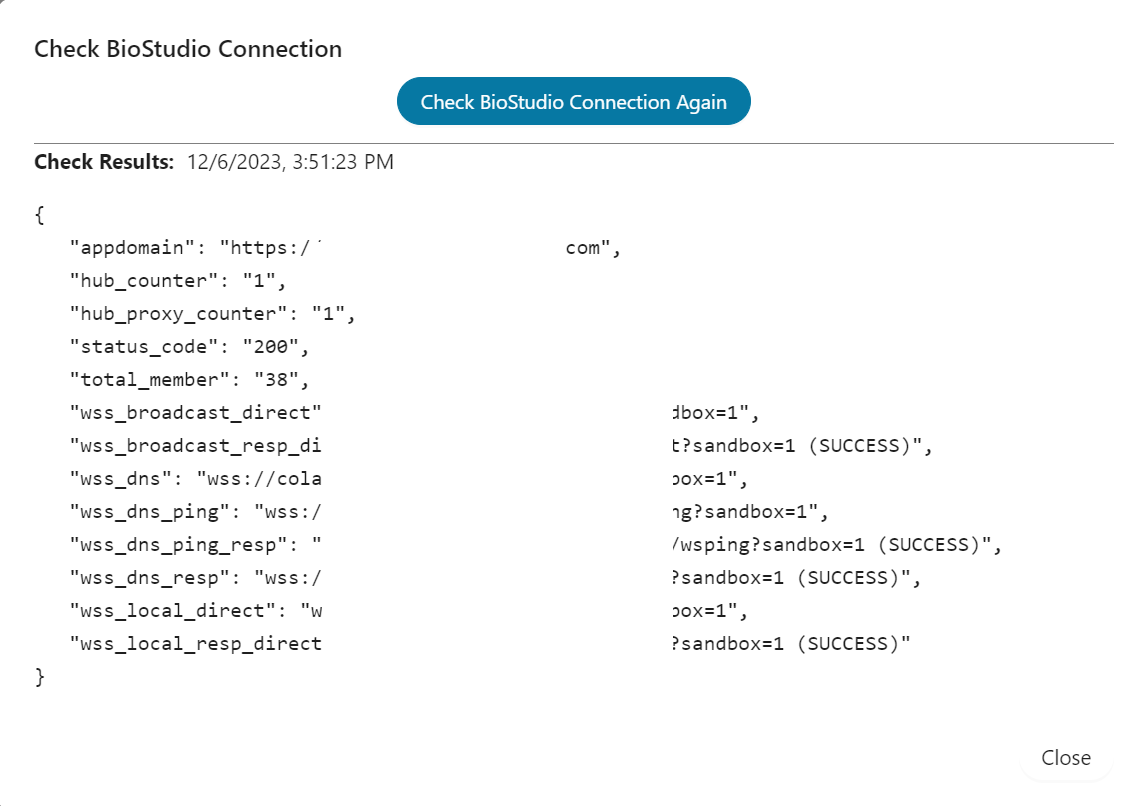
8] Check websocket
9] Check to download notebook and running
10] Guide for SSO login
Test and verification 
Before start installation below is the status:
root@ip-172-31-39-182:/biocolab/installation-2.1.11# netstat -nltup
Active Internet connections (only servers)
Proto Recv-Q Send-Q Local Address           Foreign Address         State       PID/Program name
tcp        0      0 127.0.0.53:53           0.0.0.0:*               LISTEN      2892/systemd-resolv
tcp        0      0 0.0.0.0:22              0.0.0.0:*               LISTEN      2820/sshd: /usr/sbi
tcp6       0      0 :::22                   :::*                    LISTEN      2820/sshd: /usr/sbi
udp        0      0 127.0.0.53:53           0.0.0.0:*                           2892/systemd-resolv
udp        0      0 172.31.39.182:68        0.0.0.0:*                           2882/systemd-networ
udp        0      0 127.0.0.1:323           0.0.0.0:*                           2808/chronyd
udp6       0      0 ::1:323                 :::*                                2808/chronyd

root@ip-172-31-39-182:/biocolab/installation-2.1.11# env
SHELL=/bin/bash
PWD=/biocolab/installation-2.1.11
LOGNAME=root
HOME=/root
LANG=C.UTF-8
XDG_DATA_DIRS=/usr/local/share:/usr/share:/var/lib/snapd/desktop
PATH=/usr/local/sbin:/usr/local/bin:/usr/sbin:/usr/bin:/sbin:/bin:/usr/games:/usr/local/games:/snap/bin
MAIL=/var/mail/root
_=/usr/bin/env
OLDPWD=/biocolab
Testing with normal structure 
After installation
⭕ HTTP port : 80 and HTTPS port : 443
Application port : 11123
netstat command testing 
Below are the port should be in as status.
1️⃣ Check netstat -nltup with Host and inside the container.
netstat -nltup # from host
root@ip-172-31-39-182:/biocolab/installation-2.1.11# netstat -nltup
Active Internet connections (only servers)
Proto Recv-Q Send-Q Local Address           Foreign Address         State       PID/Program name
tcp        0      0 127.0.0.53:53           0.0.0.0:*               LISTEN      2892/systemd-resolv
tcp        0      0 0.0.0.0:1883            0.0.0.0:*               LISTEN      10842/docker-proxy
tcp        0      0 0.0.0.0:18000           0.0.0.0:*               LISTEN      10736/docker-proxy
tcp        0      0 0.0.0.0:443             0.0.0.0:*               LISTEN      10059/docker-proxy
tcp        0      0 0.0.0.0:80              0.0.0.0:*               LISTEN      10081/docker-proxy
tcp        0      0 0.0.0.0:22              0.0.0.0:*               LISTEN      2820/sshd: /usr/sbi
tcp        0      0 0.0.0.0:5432            0.0.0.0:*               LISTEN      10009/docker-proxy
tcp        0      0 0.0.0.0:6800            0.0.0.0:*               LISTEN      10821/docker-proxy
tcp        0      0 0.0.0.0:6379            0.0.0.0:*               LISTEN      9982/docker-proxy
tcp        0      0 0.0.0.0:9091            0.0.0.0:*               LISTEN      9958/docker-proxy
tcp        0      0 0.0.0.0:9001            0.0.0.0:*               LISTEN      10802/docker-proxy
tcp        0      0 0.0.0.0:11300           0.0.0.0:*               LISTEN      10757/docker-proxy
tcp        0      0 0.0.0.0:11211           0.0.0.0:*               LISTEN      9937/docker-proxy
tcp        0      0 0.0.0.0:11123           0.0.0.0:*               LISTEN      10778/docker-proxy
tcp        0      0 0.0.0.0:32767           0.0.0.0:*               LISTEN      9893/docker-proxy
tcp        0      0 0.0.0.0:32765           0.0.0.0:*               LISTEN      9915/docker-proxy
tcp6       0      0 :::1883                 :::*                    LISTEN      10849/docker-proxy
tcp6       0      0 :::18000                :::*                    LISTEN      10744/docker-proxy
tcp6       0      0 :::443                  :::*                    LISTEN      10066/docker-proxy
tcp6       0      0 :::80                   :::*                    LISTEN      10088/docker-proxy
tcp6       0      0 :::22                   :::*                    LISTEN      2820/sshd: /usr/sbi
tcp6       0      0 :::5432                 :::*                    LISTEN      10030/docker-proxy
tcp6       0      0 :::6800                 :::*                    LISTEN      10829/docker-proxy
tcp6       0      0 :::6379                 :::*                    LISTEN      9988/docker-proxy
tcp6       0      0 :::9091                 :::*                    LISTEN      9965/docker-proxy
tcp6       0      0 :::9001                 :::*                    LISTEN      10809/docker-proxy
tcp6       0      0 :::11300                :::*                    LISTEN      10764/docker-proxy
tcp6       0      0 :::11211                :::*                    LISTEN      9943/docker-proxy
tcp6       0      0 :::11123                :::*                    LISTEN      10786/docker-proxy
tcp6       0      0 :::32767                :::*                    LISTEN      9900/docker-proxy
tcp6       0      0 :::32765                :::*                    LISTEN      9921/docker-proxy
udp        0      0 127.0.0.53:53           0.0.0.0:*                           2892/systemd-resolv
udp        0      0 172.31.39.182:68        0.0.0.0:*                           2882/systemd-networ
udp        0      0 127.0.0.1:323           0.0.0.0:*                           2808/chronyd
udp6       0      0 ::1:323                 :::*                                2808/chronyd
netstat -nltup # inside the container
root@ip-172-31-39-182:/biocolab/installation-2.1.11# docker exec -it bioproxy /bin/bash
root@6c1fca69acf1:/home# netstat -nltup
Active Internet connections (only servers)
Proto Recv-Q Send-Q Local Address           Foreign Address         State       PID/Program name
tcp        0      0 0.0.0.0:11211           0.0.0.0:*               LISTEN      -
tcp        0      0 127.0.0.1:8886          0.0.0.0:*               LISTEN      183/node
tcp        0      0 127.0.0.1:9005          0.0.0.0:*               LISTEN      167/python3
tcp        0      0 0.0.0.0:5432            0.0.0.0:*               LISTEN      -
tcp        0      0 0.0.0.0:6379            0.0.0.0:*               LISTEN      -
tcp        0      0 0.0.0.0:8077            0.0.0.0:*               LISTEN      182/nginx: master p
tcp        0      0 127.0.0.1:5555          0.0.0.0:*               LISTEN      298/dataplaneapi
tcp        0      0 0.0.0.0:80              0.0.0.0:*               LISTEN      -
tcp        0      0 0.0.0.0:443             0.0.0.0:*               LISTEN      -
tcp6       0      0 :::11211                :::*                    LISTEN      -
tcp6       0      0 :::5432                 :::*                    LISTEN      -
tcp6       0      0 :::8077                 :::*                    LISTEN      182/nginx: master p
udp        0      0 0.0.0.0:58951           0.0.0.0:*                           -
udp        0      0 0.0.0.0:36226           0.0.0.0:*                           -
root@6c1fca69acf1:/home#

-------

root@ip-172-31-39-182:/biocolab/installation-2.1.11# docker exec -it biocolab /bin/bash
root@5fc5db8bc5cf:/home# netstat -nltup
Active Internet connections (only servers)
Proto Recv-Q Send-Q Local Address           Foreign Address         State       PID/Program name
tcp        0      0 0.0.0.0:9001            0.0.0.0:*               LISTEN      -
tcp        0      0 127.0.0.1:18001         0.0.0.0:*               LISTEN      513/node
tcp        0      0 0.0.0.0:11123           0.0.0.0:*               LISTEN      148/t2d_dsc_tool
tcp        0      0 0.0.0.0:11300           0.0.0.0:*               LISTEN      -
tcp        0      0 0.0.0.0:18081           0.0.0.0:*               LISTEN      360/python3.10
tcp        0      0 0.0.0.0:18000           0.0.0.0:*               LISTEN      513/node
tcp        0      0 0.0.0.0:1883            0.0.0.0:*               LISTEN      -
tcp        0      0 0.0.0.0:2223            0.0.0.0:*               LISTEN      149/sshd: /usr/sbin
tcp        0      0 127.0.0.1:11113         0.0.0.0:*               LISTEN      147/t2d_blc_tool
tcp        0      0 0.0.0.0:6800            0.0.0.0:*               LISTEN      144/aria2c
tcp6       0      0 :::9001                 :::*                    LISTEN      -
tcp6       0      0 :::1883                 :::*                    LISTEN      -
tcp6       0      0 :::2222                 :::*                    LISTEN      148/t2d_dsc_tool
tcp6       0      0 :::2223                 :::*                    LISTEN      149/sshd: /usr/sbin
root@5fc5db8bc5cf:/home#
Environmental variables 
Bioproxy : environmental variable
# docker exec -it bioproxy /bin/bash

root@507cd2637a97:/home# env
NFS_T2_PORT=2049
SHELL=/bin/bash
POSTGRESQL_CLIENT_MIN_MESSAGES=error
DEBUG_MODE=false
HTTPS_SERVER_PORT=443
POSTGRESQL_USERNAME=XXXXXXXXXXXXXX
REDIS_PASSWORD=XXXXXXXXXXXXXXXXXXXXXXXXXXXXXXXXX

root@507cd2637a97:/home#

root@507cd2637a97:/home# cat /etc/environment
root@507cd2637a97:/home#
root@507cd2637a97:/home# exit
BioColab : environmental variable
# docker exec -it biocolab /bin/bash
# env

root@c355340b52ce:/home# cat /etc/environment
PATH="/usr/local/sbin:/usr/local/bin:/usr/sbin:/usr/bin:/sbin:/bin:/usr/games:/usr/local/games:/snap/bin"
no_proxy="kubernetes,.svc,.default,localhost,0.0.0.0,.cluster.local,100.10.0.0/16,fe80::/10,.local,100.10.0.3,fc00::/7,::1/128,182.168.10.0/24,10.0.0.0/8,10.82.0.90,127.0.0.1"
BioStudio process verification 
Process running with Bioproxy container
root@ip-172-31-39-123:/biocolab/installation-2.1.11/biocolab# docker exec -it bioproxy /bin/bash
root@507cd2637a97:/home# ps -ef
UID          PID    PPID  C STIME TTY          TIME CMD
root           1       0  0 03:50 pts/0    00:00:00 /bin/bash /super.sh
root         204       1  0 03:50 pts/0    00:00:02 /usr/bin/python3 /usr/bin/supervisord -n -c /etc/supervisor/supervisord.conf
root         205     204  0 03:50 pts/0    00:00:00 /usr/sbin/cron -f
memcach+     206     204  0 03:50 pts/0    00:00:00 /usr/bin/memcached -p 11211 -u memcached -m 128 -c 1024000 -P /memcached/program.pid
postgres     207     204  0 03:50 pts/0    00:00:00 /opt/bitnami/postgresql/bin/postgres -D /bitnami/postgresql/data --config-file=/opt/bitnami/postgresql/conf/po
redis        208     204  0 03:50 pts/0    00:00:11 /usr/bin/redis-server 0.0.0.0:6379
root         219     204  0 03:50 pts/0    00:00:00 nginx: master process /usr/sbin/nginx -g daemon off;
root         220     204  0 03:50 pts/0    00:00:00 /usr/bin/node /server.js
www-data     221     204  0 03:50 pts/0    00:00:04 /usr/local/sbin/haproxy -f /etc/haproxy/haproxy.cfg -p /var/run/haproxy.pid
www-data     253     219  0 03:50 pts/0    00:00:00 nginx: worker process
www-data     254     219  0 03:50 pts/0    00:00:00 nginx: worker process
www-data     255     219  0 03:50 pts/0    00:00:00 nginx: worker process
www-data     257     219  0 03:50 pts/0    00:00:00 nginx: worker process
postgres     308     207  0 03:50 ?        00:00:00 postgres: checkpointer
postgres     309     207  0 03:50 ?        00:00:00 postgres: background writer
postgres     311     207  0 03:50 ?        00:00:00 postgres: walwriter
postgres     312     207  0 03:50 ?        00:00:00 postgres: autovacuum launcher
postgres     313     207  0 03:50 ?        00:00:00 postgres: logical replication launcher
root         336     204  0 03:50 pts/0    00:00:02 /usr/local/bin/dataplaneapi --port 5555 -b /usr/local/sbin/haproxy -c /etc/haproxy/haproxy.cfg -d 5 -r /usr/bi
postgres     705     207  0 03:58 ?        00:00:00 postgres: postgres postgres 172.17.0.1(37132) idle
postgres     706     207  0 03:58 ?        00:00:00 postgres: postgres biocolab 172.17.0.1(37140) idle
postgres     707     207  0 03:58 ?        00:00:00 postgres: postgres biocolab 172.17.0.1(37156) idle
postgres    1036     207  0 04:08 ?        00:00:00 postgres: postgres biocohub 172.17.0.1(57498) idle
root        4206       0  1 05:33 pts/1    00:00:00 /bin/bash
root        4212    4206  0 05:33 pts/1    00:00:00 ps -ef
root@507cd2637a97:/home#
Process running with BioColab container
root@ip-172-31-39-123:/biocolab/installation-2.1.11/biocolab# docker exec -it biocolab /bin/bash
root@b1a226ccc20a:/home# ps -ef
UID          PID    PPID  C STIME TTY          TIME CMD
root           1       0  0 03:56 pts/0    00:00:00 /bin/bash /super.sh
root         110       1  0 03:56 pts/0    00:00:09 /usr/bin/python3 /usr/bin/supervisord -n -c /etc/supervisor/supervisord.conf
mosquit+     112     110  0 03:56 pts/0    00:00:02 /usr/local/sbin/mosquitto -c /mosquitto/config/mosquitto.conf
beansta+     113     110  0 03:56 pts/0    00:00:00 /usr/local/bin/beanstalkd -b /appdata/beanstalkd -f 1000 -u beanstalkd
root         115     110  0 03:56 pts/0    00:00:00 /usr/bin/Xvfb :0.0 -screen 0 800x600x16 -dpi 75 -nolisten tcp -audit 4 -ac -auth /root/.Xauthority
root         125     110  0 03:56 pts/0    00:00:00 /usr/bin/aria2c --enable-rpc --rpc-listen-all --rpc-allow-origin-all --rpc-secret=************ --rpc-listen-po
root         128     110  0 03:56 pts/0    00:00:00 sshd: /usr/sbin/sshd -p 2223 -D [listener] 0 of 10-100 startups
root         129     110  0 03:56 pts/0    00:00:00 /usr/sbin/cron -f
root         462     110  1 03:58 pts/0    00:01:43 /appdata/apps/t2d_dsc_tool
root         484     110  0 03:58 pts/0    00:00:10 /appdata/apps/t2d_blc_tool
root        1846     110  0 04:06 pts/0    00:00:00 /miniconda/user/bin/python3.10 /miniconda/user/bin/bhub-create-kernel-worker
root        1858     110  0 04:06 pts/0    00:00:00 /miniconda/user/bin/python3.10 /miniconda/user/bin/bhub-create-kernel-worker
root        1867     110  0 04:06 pts/0    00:00:00 /miniconda/user/bin/python3.10 /miniconda/user/bin/bhub-create-kernel-worker
root        1880     110  0 04:06 pts/0    00:00:00 /miniconda/user/bin/python3.10 /miniconda/user/bin/bhub-create-kernel-worker
root        1881     110  0 04:06 pts/0    00:00:01 /miniconda/user/bin/python3.10 /miniconda/user/bin/bhub-create-kernel-worker
root        1882     110  0 04:06 pts/0    00:00:01 /miniconda/user/bin/python3.10 /miniconda/user/bin/bhub-create-kernel-worker
root        1883     110  0 04:06 pts/0    00:00:01 /miniconda/user/bin/python3.10 /miniconda/user/bin/bhub-create-kernel-worker
root        1884     110  0 04:06 pts/0    00:00:00 /miniconda/user/bin/python3.10 /miniconda/user/bin/bhub-create-kernel-worker
root        1885     110  0 04:06 pts/0    00:00:00 /miniconda/user/bin/python3.10 /miniconda/user/bin/bhub-create-kernel-worker
root        1886     110  0 04:06 pts/0    00:00:00 /miniconda/user/bin/python3.10 /miniconda/user/bin/bhub-create-kernel-worker
root        1887     110  0 04:06 pts/0    00:00:00 /miniconda/user/bin/python3.10 /miniconda/user/bin/bhub-create-kernel-worker
root        1888     110  0 04:06 pts/0    00:00:00 /miniconda/user/bin/python3.10 /miniconda/user/bin/bhub-create-kernel-worker
root        1889     110  0 04:06 pts/0    00:00:01 /miniconda/user/bin/python3.10 /miniconda/user/bin/bhub-create-kernel-worker
root        1890     110  0 04:06 pts/0    00:00:00 /miniconda/user/bin/python3.10 /miniconda/user/bin/bhub-create-kernel-worker
root        1891     110  0 04:06 pts/0    00:00:00 /miniconda/user/bin/python3.10 /miniconda/user/bin/bhub-create-kernel-worker
root        1957     110  0 04:08 pts/0    00:00:00 /bin/bash /start.sh
root        1958    1957  0 04:08 pts/0    00:00:04 /miniconda/user/bin/python3.10 /miniconda/user/bin/jupyterhub --config /configs/hub/etc/config.py --ip 0.0.0.0
root        1965    1958  0 04:08 ?        00:00:01 node /miniconda/user/bin/configurable-http-proxy --ip 0.0.0.0 --port 18000 --api-ip 127.0.0.1 --api-port 18001
root        1975    1958  0 04:08 ?        00:00:00 /miniconda/user/bin/python3.10 -m jupyterhub_idle_culler --timeout=36000
root        2021     110  0 04:08 pts/0    00:00:00 /miniconda/user/bin/python3.10 /miniconda/user/bin/bhub-create-custom-task-worker
root        2022     110  0 04:08 pts/0    00:00:00 /miniconda/user/bin/python3.10 /miniconda/user/bin/bhub-create-custom-task-worker
root        2023     110  0 04:08 pts/0    00:00:00 /miniconda/user/bin/python3.10 /miniconda/user/bin/bhub-create-custom-task-worker
root        2024     110  0 04:08 pts/0    00:00:00 /miniconda/user/bin/python3.10 /miniconda/user/bin/bhub-create-custom-task-worker
root        2025     110  0 04:08 pts/0    00:00:00 /miniconda/user/bin/python3.10 /miniconda/user/bin/bhub-create-custom-task-worker
root        2026     110  0 04:08 pts/0    00:00:00 /miniconda/user/bin/python3.10 /miniconda/user/bin/bhub-create-custom-task-worker
root        2027     110  0 04:08 pts/0    00:00:00 /miniconda/user/bin/python3.10 /miniconda/user/bin/bhub-create-custom-task-worker
root        2028     110  0 04:08 pts/0    00:00:00 /miniconda/user/bin/python3.10 /miniconda/user/bin/bhub-create-custom-task-worker
root        2029     110  0 04:08 pts/0    00:00:00 /miniconda/user/bin/python3.10 /miniconda/user/bin/bhub-create-custom-task-worker
root        2030     110  0 04:08 pts/0    00:00:00 /miniconda/user/bin/python3.10 /miniconda/user/bin/bhub-create-custom-task-worker
root        2031     110  0 04:08 pts/0    00:00:00 /miniconda/user/bin/python3.10 /miniconda/user/bin/bhub-create-custom-task-worker
root        2032     110  0 04:08 pts/0    00:00:00 /miniconda/user/bin/python3.10 /miniconda/user/bin/bhub-create-custom-task-worker
root        2033     110  0 04:08 pts/0    00:00:00 /miniconda/user/bin/python3.10 /miniconda/user/bin/bhub-create-custom-task-worker
root        2034     110  0 04:08 pts/0    00:00:00 /miniconda/user/bin/python3.10 /miniconda/user/bin/bhub-create-custom-task-worker
root        2035     110  0 04:08 pts/0    00:00:00 /miniconda/user/bin/python3.10 /miniconda/user/bin/bhub-create-custom-task-worker
root        2036     110  0 04:08 pts/0    00:00:00 /miniconda/user/bin/python3.10 /miniconda/user/bin/bhub-create-custom-task-worker
root        2037     110  0 04:08 pts/0    00:00:00 /miniconda/user/bin/python3.10 /miniconda/user/bin/bhub-create-custom-task-worker
root        2038     110  0 04:08 pts/0    00:00:00 /miniconda/user/bin/python3.10 /miniconda/user/bin/bhub-create-custom-task-worker
root        2039     110  0 04:08 pts/0    00:00:00 /miniconda/user/bin/python3.10 /miniconda/user/bin/bhub-create-custom-task-worker
root        2040     110  0 04:08 pts/0    00:00:00 /miniconda/user/bin/python3.10 /miniconda/user/bin/bhub-create-custom-task-worker
root        2094     110  0 04:08 pts/0    00:00:00 /miniconda/user/bin/python3.10 /miniconda/user/bin/bhub-pack-notebook-worker
root        2095     110  0 04:08 pts/0    00:00:00 /miniconda/user/bin/python3.10 /miniconda/user/bin/bhub-pack-notebook-worker
root        2107     110  0 04:08 pts/0    00:00:01 /miniconda/user/bin/python3.10 /miniconda/user/bin/bhub-setup-notebook-worker
root        2108     110  0 04:08 pts/0    00:00:01 /miniconda/user/bin/python3.10 /miniconda/user/bin/bhub-setup-notebook-worker
root        2109     110  0 04:08 pts/0    00:00:01 /miniconda/user/bin/python3.10 /miniconda/user/bin/bhub-setup-notebook-worker
root        2110     110  0 04:08 pts/0    00:00:01 /miniconda/user/bin/python3.10 /miniconda/user/bin/bhub-setup-notebook-worker
root        2111     110  0 04:08 pts/0    00:00:01 /miniconda/user/bin/python3.10 /miniconda/user/bin/bhub-setup-notebook-worker
root        2112     110  0 04:08 pts/0    00:00:01 /miniconda/user/bin/python3.10 /miniconda/user/bin/bhub-setup-notebook-worker
root        2113     110  0 04:08 pts/0    00:00:01 /miniconda/user/bin/python3.10 /miniconda/user/bin/bhub-setup-notebook-worker
root        2114     110  0 04:08 pts/0    00:00:01 /miniconda/user/bin/python3.10 /miniconda/user/bin/bhub-setup-notebook-worker
root        2115     110  0 04:08 pts/0    00:00:01 /miniconda/user/bin/python3.10 /miniconda/user/bin/bhub-setup-notebook-worker
root        2116     110  0 04:08 pts/0    00:00:01 /miniconda/user/bin/python3.10 /miniconda/user/bin/bhub-setup-notebook-worker
root        2117     110  0 04:08 pts/0    00:00:01 /miniconda/user/bin/python3.10 /miniconda/user/bin/bhub-setup-notebook-worker
root        2118     110  0 04:08 pts/0    00:00:01 /miniconda/user/bin/python3.10 /miniconda/user/bin/bhub-setup-notebook-worker
root        2119     110  0 04:08 pts/0    00:00:01 /miniconda/user/bin/python3.10 /miniconda/user/bin/bhub-setup-notebook-worker
root        2120     110  0 04:08 pts/0    00:00:01 /miniconda/user/bin/python3.10 /miniconda/user/bin/bhub-setup-notebook-worker
root        2121     110  0 04:08 pts/0    00:00:01 /miniconda/user/bin/python3.10 /miniconda/user/bin/bhub-setup-notebook-worker
root        2122     110  0 04:08 pts/0    00:00:01 /miniconda/user/bin/python3.10 /miniconda/user/bin/bhub-setup-notebook-worker
root        2123     110  0 04:08 pts/0    00:00:01 /miniconda/user/bin/python3.10 /miniconda/user/bin/bhub-setup-notebook-worker
root        2124     110  0 04:08 pts/0    00:00:01 /miniconda/user/bin/python3.10 /miniconda/user/bin/bhub-setup-notebook-worker
root        2125     110  0 04:08 pts/0    00:00:01 /miniconda/user/bin/python3.10 /miniconda/user/bin/bhub-setup-notebook-worker
root        2126     110  0 04:08 pts/0    00:00:01 /miniconda/user/bin/python3.10 /miniconda/user/bin/bhub-setup-notebook-worker
root        2127     110  0 04:08 pts/0    00:00:01 /miniconda/user/bin/python3.10 /miniconda/user/bin/bhub-setup-notebook-worker
root        2128     110  0 04:08 pts/0    00:00:01 /miniconda/user/bin/python3.10 /miniconda/user/bin/bhub-setup-notebook-worker
root        2129     110  0 04:08 pts/0    00:00:01 /miniconda/user/bin/python3.10 /miniconda/user/bin/bhub-setup-notebook-worker
root        2130     110  0 04:08 pts/0    00:00:01 /miniconda/user/bin/python3.10 /miniconda/user/bin/bhub-setup-notebook-worker
root        2131     110  0 04:08 pts/0    00:00:01 /miniconda/user/bin/python3.10 /miniconda/user/bin/bhub-setup-notebook-worker
root        5607       0  1 05:34 pts/1    00:00:00 /bin/bash
root        5619    5607  0 05:34 pts/1    00:00:00 ps -ef
root@b1a226ccc20a:/home#
curl command testing 
curl <localhost>
curl <localhost>:<http port>
curl <localhost>:<application port>
curl <localhost>:<nginx port>
🔔 NOTE : BioStudio is running on http (80) and https (443)
Curl with host
root@ip-172-31-39-182:/biocolab/installation-2.1.11# curl localhost
<html lang="en">

<head>
    <meta charset="UTF-8">
    <meta http-equiv="X-UA-Compatible" content="IE=edge">
    <meta name="viewport" content="width=device-width, initial-scale=1.0">
    <meta property="og:type" content="article" />
    <meta property="og:url" content="https://studio.bioturing.com/" />
    <meta property="og:description" content="BioStudio is the complete

-------

-------

root@ip-172-31-39-182:/biocolab/installation-2.1.11# curl localhost:80

<head>
    <meta charset="UTF-8">
    <meta http-equiv="X-UA-Compatible" content="IE=edge">
    <meta name="viewport" content="width=device-width, initial-scale=1.0">
    <meta property="og:type" content="article" />
    <meta property="og:url" content="https://studio.bioturing.com/" />
    <meta property="og:description" content="BioStudio is the complete

-------

-------

root@ip-172-31-39-182:/biocolab/installation-2.1.11# curl localhost:11123
<head>
    <meta charset="UTF-8">
    <meta http-equiv="X-UA-Compatible" content="IE=edge">
    <meta name="viewport" content="width=device-width, initial-scale=1.0">
    <meta property="og:type" content="article" />
    <meta property="og:url" content="https://studio.bioturing.com/" />
    <meta property="og:description" content="BioStudio is the complete
Curl inside the container
# BioProxy container

root@ip-172-31-39-182:/biocolab/installation-2.1.11# docker exec -it bioproxy /bin/bash
root@6c1fca69acf1:/home# curl localhost
<html lang="en">

<head>
    <meta charset="UTF-8">
    <meta http-equiv="X-UA-Compatible" content="IE=edge">
    <meta name="viewport" content="width=device-width, initial-scale=1.0">
    <meta property="og:type" content="article" />
    <meta property="og:url" content="https://studio.bioturing.com/" />
    <meta property="og:description" content="BioStudio is the complete analytics platform that empowers scientists to expand their research
 horizons without technical complexities." />

-------

-------

# BioColab Container

NOTE: Here we can only curl with application port.

root@5fc5db8bc5cf:/home# curl localhost:11123
  % Total    % Received % Xferd  Average Speed   Time    Time     Time  Current
                                 Dload  Upload   Total   Spent    Left  Speed
 37  168k   37 65219   <!DOCTYPE html>      0 --:--:-- --:--:-- --:--:--     0
 0 <html lang="en">

   <head>
0   159k      <meta charset="UTF-8">
    <meta http-equiv="X-UA-Compatible" content="IE=edge">
    <meta name="viewport" content="width=device-width, initial-scale=1.0">
Check nslookup 
nslookup <Domain name>

root@ip-172-31-39-182:/biocolab/installation-2.1.11# nslookup <Client BioStudio Domain>
Server:         127.0.0.53
Address:        127.0.0.53#53

Non-authoritative answer:
Name:   <Client BioStudio Domain>
Address: 54.203.5.109

root@ip-172-31-39-182:/biocolab/installation-2.1.11#
check whiltelist of domian 
Check with host
# curl https://colab.biotruing.com
-- Should show contents

# curl https://cdn.biotruing.com
# wget https://cdn.bioturing.com/documentation/adm.png

# curl https://cdn-eu-west-1.s3.eu-west-1.amazonaws.com
# wget https://cdn-eu-west-1.s3.eu-west-1.amazonaws.com/colab/apps/0w-byh0iNCWigGEjbZybU.92ae1dec-6bf9-4041-9d06-330e0fe7b564.zip

# curl https://s3.us-west-2.amazonaws.com/cdn.bioturing.com
# wget https://s3.us-west-2.amazonaws.com/cdn.bioturing.com/documentation/adm.png

# curl https://studio.bioturing.com
-- Should show contents
Check inside the both containers
# Both container should show the same output and all would have the result.

# curl https://colab.biotruing.com
-- Should show contents

# curl https://cdn.biotruing.com
# wget https://cdn.bioturing.com/documentation/adm.png

# curl https://cdn-eu-west-1.s3.eu-west-1.amazonaws.com
# wget https://cdn-eu-west-1.s3.eu-west-1.amazonaws.com/colab/apps/0w-byh0iNCWigGEjbZybU.92ae1dec-6bf9-4041-9d06-330e0fe7b564.zip

# curl https://s3.us-west-2.amazonaws.com/cdn.bioturing.com
# wget https://s3.us-west-2.amazonaws.com/cdn.bioturing.com/documentation/adm.png

# curl https://studio.bioturing.com
-- Should show contents
Check application varification processes 
with Host machine
# ps -ef | grep 'docker'
# ps -ef | grep 'miniconda'
# ps -ef | grep nginx
# ps -ef | grep postgres


root@ip-172-31-39-182:/biocolab/installation-2.1.11/test# ps -ef | grep 'docker'
root        4243       1  1 03:24 ?        00:02:54 /usr/bin/dockerd -H fd:// --containerd=/run/containerd/containerd.sock
root        9893    4243  0 04:04 ?        00:00:00 /usr/bin/docker-proxy -proto tcp -host-ip 0.0.0.0 -host-port 32767 -container-ip 172.17.0.2 -container-port 32767
root        9900    4243  0 04:04 ?        00:00:00 /usr/bin/docker-proxy -proto tcp -host-ip :: -host-port 32767 -container-ip 172.17.0.2 -container-port 32767
root        9915    4243  0 04:04 ?        00:00:00 /usr/bin/docker-proxy -proto tcp -host-ip 0.0.0.0 -host-port 32765 -container-ip 172.17.0.2 -container-port 32765
root        9921    4243  0 04:04 ?        00:00:00 /usr/bin/docker-proxy -proto tcp -host-ip :: -host-port 32765 -container-ip 172.17.0.2 -container-port 32765
root        9937    4243  0 04:04 ?        00:00:00 /usr/bin/docker-proxy -proto tcp -host-ip 0.0.0.0 -host-port 11211 -container-ip 172.17.0.2 -container-port 11211
root        9943    4243  0 04:04 ?        00:00:00 /usr/bin/docker-proxy -proto tcp -host-ip :: -host-port 11211 -container-ip 172.17.0.2 -container-port 11211
root        9958    4243  0 04:04 ?        00:00:00 /usr/bin/docker-proxy -proto tcp -host-ip 0.0.0.0 -host-port 9091 -container-ip 172.17.0.2 -container-port 9091
root        9965    4243  0 04:04 ?        00:00:00 /usr/bin/docker-proxy -proto tcp -host-ip :: -host-port 9091 -container-ip 172.17.0.2 -container-port 9091
root        9982    4243  0 04:04 ?        00:00:06 /usr/bin/docker-proxy -proto tcp -host-ip 0.0.0.0 -host-port 6379 -container-ip 172.17.0.2 -container-port 6379
root        9988    4243  0 04:04 ?        00:00:00 /usr/bin/docker-proxy -proto tcp -host-ip :: -host-port 6379 -container-ip 172.17.0.2 -container-port 6379
root       10009    4243  0 04:04 ?        00:00:00 /usr/bin/docker-proxy -proto tcp -host-ip 0.0.0.0 -host-port 5432 -container-ip 172.17.0.2 -container-port 5432
root       10030    4243  0 04:04 ?        00:00:00 /usr/bin/docker-proxy -proto tcp -host-ip :: -host-port 5432 -container-ip 172.17.0.2 -container-port 5432
root       10059    4243  0 04:04 ?        00:00:00 /usr/bin/docker-proxy -proto tcp -host-ip 0.0.0.0 -host-port 443 -container-ip 172.17.0.2 -container-port 443
root       10066    4243  0 04:04 ?        00:00:00 /usr/bin/docker-proxy -proto tcp -host-ip :: -host-port 443 -container-ip 172.17.0.2 -container-port 443
root       10081    4243  0 04:04 ?        00:00:00 /usr/bin/docker-proxy -proto tcp -host-ip 0.0.0.0 -host-port 80 -container-ip 172.17.0.2 -container-port 80
root       10088    4243  0 04:04 ?        00:00:00 /usr/bin/docker-proxy -proto tcp -host-ip :: -host-port 80 -container-ip 172.17.0.2 -container-port 80
root       10736    4243  0 04:08 ?        00:00:00 /usr/bin/docker-proxy -proto tcp -host-ip 0.0.0.0 -host-port 18000 -container-ip 172.17.0.3 -container-port 18000
root       10744    4243  0 04:08 ?        00:00:00 /usr/bin/docker-proxy -proto tcp -host-ip :: -host-port 18000 -container-ip 172.17.0.3 -container-port 18000
root       10757    4243  0 04:08 ?        00:00:00 /usr/bin/docker-proxy -proto tcp -host-ip 0.0.0.0 -host-port 11300 -container-ip 172.17.0.3 -container-port 11300
root       10764    4243  0 04:08 ?        00:00:00 /usr/bin/docker-proxy -proto tcp -host-ip :: -host-port 11300 -container-ip 172.17.0.3 -container-port 11300
root       10778    4243  0 04:08 ?        00:00:05 /usr/bin/docker-proxy -proto tcp -host-ip 0.0.0.0 -host-port 11123 -container-ip 172.17.0.3 -container-port 11123
root       10786    4243  0 04:08 ?        00:00:00 /usr/bin/docker-proxy -proto tcp -host-ip :: -host-port 11123 -container-ip 172.17.0.3 -container-port 11123
root       10802    4243  0 04:08 ?        00:00:00 /usr/bin/docker-proxy -proto tcp -host-ip 0.0.0.0 -host-port 9001 -container-ip 172.17.0.3 -container-port 9001
root       10809    4243  0 04:08 ?        00:00:00 /usr/bin/docker-proxy -proto tcp -host-ip :: -host-port 9001 -container-ip 172.17.0.3 -container-port 9001
root       10821    4243  0 04:08 ?        00:00:00 /usr/bin/docker-proxy -proto tcp -host-ip 0.0.0.0 -host-port 6800 -container-ip 172.17.0.3 -container-port 6800
root       10829    4243  0 04:08 ?        00:00:00 /usr/bin/docker-proxy -proto tcp -host-ip :: -host-port 6800 -container-ip 172.17.0.3 -container-port 6800
root       10842    4243  0 04:08 ?        00:00:00 /usr/bin/docker-proxy -proto tcp -host-ip 0.0.0.0 -host-port 1883 -container-ip 172.17.0.3 -container-port 1883
root       10849    4243  0 04:08 ?        00:00:00 /usr/bin/docker-proxy -proto tcp -host-ip :: -host-port 1883 -container-ip 172.17.0.3 -container-port 1883
root       46489    1507  0 07:54 pts/1    00:00:00 grep --color=auto docker
root@ip-172-31-39-182:/biocolab/installation-2.1.11/test#

-------

-------

root@ip-172-31-39-182:/biocolab/installation-2.1.11/test# ps -ef | grep 'miniconda'
root       11186   11035  0 04:08 pts/0    00:00:01 /miniconda/user/bin/python3.10 /miniconda/user/bin/bhub-create-custom-task-worker
root       11187   11035  0 04:08 pts/0    00:00:01 /miniconda/user/bin/python3.10 /miniconda/user/bin/bhub-create-custom-task-worker
root       11188   11035  0 04:08 pts/0    00:00:01 /miniconda/user/bin/python3.10 /miniconda/user/bin/bhub-create-custom-task-worker
root       11189   11035  0 04:08 pts/0    00:00:01 /miniconda/user/bin/python3.10 /miniconda/user/bin/bhub-create-custom-task-worker
root       11190   11035  0 04:08 pts/0    00:00:01 /miniconda/user/bin/python3.10 /miniconda/user/bin/bhub-create-custom-task-worker
root       11191   11035  0 04:08 pts/0    00:00:01 /miniconda/user/bin/python3.10 /miniconda/user/bin/bhub-create-custom-task-worker
root       11192   11035  0 04:08 pts/0    00:00:01 /miniconda/user/bin/python3.10 /miniconda/user/bin/bhub-create-custom-task-worker
root       11193   11035  0 04:08 pts/0    00:00:01 /miniconda/user/bin/python3.10 /miniconda/user/bin/bhub-create-custom-task-worker
root       11194   11035  0 04:08 pts/0    00:00:01 /miniconda/user/bin/python3.10 /miniconda/user/bin/bhub-create-custom-task-worker
root       11195   11035  0 04:08 pts/0    00:00:01 /miniconda/user/bin/python3.10 /miniconda/user/bin/bhub-create-custom-task-worker
root       11196   11035  0 04:08 pts/0    00:00:01 /miniconda/user/bin/python3.10 /miniconda/user/bin/bhub-create-custom-task-worker
root       11197   11035  0 04:08 pts/0    00:00:01 /miniconda/user/bin/python3.10 /miniconda/user/bin/bhub-create-custom-task-worker
root       11199   11035  0 04:08 pts/0    00:00:01 /miniconda/user/bin/python3.10 /miniconda/user/bin/bhub-create-custom-task-worker
root       11200   11035  0 04:08 pts/0    00:00:01 /miniconda/user/bin/python3.10 /miniconda/user/bin/bhub-create-custom-task-worker
root       11201   11035  0 04:08 pts/0    00:00:01 /miniconda/user/bin/python3.10 /miniconda/user/bin/bhub-create-custom-task-worker
root       11202   11035  0 04:08 pts/0    00:00:01 /miniconda/user/bin/python3.10 /miniconda/user/bin/bhub-create-custom-task-worker
root       11203   11035  0 04:08 pts/0    00:00:01 /miniconda/user/bin/python3.10 /miniconda/user/bin/bhub-create-custom-task-worker
root       11204   11035  0 04:08 pts/0    00:00:01 /miniconda/user/bin/python3.10 /miniconda/user/bin/bhub-create-custom-task-worker
root       11205   11035  0 04:08 pts/0    00:00:01 /miniconda/user/bin/python3.10 /miniconda/user/bin/bhub-create-custom-task-worker
root       11206   11035  0 04:08 pts/0    00:00:01 /miniconda/user/bin/python3.10 /miniconda/user/bin/bhub-create-custom-task-worker
root       11218   11035  0 04:08 pts/0    00:00:01 /miniconda/user/bin/python3.10 /miniconda/user/bin/bhub-pack-notebook-worker
root       11219   11035  0 04:08 pts/0    00:00:01 /miniconda/user/bin/python3.10 /miniconda/user/bin/bhub-pack-notebook-worker
root       11220   11035  0 04:08 pts/0    00:00:01 /miniconda/user/bin/python3.10 /miniconda/user/bin/bhub-setup-notebook-worker
root       11221   11035  0 04:08 pts/0    00:00:01 /miniconda/user/bin/python3.10 /miniconda/user/bin/bhub-setup-notebook-worker
root       11222   11035  0 04:08 pts/0    00:00:01 /miniconda/user/bin/python3.10 /miniconda/user/bin/bhub-setup-notebook-worker
root       11223   11035  0 04:08 pts/0    00:00:01 /miniconda/user/bin/python3.10 /miniconda/user/bin/bhub-setup-notebook-worker
root       11224   11035  0 04:08 pts/0    00:00:01 /miniconda/user/bin/python3.10 /miniconda/user/bin/bhub-setup-notebook-worker
root       11225   11035  0 04:08 pts/0    00:00:00 /miniconda/user/bin/python3.10 /miniconda/user/bin/bhub-setup-notebook-worker
root       11226   11035  0 04:08 pts/0    00:00:01 /miniconda/user/bin/python3.10 /miniconda/user/bin/bhub-setup-notebook-worker
root       11229   11035  0 04:08 pts/0    00:00:01 /miniconda/user/bin/python3.10 /miniconda/user/bin/bhub-setup-notebook-worker
root       11230   11035  0 04:08 pts/0    00:00:01 /miniconda/user/bin/python3.10 /miniconda/user/bin/bhub-setup-notebook-worker
root       11231   11035  0 04:08 pts/0    00:00:01 /miniconda/user/bin/python3.10 /miniconda/user/bin/bhub-setup-notebook-worker
root       11232   11035  0 04:08 pts/0    00:00:01 /miniconda/user/bin/python3.10 /miniconda/user/bin/bhub-setup-notebook-worker
root       11234   11035  0 04:08 pts/0    00:00:01 /miniconda/user/bin/python3.10 /miniconda/user/bin/bhub-setup-notebook-worker
root       11235   11035  0 04:08 pts/0    00:00:01 /miniconda/user/bin/python3.10 /miniconda/user/bin/bhub-setup-notebook-worker
root       11236   11035  0 04:08 pts/0    00:00:01 /miniconda/user/bin/python3.10 /miniconda/user/bin/bhub-setup-notebook-worker
root       11237   11035  0 04:08 pts/0    00:00:01 /miniconda/user/bin/python3.10 /miniconda/user/bin/bhub-setup-notebook-worker
root       11238   11035  0 04:08 pts/0    00:00:01 /miniconda/user/bin/python3.10 /miniconda/user/bin/bhub-setup-notebook-worker
root       11239   11035  0 04:08 pts/0    00:00:01 /miniconda/user/bin/python3.10 /miniconda/user/bin/bhub-setup-notebook-worker
root       11240   11035  0 04:08 pts/0    00:00:01 /miniconda/user/bin/python3.10 /miniconda/user/bin/bhub-setup-notebook-worker
root       11241   11035  0 04:08 pts/0    00:00:01 /miniconda/user/bin/python3.10 /miniconda/user/bin/bhub-setup-notebook-worker
root       11242   11035  0 04:08 pts/0    00:00:01 /miniconda/user/bin/python3.10 /miniconda/user/bin/bhub-setup-notebook-worker
root       11243   11035  0 04:08 pts/0    00:00:01 /miniconda/user/bin/python3.10 /miniconda/user/bin/bhub-setup-notebook-worker
root       11244   11035  0 04:08 pts/0    00:00:01 /miniconda/user/bin/python3.10 /miniconda/user/bin/bhub-setup-notebook-worker
root       11245   11035  0 04:08 pts/0    00:00:01 /miniconda/user/bin/python3.10 /miniconda/user/bin/bhub-setup-notebook-worker
root       11246   11035  0 04:08 pts/0    00:00:01 /miniconda/user/bin/python3.10 /miniconda/user/bin/bhub-setup-notebook-worker
root       11247   11035  0 04:08 pts/0    00:00:01 /miniconda/user/bin/python3.10 /miniconda/user/bin/bhub-setup-notebook-worker
root       11248   11035  0 04:08 pts/0    00:00:01 /miniconda/user/bin/python3.10 /miniconda/user/bin/bhub-create-kernel-worker
root       11249   11035  0 04:08 pts/0    00:00:01 /miniconda/user/bin/python3.10 /miniconda/user/bin/bhub-create-kernel-worker
root       11250   11035  0 04:08 pts/0    00:00:01 /miniconda/user/bin/python3.10 /miniconda/user/bin/bhub-create-kernel-worker
root       11251   11035  0 04:08 pts/0    00:00:01 /miniconda/user/bin/python3.10 /miniconda/user/bin/bhub-create-kernel-worker
root       11252   11035  0 04:08 pts/0    00:00:01 /miniconda/user/bin/python3.10 /miniconda/user/bin/bhub-create-kernel-worker
root       11253   11035  0 04:08 pts/0    00:00:01 /miniconda/user/bin/python3.10 /miniconda/user/bin/bhub-create-kernel-worker
root       11254   11035  0 04:08 pts/0    00:00:01 /miniconda/user/bin/python3.10 /miniconda/user/bin/bhub-create-kernel-worker
root       11255   11035  0 04:08 pts/0    00:00:01 /miniconda/user/bin/python3.10 /miniconda/user/bin/bhub-create-kernel-worker
root       11256   11035  0 04:08 pts/0    00:00:01 /miniconda/user/bin/python3.10 /miniconda/user/bin/bhub-create-kernel-worker
root       11257   11035  0 04:08 pts/0    00:00:01 /miniconda/user/bin/python3.10 /miniconda/user/bin/bhub-create-kernel-worker
root       11258   11035  0 04:08 pts/0    00:00:01 /miniconda/user/bin/python3.10 /miniconda/user/bin/bhub-create-kernel-worker
root       11259   11035  0 04:08 pts/0    00:00:01 /miniconda/user/bin/python3.10 /miniconda/user/bin/bhub-create-kernel-worker
root       11260   11035  0 04:08 pts/0    00:00:01 /miniconda/user/bin/python3.10 /miniconda/user/bin/bhub-create-kernel-worker
root       11261   11035  0 04:08 pts/0    00:00:01 /miniconda/user/bin/python3.10 /miniconda/user/bin/bhub-create-kernel-worker
root       11262   11035  0 04:08 pts/0    00:00:01 /miniconda/user/bin/python3.10 /miniconda/user/bin/bhub-create-kernel-worker
root       11264   11263  0 04:08 pts/0    00:00:10 /miniconda/user/bin/python3.10 /miniconda/user/bin/jupyterhub --config /configs/hub/etc/config.py --ip 0.0.0.0 --port 18000 --no-ssl
root       11422   11264  0 04:08 ?        00:00:02 node /miniconda/user/bin/configurable-http-proxy --ip 0.0.0.0 --port 18000 --api-ip 127.0.0.1 --api-port 18001 --error-target http://5fc5db8bc5cf:18081/hub/error --log-level info
root       11436   11264  0 04:08 ?        00:00:00 /miniconda/user/bin/python3.10 -m jupyterhub_idle_culler --timeout=36000
root       46573    1507  0 07:54 pts/1    00:00:00 grep --color=auto miniconda
root@ip-172-31-39-182:/biocolab/installation-2.1.11/test#

-------

-------


root@ip-172-31-39-182:/biocolab/installation-2.1.11/test# ps -ef | grep nginx
root       10327   10312  0 04:04 pts/0    00:00:00 nginx: master process /usr/sbin/nginx -g daemon off;
www-data   10374   10327  0 04:04 pts/0    00:00:00 nginx: worker process
www-data   10375   10327  0 04:04 pts/0    00:00:00 nginx: worker process
www-data   10376   10327  0 04:04 pts/0    00:00:00 nginx: worker process
www-data   10377   10327  0 04:04 pts/0    00:00:00 nginx: worker process
root       46627    1507  0 07:54 pts/1    00:00:00 grep --color=auto nginx
root@ip-172-31-39-182:/biocolab/installation-2.1.11/test#

-------

-------

root@ip-172-31-39-182:/biocolab/installation-2.1.11/test# ps -ef | grep postgres
ubuntu     10315   10312  0 04:04 pts/0    00:00:00 /opt/bitnami/postgresql/bin/postgres -D /bitnami/postgresql/data --config-file=/opt/bitnami/postgresql/conf/postgresql.conf --external_pid_file=/opt/bitnami/postgresql/tmp/postgresql.pid --hba_file=/opt/bitnami/postgresql/conf/pg_hba.conf
ubuntu     10384   10315  0 04:04 ?        00:00:00 postgres: checkpointer
ubuntu     10385   10315  0 04:04 ?        00:00:00 postgres: background writer
ubuntu     10388   10315  0 04:04 ?        00:00:00 postgres: walwriter
ubuntu     10389   10315  0 04:04 ?        00:00:00 postgres: autovacuum launcher
ubuntu     10390   10315  0 04:04 ?        00:00:00 postgres: logical replication launcher
ubuntu     11335   10315  0 04:08 ?        00:00:00 postgres: postgres postgres 172.17.0.1(38918) idle
ubuntu     11336   10315  0 04:08 ?        00:00:00 postgres: postgres biocolab 172.17.0.1(38924) idle
ubuntu     11421   10315  0 04:08 ?        00:00:00 postgres: postgres biocohub 172.17.0.1(38936) idle
ubuntu     11516   10315  0 04:09 ?        00:00:00 postgres: postgres biocolab 172.17.0.1(55506) idle
root       46638    1507  0 07:55 pts/1    00:00:00 grep --color=auto postgres
root@ip-172-31-39-182:/biocolab/installation-2.1.11/test#
Check process with BioProxy container
root@ip-172-31-39-182:/biocolab/installation-2.1.11/test# docker exec -it  bioproxy /bin/bash
root@6c1fca69acf1:/home# ps -ef
UID          PID    PPID  C STIME TTY          TIME CMD
root           1       0  0 04:04 pts/0    00:00:00 /bin/bash /super.sh
root         167       1  0 04:04 pts/0    00:00:06 /usr/bin/python3 /usr/bin/supervisord -n -c /etc/supervisor/supervisord.conf
root         168     167  0 04:04 pts/0    00:00:00 /usr/sbin/cron -f
memcach+     169     167  0 04:04 pts/0    00:00:02 /usr/bin/memcached -p 11211 -u memcached -m 128 -c 1024000 -P /memcached/program.pid
postgres     170     167  0 04:04 pts/0    00:00:00 /opt/bitnami/postgresql/bin/postgres -D /bitnami/postgresql/data --config-file=/opt/bit
redis        171     167  0 04:04 pts/0    00:00:25 /usr/bin/redis-server 0.0.0.0:6379
root         182     167  0 04:04 pts/0    00:00:00 nginx: master process /usr/sbin/nginx -g daemon off;
root         183     167  0 04:04 pts/0    00:00:00 /usr/bin/node /server.js
www-data     184     167  0 04:04 pts/0    00:00:10 /usr/local/sbin/haproxy -f /etc/haproxy/haproxy.cfg -p /var/run/haproxy.pid
www-data     229     182  0 04:04 pts/0    00:00:00 nginx: worker process
www-data     230     182  0 04:04 pts/0    00:00:00 nginx: worker process
www-data     231     182  0 04:04 pts/0    00:00:00 nginx: worker process
www-data     232     182  0 04:04 pts/0    00:00:00 nginx: worker process
postgres     239     170  0 04:04 ?        00:00:00 postgres: checkpointer
postgres     240     170  0 04:04 ?        00:00:00 postgres: background writer
postgres     243     170  0 04:04 ?        00:00:00 postgres: walwriter
postgres     244     170  0 04:04 ?        00:00:00 postgres: autovacuum launcher
postgres     245     170  0 04:04 ?        00:00:00 postgres: logical replication launcher
root         298     167  0 04:04 pts/0    00:00:05 /usr/local/bin/dataplaneapi --port 5555 -b /usr/local/sbin/haproxy -c /etc/haproxy/hapr
postgres     467     170  0 04:08 ?        00:00:00 postgres: postgres postgres 172.17.0.1(38918) idle
postgres     468     170  0 04:08 ?        00:00:00 postgres: postgres biocolab 172.17.0.1(38924) idle
postgres     469     170  0 04:08 ?        00:00:00 postgres: postgres biocohub 172.17.0.1(38936) idle
postgres     473     170  0 04:09 ?        00:00:00 postgres: postgres biocolab 172.17.0.1(55506) idle
root        9008       0  0 07:57 pts/1    00:00:00 /bin/bash
root        9014    9008  0 07:57 pts/1    00:00:00 ps -ef
root@6c1fca69acf1:/home#
Check process with BioColab container
root@5fc5db8bc5cf:/home# ps -ef
UID          PID    PPID  C STIME TTY          TIME CMD
root           1       0  0 04:08 pts/0    00:00:00 /bin/bash /super.sh
root         131       1  0 04:08 pts/0    00:00:10 /usr/bin/python3 /usr/bin/supervisord -n -c /etc/supervisor/supervisord.conf
mosquit+     133     131  0 04:08 pts/0    00:00:06 /usr/local/sbin/mosquitto -c /mosquitto/config/mosquitto.conf
beansta+     134     131  0 04:08 pts/0    00:00:00 /usr/local/bin/beanstalkd -b /appdata/beanstalkd -f 1000 -u beanstalkd
root         136     131  0 04:08 pts/0    00:00:00 /usr/bin/Xvfb :0.0 -screen 0 800x600x16 -dpi 75 -nolisten tcp -audit 4 -ac -auth /root/
root         144     131  0 04:08 pts/0    00:00:00 /usr/bin/aria2c --enable-rpc --rpc-listen-all --rpc-allow-origin-all --rpc-secret=*****
root         147     131  0 04:08 pts/0    00:00:22 /appdata/apps/t2d_blc_tool
root         148     131  0 04:08 pts/0    00:01:50 /appdata/apps/t2d_dsc_tool
root         149     131  0 04:08 pts/0    00:00:00 sshd: /usr/sbin/sshd -p 2223 -D [listener] 0 of 10-100 startups
root         150     131  0 04:08 pts/0    00:00:00 /usr/sbin/cron -f
root         282     131  0 04:08 pts/0    00:00:01 /miniconda/user/bin/python3.10 /miniconda/user/bin/bhub-create-custom-task-worker
root         283     131  0 04:08 pts/0    00:00:01 /miniconda/user/bin/python3.10 /miniconda/user/bin/bhub-create-custom-task-worker
root         284     131  0 04:08 pts/0    00:00:01 /miniconda/user/bin/python3.10 /miniconda/user/bin/bhub-create-custom-task-worker
root         285     131  0 04:08 pts/0    00:00:01 /miniconda/user/bin/python3.10 /miniconda/user/bin/bhub-create-custom-task-worker
root         286     131  0 04:08 pts/0    00:00:01 /miniconda/user/bin/python3.10 /miniconda/user/bin/bhub-create-custom-task-worker
root         287     131  0 04:08 pts/0    00:00:01 /miniconda/user/bin/python3.10 /miniconda/user/bin/bhub-create-custom-task-worker
root         288     131  0 04:08 pts/0    00:00:01 /miniconda/user/bin/python3.10 /miniconda/user/bin/bhub-create-custom-task-worker
root         289     131  0 04:08 pts/0    00:00:01 /miniconda/user/bin/python3.10 /miniconda/user/bin/bhub-create-custom-task-worker
root         290     131  0 04:08 pts/0    00:00:01 /miniconda/user/bin/python3.10 /miniconda/user/bin/bhub-create-custom-task-worker
root         291     131  0 04:08 pts/0    00:00:01 /miniconda/user/bin/python3.10 /miniconda/user/bin/bhub-create-custom-task-worker
root         292     131  0 04:08 pts/0    00:00:01 /miniconda/user/bin/python3.10 /miniconda/user/bin/bhub-create-custom-task-worker
root         293     131  0 04:08 pts/0    00:00:01 /miniconda/user/bin/python3.10 /miniconda/user/bin/bhub-create-custom-task-worker
root         295     131  0 04:08 pts/0    00:00:01 /miniconda/user/bin/python3.10 /miniconda/user/bin/bhub-create-custom-task-worker
root         296     131  0 04:08 pts/0    00:00:01 /miniconda/user/bin/python3.10 /miniconda/user/bin/bhub-create-custom-task-worker
root         297     131  0 04:08 pts/0    00:00:01 /miniconda/user/bin/python3.10 /miniconda/user/bin/bhub-create-custom-task-worker
root         298     131  0 04:08 pts/0    00:00:01 /miniconda/user/bin/python3.10 /miniconda/user/bin/bhub-create-custom-task-worker
root         299     131  0 04:08 pts/0    00:00:01 /miniconda/user/bin/python3.10 /miniconda/user/bin/bhub-create-custom-task-worker
root         300     131  0 04:08 pts/0    00:00:01 /miniconda/user/bin/python3.10 /miniconda/user/bin/bhub-create-custom-task-worker
root         301     131  0 04:08 pts/0    00:00:01 /miniconda/user/bin/python3.10 /miniconda/user/bin/bhub-create-custom-task-worker
root         302     131  0 04:08 pts/0    00:00:01 /miniconda/user/bin/python3.10 /miniconda/user/bin/bhub-create-custom-task-worker
root         314     131  0 04:08 pts/0    00:00:01 /miniconda/user/bin/python3.10 /miniconda/user/bin/bhub-pack-notebook-worker
root         315     131  0 04:08 pts/0    00:00:01 /miniconda/user/bin/python3.10 /miniconda/user/bin/bhub-pack-notebook-worker
root         316     131  0 04:08 pts/0    00:00:01 /miniconda/user/bin/python3.10 /miniconda/user/bin/bhub-setup-notebook-worker
root         317     131  0 04:08 pts/0    00:00:01 /miniconda/user/bin/python3.10 /miniconda/user/bin/bhub-setup-notebook-worker
root         318     131  0 04:08 pts/0    00:00:01 /miniconda/user/bin/python3.10 /miniconda/user/bin/bhub-setup-notebook-worker
root         319     131  0 04:08 pts/0    00:00:01 /miniconda/user/bin/python3.10 /miniconda/user/bin/bhub-setup-notebook-worker
root         320     131  0 04:08 pts/0    00:00:01 /miniconda/user/bin/python3.10 /miniconda/user/bin/bhub-setup-notebook-worker
root         321     131  0 04:08 pts/0    00:00:00 /miniconda/user/bin/python3.10 /miniconda/user/bin/bhub-setup-notebook-worker
root         322     131  0 04:08 pts/0    00:00:01 /miniconda/user/bin/python3.10 /miniconda/user/bin/bhub-setup-notebook-worker
root         325     131  0 04:08 pts/0    00:00:01 /miniconda/user/bin/python3.10 /miniconda/user/bin/bhub-setup-notebook-worker
root         326     131  0 04:08 pts/0    00:00:01 /miniconda/user/bin/python3.10 /miniconda/user/bin/bhub-setup-notebook-worker
root         327     131  0 04:08 pts/0    00:00:01 /miniconda/user/bin/python3.10 /miniconda/user/bin/bhub-setup-notebook-worker
root         328     131  0 04:08 pts/0    00:00:01 /miniconda/user/bin/python3.10 /miniconda/user/bin/bhub-setup-notebook-worker
root         330     131  0 04:08 pts/0    00:00:01 /miniconda/user/bin/python3.10 /miniconda/user/bin/bhub-setup-notebook-worker
root         331     131  0 04:08 pts/0    00:00:01 /miniconda/user/bin/python3.10 /miniconda/user/bin/bhub-setup-notebook-worker
root         332     131  0 04:08 pts/0    00:00:01 /miniconda/user/bin/python3.10 /miniconda/user/bin/bhub-setup-notebook-worker
root         333     131  0 04:08 pts/0    00:00:01 /miniconda/user/bin/python3.10 /miniconda/user/bin/bhub-setup-notebook-worker
root         334     131  0 04:08 pts/0    00:00:01 /miniconda/user/bin/python3.10 /miniconda/user/bin/bhub-setup-notebook-worker
root         335     131  0 04:08 pts/0    00:00:01 /miniconda/user/bin/python3.10 /miniconda/user/bin/bhub-setup-notebook-worker
root         336     131  0 04:08 pts/0    00:00:01 /miniconda/user/bin/python3.10 /miniconda/user/bin/bhub-setup-notebook-worker
root         337     131  0 04:08 pts/0    00:00:01 /miniconda/user/bin/python3.10 /miniconda/user/bin/bhub-setup-notebook-worker
root         338     131  0 04:08 pts/0    00:00:01 /miniconda/user/bin/python3.10 /miniconda/user/bin/bhub-setup-notebook-worker
root         339     131  0 04:08 pts/0    00:00:01 /miniconda/user/bin/python3.10 /miniconda/user/bin/bhub-setup-notebook-worker
root         340     131  0 04:08 pts/0    00:00:01 /miniconda/user/bin/python3.10 /miniconda/user/bin/bhub-setup-notebook-worker
root         341     131  0 04:08 pts/0    00:00:01 /miniconda/user/bin/python3.10 /miniconda/user/bin/bhub-setup-notebook-worker
root         342     131  0 04:08 pts/0    00:00:01 /miniconda/user/bin/python3.10 /miniconda/user/bin/bhub-setup-notebook-worker
root         343     131  0 04:08 pts/0    00:00:01 /miniconda/user/bin/python3.10 /miniconda/user/bin/bhub-setup-notebook-worker
root         344     131  0 04:08 pts/0    00:00:01 /miniconda/user/bin/python3.10 /miniconda/user/bin/bhub-create-kernel-worker
root         345     131  0 04:08 pts/0    00:00:01 /miniconda/user/bin/python3.10 /miniconda/user/bin/bhub-create-kernel-worker
root         346     131  0 04:08 pts/0    00:00:01 /miniconda/user/bin/python3.10 /miniconda/user/bin/bhub-create-kernel-worker
root         347     131  0 04:08 pts/0    00:00:01 /miniconda/user/bin/python3.10 /miniconda/user/bin/bhub-create-kernel-worker
root         348     131  0 04:08 pts/0    00:00:01 /miniconda/user/bin/python3.10 /miniconda/user/bin/bhub-create-kernel-worker
root         349     131  0 04:08 pts/0    00:00:01 /miniconda/user/bin/python3.10 /miniconda/user/bin/bhub-create-kernel-worker
root         350     131  0 04:08 pts/0    00:00:01 /miniconda/user/bin/python3.10 /miniconda/user/bin/bhub-create-kernel-worker
root         351     131  0 04:08 pts/0    00:00:01 /miniconda/user/bin/python3.10 /miniconda/user/bin/bhub-create-kernel-worker
root         352     131  0 04:08 pts/0    00:00:01 /miniconda/user/bin/python3.10 /miniconda/user/bin/bhub-create-kernel-worker
root         353     131  0 04:08 pts/0    00:00:01 /miniconda/user/bin/python3.10 /miniconda/user/bin/bhub-create-kernel-worker
root         354     131  0 04:08 pts/0    00:00:01 /miniconda/user/bin/python3.10 /miniconda/user/bin/bhub-create-kernel-worker
root         355     131  0 04:08 pts/0    00:00:01 /miniconda/user/bin/python3.10 /miniconda/user/bin/bhub-create-kernel-worker
root         356     131  0 04:08 pts/0    00:00:01 /miniconda/user/bin/python3.10 /miniconda/user/bin/bhub-create-kernel-worker
root         357     131  0 04:08 pts/0    00:00:01 /miniconda/user/bin/python3.10 /miniconda/user/bin/bhub-create-kernel-worker
root         358     131  0 04:08 pts/0    00:00:01 /miniconda/user/bin/python3.10 /miniconda/user/bin/bhub-create-kernel-worker
root         359     131  0 04:08 pts/0    00:00:00 /bin/bash /start.sh
root         360     359  0 04:08 pts/0    00:00:10 /miniconda/user/bin/python3.10 /miniconda/user/bin/jupyterhub --config /configs/hub/etc
root         513     360  0 04:08 ?        00:00:02 node /miniconda/user/bin/configurable-http-proxy --ip 0.0.0.0 --port 18000 --api-ip 127
root         527     360  0 04:08 ?        00:00:00 /miniconda/user/bin/python3.10 -m jupyterhub_idle_culler --timeout=36000
root        9394       0  0 07:58 pts/1    00:00:00 /bin/bash
root        9406    9394  0 07:58 pts/1    00:00:00 ps -ef
root@5fc5db8bc5cf:/home#
Application location 
Application location
BioColab
docker exec -it biocolab /bin/bash
root@5fc5db8bc5cf:/appdata/share/miniconda# ll
total 16
drwxr-xr-x  4 root root 4096 Dec 15 04:08 ./
drwxr-xr-x  6 root root 4096 Dec 15 03:36 ../
drwxr-xr-x  2 root root 4096 Sep 18 08:09 apps/
lrwxrwxrwx  1 root root   24 Dec 15 04:08 miniconda -> /appdata/share/miniconda/
drwxr-xr-x 38 root root 4096 Oct 10 12:41 user/
root@5fc5db8bc5cf:/appdata/share/miniconda# pwd
/appdata/share/miniconda
root@5fc5db8bc5cf:/appdata/share/miniconda#
Installation for APP
root@5fc5db8bc5cf:/appdata/.bbcache# ls -l
total 12
-rwx------ 1 root root  908 Dec 15 08:08 kjjsdkfjslkdmlkclriltrij78783749879875.license
-rw------- 1 root root  908 Dec 15 08:08 kjjsdkfjslkdmlkclriltrij78783749879875.license_bk
drwx------ 4 root root 4096 Dec 15 03:30 searching
root@5fc5db8bc5cf:/appdata/.bbcache# ls searching/
conda.bleve  download
root@5fc5db8bc5cf:/appdata/.bbcache# tree
.
├── kjjsdkfjslkdmlkclriltrij78783749879875.license
├── kjjsdkfjslkdmlkclriltrij78783749879875.license_bk
└── searching
    ├── conda.bleve
    │   ├── index_meta.json
    │   └── store
    │       ├── 00000000013c.zap
    │       ├── 00000000014f.zap
    │       ├── 000000000155.zap
    │       ├── 000000000164.zap
    │       ├── 000000000173.zap
    │       ├── 00000000017d.zap
    │       ├── 000000000191.zap
    │       ├── 000000000192.zap
    │       └── root.bolt
    └── download
        ├── anaconda_channeldata.json
        ├── anaconda_channeldata.json.converted
        ├── anaconda_linux-64.json
        ├── anaconda_noarch.json
        ├── bioconda_linux-64.json
        ├── bioconda_noarch.json
        ├── bioturing_linux-64.json
        ├── bioturing_noarch.json
        ├── cctbx202211_linux-64.json
        ├── cctbx202211_noarch.json
        ├── conda-forge_channeldata.json
        ├── conda-forge_channeldata.json.converted
        ├── conda-forge_linux-64.json
        ├── conda-forge_noarch.json
        ├── fastai_linux-64.json
        ├── fastai_noarch.json
        ├── fastchan_linux-64.json
        ├── fastchan_noarch.json
        ├── intel_linux-64.json
        ├── intel_noarch.json
        ├── main_linux-64.json
        ├── main_noarch.json
        ├── nvidia_linux-64.json
        ├── nvidia_noarch.json
        ├── ome_linux-64.json
        ├── ome_noarch.json
        ├── prometeia_linux-64.json
        ├── prometeia_noarch.json
        ├── pytorch_linux-64.json
        ├── pytorch_noarch.json
        ├── r_linux-64.json
        ├── r_noarch.json
        ├── sunpy_linux-64.json
        └── sunpy_noarch.json

4 directories, 46 files
root@5fc5db8bc5cf:/appdata/.bbcache#
Application log
root@5fc5db8bc5cf:/appdata/logs# pwd
/appdata/logs
root@5fc5db8bc5cf:/appdata/logs# ls -l
total 0
-rwx------ 1 root root 0 Dec 15 03:44 jupyterhub.log
root@5fc5db8bc5cf:/appdata/logs#

# ls -la /var/log/supervisor

root@5fc5db8bc5cf:/appdata/logs# ls -la /var/log/supervisor
total 444
drwx------ 1 root root   4096 Dec 15 04:08 .
drwxr-xr-x 1 root root   4096 Dec 15 04:08 ..
-rwx------ 1 root root      0 Dec 15 04:08 aria2c_stderr.log
-rwx------ 1 root root  12536 Dec 15 07:33 aria2c_stdout.log
-rwx------ 1 root root      0 Dec 15 04:08 beanstalkd_stderr.log
-rwx------ 1 root root      0 Dec 15 04:08 beanstalkd_stdout.log
-rw-r--r-- 1 root root      0 Dec 15 04:08 bhub-create-custom-task-worker_stderr.log
-rw-r--r-- 1 root root 108160 Dec 15 08:03 bhub-create-custom-task-worker_stdout.log
-rw-r--r-- 1 root root      0 Dec 15 04:08 bhub-create-kernel-worker_stderr.log
-rw-r--r-- 1 root root  90120 Dec 15 08:03 bhub-create-kernel-worker_stdout.log
-rw-r--r-- 1 root root      0 Dec 15 04:08 bhub-pack-notebook-worker_stderr.log
-rw-r--r-- 1 root root  11416 Dec 15 08:03 bhub-pack-notebook-worker_stdout.log
-rw-r--r-- 1 root root      0 Dec 15 04:08 bhub-setup-notebook-worker_stderr.log
-rw-r--r-- 1 root root 143950 Dec 15 08:03 bhub-setup-notebook-worker_stdout.log
-rwx------ 1 root root      0 Dec 15 04:08 cleanup_stderr.log
-rwx------ 1 root root     24 Dec 15 04:08 cleanup_stdout.log
-rwx------ 1 root root      0 Dec 15 04:08 colab-unset-vars_stderr.log
-rwx------ 1 root root      0 Dec 15 04:08 colab-unset-vars_stdout.log
-rwx------ 1 root root    720 Dec 15 04:08 colab_stderr.log
-rwx------ 1 root root    151 Dec 15 04:08 colab_stdout.log
-rwx------ 1 root root   4050 Dec 15 04:08 colabblc_stderr.log
-rwx------ 1 root root      0 Dec 15 04:08 colabblc_stdout.log
-rwx------ 1 root root      0 Dec 15 04:08 cron_stderr.log
-rwx------ 1 root root      0 Dec 15 04:08 cron_stdout.log
-rwx------ 1 root root    613 Dec 15 04:08 jupyterhub-upgrade-db_stderr.log
-rwx------ 1 root root     26 Dec 15 04:08 jupyterhub-upgrade-db_stdout.log
-rwx------ 1 root root     77 Dec 15 04:08 jupyterhub_stderr.log
-rwx------ 1 root root   3554 Dec 15 08:03 jupyterhub_stdout.log
-rwx------ 1 root root  14333 Dec 15 08:04 mosquitto_stderr.log
-rwx------ 1 root root      0 Dec 15 04:08 mosquitto_stdout.log
-rwx------ 1 root root      0 Dec 15 04:08 sshd_stderr.log
-rwx------ 1 root root      0 Dec 15 04:08 sshd_stdout.log
-rwx------ 1 root root      0 Dec 15 04:08 xvfb_stderr.log
-rwx------ 1 root root      0 Dec 15 04:08 xvfb_stdout.log
root@5fc5db8bc5cf:/appdata/logs#
BioProxy
docker exec -it bioproxy /bin/bash
root@6c1fca69acf1:/# ls
bin               checkstatus.sh                 etc    memcached  postgresql-entrypoint.sh    run        sys
bitnami           dev                            home   mnt        prepare_letsencrypt_pem.sh  sbin       tmp
boot              docker-entrypoint-initdb.d     lib    nfs        proc                        server.js  usr
certbot_timer.sh  docker-entrypoint-preinitdb.d  lib64  nfs.sh     renew.sh                    srv        var
checkssl.sh       docker-entrypoint.sh           media  opt        root                        super.sh
root@6c1fca69acf1:/#

-------

-------

root@6c1fca69acf1:/var/log/supervisor# ls -l
total 220
-rw-r--r-- 1 root root     45 Dec 15 04:04 certbot_stderr.log
-rw-r--r-- 1 root root     21 Dec 15 04:04 certbot_stdout.log
-rw-r--r-- 1 root root      0 Dec 15 04:04 cron_stderr.log
-rw-r--r-- 1 root root      0 Dec 15 04:04 cron_stdout.log
-rw-r--r-- 1 root root      0 Dec 15 04:04 dataplaneapi_stderr.log
-rw-r--r-- 1 root root      0 Dec 15 04:04 dataplaneapi_stdout.log
-rw-r--r-- 1 root root    997 Dec 15 04:08 haproxy_stderr.log
-rw-r--r-- 1 root root      0 Dec 15 04:04 haproxy_stdout.log
-rw-r--r-- 1 root root      0 Dec 15 04:04 memcached_stderr.log
-rw-r--r-- 1 root root      0 Dec 15 04:04 memcached_stdout.log
-rw-r--r-- 1 root root      0 Dec 15 04:04 nfsserver_stderr.log
-rw-r--r-- 1 root root 170850 Dec 15 08:08 nfsserver_stdout.log
-rw-r--r-- 1 root root      0 Dec 15 04:04 nginx_stderr.log
-rw-r--r-- 1 root root      0 Dec 15 04:04 nginx_stdout.log
-rw-r--r-- 1 root root      0 Dec 15 04:04 pgentrypoint_stderr.log
-rw-r--r-- 1 root root     19 Dec 15 04:04 pgentrypoint_stdout.log
-rw-r--r-- 1 root root  24450 Dec 15 08:09 postgresql_stderr.log
-rw-r--r-- 1 root root      0 Dec 15 04:04 postgresql_stdout.log
-rw-r--r-- 1 root root      0 Dec 15 04:04 redis_stderr.log
-rw-r--r-- 1 root root      0 Dec 15 04:04 redis_stdout.log
-rw-r--r-- 1 root root      0 Dec 15 04:04 sslapi_stderr.log
-rw-r--r-- 1 root root     81 Dec 15 04:04 sslapi_stdout.log
root@6c1fca69acf1:/var/log/supervisor#
Certificate chain 
When ever you would have bundle , pem, p7b three files then you must combine pem, bundle.pem and create certificate chain.
cat test.pem test_bundle.pem > test_chained.pem
now you would have test_chained.pem and test.p7b file.
# openssl x509 -text -noout -in test_chained.pem
above command will show the detail and validation.
BioStudio Supervior services 
All supervisior service configured in below location.
/etc/supervisor/supervisord.conf
Download t2d services inside BioColab
# cd /appdata/apps/download
# wget "https://colablocal.bioturing.com/content/t2d_blc_tool"
# wget "https://colablocal.bioturing.com/content/t2d_dsc_tool"
# chmod 700 t2d_blc_tool t2d_dsc_tool
# mv t2d_* ../
#
# supervisorctl restart colabblc:*
# supervisorctl restart colab:*
Restart t2d services inside BioColab
# supervisorctl restart colabblc:*
# supervisorctl restart colab:*

root@b1a226ccc20a:/etc/supervisor# supervisorctl restart colabblc:*
colabblc:colabblc_00: stopped
colabblc:colabblc_00: started
Restart haproxy services
root@507cd2637a97:/home# supervisorctl restart haproxy:*
haproxy:haproxy_00: stopped
haproxy:haproxy_00: started
Installing Nginx Proxy 
# sudo apt install nginx

root@ip-172-31-39-123:/biocolab/installation-2.1.11/biocolab# curl -I 127.0.0.1
HTTP/1.1 200 OK
Server: nginx/1.18.0 (Ubuntu)
Date: Mon, 18 Dec 2023 07:09:02 GMT
Content-Type: text/html
Content-Length: 612
Last-Modified: Mon, 18 Dec 2023 07:08:18 GMT
Connection: keep-alive
ETag: "657fefe2-264"
Accept-Ranges: bytes
🔔 NOTE: Unti, we will not post vhost entry with Nginx, You can see browser window was Nginx s running well.
Nginx Configuration 
# In case of we are not having SSL

server {
    listen 0.0.0.0:80;
    server_name <Your Domain>.com www.<Your Domain>.com;
    #return 301 https:<Your Domain>.com$request_uri;

    ignore_invalid_headers off;
    client_max_body_size 0;
    client_body_timeout 1d;
    proxy_buffering off;
    proxy_read_timeout 1d;
    proxy_connect_timeout 1d;
    proxy_send_timeout 1d;
    location / {
        proxy_pass http://127.0.0.1:8081;
        proxy_http_version 1.1;
        proxy_set_header X-Real-IP $remote_addr;
        proxy_set_header X-Forwarded-For $proxy_add_x_forwarded_for;
        proxy_set_header X-Forwarded-Proto $scheme;
        proxy_set_header Host $http_host;
        add_header X-Host $host;
        proxy_set_header X-Forwarded-Host $http_host;
        proxy_set_header Upgrade $http_upgrade;
        proxy_set_header Connection 'upgrade';
    }
    location ~ /\.ht {
        deny all;
    }
}

server {
    listen 0.0.0.0:443;
#       ssl http2;
    server_name <Your Domain>.com www.<Your Domain>.com;
    if ($host = 'www.<Your Domain>.com' ) {
        rewrite  ^/(.*)$  https://<Your Domain>.com/$1  permanent;
    }
    #ssl_certificate /etc/ssl/certs/testdomain.pem;
    #ssl_certificate_key /etc/pki/tls/private/testdomain.key;
    #ssl_session_timeout 1d;
    #ssl_session_cache shared:SSL:20m;
    #ssl_prefer_server_ciphers on;
    #ssl_protocols TLSv1 TLSv1.1 TLSv1.2;
    #ssl_ciphers EECDH+AESGCM:EDH+AESGCM:AES256+EECDH:AES256+EDH;
    ignore_invalid_headers off;
    client_max_body_size 0;
    client_body_timeout 1d;
    proxy_buffering off;
    proxy_read_timeout 1d;
    proxy_connect_timeout 1d;
    proxy_send_timeout 1d;
    location / {
        proxy_pass http://127.0.0.1:8081;
        proxy_http_version 1.1;
        proxy_set_header X-Real-IP $remote_addr;
        proxy_set_header X-Forwarded-For $proxy_add_x_forwarded_for;
        proxy_set_header X-Forwarded-Proto $scheme;
        proxy_set_header Host $http_host;
        add_header X-Host $host;
        proxy_set_header X-Forwarded-Host $http_host;
        proxy_set_header Upgrade $http_upgrade;
        proxy_set_header Connection 'upgrade';
    }
    location ~ /\.ht {
        deny all;
    }
}
Troubleshoot 
Not able to install Docker. 
⭕ Reason
Ceriticate issue.

 curl: (77) error setting certificate file: /etc/ssl/certs/ca-certificates.crt
⭕ Resolution
# echo insecure >> ~/.curlrc
fstab entry for mount point. 
⭕ Reason
To auto mount patition.
⭕ Resolution
UUID="3ad2185e-82dd-40cd-8d43-1a82a780d0be" /biocolab xfs defaults 0 0
Error code 413 ( Not able to upload large file). 
⭕ Reason
The HTTP 413 Content Too Large response status code signifies that the request entity surpasses the server-defined limits. This issue pertains to resource limitations.
⭕ Resolution
That issue can be fixed by updating the (Nginx) load balancer by incorporating the following value:

client_max_body_size = 0

By implementing this configuration, users will have the flexibility to upload files without any imposed size restrictions. Setting this value to zero will exempt the client request a body size check, allowing users to upload files of unlimited sizes.

- nginx load balancing standalone : client_max_body_size 0
- nginx k8s ingress : nginx.ingress.kubernetes.io/proxy-body-size 0

in case you have seperate Nginx Load Balancer.

    nginx.ingress.kubernetes.io/client_max_body_size: 100m
    nginx.ingress.kubernetes.io/proxy-body-size: 100m
    nginx.ingress.kubernetes.io/proxy-read-timeout: 3600
    nginx.ingress.kubernetes.io/proxy-send-timeout: 3600

--Based on situation -- anotation and values can be vary--

Kubernete ingress:

    nginx.ingress.kubernetes.io/client_max_body_size: 5000M
    nginx.ingress.kubernetes.io/proxy-body-size: 5000M
    nginx.ingress.kubernetes.io/proxy-buffer-size: 16k
    nginx.ingress.kubernetes.io/proxy-connect-timeout: "3600"
    nginx.ingress.kubernetes.io/proxy-read-timeout: "3600"
    nginx.ingress.kubernetes.io/proxy-send-timeout: "3600"
    nginx.ingress.kubernetes.io/use-regex: "true"

    nginx.ingress.kubernetes.io/rewrite-target /;
    nginx.ingress.kubernetes.io/ssl_protocols TLSv1 TLSv1.1 TLSv1.2 TLSv1.3;
    nginx.ingress.kubernetes.io/client-header-buffer-size 100k;

 Nginx lb:


    proxy_buffers 4 256k;
    proxy_buffer_size 256k;
    proxy_busy_buffers_size 256k;
    proxy_connect_timeout 3600s;
    proxy_read_timeout 3600s;
    proxy_send_timeout 3600s;
    client_max_body_size 5000M;

For Nginx LB, the value we updated will not be effective until we restart or reload it.

Restart Nginx in case needed:

1] Check Syntax

sudo nginx -t


2] Restart

sudo nginx -s reload

or

sudo systemctl reload nginx

or

sudo systemctl restart nginx
Ref:
Nginx Proxy Module
Nginx HTTP Module
Nginx Suffix rule
Conda installation error. 
⭕ Reason
There are several reason that conda driver failed to installed. It could be due to network, blocking, Speed, Software incompatibility with OS ...
⭕ Resolution
Driver can be intalled manually.
Kindly visit below site and choose driver according to OS.

https://developer.nvidia.com/cuda-downloads

root@biocolab-server:/lalit-test-nvidia-driver# sh cuda_12.2.2_535.104.05_linux.run
===========
= Summary =
===========

Driver:   Installed
Toolkit:  Installed in /usr/local/cuda-12.2/

Please make sure that
 -   PATH includes /usr/local/cuda-12.2/bin
 -   LD_LIBRARY_PATH includes /usr/local/cuda-12.2/lib64, or, add /usr/local/cuda-12.2/lib64 to /etc/ld.so.conf and run ldconfig as root

To uninstall the CUDA Toolkit, run cuda-uninstaller in /usr/local/cuda-12.2/bin
To uninstall the NVIDIA Driver, run nvidia-uninstall
Logfile is /var/log/cuda-installer.log
root@biocolab-server:/lalit-test-nvidia-driver#

=====================================
= Solution with cuda version 11.7.1 =
=====================================

sh cuda_11.7.1_515.65.01_linux.run --no-drm
Conda uninstallation. 
Sometime, we need to reinstall cuda tool kits. Please follow URL below to uninstall cuda tool kit.

https://docs.nvidia.com/cuda/cuda-installation-guide-linux/index.html

root@biocolab-server:/usr/local/cuda-12.2/bin# pwd
/usr/local/cuda-12.2/bin
root@biocolab-server:/usr/local/cuda-12.2/bin# ls -lhrt cuda*
-rwxr-xr-x 1 root root   15M Sep 22 05:47 cuda-gdb
-rwxr-xr-x 1 root root  789K Sep 22 05:47 cuda-gdbserver
-rwxr-xr-x 1 root root  6.6M Sep 22 05:49 cudafe++
-rwxr-xr-x 1 root root 1023K Sep 22 05:49 cuda-uninstaller
root@biocolab-server:/usr/local/cuda-12.2/bin#

To uninstall cuda driver. Just run uninstallation script.

cd /usr/local/cuda-12.2/bin

root@biocolab-server:/usr/local/cuda-12.2/bin# ./cuda-uninstaller
 Successfully uninstalled
Containers are failed to start automatically. 
⭕ Reason
There could be several reasons. It could be port mapping or ports are already in use ...etc
⭕ Resolution
Try to identify exact reason by start container manaully by following commands below.

Check docker status

# systemctl status docker.service

# systemctl status docker.service

# docker info

Check container status

# docker ps -a

Run container manually

# docker start biocolab

# docker start bioproxy

Chcek container log to see if we could see any errors

# docker logs biocolab

# docker logs bioproxy

NOTE: Service should be disable which cause port issue. Like NFS.
✏️ Please contact 📧 [support@bioturing.com] and share your issue.
Not able to launch server once try to go inside WORKSPACE. 
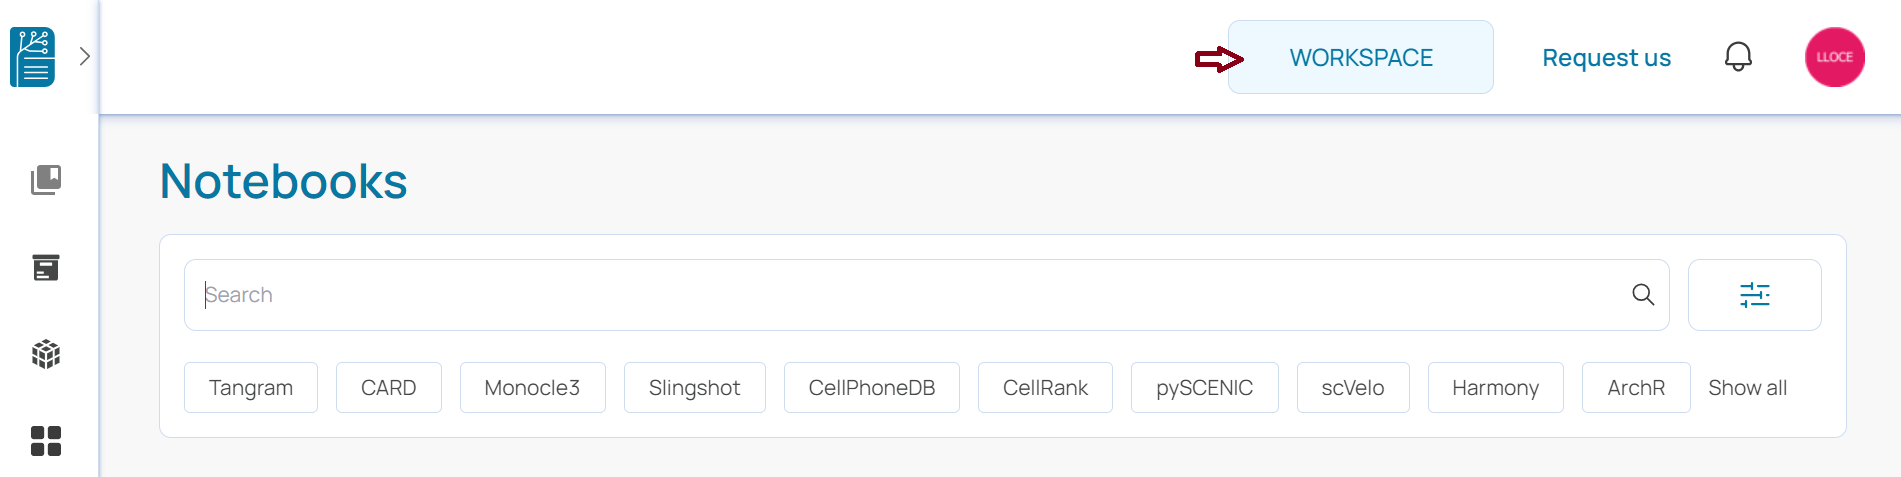
⭕ Reason
This issue is related to machine creation is not correct and volume. It could be wrong (Private IP) or wrong DNS.
⭕ Resolution
In order to resovle this issue. Please check and make sure that you configured machine private IP / DNS correctly.

Kindly run the following command to check machine IP.

# docker exec biocolab cat /etc/hosts

Check Machine Private IP configured with your DNS.

Note this IP and cross check with Machine IP creation on Admin dashboard.

http://<Domain name>/dashboard.

Kindly check you must create volume attached with this machine.

NOTE: volume name can be anything but Volume path should be "/home"
Not able to download notebook. 
⭕ Reason
There could be several reason behind this issue. Common reason is blocking below sites.

*.bioturing.com
*.anaconda.org
*repo.anaconda.com
Amazon S3
github.com
cdn-eu-west-1.s3.eu-west-1.amazonaws.com (euro -west1)
s3.us-west-2.amazonaws.com/cdn.bioturing.com (us -west2)
cdn.bioturing.com (us -west2)
⭕ Resolution
Kindly allow below sites.
*.bioturing.com
*.anaconda.org
*repo.anaconda.com
Amazon S3
github.com
cdn-eu-west-1.s3.eu-west-1.amazonaws.com (euro -west1)
s3.us-west-2.amazonaws.com/cdn.bioturing.com (us -west2)
cdn.bioturing.com (us -west2)
Workspace / any other element access is not showing graphics clear and images are not showing correctly. 
⭕ Reason
This issue is related to redirection from Load Balancer.
⭕ Resolution
Please check redirection rule on Load Balancer.

It should be "/*"

So that load balancer allowed all redirections.
Nginx config for BioStudio in case installing on the same server. 
Bioturing ecosystem
server {
    listen 0.0.0.0:80;
    server_name <test-domain.com> www.<test-domain.com>;
    return 301 https://<test-domain.com>$request_uri;
}
server {
    listen 0.0.0.0:443 ssl http2;
    # listen 0.0.0.0:443;
    server_name <test-domain.com> www.<test-domain.com>;
    if ($host = 'www.<test-domain.com>' ) {
        rewrite  ^/(.*)$  https://<test-domain.com>/$1  permanent;
    }
    ssl_certificate /etc/ssl/certs/<test-domain.com>.pem;
    ssl_certificate_key /etc/pki/tls/private/<test-domain.com>.key;
    ssl_session_timeout 1d;
    ssl_session_cache shared:SSL:20m;
    ssl_prefer_server_ciphers on;
    ssl_protocols TLSv1 TLSv1.1 TLSv1.2;
    ssl_ciphers EECDH+AESGCM:EDH+AESGCM:AES256+EECDH:AES256+EDH;
    ignore_invalid_headers off;
    client_max_body_size 0;
    client_body_timeout 1d;
    proxy_buffering off;
    proxy_read_timeout 1d;
    proxy_connect_timeout 1d;
    proxy_send_timeout 1d;
    location / {
        proxy_pass http://127.0.0.1:3000/;
        proxy_intercept_errors on;
        error_page 404 /404_not_found;
    }
}
BioStudio
server {
    listen 0.0.0.0:80;
    server_name <testdomain>.com www.<testdomain>.com;
    return 301 https://<testdomain>.com$request_uri;

    ignore_invalid_headers off;
    client_max_body_size 0;
    client_body_timeout 1d;
    proxy_buffering off;
    proxy_read_timeout 1d;
    proxy_connect_timeout 1d;
    proxy_send_timeout 1d;
    location / {
        proxy_pass http://127.0.0.1:8081;
        proxy_http_version 1.1;
        proxy_set_header X-Real-IP $remote_addr;
        proxy_set_header X-Forwarded-For $proxy_add_x_forwarded_for;
        proxy_set_header X-Forwarded-Proto $scheme;
        proxy_set_header Host $http_host;
        add_header X-Host $host;
        proxy_set_header X-Forwarded-Host $http_host;
        proxy_set_header Upgrade $http_upgrade;
        proxy_set_header Connection 'upgrade';
    }
    location ~ /\.ht {
        deny all;
    }
}

server {
    listen 0.0.0.0:443 ssl http2;
    server_name <testdomain>.com www.<testdomain>.com;
    if ($host = 'www.<testdomain>.com' ) {
        rewrite  ^/(.*)$  https://<testdomain>.com/$1  permanent;
    }
    ssl_certificate /etc/ssl/certs/testdomain.pem;
    ssl_certificate_key /etc/pki/tls/private/testdomain.key;
    ssl_session_timeout 1d;
    ssl_session_cache shared:SSL:20m;
    ssl_prefer_server_ciphers on;
    ssl_protocols TLSv1 TLSv1.1 TLSv1.2;
    ssl_ciphers EECDH+AESGCM:EDH+AESGCM:AES256+EECDH:AES256+EDH;
    ignore_invalid_headers off;
    client_max_body_size 0;
    client_body_timeout 1d;
    proxy_buffering off;
    proxy_read_timeout 1d;
    proxy_connect_timeout 1d;
    proxy_send_timeout 1d;
    location / {
        proxy_pass http://127.0.0.1:8081;
        proxy_http_version 1.1;
        proxy_set_header X-Real-IP $remote_addr;
        proxy_set_header X-Forwarded-For $proxy_add_x_forwarded_for;
        proxy_set_header X-Forwarded-Proto $scheme;
        proxy_set_header Host $http_host;
        add_header X-Host $host;
        proxy_set_header X-Forwarded-Host $http_host;
        proxy_set_header Upgrade $http_upgrade;
        proxy_set_header Connection 'upgrade';
    }
    location ~ /\.ht {
        deny all;
    }
}


============== OR ==============

server {
    listen 0.0.0.0:80;
    server_name <testdomain>.com www.<testdomain>.com;
    return 301 https://<testdomain>.com$request_uri;
}

server {
    listen 0.0.0.0:443 ssl http2;
    server_name <testdomain>.com www.<testdomain>.com;
    if ($host = 'www.<testdomain>.com' ) {
        rewrite  ^/(.*)$  https://<testdomain>.com/$1  permanent;
    }
    ssl_certificate /etc/ssl/certs/testdomain.pem;
    ssl_certificate_key /etc/pki/tls/private/testdomain.key;
    ssl_session_timeout 1d;
    ssl_session_cache shared:SSL:20m;
    ssl_prefer_server_ciphers on;
    ssl_protocols TLSv1 TLSv1.1 TLSv1.2;
    ssl_ciphers EECDH+AESGCM:EDH+AESGCM:AES256+EECDH:AES256+EDH;
    ignore_invalid_headers off;
    client_max_body_size 0;
    client_body_timeout 1d;
    proxy_buffering off;
    proxy_read_timeout 1d;
    proxy_connect_timeout 1d;
    proxy_send_timeout 1d;
    location / {
        proxy_pass http://127.0.0.1:8080;
        proxy_http_version 1.1;
        proxy_set_header X-Real-IP $remote_addr;
        proxy_set_header X-Forwarded-For $proxy_add_x_forwarded_for;
        proxy_set_header X-Forwarded-Proto $scheme;
        proxy_set_header Host $http_host;
        add_header X-Host $host;
        proxy_set_header X-Forwarded-Host $http_host;
        proxy_set_header Upgrade $http_upgrade;
        proxy_set_header Connection 'upgrade';
    }
    location ~ /\.ht {
        deny all;
    }
}


============== OR ==============

# In case you have external Load balancers

upstream bioturing_router_http {
    ip_hash;
    server XX.XX.X.XX:80;
    server XX.XX.X.XX:80;
}

server {
    listen 443 ssl http2;
    server_name biocolab.YOUR-DOMAIN;
    ssl_certicate /etc/ssl/certs/YOUR-DOMAINyellow.crt;
    ssl_certicate_key /etc/ssl/certs/YOUR-DOMAINyellow.key;
    ssl_protocols TLSv1 TLSv1.1 TLSv1.2 TLSv1.3;

    location / {
        # For reverse proxy to backends
        proxy_pass http://bioturing_router_http;
        proxy_redirect off;
        proxy_set_header Host $host;
        proxy_set_header X-Real-IP $remote_addr;
        proxy_set_header X-Forwarded-For  $proxy_add_x_forwarded_for;
        proxy_connect_timeout 3600;
        proxy_read_timeout 3600;
        proxy_write_timeout 3600;


        # For HTTP/HTTPS
        client_max_body_size 5000m;
        client_header_buffer_size 16k;
        large_client_header_buffers  4 32k;

        # For websocket
        proxy_http_version 1.1;
        proxy_set_header Upgrade "websocket";
        proxy_set_header Connection 'Upgrade';
        proxy_cache_bypass "websocket";
        proxy_set_header Connection “keep-alive”;
    }
}

# In K8s Nginx Ingress. Please help to make sure that the below annotation is set up.

nginx.ingress.kubernetes.io/rewrite-target /;
nginx.ingress.kubernetes.io/ssl_protocols TLSv1 TLSv1.1 TLSv1.2 TLSv1.3;
nginx.ingress.kubernetes.io/client-header-buffer-size 100k;
Multiple redirection and timeout issue. 
⭕ Reason
Ingress setting is not correct on LB.
⭕ Resolution
There is no any specific solution. Issue could be form Load Balancer or would be form Application.
⭕ How to test websocket?
BioStudio has an inbuilt feature to test Websocket.

1] Login to BioStudio Admin dashboard.

2] Select System Setting -- Click to Check BioStudio button

You could see the result below.